1965 D1100 4x4 driver/project

Maybe. Hard to tell with all the grease. I doubt the shop recycled your coolant, but even fresh bug joos will contaminate quickly if the cooling passages inside the block aren't well flushed out first.
 
Well, Idk how ima fix it but I dont want to leave it un fixed. Some how or another Ive gotta flush out the block. I had a chat with my shop so for the time being my fix is on hold and Im taking ir down there tomorow. I filtered the coolant on the way back in with a shop towel.
 
Well, the shop is now under new management come to find out the mechanic that did my truck got both the proverbial and literal boot long ago. They agreed to correct the brake line issue in front and install a clutch slave cyl and the wheel cylinder they never replaced for free with two day time limit so Im happy enough. I don't want to fool with the freeze plugs right now, so Ima try a fix from a friend in flushing the block via bottom hose disconect and hose water, a gallon of simple green, run up to optemp and then flush again before install of my new radiator.
 
Ok, got the truck back, my clutch is now 110% better with the new slave, and they custom made rubber front brake hoses that go all the way from frame to hub, brakes are still nice and hard right at the top so I'm happy. In other news I may have a shot at a pile of IH nos service parts, so look out for that. Will most likely all be Farmall parts but you never know, I'm sure this forum can absorb all of it if needed, and also help id if necessary.
 
Good news about the shop un-f****ing that terrible work. It was shameful, really.
Simple Green cuts grease, not rust. Use CLR, but don't leave it in for weeks...It'll eat the hoses. Drive it around for a day or so with it in the cooling system, then flush. Refill with de-ionized water from the supermarket. Plus whatever ratio of antifreeze you're comfortable with.
Glad to hear this project is pointed in the right direction again. Keep the updates coming!
 
Full advice was run simple green, flushing, and a rust preventing additive in the new coolant. If you think clr works better i will do that. Just dont want to screw up my shiny new rad. Im going to need capacity estimate on this thing as well. Since the block drain is pluged and not fixable anytime soon I will have to flush with distilled water. Sii radiator but otherwise stock
 
Back in the days before nanny-state-ism really took hold, the chemicals you could get in prestone radiator flush kits were actually caustic enough to do a good job at loosening rust and scale. Imagine that if you will...a product that actually did what it was advertised to do. So what if had carcinogens? Anyway, the store bought rad flushes of today are all pretty much citrus based. They'll loosen a small percentage, but too much will be left behind. I would also agree that CLR might be more effective in this case than simple green. Simple is a great product, it just might not be the best tool for this job. But I would want to make sure it's safe for aluminum before I used it.
 
Well according to G@@gle, clr should NOT be used on alluminum. I think In my case I will go with the simple green for cleaning and a rust inhibitor in the new coolant. The new rad has a 5 year warranty, I would rather not risk the clr not liking my heater core. The coolant I drained didn't seem rusty per say, but real cloudy.
In other news, it, aswell as myself survived the trip to a show today :D
 
So my rear axle is (off the top of my head) an RA 16, my truck had a powr lock d44 in back originally, and if I'm not mistaken it was a track lock that came in a d60 for an RA 17? So my question is, how does an original track lock compare to a similar and more modern unit, and also how would a set of manual lockers be for all around use? My goal is keeping with the original, bomb proof, till the bitter mud-up-to-the-axles end theme, while maintaining maximum versatility. If the track lock offers better on road performance in regards to doing truck things then I would prefer it over an open dif. If not then open dif on road and spool mode for off road is what I will go for. This is all speculation at this point, but I have a feeling a couple of these ideas will end up requiring a newer d60 wich is what I'm prospecting the parts required in terms of how many internal organs I need to sell to get there :crazy:
 
On the note of caps, 1: anyone recomend a good rad cap? And 2: anybody else's power steering leak from the cap and can it be resealed?
 

Attachments

  • 20180925_090329.jpg
    20180925_090329.jpg
    50 KB · Views: 404
  • 20180925_090354.jpg
    20180925_090354.jpg
    46.7 KB · Views: 406
I like the Stant Lev-R-Vent rad caps. The 13lb-er isn't bad. You could safely go up to a 16lb-er with the radiator you have. I think there is supposed to be some type of felt gasket under the PSP cap. They naturally deteriorate over time. Where to get a new one? I don't know. You might have to roll your own.
 
Well, I'm in cheapo luck since that apperars to be exactly what I already have :icon_xd: I figured it was some random junk that anybody else would replace but screw it, budget wins! Felt gasket, should be easy. Now watch me make it dificult some how :lol: Ok, Ive run out of time to do the jobs I wanted to do all at once, hunting season just hit me like a ton of bricks in the form of a 30-30 buttplate under recoil. I think I will play with stuff underneath for now and fix up my rad once I return from my upcoming expedition, I was hoping to take this thing up to Tahoe this year but it seems it will have to wait till next time. I also will need to order all the joints needed in the front end so I may well have to leave the front end apart for a week half done. It wasnt ideal but I guess this is why they say, "no plan survives contact with the enemy." :nonod:
*edit: or more accurately, "no plan survives contact with PO patch jobs"
 
Took a nature break, so enjoy some trail pics. Sadly no IH this year but this is what I'm working towards!(hunting in a taller vehicle with doors and a heater) The beast will return shortly with an adventure in front suspension and a newly discovered sloppy front driveline.
 

Attachments

  • 20181003_180501_HDR.jpg
    20181003_180501_HDR.jpg
    63.3 KB · Views: 455
  • 20181004_153827_HDR.jpg
    20181004_153827_HDR.jpg
    58.1 KB · Views: 460
  • 20181004_162840_HDR.jpg
    20181004_162840_HDR.jpg
    61.3 KB · Views: 463
  • 20181004_115913.jpg
    20181004_115913.jpg
    98.9 KB · Views: 459
Spring packs is the game today, so far ive found more road code violations (in excess of 10 wazillion at this point), u bolts that were barely snug, and I made a new critter friend when I removed the driver wheel. At least the black widow that was in there is gone :lol: 
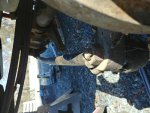
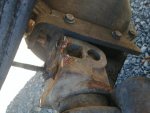
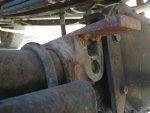
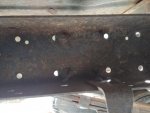
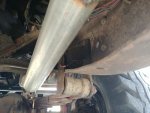
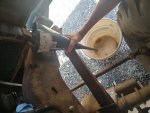
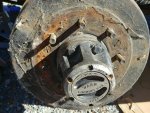
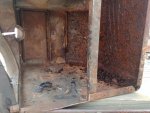
In that pic you can see the extent of rubbing on the tire. Also im fairly certain the three screws missing from the pass drum are important. Also the axle seems to be magically levitating with no U-bolts holding it on??? Am I missing something?
*edit never mind, went inside for a bottle of watter, came back out and the axle is now on the jacks
 

Attachments

  • 20181013_105117.jpg
    20181013_105117.jpg
    52.3 KB · Views: 452
  • 20181013_105056.jpg
    20181013_105056.jpg
    66.4 KB · Views: 524
  • 20181013_105110_HDR.jpg
    20181013_105110_HDR.jpg
    51.5 KB · Views: 469
  • 20181013_104642_HDR.jpg
    20181013_104642_HDR.jpg
    81.9 KB · Views: 464
  • 20181013_102232.jpg
    20181013_102232.jpg
    100.5 KB · Views: 449
  • 20181013_104122_HDR.jpg
    20181013_104122_HDR.jpg
    97.6 KB · Views: 448
  • 20181013_104009_HDR.jpg
    20181013_104009_HDR.jpg
    78.3 KB · Views: 480
Last edited:
Anyone rekon this is bent enough to warant replacing? Side note this guy is just happy to be here...
 

Attachments

  • 20181013_121601_HDR.jpg
    20181013_121601_HDR.jpg
    63.6 KB · Views: 471
  • 20181013_121846.jpg
    20181013_121846.jpg
    104.7 KB · Views: 481
Welded wedges removed, just realized this belonged on my axle tech thread but oh well its just as home here, trying to make heads or tails of the pass U-bolt setup. I dont think that flange is original but theres nowhere to put another bolt.
Edit: experamenting with pictures outside of test forum. Bad idea? Probably. . . or maybe. . . pure genious! HAHA! ITSALIVE!
attachment.php

attachment.php

attachment.php

attachment.php
 

Attachments

  • 20181013_132220.jpg
    20181013_132220.jpg
    61.3 KB · Views: 844
  • 20181013_130451.jpg
    20181013_130451.jpg
    60 KB · Views: 799
  • 20181013_125851_HDR.jpg
    20181013_125851_HDR.jpg
    96.5 KB · Views: 841
  • 20181013_131526.jpg
    20181013_131526.jpg
    123.3 KB · Views: 818
Last edited:
Okay, Ive been super bussy with gun repairs, sales, hunting, and trying to fit in my IH addiction, I'm going to collect my thoughts here so I dont loose any. I've got about a week or more till I will start this round of fixes, and still have others in the works. I also have a massive box with a delicate aluminum radiator sitting in my garage that needs to disapear before something gets dropped on it.
Next up: coolant(finally) run a gallon of simple green and flush thoroughly. From here I will look at the thermostat and inner workings for rust and re evaluate things as necessary. I will pull the heater out for disassembly/repair, replace the firewall pad, and install the new rad. Lastly once the block is clean I will install a new t-stat, a couple new gaskets(I plan on a water pump inspection so I will reseal that as well) new hoses and add new coolant with a rust inhibitor. Hopefully somewhere in there I will continue working on the front end and steering. If anybody has suggestions on direct drive vs clutch fans, now is the time as I will be ordering parts.
 
Boy howdy! The parts manual, is ALOT more useful than I expected. So, I'm only in two sections so far, and I've already learnt alot. The 1100 and 1200 frames/components apear more or less the same accept for wheel base. The 1200 springs have one more leaf than the equivalent in an 1100. Looking at my springs, the original build sheet springs are long gone, however there is in all four corners what seems to be an IH miscellaneous meat stew of spring groups. I also found yet another "PO was here" in the rear helper spring shelfs. You can see this pic the properly installed driver rear shelf and four bolts(behind frame rail):
attachment.php

And here the passenger rear shelf:
attachment.php

At this point I'm honestly wondering how clinically incompetent you can be. Apparently this much.
Moving on from that, the rear springs themselves are the only anomaly. Everything else looks like IH assemblies including the helpers. The rear main springs are 5 leaf. They're supposed to be 6 leaf. No clue. Fronts apear standard 5 leaf for this truck even though the build sheet says HD fronts (6 leaf). The rear groups are consistent with the heavy duty factory groups (omitting the main springs) and factory for my truck is standard (without helpers). Hence miscellaneous meat statement.
In other news Ive found my US tubular tire carr. Aparently US=Under Slung, the pivots and spacer are still there unfortunately the rest is MIA. I could fabricate one, however I kinda want that space for a fuel tank. But then again the box aint that big on this thing, and I cant do a side mount because theres not enough space between the fender and cab.
Lastly I will (eventually) get my previously discused fixes done, but the problem is my front driveline just ate half my budget, leaving me literally counting dollars (and my wallet seeing stars).
attachment.php

attachment.php

attachment.php

attachment.php
 

Attachments

  • 20181030_151058.jpg
    20181030_151058.jpg
    58.7 KB · Views: 801
  • 20181030_151100.jpg
    20181030_151100.jpg
    54.4 KB · Views: 770
  • 20181030_151234.jpg
    20181030_151234.jpg
    69.8 KB · Views: 805
  • 20181030_151534.jpg
    20181030_151534.jpg
    52.5 KB · Views: 781
  • 20181030_151604.jpg
    20181030_151604.jpg
    55.7 KB · Views: 792
  • 20181030_150921.jpg
    20181030_150921.jpg
    79 KB · Views: 768
Another eternity stuffed inside my wheel well later. . .
attachment.php

Unfortunately, both my block drains are fubared. :cryin: 
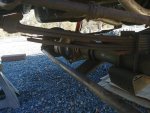
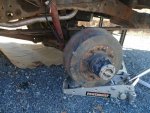
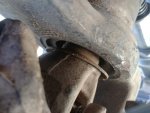
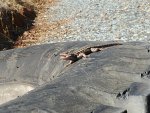
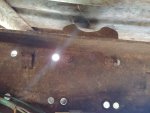
I can try to get the driver side out but have a feeling I'll end up rounding it. Will have to drill/tap the other side for sure, no clue how I'm going to clear the chips out unless the hole is at the ABSOLUTE bottom of the water jacket. Then they may rinse out with a hose from up top. I was looking through the service manual, is there a map for water flow? Like there is for oil? And any tips on not further fubaring the existing drain plug? Anyways, the heater is out, will tear into that tomorrow, as well as open up the t-stat housing/water pump. If things arent too rusty I will run a hose till the juice coming out is clear, then flush with a gallon of distilled since my water has alot of mineral content. If it looks semi clean in there I will install the new rad with new coolant. I ran it up to temp yesterday with a gallon of simple green in, coolant that came out today looked terrible compared to the near clear stuff that I got before I put the simple green in. Hopefully that worked all there was in there loose. Its getting all new hoses, t-stat, a few gaskets, heater valve repair kit, and a tune up while I have the rad tube off. Shiny new things to come, after I hack my way through 50 years of bandaids.... So yea business as usual :icon_eek:
 

Attachments

  • 20181103_125316_HDR.jpg
    20181103_125316_HDR.jpg
    75.6 KB · Views: 765
WHY? WHY DID THE PO HAVE TO FIX EVERYTHING?!? :mad2: 
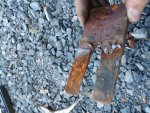
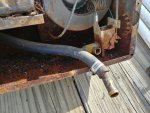
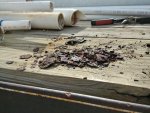
Uuhhhg. Heaters out, aparently the bright red valve spliced into my heater wasnt the only splice, someone thought it would be a good idea to saw off the outlet tube from the valve and use that to rout a straight tube through the fire wall to the heater core.
attachment.php

attachment.php

I found Mr. Previousowner's name all over the inside of the heater; jb weld everywhere on the core along with the aforementioned butchery, topped off by enough fossilized pine needles and rust flakes to fill up a gallon jug.
attachment.php

attachment.php

attachment.php

attachment.php

attachment.php

On the rad swap, this is what I've gotten off today, fortunately, it doesnt seem real sediment-ey, so what I think I will do is rinse like I planned, and run a extra does of flush for about 50 miles or so then flush and refill again. I'm also open to advice on what to do, I want to do the best I can for it, however budget will be the limiting factor.
attachment.php

attachment.php

I'm seriously considering bypassing the heater entirely for now and properly fixing it, paint and all.
 

Attachments

  • 20181104_125046_HDR.jpg
    20181104_125046_HDR.jpg
    74.6 KB · Views: 775
  • 20181104_125050_HDR.jpg
    20181104_125050_HDR.jpg
    92.3 KB · Views: 769
  • 20181104_130713.jpg
    20181104_130713.jpg
    63.3 KB · Views: 731
  • 20181104_130700_HDR.jpg
    20181104_130700_HDR.jpg
    92 KB · Views: 750
  • 20181104_130655.jpg
    20181104_130655.jpg
    82.2 KB · Views: 749
  • 20181104_130840_HDR.jpg
    20181104_130840_HDR.jpg
    109.9 KB · Views: 764
  • 20181104_130846_HDR.jpg
    20181104_130846_HDR.jpg
    54 KB · Views: 742
  • 20181104_122012.jpg
    20181104_122012.jpg
    79 KB · Views: 742
  • 20181104_122119.jpg
    20181104_122119.jpg
    82.2 KB · Views: 744
Took the heater the rest of the way apart, I'm just gona suck it up and completely restore it. Its so bad I'd feel guilty if I put it back anything close to this. On the upside, I've found that aparently the heater core is still made :out: 
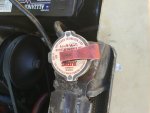
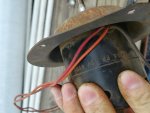
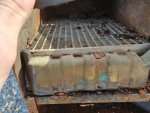
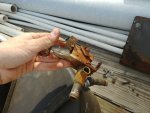
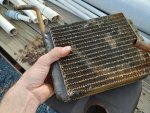
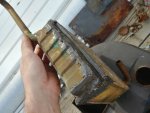
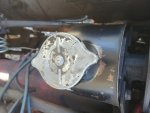
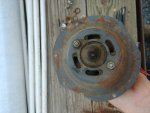
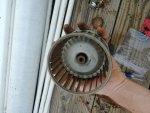
and the valve is rebuildable. I have several options, I can sleve and rebraze the tube on mine, take the one out of my parts truck(arguably the most work) or find one online. I will also read into the r&r for heaters thread. The blower motor save for some greasy dust looks great, air rotor is pristeen. Will look for a rebuild kit since there is alot "thrust" slop in the motor shaft, even though it runs great, that may not be the case when cold outside. On the housing for it all, anybody know a paint that looks original? Looks to have been grey before somebody POahehem roll brushed over the rust with matt brown. I've got an idea to try and clean up the water jacketing once I get the block drains sorted. Basically my idea is to cap off the bottom hose and fill the system with a medium ish rust solvent and let it sit in there a couple days, then thoroughly flush. Let me know if inhaling all this rust has made me crazy but it seems like a good idea.
attachment.php

attachment.php

attachment.php

attachment.php

attachment.php
 

Attachments

  • 20181104_154137.jpg
    20181104_154137.jpg
    51.3 KB · Views: 745
  • 20181104_154153_HDR.jpg
    20181104_154153_HDR.jpg
    53.6 KB · Views: 709
  • 20181104_154206.jpg
    20181104_154206.jpg
    66.7 KB · Views: 718
  • 20181104_154212.jpg
    20181104_154212.jpg
    66.2 KB · Views: 749
  • 20181104_154143.jpg
    20181104_154143.jpg
    58.3 KB · Views: 747
An electric motor needs that endplay to find its magnetic center. If is side to side bearing play then it's no good.

Plenty of people just flush their cooling system with a dishwasher detergent that doesn't suds up.
 
I knew about the endplay, however is slightly over .25" a bit excessive? I've never seen a motor with this much is all. Side to side wise it seems fine, I'll lube up the bearings all the same. I ran some simple green up to temp before I dismantled it, that made my coolant murkier than Ive ever seen. Dish washer detergent huh? Thats a new one. I was thinking about capping the bottom hose and filling the engine jacketing with clr for a day or two, then rinsing with distilled. Does your dishwasher detergent flush involve going up to temp? Its half way apart but I can put it all back if you think it would work better than the clr.
 
Mayday, mayday, mayday, this is Gunfighter97, we have a full can o' worms situation, I repeat, A FULL CAN O' WORMS SITUATION! SEND REINFORCEMENTS A-S-A-. . . . . . *over run by worms :icon_xp: :icon_xp: :icon_xp:
Ooookay, heres where Im at. I was in denial when I pulled the upper hose off, now Ive come to terms with the fact that my entire cooling system is in need of a total overhaul. Basically I've removed the heater; the core and valve were garbage, and will be replaced with the radiator. Right now I'm going to loop the heater tubing, and fill the old component system with new coolant and clr, drive a couple days, and drain/inspect through a rear driver bank freeze pulg. Repeat as necessary. Once thats cleaned out I will repair my block drains and replace ALL the freeze plugs with new brass ones, the rear ones as I understand, involve removing the tranny. . . since Im doing that, I might as well rebuild it. . . since the truck will be dead anyways, same goes for the t-case. . . and I might as well replace the rear main seal while I'm back there. . . might as well work on the clutch. . . so on and so forth. I will add a reverse switch to the tranny, new fluids, inspect the drivelines, repair my parking brake, and once the engine is done, put everything back, install the new alluminum rad with new hoses, t-stat, heat sender, a few gaskets and a restored heater. While the engine is apart I will do a tune up: new condenser, points, rotor, cap, plug wires, and replace a couple old wires to the coil. Also I'll finally change out the factory original engine oil and give it new filter housing/pan/valve/timing cover gaskets, new filter, and inspect the lifters, new battery cables, fan belts, fix an issue with my alternator bracket, clean clean clean, and maybe something with the starter? If there is ANYTHING ELSE I COULD DO, PLEASE SUGGEST IT NOW as I'm strategically planning the funding behind all the parts I'm going to need.
Bottom line: in order to fix the thing I need to fix, I basically need to fix EVERYTHING ELSE!!! I'm not even upset at this point, it's actually rather comical. A lot, and I mean a lot more things to come. . . hopefully loosing my sanity isnt among them...
 
Last edited:
For rust abatement, you need an acid. CLR has a small amount of acid to cut thru hard water scale and rust in the bathroom. Simple Green, Dawn and Cascade cut grease. They won't do jack sh#t against rust. If you were to break that motor completely down and have a machine shop hot tank it, they would submerge it in a bath of hot water and a gentle dose of muratic or citric acid to break down the rust. I recommended CLR because its a safe home remedy. Don't go buy pool acid and try it at home! Remember: Acids eat rust and most things metallic, Lye eats organic material (paint, grease, meat, etc). Simple Green and most soaps are based on a lye-style chemistry. And like acids, concentrated lye will seriously ruin your world.
 
Back
Top