You are using an out of date browser. It may not display this or other websites correctly.
You should upgrade or use an alternative browser.
You should upgrade or use an alternative browser.
Project Karma
- Thread starter Tahoedonner
- Start date

mikeindustries
Member
Your Scout is looking really good. I like the rims and tires a lot. The rear axle looks really far forward. How far back is it going to move with the axles articulated? Wondering if it would clear if you cut and moved the front mount for the rear springs back like an inch? This would put the rear shackles straight up and down allowing for more drop out too. Just thinking out loud.
Tahoedonner
Member
your Scout is looking really good. I like the rims and tires a lot. The rear axle looks really far forward. How far back is it going to move with the axles articulated? Wondering if it would clear if you cut and moved the front mount for the rear springs back like an inch? This would put the rear shackles straight up and down allowing for more drop out too. Just thinking out loud.
Just finished checking out your build last night. Looks like you're up to some good stuff.
The rear axle should settle a smidge more rearward once the suspension has settled but I suspect it will still appear more forward than it should. I guess this is a byproduct of lifting these trucks.
Thanks for the reply.
Tahoedonner
Member
Big day yesterday for me. Got the truck running again after the pertronix install. Started right up. Not sure why I waited so long to get it running again but oh well. Here's a video of the start up. She's running really well. Hasn't been timed nor have I set the idle. I'll get to that this week some time. Right now it's idling at about 1100rpm.
https://www.youtube.com/watch?v=9ap_hk7gd4k
Brakes are officially leak free. Still need to be bled some more but they stop the truck okay.
Took the truck for my first ever drive. Here's a video of that. My wife thought she was taping the entire time down the driveway but she forgot to hit record. Exciting for me anyway.
https://www.youtube.com/watch?v=aj98lat2ti8
The transmission wouldn't shift back into gear when I got two doors down and I was a little worried. However I knew the transmission pan had been leaking for 2+ years and all it needed was some more fluid. Added the fluid and it shifted great. Finally got it in my garage so I can start working on it more often. Plus no more worries about varmints moving in.
Couple issues still remain.
Transmission linkage seems to be off by one click I.e. I'm down to neutral when actually I'm in reverse. Drive doesn't click in until the bottom of the pattern. Need to tighten/adjust the linkage for the proper alignment.
Transmission is leaking pretty heavily so I have ordered one of those mopar resealable gaskets that everybody seems to love.
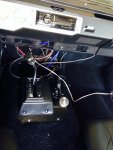
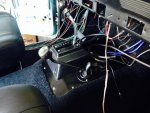
Got the transmission tunnel and gear selector cover installed. Turned out nice. I am going to cover the metal tunnel cover in vinyl when I redo the interior. For now it will stay painted black.


https://www.youtube.com/watch?v=9ap_hk7gd4k
Brakes are officially leak free. Still need to be bled some more but they stop the truck okay.
Took the truck for my first ever drive. Here's a video of that. My wife thought she was taping the entire time down the driveway but she forgot to hit record. Exciting for me anyway.
https://www.youtube.com/watch?v=aj98lat2ti8
The transmission wouldn't shift back into gear when I got two doors down and I was a little worried. However I knew the transmission pan had been leaking for 2+ years and all it needed was some more fluid. Added the fluid and it shifted great. Finally got it in my garage so I can start working on it more often. Plus no more worries about varmints moving in.
Couple issues still remain.
Transmission linkage seems to be off by one click I.e. I'm down to neutral when actually I'm in reverse. Drive doesn't click in until the bottom of the pattern. Need to tighten/adjust the linkage for the proper alignment.
Transmission is leaking pretty heavily so I have ordered one of those mopar resealable gaskets that everybody seems to love.
Got the transmission tunnel and gear selector cover installed. Turned out nice. I am going to cover the metal tunnel cover in vinyl when I redo the interior. For now it will stay painted black.
Attachments
DocG
Member
Man! I'm so excited! I have been waiting you to fire that thing for some time. I'm gald you are working on her again.
I have mine about done except for weather stripping on the doors and have started another 80 for my son. I'm doing more of a beater this time so I can wheel it!
Looks great. Keep up the good work and keep us posted!
I have mine about done except for weather stripping on the doors and have started another 80 for my son. I'm doing more of a beater this time so I can wheel it!
Looks great. Keep up the good work and keep us posted!
Tahoedonner
Member
man! I'm so excited! I have been waiting you to fire that thing for some time. I'm gald you are working on her again.
I have mine about done except for weather stripping on the doors and have started another 80 for my son. I'm doing more of a beater this time so I can wheel it!
Looks great. Keep up the good work and keep us posted!
Thanks doc. Needed the break. Sometimes it's good to clear the mind. Loving your ride by the way.
Tahoedonner
Member
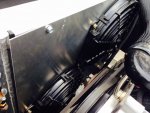
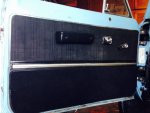
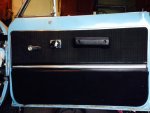
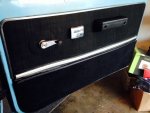
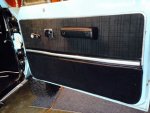
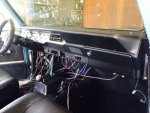
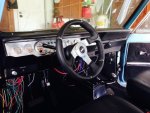
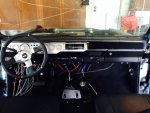
Got the refreshed door panels installed. I like the way they turned out using simple black dye. They will eventually get redone in vinyl.


Also got the dash pad installed. It has cracks, like most do, so it will be recovered at some point as well. For now I'm digging the fact that the interior is almost back together.


Also got the dash pad installed. It has cracks, like most do, so it will be recovered at some point as well. For now I'm digging the fact that the interior is almost back together.
Attachments
-
 Driver Door Panel 1.JPG118.5 KB · Views: 1,643
 -
 Driver Door Panel 2.JPG130.4 KB · Views: 1,593
 -
 Pass Door Panel 1.JPG100.1 KB · Views: 1,584
 -
 Pass Door Panel 2.JPG111.1 KB · Views: 1,544
 -
 Pass Door Panel 3.JPG130 KB · Views: 1,617
 -
 Dash 3.JPG133 KB · Views: 1,608
 -
 Dash 2.JPG125.9 KB · Views: 1,560
 -
 Dash 1.JPG121.5 KB · Views: 1,571
 kind of in middle of helping out a friend with efi upgrade on his 69 800.
Tahoedonner
Member
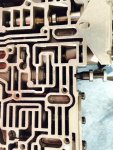
So transmission leaks like crazy. I've known this for the whole time but never realized how much since fluid has never been added since recently. In my short drive after adding fluid the transmission responded very nicely. I've decided to re-seal shift shaft seals, new nss and seal, new pan with drain plug, new fangled mopar gasket, transgo tf-2 shift kit, new filter, new trans mount, adjust bands, and then properly adjust linkage. I've read through about 5 727 rebuild threads and feel comfortable rebuilding the trans if need be but am pretty sure this will do the trick this time around. When removing the valve body are there any glaring signs that would scream rebuild now? I'm also going to post this in the transmission section for replies as well.
Tahoedonner
Member
All in the transmission work took me about 10 hours. Since I've never been inside a transmission before I took a lot of time double checking everything and spent plenty of time trying to figure things out. If I had to do it again I could cut that time in half. I'm confident that everything was done correctly and didn't find the transgo kit, new seals, new pan, new gasket, new filter, and all that was involved all that difficult to do. I took plenty of pictures along the way.
Here's what my linkage and shift shaft area looked like before the process. There was major leakage from both of the seals in this area. I don't know if I would try and replace these seals without removing the valve body. I read numerous times that it's possible but it was tough enough with the valve body removed. I can only imagine what a pain this job would be if it weren't.


New nss installed

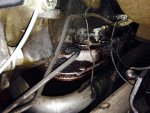
Here's the inside of the trans after the valve body was removed.


Here's what my linkage and shift shaft area looked like before the process. There was major leakage from both of the seals in this area. I don't know if I would try and replace these seals without removing the valve body. I read numerous times that it's possible but it was tough enough with the valve body removed. I can only imagine what a pain this job would be if it weren't.
New nss installed
Here's the inside of the trans after the valve body was removed.
Attachments
Last edited:
Tahoedonner
Member
Installation of the transgo tf-2 kit was pretty straight forward. Since I have a later model 727 it seems that I had less drilling to do then if I had an older model.
Here's the valve body pre-transgo

Couple mods that need to be done in the kit.
Drilled out separator plate holes. No you can't tell from this pic but here it is anyway.

Slot filed into valve body casing

Notch that must be drilled 7/16" into casing.

Valve ground down

Too difficult to explain in a picture

Here's the finished valve body and another pic of it installed back into the transmission.


Here's the valve body pre-transgo
Couple mods that need to be done in the kit.
Drilled out separator plate holes. No you can't tell from this pic but here it is anyway.
Slot filed into valve body casing
Notch that must be drilled 7/16" into casing.
Valve ground down
Too difficult to explain in a picture
Here's the finished valve body and another pic of it installed back into the transmission.
Attachments
Last edited:
Tahoedonner
Member
Last post for the night here.
Here's a couple pics of the smaller shift shaft seal that is on the actual arm itself. The other seal is seated into the 727 casing.
The po had put this particular seal (small shift shaft seal) in upside down when it was redone at some point. Maybe why it was leaking so badly. I could see this seal being very easy to replace once the kickdown linkage is removed. Most likely both seals would be leaking though.
Here it is no seal.

Seal pic 1

Pic 2

Here's a pic of the nss from the inside of the case.

Here's a couple pics of the pan with the new fangled mopar gasket installed. Love the fact this pan has a drain plug. Why anyone would ever make anything full of fluid without a drain plug is beyond me.


Still have one more fitting to replace on the radiator/trans cooler line. It leaked a little when the trans had some fluid so I'm erring on the side of caution and solving the issue before I fill the trans again. Fingers crossed everything was done right. Would love to drive her for a mile or so tomorrow.
Oh yeah almost forgot that I picked up a nice little piece from IH Parts America. Love this new air cleaner nut. Thing looks awesome.


Here's a couple pics of the smaller shift shaft seal that is on the actual arm itself. The other seal is seated into the 727 casing.
The po had put this particular seal (small shift shaft seal) in upside down when it was redone at some point. Maybe why it was leaking so badly. I could see this seal being very easy to replace once the kickdown linkage is removed. Most likely both seals would be leaking though.
Here it is no seal.
Seal pic 1
Pic 2
Here's a pic of the nss from the inside of the case.
Here's a couple pics of the pan with the new fangled mopar gasket installed. Love the fact this pan has a drain plug. Why anyone would ever make anything full of fluid without a drain plug is beyond me.
Still have one more fitting to replace on the radiator/trans cooler line. It leaked a little when the trans had some fluid so I'm erring on the side of caution and solving the issue before I fill the trans again. Fingers crossed everything was done right. Would love to drive her for a mile or so tomorrow.
Oh yeah almost forgot that I picked up a nice little piece from IH Parts America. Love this new air cleaner nut. Thing looks awesome.
Last edited:
Scoutboy74
Moderator
Good work. This might be a little late in the process, but I'm noticing the grooves worn into your shift shaft which is typical of a high miles unit. Those grooves can present sealing issues even with a new seal in place. Sop is to sand the shaft down with some emory cloth until your fingernail doesn't catch on any ridges. Hopefully yours won't leak from the seal any time soon, but if it does, you'll know why.
Tahoedonner
Member
good work. This might be a little late in the process, but I'm noticing the grooves worn into your shift shaft which is typical of a high miles unit. Those grooves can present sealing issues even with a new seal in place. Sop is to sand the shaft down with some emory cloth until your fingernail doesn't catch on any ridges. Hopefully yours won't leak from the seal any time soon, but if it does, you'll know why.
I should have done that. I was afraid it would take off too much material though. It was all smooth except for those grooves which I suspect will be the cause of an early leak. I've run it the last couple days and shifted through the gears and no leakage yet. We'll see when the linkage is properly adjusted and I can drive it again. Fingers crossed.
Tahoedonner
Member
Got the linkage all set on the transmission. Took quite a bit of time but now r is reverse and d is drive and so on.
Holley 20457s brand new carb with spacer.
Idle is at 1100 in park and drops to 6-700 in gear then tails off. No binding in linkage. Idle set screw a all the way out. Truck is dying after about 5-10 seconds of being in gear with the brakes applied. It reacts fine when I initially put it in gear then stumbles. Reacted the same when mixture screws were 1 1/2 turns out also. Seems like too much fuel to me. I have set timing to 8deg. Mixture screws are 2 turns out. Pretty much everything in the system, ignition and engine, is new.
Tomorrow I plan on:
hooking up vac gauge to get 20+ vac reading
checking for vacuum leaks
adjusting mixture screws
anything else I'm missing?
After truck dies in gear it is difficult to start. Starts great when sitting overnight.
Tahoedonner
Member
Got the truck idling solid at 900 and 600 in gear at 18hg vacuum and 10* advance. Doesn't die in gear.
Had some cooling issues that I started a thread on the bp to help find the issues.
black sludge in radiator - binder planet forums
Seems like I've been able to clean out all the rust and crud from the cooling system. It's only had water to this date and there was probably a bit of rust that needed to be cleaned out. I borrowed a combustion gas tester just in case and I will be running the test tomorrow.
I ran the truck tonight and it sounded great.
Fingers crossed.
Tahoedonner
Member
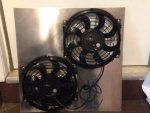
I can't keep the truck cool with the engine mounted fan without a shroud. What a surprise. So instead of buying an aftermarket/used fan shroud and trimming it to work with my body lift I decided to go with an electric fan. I started with getting a taurus fan but the depth of the overall fan turned out to be too much. I just couldn't make it fit without major modification which I decided wasn't worth it. So I then switched gears to dual fans. I went this direction because I wanted a high and low fan setting and they were just as good as a larger, dual speed fan. Picked up two flex a lite curved blade fans that I installed on an aluminum shroud that I cut to make them fit. Love that the fans say "made in the usa" right on them. They claim about 900cfm apiece and I feel that will be plenty to cool the truck.
Here's a couple pics of the fans mounted to the shroud. I will be using a jegs dual fan controller to run the fans.
They're not the best cut circles but who cares when they're covered with fans.


Here's a couple pics of the fans mounted to the shroud. I will be using a jegs dual fan controller to run the fans.
They're not the best cut circles but who cares when they're covered with fans.
Attachments

Tahoedonner
Member
Fans are all dialed in and working great. Truck stayed right at 185 while running at 3k rpm for 20 min. Excited to be able to start tuning and working out the kinks since I can run the engine longer then 15 min. Pics of fan install coming soon. Lighting was no good tonight.
Tahoedonner
Member
Garage is just to dark to get a decent fan pic for the time being.
I have been able to spend the last two days tuning the engine since I can run it as long as I want finally. I think I've got it dialed in but would love some advice/feedback on the numbers. Yes I know it May change under load/drive.
"crate" long block 345 engine, balanced, comp rv cam, new pertronix in a prestolite, mallory hyfire, matching coil, new plugs, wires, cap, new Holley 4160, dual to single to dual exhaust, smog pump attached and hooked up, all vacuum plugged, aluminum radiator, dual electric fans(stays at 180), and maybe something else I forgot.
Numbers:
17 hg vacuum at 700-800 idle in park
10 btdc
idle mix screws right about 2.5 turns out.
No stumbles off idle or anywhere up to 4k with no load
brakes applied and put in gear idle drops to 500ish. Seems like it's hurting but never loses its gusto or dies.
It really seems like after all the reading and studying I May have tuned it pretty well. The exhaust smell alone is much less pungent.
I will get it under load at some point this weekend to really get a feel but have a couple questions.
Should I increase idle for better vacuum? Say 900. At 900 I'm at about 19.
Does my rv cam mean I should expect less than 20hg vacuum?
Do you see anything I might be overlooking?
Thx
Tahoedonner
Member
that is right about what I'm seeing with a comp 252 and 390cfm 4160. Same hunting issues too.
Thx chappie. I'm running a 260 comp with a 600cfm Holley 4bbl. I raised the park idle to just under 1000 and it now idles in gear really well at about 550-600.