

You are using an out of date browser. It may not display this or other websites correctly.
You should upgrade or use an alternative browser.
You should upgrade or use an alternative browser.
ENGINE NOISE
- Thread starter Benjamin7
- Start date
Michael Mayben
IHPA Tech Moderator - Retired & No Longer Online
I personally feel that the 304 is the best of all the sv engines. It was the prime mover for many years for commercial truck applications. Ya put a 304-powered sumthin' beside a 392-powered sumthin' (both same platform, same weight, same gearing) with a 5klb. Trailer hooked on in a drag race...I think you would see very little difference in overall performance.
But I'd dam shore go after some "restitution" from the seller if he advertised and represented that motor incorrectly!
But I'd dam shore go after some "restitution" from the seller if he advertised and represented that motor incorrectly!
Scoutboy74
Moderator
If jerry wuz drivin' the 392 powered rig, the dam thing had better have a chute tuh deeploy!
Mm, thanks for that. The reason I'm so concerned is that I'm planning on 33-35 inch tires after I do my SOA... If I don't have the power I need then I'm gonnna have to change gears, which is something I don't wanna do. But if the 304 is a good engine and can give me what I need, then I'll be happy. The fact is that after having a gimppy pos in my truck for so long, just having a good engine in there, even if it's weak compared to everyone else, it will feel great to me. I'll post some more pics in a bit, been working on it for a little bit and I almost have the heads off, just had to come in for some dinner (wifey says).
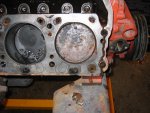
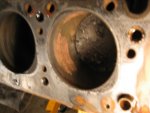
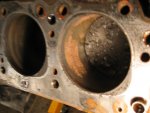
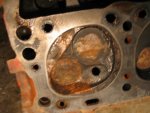
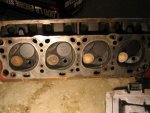
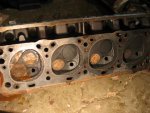
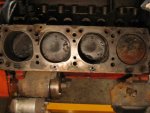
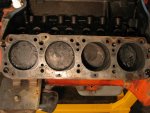
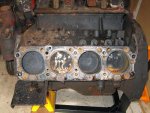
Wellp, got the heads off. Not as bad as I thought it was gonna be, but not as good as I'd like either. Here's the pics, tell me what ya think.
The rusty one on top is #2, the one that has a bit of rust in the cylinder #7. It seems like it's just a little bit of rust, maybe I can hone it out? All the rust on #2 is pretty nasty, but the cylinder is at tdc so it's not too bad on the cylinder walls. After I oil everything good with the pump (I still haven't drained the oil and changed it yet), I will turn it over a bit and see if there's any rust lower in the cylinders. Hope not! On the bright side none of the oil passages are clogged (the rockers I mean).
The rusty one on top is #2, the one that has a bit of rust in the cylinder #7. It seems like it's just a little bit of rust, maybe I can hone it out? All the rust on #2 is pretty nasty, but the cylinder is at tdc so it's not too bad on the cylinder walls. After I oil everything good with the pump (I still haven't drained the oil and changed it yet), I will turn it over a bit and see if there's any rust lower in the cylinders. Hope not! On the bright side none of the oil passages are clogged (the rockers I mean).
Attachments
-
 IMG_3281.jpg88.1 KB · Views: 327
 -
 IMG_3282.jpg62.2 KB · Views: 310
 -
 IMG_3283.jpg42.5 KB · Views: 322
 -
 IMG_3284.jpg48.8 KB · Views: 309
 -
 IMG_3285.jpg51.5 KB · Views: 301
 -
 IMG_3286.jpg60.2 KB · Views: 303
 -
 IMG_3287.jpg69.5 KB · Views: 298
 -
 IMG_3288.jpg59.8 KB · Views: 304
 -
 IMG_3289.jpg68.2 KB · Views: 304
Last edited:
Michael Mayben
IHPA Tech Moderator - Retired & No Longer Online
And that my friend is just what I'd expect to see in an engine left exposed to the elements!
And how many times have others been in this exact same sitch and followed the advice of others to "just run it!" with resulting catastrophic failure of yet one more sv engine!!! You certainly made the right choice to pull inspection on this one!
I know this is not technically correct...but since this rig is basically a "toy" as I understand it and not a dd/life, I'd do a basic clean-up as you are prolly doing right now! Pull those two rod/pistons and use a brush hone in the holes. I know it looks bad, but you will be surprised at how well it cleans up.
Same for the head with the water in the combustion chamber, pull both valves and clean well. If any water etching is noted on the valve face/seats, then do a light hand-lapping process and clean/re-assemble. Then carefully pour some rubbing alcohol into each port and watch for liquid leak. If it does not leak or leakage is barely a seep, then the valve/seat seal will be fine. Alcohol will actually seep though voids that gasoline or parts washer solvent will not. I always liquid test all my valve work after the head(s) is re-assembled before installing.
And with all that rtv slathered everywhere, I bet yore gonna find some on the oil pump pickup screen!
I've gone through this same thing with many marine genset motors that got "wet" inadvertently. Those had to be redneck overhauled with 'em installed in the hull as removal was simply not practical due to the situations.
This will give ya a runner motor now, then ya can put your future resources in building the pullout in a correct fashion!
Michael Mayben
IHPA Tech Moderator - Retired & No Longer Online
I'm gonna hi-jack yore thread to relate a leetle story that should make ya feel alot better about this deal!
Our guud bubba and fellow IHSTO'r Matt g. Who hangs around here wanted an sv engine to learn how to build with his kids as a fun "how-to" project. Daughter lizzee May sumday be much more of a wrench than Matt can ever think about! Tommy dreams of turning that motor into a power unit for a locomotive!
So in our club repository we had a stock of several complete sv motors that needed to be moved out. I met Matt there one day and picked out what I thought was the best of the bunch, what appeared to be a virgin 345 pullout from a Scout II, complete with all accessories, wiring, etc. Perfect candidate! We loaded it in my trailer and Matt drug it on home along with my cherry picker.
Few days later, he and the kidz start bustin' it down as a typical father/kidz project. Then he called me and said that the motor "smelled bad"! Well, these motors had been stored under cover for years inna boneyard that was closed down in portland, not exposed to the weather as such even though the roof did leak! So I thought..."it's just mildew!".
Another day goes by and Matt calls again...he had the valve covers and then the intake manifold removed...and what a freeekin' mess! Mice had been living inside the motor for many generations! The rocker chambers and lifter chamber were packed with mousenest and everything that goes with that...generation after generation!
And then it only got worse! I don't know what the status is right now but I know Matt doesn't have the tooling needed to bust the core all the way down, that one is gonna need much heat! No doubt it's rolled to the corner of the garage and is now serving as a shelf for garage clutter!
Pic is attached of the best of what Matt sent me (this is his pic!).
So...now ya shouldn't feel so bad...ya got snookered but in the end I think you got a great package of "stuff" with spares for everything for the future. Keep in kind,...I made the choice of motors for Matt based upon external appearance and completeness. Next time this comes up, I'll pop the oil filler and smell the inside!!!! Live and learn!
By the way...ya think those lifters won't make noise???? Somehow, I don't think that marvel oil or atf poured down the carb will free those "sticky lifters"!
Attachments
Scoutboy74
Moderator
Ben, I just gotta tell ya, I like the attitude you've displayed as this whole situation as steadily evolved from bad to shitty. Hopefully you've already hit rock bottom on this deal and can begin the steady uphill climb. But, in spite of these setbacks, you've asked the right questions and attacked this beeyatch with gusto. You are gonna make it play nice eventually, of that I have no doubt. You've already been further up inside one of these motors out of necessity than I have in almost a decade of playin' with this stuff. That's just good fortune on my part, but that hour glass runs out for everybody sooner or later if you hang around these piles long enough, I know. Keep your head up and keep pluggin' away at 'er.
Michael Mayben
IHPA Tech Moderator - Retired & No Longer Online
I'd say this experience has served as a pretty good probation for induction into the fwb fraternity of bros??? And ben has definitely shown the right 'tude ta git 'er dun!
I know yawl kin Scout out a trail over the hills 'tween mexturd and kfalls that don't involve stop signs and pavement so yawl kin run parts back and forth!
I know yawl kin Scout out a trail over the hills 'tween mexturd and kfalls that don't involve stop signs and pavement so yawl kin run parts back and forth!
Scoutboy74
Moderator
While I cunker thet he'z a strong kennydut fer fwb indukshun, they's still important kwestyuns needs ansirin. Kin the boy hold a beer in wun hand whilst renchin' with t'otherin'? Duz he got an ubdominul protuberuns that hez gotta suk in afore he shimeez underneath a rustpyle? We kain't let jes any yayhoo intuh this here exkloosive klub.
Michael Mayben
IHPA Tech Moderator - Retired & No Longer Online
while I cunker thet he'z a strong kennydut fer fwb indukshun, they's still important kwestyuns needs ansirin. Kin the boy hold a beer in wun hand whilst renchin' with t'otherin'? Duz he got an ubdominul protuberuns that hez gotta suk in afore he shimeez underneath a rustpyle? We kain't let jes any yayhoo intuh this here exkloosive klub.
Ben ya been challenged, we needa profile shot of yore lower end with all kundishuns accounted for before we kin move on ta tha next obstikle. If yore an abstainer, then substitute texian hot links rolled inna double tortilla for tha beer.
Thanks guys. Ya, honestly I think it could be worse, but really this is just a lot of fun for me. It's something I've wanted to learn for a long time and so this has been a great experience just figuring out how all of this stuff works. 2 weeks ago I would come up and read 10 pages for every bolt that I'd remove. Last night I tore that engine down to where it is now with confidence. It was a good feeling. Anyways, today I drain the oil (I'll keep it to check for water) then I'll turn the engine over and plastiguage the bottom, just like I did on my other engine. Hopefully all of my bearings will be nice and happy. I'll pull the two bad cylinders and brus them like mayben said. On that note, what kind of brush should I use? What kind of lubricant? And do I just push the pison down as far as I can or should I take it out all together? If I take it out, how do I check for a ridge? I'm gonna guage all the pistons while I'm at it and check for clearance... Hell, I'm almost tempted to hone all of the cylinders, but we'll see!
As far as the po, he e-mailed me back this morning and it sounds like he'll do what he needs to ta make it right. I'm confident that he didn't make the mistake on purpose and it was similar to what mm was saying, one guy says one thing and it comes out completely different 2 guys later.
Regarding the fat white boys, that would be an honor
we could set up a nice little smuggling trail and try to meet somewhere around mt. Mcgloughlin.
allright guys, I'll let ya know what's up later today. Should be fun.
Mm, you should see what a packrat can do to the inside of a 2000 gmc safari box truck engine compartment over the course of one winter! I paid a mechanic over 1500 bucks to sort out all of the wiring... And that was after I cleaned out mountains of shit, piss, tree limbs, tools, grass, dried up dog crap (they like it for some reason), hell, I even found jimmy hoffa in there! Ya, it was pretty bad. Not as bad as if they'd been in the engine tho!
Scoutboy74
Moderator
Kloce enuff. Yer in bubba! Kungracheelashuns! You won't be the first stick boy we dun mayd 'cepshun fer. Cambo an' greg r ain't hardlee got enuff azz betwixt 'em to tuh make wun normal fwb. Send me a pm with yer mailing info an' I'll git sum uhfishul stikerz on the way to ya post hayst. That way yawl kin pimp up yer ride real purdee-like!
Michael Mayben
IHPA Tech Moderator - Retired & No Longer Online
For cylinder wall prep I only use a "brush"/ball/flex hone setup. I normally use atf for a brush hone lube, a light engine oil works ok also. This pic is the 345 block for sonja's rig after the cleanup phase and bake and blast from the machine shop. The lifter bores also got honed with a smaller version of the brush.
Once the cylinder bores are prepped, then ya really have to scrub the bores with hot abrasive detergent and water to remove any trace of embedded hone grit that sluffs off. No way around that. If ya leave any trace of grit, the rings will disappear really quick! Once it's washed down, then ya keep wiping the bores with atf and a clean cloth until the cloth comes out totally clean and no "gray" deposits. This is absolutely necessary!
IH did not spec a true "piston-to-cylinder" clearance that can be determined by using a micrometer and snap gauge set. They used the "feeler gauge" method which I personally think is bogus!
Measure the bore at six points to determine "roundness/taper", then measure the skirt of the piston about one inch up from the bottom at 90* to the pin hole and use that number to determine piston-to-cylinder clearance.
As for ratshit...I've investigated hundreds of subaru customer complaints on nearly new rides regarding "odor" from the heater/ac, including several from your local dealer there in kfalls! Customer thinks that's a warranty issue, but not when ya store dog food or any kinda food in a vehicle! It was always ratresidue and bubba, that ain't a "workmanship or materials" issue!
Ok, still not sure tho whether or not you can leave the piston in and push it all the way down or if I should take it all the way out. I know if I take them out then I'll need to get a ring compressor and whatnot. I don't mind cleaning... I should have taken a pic of my 345's oil pan when I got done with it ") you woulda thot it was stainless steel fresh off the press!
you woulda thot it was stainless steel fresh off the press!
As for right now, I can't find my small plastiguage, so I'm gonna go get one from the parts store, but while I'm at it I'd like to know if I should get a ridge removing tool as well. I guess I'll just get it and if I need it I'll have it, if I don't... Well, the part monkey is paid to take it back! I'll post the pics of the gobledy goop that was on this oil pan. Luckily no kibble at all. Just some nasty water and surprisingly, about a pint, maybe a bit more than that, of oil. The drained the oil before the stored it I guess??? Why I don't know.
you woulda thot it was stainless steel fresh off the press!As for right now, I can't find my small plastiguage, so I'm gonna go get one from the parts store, but while I'm at it I'd like to know if I should get a ridge removing tool as well. I guess I'll just get it and if I need it I'll have it, if I don't... Well, the part monkey is paid to take it back! I'll post the pics of the gobledy goop that was on this oil pan. Luckily no kibble at all. Just some nasty water and surprisingly, about a pint, maybe a bit more than that, of oil. The drained the oil before the stored it I guess??? Why I don't know.
Okeydoke, I plastiguaged all the main bearings. The all came out exactly the same... About .0035 or so. A couple of the bearings had small scratches, but nothing too bad (I don't think anyways). None of them were showing copper and they didn't show too much wear; no uneven coloring or anything, just a few scratches. The thrust bearing was tight. It took me a long time to get it out, but it was also looking good, especially the edges. So, I'm thinking I won't worry about main bearings. I'm gonna pull the rods next and see how bad they are. I can't find a wire hone here in town (on a Sunday) so I was wondering what you guys think about stone hones?? I would imagine it would work ok? The only lower cylinder that had any rust was the #2 which was nasty on top, but the rust is just tiny little specks, the other lower cylinders couldn't be seen because of the position of the pistons. So I'm thinking everything will be pretty good with this engine!
Tell me what ya think!
Tell me what ya think!
bigcountryihcrazy
New member
If u are able to isolate the noise to a specific cylinder ied pull the pan and check the bearings that go to that piston. U could verry well have a spun bearing.as sugested use plastiguage to check ure clearences,and it definately sounds like someone has messed with the bottom end bolts dont just fall out. Ied guess it wasnt torqued correctly and came loose due to vibration wich could cause damage to that bearing.
bigcountryihcrazy
New member
U May also have a pre detonation prablem due to carbon build up on top of the piston creating a hot spot that egnites un burned fuel in the cylinder when its not suposed to causing a knock.
Michael Mayben
IHPA Tech Moderator - Retired & No Longer Online
okeydoke, I plastiguaged all the main bearings. The all came out exactly the same... About .0035 or so. A couple of the bearings had small scratches, but nothing too bad (I don't think anyways). None of them were showing copper and they didn't show too much wear; no uneven coloring or anything, just a few scratches. The thrust bearing was tight. It took me a long time to get it out, but it was also looking good, especially the edges. So, I'm thinking I won't worry about main bearings. I'm gonna pull the rods next and see how bad they are. I can't find a wire hone here in town (on a Sunday) so I was wondering what you guys think about stone hones?? I would imagine it would work ok? The only lower cylinder that had any rust was the #2 which was nasty on top, but the rust is just tiny little specks, the other lower cylinders couldn't be seen because of the position of the pistons. So I'm thinking everything will be pretty good with this engine!
Tell me what ya think!
To completely prep the rusty cylinders, the pistons need to come out. The pistons themselves will need some major cleanup as the rings will be corroded also...and you will find some "white rust"-type corrosion on the pistons adjacent to the ring grooves/lands.
A "stone"-type hone (glaze breaker) is worthless for doing what you need to do, it will just skip over the corrosion that is micro-embedded in the cylinder wall surface. Better than nothing though...barely.
Once the two pistons are out, ya need to roll the motor over many times and douche the rest of the cylinders, there will be crap in those holes, ya just can't see it right now, but without seeing the holes, I'd say just clean up the two rotten holes with the ball hone.
You are already in there, do all ya can to help this motor come to life so ya don't end up with another parts donor!