

You are using an out of date browser. It may not display this or other websites correctly.
You should upgrade or use an alternative browser.
You should upgrade or use an alternative browser.
Project Karma
- Thread starter Tahoedonner
- Start date
Tahoedonner
Member
how is all the eastwood paint holding up on the various parts? I see that you painted a some of it a couple years ago, anything to report? I'm trying to browse through and "borrow" some ideas from y'all :d
Considering it hasn't been driven more than 3 miles it's really hard to tell. Im about 1-2 months away from getting it registered so I will know much more come sept how it'll hold up. It is however holding up quite well with no abuse.
punjig
Member
I have been following your build for awhile and I know that in the past you had problems with heating issues. I am curious as to what model flex-a-lite fans you did get for this build? Also, what aftermarket radiator you ended up with. The radiator is a main issue, while I can find them on the market just fine, some are very expensive and others seem price to low as though the quality May come into question.
Tahoedonner
Member
I have been following your build for awhile and I know that in the past you had problems with heating issues. I am curious as to what model flex-a-lite fans you did get for this build? Also, what aftermarket radiator you ended up with. The radiator is a main issue, while I can find them on the market just fine, some are very expensive and others seem price to low as though the quality May come into question.
The fans are flex-a-lite 392 s blade 12" fans. They just barely fit, width wise, over the radiator. Could have easily gone with 10" fans. I am having absolutely no cooling issues anymore.
Radiator is a champion radiator. No issues with it either.
My cooling issues were mostly due to not having a shroud for the engine mounted fan and some air trapped in the system. Due to my body lift I decided that going with the electric fans was a better avenue for me. I am controlling them with a dual speed fan controller as well.
Tahoedonner
Member
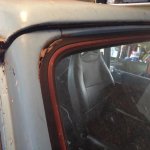
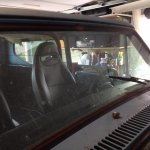
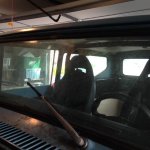
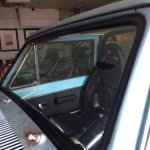
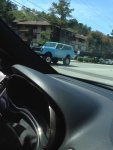
Got a new windshield installed this morning. Seal was from IH parts, non chrome locking version, and the installer was very impressed with its quality. Seal is tight as all hell and that's a good thing. The list is becoming very short to get this thing registered.
Here's a couple pics:
old


New


Here's a couple pics:
old
New
Attachments
Tahoedonner
Member
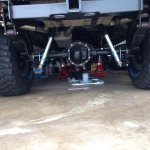
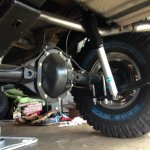
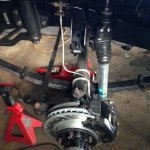
Finally got around to installing the shocks. Been driving it up and down my block a bunch lately and realized that it would be nice to see how it rides with some shocks. Unfortunately I sprung a leak at the water neck gasket so I didn't get to take it for a spin. Easy fix though. I don't think I replaced the lower gasket last time I swapped out the thermostat.
Rear view: I installed them body down because I was told it technically won't matter and I didn't want to look at the scrunched up shock boots.


Here you can see how close the boot comes to the exhaust. I've ordered some heat shields to make sure that the boot doesn't melt and that there won't be any other problems associated with the proximity to exhaust heat.

Here is a look at the fronts installed.

Rear view: I installed them body down because I was told it technically won't matter and I didn't want to look at the scrunched up shock boots.
Here you can see how close the boot comes to the exhaust. I've ordered some heat shields to make sure that the boot doesn't melt and that there won't be any other problems associated with the proximity to exhaust heat.
Here is a look at the fronts installed.
Attachments
Tahoedonner
Member
A huge turning point happened last Friday. The truck is finally registered. It's been almost 4 years since I started this build and I see a smidgen of light at the end of the tunnel. Now I can take her out and really fine tune the engine. I have a month to get the smog done and I don't see any problems passing. Knock on wood.
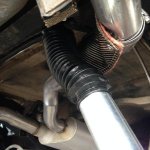
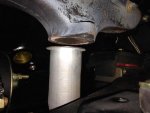
Got the heater core installed and new plastic valve. Old chords were in really good shape and have no binding whatsoever.
Heater valve and core

Got the heater core installed and new plastic valve. Old chords were in really good shape and have no binding whatsoever.
Heater valve and core
Attachments
Tahoedonner
Member
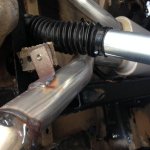
Picked up some titanium heat shield for the shocks to protect them from the exhaust pipes. Truck was having a real tough time idling after it started today and after shut down I noticed that gas had pooled in the secondaries. I could also feel gas leaking out somewhere around the vacuum secondary screw as well. Going to pull the bowl tomorrow and check the needle and seat to see if it has stuck open.


Attachments

Tahoedonner
Member
Wife came home today and noticed the truck missing from the garage. Took it for a 20 min ride today. She found me.
Transmission is shifting great. Ran it up to 50mph. Definitely needs an alignment. Shocks made a huge difference in ride quality. Not surprising considering I had none on before. Engine is running really strong. This 345 w/ 3.73 and 35's and the 727 has a ton more power than my original manual 304 with 33's. Granted that engine wasn't in the greatest shape. Off to get a smog here in the next week or so.


Transmission is shifting great. Ran it up to 50mph. Definitely needs an alignment. Shocks made a huge difference in ride quality. Not surprising considering I had none on before. Engine is running really strong. This 345 w/ 3.73 and 35's and the 727 has a ton more power than my original manual 304 with 33's. Granted that engine wasn't in the greatest shape. Off to get a smog here in the next week or so.
Attachments
Tahoedonner
Member
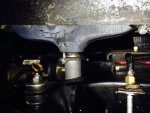
Had decent exhaust leaks coming from the collector and manifold attachment on each side. Replaced the cheap bolts the guy used with some grade 8's and some lock washers. Still a decent amount of leakage. Figured the guy must have screwed up the installation of the donuts. Turns out he didn't use them at all. 2 on order.
Attachments
Tahoedonner
Member
Finally got the donuts sealed up nice and tight. Took about three cycles of engine heating to get a perfect seal. Absolutely no exhaust leak now. The donuts are victor reinz f7395. They do not have the sleeve. Decided on these after reading a bunch of threads.

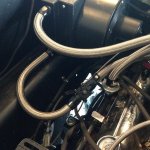
Have been having a slight leak at the trans cooler line fittings and finally got fed up with all the fiddling and decided to just replace the lines and fittings with 6 an stainless braided ptfe hose. Not a drip anymore. I ran them in the same position as the hard lines to keep them away from the exhaust.


All that is left before smog next weekend is to reinstall all the vac lines to the engine. Charcoal canister. Heat exchanger thingy on the passenger side. Will pop on an old air cleaner for the test.
Have been having a slight leak at the trans cooler line fittings and finally got fed up with all the fiddling and decided to just replace the lines and fittings with 6 an stainless braided ptfe hose. Not a drip anymore. I ran them in the same position as the hard lines to keep them away from the exhaust.
All that is left before smog next weekend is to reinstall all the vac lines to the engine. Charcoal canister. Heat exchanger thingy on the passenger side. Will pop on an old air cleaner for the test.
Attachments


Tahoedonner
Member
Smog update
took the rig in for it's first smog and failed instantly because, through all my planning, I screwed up and bought a cd ignition box and coil that weren't carb certified. I have no idea how I pulled that off but there wasn't anything I could do but buy new parts. Bought and installed a new msd box and msd coil and took her down for the second go around. She passed everything with flying colors except for the evap test. Essentially the only parts that I haven't replaced were the fuel lines and the lines running to the evap canister in the rear. Turns out gas cap failed as well. The good news is I wanted to drop the tank and test the sender as it doesn't seem to be working correctly. Going to drop the tank tonight and replace all the lines, paint, and reinstall for it's final smog check. Those were the only problems remaining. Been logging some decent road time recently so it's been fun.
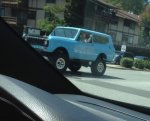
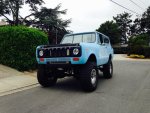
Here's what she looks like as of now. Still no hood.
took the rig in for it's first smog and failed instantly because, through all my planning, I screwed up and bought a cd ignition box and coil that weren't carb certified. I have no idea how I pulled that off but there wasn't anything I could do but buy new parts. Bought and installed a new msd box and msd coil and took her down for the second go around. She passed everything with flying colors except for the evap test. Essentially the only parts that I haven't replaced were the fuel lines and the lines running to the evap canister in the rear. Turns out gas cap failed as well. The good news is I wanted to drop the tank and test the sender as it doesn't seem to be working correctly. Going to drop the tank tonight and replace all the lines, paint, and reinstall for it's final smog check. Those were the only problems remaining. Been logging some decent road time recently so it's been fun.
Here's what she looks like as of now. Still no hood.
Attachments
Tahoedonner
Member
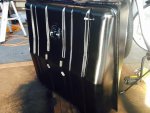
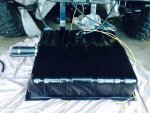
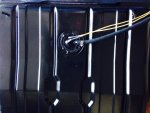
Failed the evap test so it was time to drop the tank and replace every hose that connects the tank with the engine, smog canister, and evap canister. Had to rip away my perfectly glued down carpeting to get to the access panel for the evap canister but there was no other option. Evap canister, after being washed off with water, was in pristine condition. There are a couple hoses that connect at the top, way up inside the fender, that are only reachable by removing the access panel. Bought 50' of gates barricade hose thinking I would have plenty (20+' left over). Replaced all tank to evap canister connections (5). Also replaced the 6th evap connection that runs to the charcoal canister under the hood. Replaced the fuel feed line that runs from tank to fuel pump. I ended up with abuout 3' of hose left over. My gas gauge hadn't been working and I was afraid the float was defective. Turns out the old wiring connections at the sender were the culprit. New wiring was run off the original sender and the gauge now works like a champ. Sanded down and painted very thing with eastwood chassis paint. Everything is new and tight.
Today I passed California smog completely. 4 years after starting this build I finally have the ability to drive this beast wherever I want. Lots more to finish but this is the biggest lesson of patience I have ever endured.
Couple pics of the tank process:
freshly painted tank:

Tank ready for install

Evap canister after cleaning. Was in perfect condition

New tank wiring connections

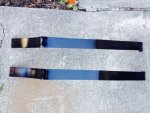
Is there anything more exciting than freshly painted gas tank straps?

Today I passed California smog completely. 4 years after starting this build I finally have the ability to drive this beast wherever I want. Lots more to finish but this is the biggest lesson of patience I have ever endured.
Couple pics of the tank process:
freshly painted tank:
Tank ready for install
Evap canister after cleaning. Was in perfect condition
New tank wiring connections
Is there anything more exciting than freshly painted gas tank straps?
Attachments


Tahoedonner
Member
Couple updates:
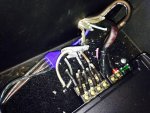
been meaning to get to the amp that the rat had chewed up the wires and see what needed replacing. Turns out the gigantic bastard chewed through every wire but 2. That's 11 wires at about 5 inches per all fully consumed.

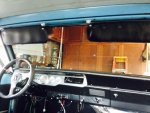
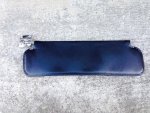
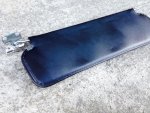
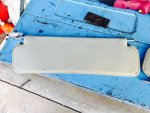
Also got around to cleaning up the visors. They needed a deep cleaning, the chrome needed polishing and I needed to dye them black. Boring but they turned out great. I'll recover them at some point but these will do for the time being.


been meaning to get to the amp that the rat had chewed up the wires and see what needed replacing. Turns out the gigantic bastard chewed through every wire but 2. That's 11 wires at about 5 inches per all fully consumed.
Also got around to cleaning up the visors. They needed a deep cleaning, the chrome needed polishing and I needed to dye them black. Boring but they turned out great. I'll recover them at some point but these will do for the time being.
Attachments
Cowtron
Member
Looking great, donner. Man, I feel your pain with all that smog stuff. I had an '86 Bronco that just refused to pass smog, I tried for almost a year. I finally gave up on it and bought the Scout (which I'm way happier with, anyway). It's pretty ridiculous what they make you go through to keep these old trucks on the road. Glad to hear you're finally able to enjoy taking her out on the road. Gives me a little motivation to think someday I'll be there!
Tahoedonner
Member
Been logging some decent road time in the truck. Added some 2* shims to the front axle and had an alignment done. She tracks really nice right now. Finally felt safe taking her above 55 but when I did I got a decent driveline vibration. Downloaded a tremec driveline app for my phone and the measurements say I need to shim the rear. Ordered up some more 2* shims for the rear along with some new centering pins from IHPA. I'm going to install those first and then take her on the freeway again. I've got a new tranny mount from IHPA that I want to put in but I was waiting until I dropped the t-case. Hopefully the shims will solve the vibration. I also finally got around to putting the hood on. Shockingly it runs hotter than without the hood. Coolant temp holds steady at about 205 after going up a steep grade and then letting it sit. Will sit at 185 when it's not being pushed. Temp is a touch high but nothing I'm worried about.
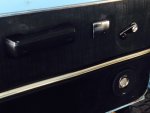
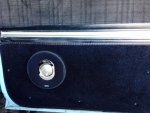
Finally got the front speakers installed also. They really solidify the door panels.


Finally got the front speakers installed also. They really solidify the door panels.
Attachments


Last edited:
Tahoedonner
Member
Installed some rear 2* shims and new center pins, I got from IHPA, based on the info I got from the tremec driveline calculator I downloaded and took the truck out for another freeway drive. Driveline vibration when I was between 65-70, which is technically 1.2 x speedometer @ 78-84, was reduced quite a bit. Pretty sure the new transmission mount will reduce it even more. Overall I'm pretty damn happy with how well everything is working. Transfer case is now leaking a little bit. 4 days later I've got a couple quarters worth of oil on the ground. The t-case seems to be seeping from pretty much every spot you would think it would leak from. It looks to me that it is transmission fluid. I'm hoping the po put tranny fluid in the t-case. Probably wishful thinking. Either way I should probably pull the t-case and inspect. Too bad because I really wanted to put a few hundred miles on her before I left her inoperable again. Already have the reseal kit. Going to drain the t-case and see if it refills with fluid.
I just read this 12 page thread in one sitting, and I am extremely impressed by your patience, attention to detail, and commitment to this project. I am about to take the plunge on my first Scout as well, a 74, and had similar intentions, though reading through your meticulous journal has given me some great ideas. It has also highlighted some things I need to consider as I make my plan (aside from questioning my sanity).
Thank you for keeping up with this - it is very helpful for others who are about to walk in your shoes.
Thank you for keeping up with this - it is very helpful for others who are about to walk in your shoes.
Tahoedonner
Member
I just read this 12 page thread in one sitting, and I am extremely impressed by your patience, attention to detail, and commitment to this project. I am about to take the plunge on my first Scout as well, a 74, and had similar intentions, though reading through your meticulous journal has given me some great ideas. It has also highlighted some things I need to consider as I make my plan (aside from questioning my sanity).
Thank you for keeping up with this - it is very helpful for others who are about to walk in your shoes.
Thanks. It has been quite the journey.
Tahoedonner
Member

subldoed@yahoo.com
New member
Love your build!
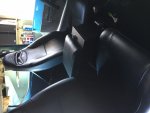
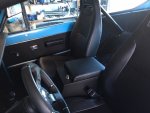
Is the center console the 10" wide version? Did you have to modify the rear base?
Also, where'd you get the new pedals?
Thx!
Is the center console the 10" wide version? Did you have to modify the rear base?
Also, where'd you get the new pedals?
Thx!
Tahoedonner
Member
love your build!
Is the center console the 10" wide version? Did you have to modify the rear base?
Also, where'd you get the new pedals?
Thx!
Picked up the pedals from summit. I think they're lokar midnight series pedals. I did have to drill new holes in the pedals to attach but it's pretty painless. Probably took and hour total. Console is the 10" version and fits perfect between the seats. The rear attachment of the console just needs to be slightly rounded out for the legs to reach the floor. Technically you could just put the two bolts in and I'm sure it would be snug as can be.