ENGINE NOISE

Ok guys, here's the update. The block looks good. We honed it and everythings nice. New cam bearings are going in next week and the rod/main bearings are ordered. The heads are decent but it looks like I'll need a valve job. He's quoting me 175 for a five angle valve job. I didn't know if that was reasonable, and I've only heard of folks doing a 3 angle on IH engines. Am I wrong on this? Let me know what you think.
On another note, I was driving to a new job that I just started and happened to pass an old house with an '71 IH 1210 sitting out front under an apricot tree. Just for shits and giggles I stopped in to see if he was wanting to get rid of it.... Turns out he'd been thinking of having the wrecking yard come and tow it away, so he said I could have it. It's been sitting since around 1990 but he says when he parked it, it ran. Has a 345 and is 2 wheel drive. Body is mostly straight, only a slight bend in the hood and a decent dent along the quarter pannel on the pass. Side. Really, this truck is nice. Interior it looks old, but in great shape. Only problem is that it's been sitting with no carb! Anyhoot, I think I'll get it just to have the extra 345... Maybe see if I can get it running, who knows? Maybe it will be a good runnin' machine! So at least somethings going my way! :cornut:
 
Holee sheeyit man! Did I fergit tuh tel ya the dam thangs breed in kaptivitee? Yer hedid down a slipry sloap now!:yikes:

my mongo is a '71 1210 also. If you decide yer gunna part the sumbish, I maht kud need a fyoo thangs.:ihih:
 
He's quoting me 175 for a five angle valve job. I didn't know if that was reasonable, and I've only heard of folks doing a 3 angle on IH engines. Am I wrong on this? Let me know what you think.

3 angle is a 45* seat 30* top and a 60* bottom or bowl cut.

5 angle is 15-20* top, 30* top mid, 45* seat 60* bottom mid and a 75* bowl cut.

For your asthmatic engine it is a total waste of time and $$$.. Tell him to knock $50.00 off and do a 3 angle. You ain't building a race car here.
 
3 angle is a 45* seat 30* top and a 60* bottom or bowl cut.

5 angle is 15-20* top, 30* top mid, 45* seat 60* bottom mid and a 75* bowl cut.

For your asthmatic engine it is a total waste of time and $$$.. Tell him to knock $50.00 off and do a 3 angle. You ain't building a race car here.

Ditto, total waste of dinero!
 
Awesome, thanks for the info guys. How hard would it be to take that 1210 2x4 and turn it into a 4x4? I have an extra Dana 20. I know the rear driveline would have to be shortened and I'd have to find an axle with matching gears for the front, but what am I missing? What else do I need? Also, can I swap any power steering system onto that unit from a 1200 series pickup/t-all?
Let me know what you think.
 
awesome, thanks for the info guys. How hard would it be to take that 1210 2x4 and turn it into a 4x4? I have an extra Dana 20. I know the rear driveline would have to be shortened and I'd have to find an axle with matching gears for the front, but what am I missing? What else do I need? Also, can I swap any power steering system onto that unit from a 1200 series pickup/t-all?
Let me know what you think.

An IH pickall (either 2x4 or 4x4) is a totally different animal compared to a Scout II! Primarily due to using a divorced transfer case set up (that one would use a NP205).

A d20 is designed as a married transfer case and also does not have the load capacity needed for use in a pickall.

"some" components interchange between Scout II and the '69>'75 model "d" series pickalls, but most do not, they are completely different vehicles.

In order to convert a pickall to 4x4, ya need a donor 4x4 to begin with!

Let's keep this thread to a discussion of your Scout II engine situation, start a new thread for any other topic.
 
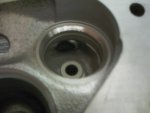
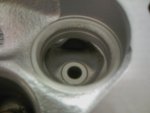
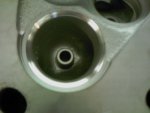
I have a question for you guys. My mechanic is saying I need to put inserts into my exhaust valve ports and grind them to spec. He's saying the existing valve seat is too porous to get a good seat. Here's some pictures of what I'm talking about. It's hard to tell but if you compare the larger opening (air intake) with the smaller (the exhaust) that has been ground already you can see on the one that's ground slight chips along the rim. I included a pic of a seat that hasn't been ground to show how porous they are. Hopefully you can tell. My question here is what do you guys think? My mechanic isn't telling me I have to do this, he's just recomending it. I want this thing strong so I'll do it if it's gonna really improve the life of the engine... But if all IH's exhaust seats look like this then is there a point? You guys know, I don't! Tell me what you think. :confused5:

let me clarify: the first picture is of a ground exhaust seat. You can see the rough edges where it should be solid metal but appears to be chipped.
The second picture is of an unground exhaust seat... Totally rough. You could file your fingernails on them.
The third picture is of a ground air intake seat. You can see solid metal and no chips.
 

Attachments

  • IMAG0068.jpg
    IMAG0068.jpg
    28.2 KB · Views: 329
  • IMAG0069.jpg
    IMAG0069.jpg
    27.6 KB · Views: 315
  • IMAG0070.jpg
    IMAG0070.jpg
    29.6 KB · Views: 316
Last edited:
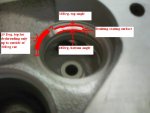
The porousity is not normal on an IH. More likely errosion/corrosion from sitting that can be removed by further cutting. The seat face needs to have a 30* and 60* angles added to narrow the contact patch to about.08 and center it on the valve face at the correct location. The outer edge of the patch seen after light lapping should be no closer than .020 from the outer edge of the valve's face. That extra angle cut and a bit more 45* cutting will remove the rough edges.

Stem height will need to be adjusted by removing some from the valve stem. All valves need to be close to the same like with in .015 of each other. Not all shops are so critical as me but that is what I expect at a minimum.
 
So you think his wanting to install inserts is bunk? Just keep grinding it down and shorten the stems? Would stronger/longer springs need to be installed since there would be less spring travel? He's quoting me 18 bucks per valve and with 8 valves I'd be looking at an extra 144 to the already 175 valve job... Now my heads will be up over 300 without new springs... Add new springs and I'm at 400. I want it done right, but if I can save a few then that's ideal!
 
I'm losing it on the english comprehension part of this...

Does your machine shop mean that an insert is a new valve seat?

What Robert kenney describes is the correct procedure for compensating for "over-grinding" valve seats due to "excessive" wear (mantain correct "valve train geometry").

I do not know what the "downside" is to replacing valve seats in cast iron heads.

Basically, it is a "judgment" call...

Replacing the valve seats probably costs more... Now...

If you drive the vehicle enough to "need" another valve job in the future; then, it May cost more in the future... If the seats are not replaced now...

Apples and oranges "type of thing"... With some money involved.
 
Ya, you are more or less right. He would bore out the old valve seat and pres in a thick metal ring (not sure what the material is), he would then grind that ring down to spec. As far as having to do the job again some day I'm not overly concerned... What I really don't want to deal with is the process of dealing with all of the symptoms leading up to needing a valve job... Number one being poor fuel ecconomy/bad compression.
 
The thick metal ring is what I would call a valve seat.

After replacement, you would grind the seat "to spec" just like you would grind the seat when a valve job is done.

If you have the seats replaced (I probably would - never seen a valve seat "eroded" like that), I would make sure that the guy used a replacement seat (ring) made of the same material as the stock seats (stellite, I think).

I do not know the procedure for replacing seats in a cast iron head (do know a little about the seats in an aluminum corvair head).

Hopefully, Robert kenney / michael mayben will reply as I am sure they know the process on replacing a valve seat -- and the material the seats are made of.
 
so you think his wanting to install inserts is bunk? Just keep grinding it down and shorten the stems? Would stronger/longer springs need to be installed since there would be less spring travel? He's quoting me 18 bucks per valve and with 8 valves I'd be looking at an extra 144 to the already 175 valve job... Now my heads will be up over 300 without new springs... Add new springs and I'm at 400. I want it done right, but if I can save a few then that's ideal!

I marked up yout photo for more detail. And what I am talking about on the seal cuts. You can see how the cuts remove the erosion and make the 45 cut need to be less deep.

I don't feel you need to inserted your heads by any means. A normal seat takes maybe a .005 face cut to clean up, the eroded one will probably take .015-.020. Not an issue.
Any time a seat and valve are refinished the stem tip height needs to be comped for the increased height as a result of the cutting. A 2 second deal for the shop.

On your deal I would simply add a 15 on top to remove the pocket resulting from the relatively large face cut. The valve will likely sit down a bit below the surface and that will act to shroud the valve restricting flow. A normal deal an any machine shop..

I don't want to piss of your machine shop either so you are kinda caught between a rock and a hard place. If he is adamant on inserting the head you May have no choice.

I work with shops who do exactly what I tell them, so getting what I want is no problem.
 

Attachments

  • SV seat cuts.JPG
    SV seat cuts.JPG
    42.2 KB · Views: 397
Last edited:
Just a few comments...

IH cylinder heads were never plagued by seat erosion/recession/etc. Created by the industry conversion to low-lead/unleaded fuels circa 1975. Your machinists is drawing parallels with typical chryfordrolet shit and ya simply cannot do that, I say this over and over! No doubt he has not much/no experience in doing IH stuff which are truck/industrial engines.

But what you are seeing with the eroded seats is due to neglect (acidic erosion) and water having been in that engine.

Also...some sv engine variations used "inserted" valve seats on the exhaust side oem, as well as positive exhaust valve rotation (such as a roto-cap). Again, these engines are not "all the same".

A three angle valve job simply is a methodology to properly locate the valve face/seat contact patch in the proper location when seats and valves have been re-faced. That procedure is how the seat location is manipulated during final inspection/assembly and is the difference in a correct cylinder head reconditioning vs. Simply having the "valves ground".

That process can also be enhanced by doing an "interference" cut also. The interference cut is determined by the type of valve seat/valve face equipment is being used, whether it's a "grinding" process (stone dressing) or a "cut" process (such as using a neway system).

If the existing seat(s) have not been previously cut all to shit, then they have an indefinite life-span on IH stuff. Installing a hard seat insert is a method of repairing (reclaiming) a head and is not needed on any IH head except to reclaim a non-func head that no longer has a seat area that can be reconditioned. And ya don't need to do all of 'em, only the one that needs it! But normally we never get into this kinda mess because the heads are cracked which is a whole other deal! Cracked heads in the combustion chamber are definitely an issue with IH shit.

Regarding any valve/head reconditioning process, the most important aspect is correcting the "installed valve height" after the seat and valve cuts are completed. Other wise, what ya end up with is too little/no pre-load on the lifter, or a lifter that is collapsed. Much of the "lifter click" noise that folks piss about is caused by a "valve job" that was simply not done correctly. And IH motors are no different in that respect compared to any engine which uses a non-adjustable valve train.

When valve seat inserts are used in the machine shop in repair work, they May be in many forms and alloys of material and the material has to be compatible with the oem valve if it's being re-used, or with the replacement valve material. That is dependent upon the seat insert process the shop uses on a routine basis. The tooling and procedures for installing will vary with the type/design of the seat being used.

All this valve work is covered in surprisingly accurate detail in all versions of the IH shop manuals, including the process for repairing a head using valve seat inserts.

Has your machine shop dude addressed the valve guides yet??? That is the first thing that must be done, if a guide needs attention, it must be done before any other machine process is performed as the guide is the centerline reference for all other work.

Also...many machinists overlook the fact that the 196 and 392 motors use 30* intake valve face angles (as opposed to a nominal 45* angle)! So they jump right in and fuck everything up by cutting before they realize that!
 
Ok fokes. Got me some good news. I got all of my stuff back from my mechanic last week. Everything looks great. New valve seats were inserted and cut, valves were checked, valve guides were checked, new springs, new cam (oregon cam grinders), new lifters, push rods checked, crank checked, block magged, cylinders deglazed, intake manifold magged, pistons cleaned, new piston rings, new carbs comin' from mayben this week. So I just put the timing gear on the cam and installed it, crank is installed, gonno finish putting in the pistons tonight. I'll post pics later when I have some extra time, just wanted to let you guys know what's up.
By the way, all said and done (so far) I have 1300 into it. 300 for the original dead engine and 1000 worth of parts, gaskets, and mechanic fees. I'm pretty happy with it all. :ihih:
 
New problem.
So I assembled everything and got to where I'm priming the oil galleries, lifters and rockers. The problem is that the rockers on the passenger side are not oiling. I have 52 psi constant on 10w30 oil. I went ahead and took off the head to see if I installed the head gasket wrong and it's fine. With the head off I still have no oil coming from the gallery. I can stick stuff down the hole and there's oil in the bottom of the hole, but nothing when I use the pump. After reviewing the lubrication chart in my manual all that I can figure is that my mechanic installed the forth cam bearing wrong and the oil holes were not lined up. I will take the blame for not double checking if this is the case but it will also piss me off to no end. So please help, tell me there's another really easy solution to this problem... I can't think of anything else to do but take it all the way down to the cam again.
Thanks
 
The head oil passages through the cam bearings only supply oil to their respective head during a limited rotation angle of the cam.

To make a long story short, rotate the engine 10 degrees at a time and re-commence pre oiling for 30 seconds at each point. You should get oil at some index. If not the cam bearing is wrong.
 
Robert! You are awesome. I had tried rotating it before but I only ran the drill about 5 seconds each time... I did it all again and rotated it 10 degrees at a time running the drill for a minimum of 30 seconds, and by the 5th rotation it must have lined up because it came out in force. Thank you bro, I was about to start taking sh*t apart!
 
Virtually every thread in this sub-forum regarding valve train lubrication (or lack thereof) describes this same situation.

If you re-read all the pertinent threads, you will see I've posted this same scenario over and over, including pics of the camshaft and bearing spit holes and the fact that the feed hole is not dead center through the camshaft journals on #2 and #4 themselves.
 
Hey mayben, back in post 67 and 69 you were talking about my prestolite distributor and my pertronix ignitor... I'm having a hard time finding a diagram/instructions on how to wire the sob. Any pointers for me? There are three wires, white, brown and red. And of course I have my wire coming from my ignition. I was hoping to have this running tonight but maybe not?? Thanks guys.
 
hey mayben, back in post 67 and 69 you were talking about my prestolite distributor and my pertronix ignitor... I'm having a hard time finding a diagram/instructions on how to wire the sob. Any pointers for me? There are three wires, white, brown and red. And of course I have my wire coming from my ignition. I was hoping to have this running tonight but maybe not?? Thanks guys.

After reviewing your pics back in post 67, I now see I was wrong regarding the pertronix conversion! I enlarged that jpeg and now see the white wire...that indicates the unit has the oem prestolite module installed still and your description in this post sez the same! Sorry for the misinformation!

So...to wire this distributor, the wiring is actually identical to a pertronix conversion though. The red wire goes to the ignition coil positive terminal, the brown wire goes to the ignition coil negative terminal. Disregard the white wire, it's not connected to anything in this instance and is simply a deadhead. The switched b+ feed from the ignition switch goes to the coil positive terminal also.

That should make fire in the hole as long as the bulkhead connector with the switched b+ feed is passing juice!
 
Very cool thank you, but now I have to ask, do you think I should go ahead and use my delco instead of this unit? Or maybe I'll just order a pertronix... I already have a flame thrower coil coming in today... Is the prestolite better than the delco at all?
 
Back
Top