

You are using an out of date browser. It may not display this or other websites correctly.
You should upgrade or use an alternative browser.
You should upgrade or use an alternative browser.
72 Ole Yeller
- Thread starter Scooter
- Start date
Scooter
Active member
take care of that knee. Can't do what we do from wheel chairs.... Well you could but it would be much harder.
Thanks. After the cortisone shot last week, the swelling has gone down. But it's still a little stiff and getting some popping in the knee. Got a friend who is actually wheel chair bound himself, that owns and drives his a 75 IH 1100 truck and his 79 Scout II.
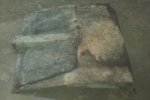
Well if it aint one thing or another. After replace exhaust manifold gaskets and donuts, I had issues with an exhaust leak on the driver side right at the donut where the pipe meets the manifold. No matter what I tried, short of pulling the whole exhaust system out, I couldn't get it to seal correctly. So I ended up cutting a piece of the pipe out and bending the 90* back to roughly 80-85* or something like that. The photo shows the section of what I dealt with most of the day. Just got finished mounting it and welded it back in place. Worked like a charm. Nice little quiet rumble going on. Now I can finish welding the exhaust brackets back on and time it, among a few other things and possibly drive it around the block.
Attachments

Scooter
Active member
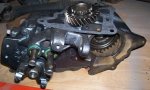
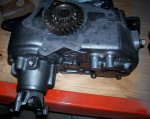
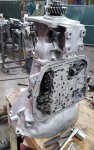
Just finished up rebuilding the d-20 transfer case a few days ago. All new bearings and seals, along with eliminating the two shifter rail pills for twin stick conversion. Currently stored on the shelf till I actually get to putting the 727 auto trans back together. Other financial obligations sort of preventing me from ordering the gear ratio change in the transmission. Once I get to putting the trans back together, I will tackle fabing up the two shifters for the t.c. Before I actually pieced the t.c. Together, I had a friend, who works for a powder coating company, take it to his work to cook and clean the t.c. Housing. Then he coated it with a zink coating of some sort to prevent rusting. Something they do on products like this to prevent rusting out from under the paint. I didn't find a need to actually get this one powder coated. It wont be a show rig, so I just rattle canned it before I stored it up on the shelf


Attachments
Scooter
Active member
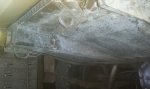
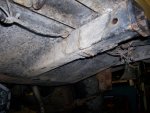
Sigh!!!. Got bit by the po bug. I'm about to beat these guys over the head with the fugly stick. Turns out that I needed to drop the fuel tank due to not getting fuel to the new fuel pump I just replaced last weekend. The sending unit pick up tube is plugged up.
But, in order to drop the tank, I end up having to deal with the po virus. The hitch welded to both the rear bumper and tank skid plate. What were these knuckle heads thinking? Got their heads up their butts.


If the po kept this Scout, I guess he never planned on dropping the tank to service the sending unit or the tank itself.
now off to drop the tank
But, in order to drop the tank, I end up having to deal with the po virus. The hitch welded to both the rear bumper and tank skid plate. What were these knuckle heads thinking? Got their heads up their butts.
If the po kept this Scout, I guess he never planned on dropping the tank to service the sending unit or the tank itself.
now off to drop the tank
Attachments
Scoutboy74
Moderator
Sheeyit kimball...that's a pyur dee dam faktree traylur draggin' pakidge! That there was a Dad burned hi dollar opshun wut had to be checkd of'n the ordur sheet at purchus tyme. Dubble check yer daggum line set ticket and then tell me I'm full of it.
it would be very difficult to convict the average po of being a long-term thinker in any court of law. That fine example of redneck injinooitee was born of necessity and zero budget. Whoever did it probably figured the rig would wind up in the scrap yard well before the tank ever needed to be dropped for any reason.
it would be very difficult to convict the average po of being a long-term thinker in any court of law. That fine example of redneck injinooitee was born of necessity and zero budget. Whoever did it probably figured the rig would wind up in the scrap yard well before the tank ever needed to be dropped for any reason.
Scooter
Active member
Gotta luv them chew chompen bubble gum welden gun slingers.
Pulled the tank with crusty hoses along with duct tape holding vent tube in place

surprisingly, the sending unit looked to be in good shape. But since the one vent tube on top of the tank is completely broken free, I will be swapping tanks with a known good tank that I've got laying around.
Pulled the tank with crusty hoses along with duct tape holding vent tube in place
surprisingly, the sending unit looked to be in good shape. But since the one vent tube on top of the tank is completely broken free, I will be swapping tanks with a known good tank that I've got laying around.
Attachments
Scooter
Active member
Well, in preparation of getting this thing road worthy, I'm finally getting around to fixing/replacing something that's been bugging me ever since I've had this Scout. New u-bolts and spring plates for the front axle. Due to the bent u-bolts, I ended up using the gas axe in order to cut out the old crap.


Turns out, that there's another issue that became apparent when I started cutting out the u-bolts around the diff pumpkin. The spring pack pin is missing. The leafs started to separate while I was removing the old u-bolts and brackets.
now I'm kinda stuck on hold till Monday when I can call up and order a new pin. And since I'm at it I plan on ordering the same parts for the rear end.
Scooter
Active member
Finally, after clearing out the front half of my cave and finishing up the u-bolt, spring plates and leaf spring bushings for the front end, I was able to actually drive ole' yeller out and drive up & down the street. First time, since I have had this rig, that it's been able to have forward motion on its own power. The spare used transmission seems ok for the moment. The true test, for when I get it insured and registered off non-op, is to actually drive it around town.
Attachments
Scooter
Active member
Just got done replacing the rear spring bushings. And it looks like I May ultimately need to do some surgery and/or replacement of the rear axle housing. I was hoping that I had another pair of spring center pins, since one pin is whooped and barely holding the leafs together. Apparently there was some axle shifting on left side that caused the hole, that the leaf's centering pin sits in the spring perch to get wobbled out and oblong.  it will have to wait for another day. Going to baby it until another rainy day of maintenance.
kingkonger708
Member
Scooter this thing running yet buddy? I think I got you beat, the Scout 80 is finally running perfectly and was worth the wait.
Did all the upgrades we discussed (petronix, weber 32/36, new exhaust, new radiator with electric fan) and wait for it... 4 speed mated to a Dana 20 with terra low.
Goog for at least 51% of that v8 you said I should have gotten!
Hope you're well...
Did all the upgrades we discussed (petronix, weber 32/36, new exhaust, new radiator with electric fan) and wait for it... 4 speed mated to a Dana 20 with terra low.
Goog for at least 51% of that v8 you said I should have gotten!
Hope you're well...
Scooter
Active member
Yup, it's running and can be driven. But this rig will be more for mall cruising, with limited camping and light trails, and wont be much of a wheeler like my other beast.
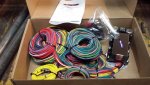
But, ever since I have had this rig, at least one of the problematic bulkhead connectors has been falling apart and refuses to stay connected. Along with some po virus hack work. Plus, I feel that replacing the 43 year old oem wiring is looking better all the time.
With a few recent parts order purchases for two of my own scouts, here's a preview of what's to come in the next few weeks for this ole girl.
22 circuit
Attachments
Last edited:
punjig
Member
I know the kwik wire kit doesn't really require it and you might already have a idea in the area of the bulk head connections, but just in case I thought would throw up these links.
These might help for the bulk head connections and end point connections. I have bought both in the past. They seem high quality to me.
amazon.com: delphi weatherpack bulkhead kit 22-pin 18-14 ga.: automotive
amazon.com: delphi weatherpack kit-1104 pcs with crimp tool: automotive
These might help for the bulk head connections and end point connections. I have bought both in the past. They seem high quality to me.
amazon.com: delphi weatherpack bulkhead kit 22-pin 18-14 ga.: automotive
amazon.com: delphi weatherpack kit-1104 pcs with crimp tool: automotive
Scooter
Active member
Thank you for the links and heads up. If my current oem wiring was in decent shape, and had atc blade style fuses, I would have considered just upgrading to the delphi style weatherpack bulkhead connector.
I have done a few complete re-wires over the years, including one with the kwik wire 14 circuit on a 69 Scout 800. And have incorporated some weatherpack connectors in several areas, depending on application.
I have done a few complete re-wires over the years, including one with the kwik wire 14 circuit on a 69 Scout 800. And have incorporated some weatherpack connectors in several areas, depending on application.
Scooter
Active member
After spending the last few months, or so, of working on other members rigs, I'm finally getting a chance to get back to working on my own Scout/s. Part of the trade off of working on another person's Scout is swapping for parts or supplies. Thanks to silverscout, 'ole yeller' is getting new shoes. When I first got this Scout, it had two pairs of un-matching donuts, along with one having a plug in the inner side, wall causing a slow leak. Yesterday, I spent a better part of the day doing some tire/rim swapping. The rims ole yeller is sporting now came off an old '90 Bronco that I had 10 years ago.


Now onto complete re-wire and other maintenance items
Now onto complete re-wire and other maintenance items
Scooter
Active member
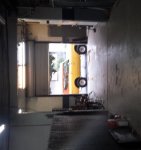
Finally spent most of this weekend gutting the old wiring and mounting new fuse box/wire harness. Also patched up the old holes left behind. Along with plugging up a few po hacked hole that wasn't needed.
Old holes:


Patched up:


Mounted fuse block onto the firewall under the dash. Just between the e-brake and other pedals. Saga continues next weekend when I have a 4 day weekend. Unless a side job gets in the way


Old holes:
Patched up:
Mounted fuse block onto the firewall under the dash. Just between the e-brake and other pedals. Saga continues next weekend when I have a 4 day weekend. Unless a side job gets in the way
Scooter
Active member
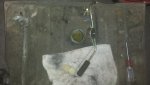
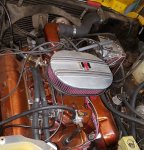
While doing the wiring, I realized that the one maintenance issue that I didn't do, was intake and valley pan gasket replacement. Well, once I tore into it, ran into a freken po bug. Some knuckle head used a bucket full of blue snot called sillycone on the valley pan gasket. Turns out, upon further inspection, that the valley pan itself was warped and bent out of shape. And that blue snot was a piss poor fix. Luckily, thanks much to fdchappie, I was able to acquire another one in decent usable shape. In the mean time I figured I do something similar to what I did with my 73 beast. And this is what I ended up with.
Powder coated chrome

Hot out of the oven


Btw it's transparent copper


And this is how it's done in my little cubby hole of a cave

Now I can tidy up and finish the wiring in the engine compartment. Also, one other issue that I need to address - is the little hole in the front of the block for a dip stick tube. Since this a Scout motor with the dip stick in side of oil pan, I don't need the one in the front. So the fun begins of plugging it while the motor is in place
Powder coated chrome
Hot out of the oven
Btw it's transparent copper
And this is how it's done in my little cubby hole of a cave
Now I can tidy up and finish the wiring in the engine compartment. Also, one other issue that I need to address - is the little hole in the front of the block for a dip stick tube. Since this a Scout motor with the dip stick in side of oil pan, I don't need the one in the front. So the fun begins of plugging it while the motor is in place
Last edited:
Tahoedonner
Member
Looks great. Coming along very nicely.

Scooter
Active member
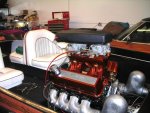
Thank you for the complements. Currently don't have much in the way of progress. I still need to finish up the complete re-wire and transmission rebuild. My full time job keeps getting in the way. I was actually skeptical at first about the color when my friend first told me about it. Then after some google searching and digging up an old photo of another friends boat motor, I started to like it more and more. The photo is a furd 460 in a boat
Attachments
Scooter
Active member
Well, this has been a long drawn out build. Was hoping to have this up and running by now. But, life and work gets in the way. Which translates to no wrench time this weekend. But, last weekend, I did manage to finish up the over sized fuel tank and install it. Even with a slight snag of 3 of the mounting tabs off the tank falling short a 1/2" to the frame cross member under the tailgate. So I had to cut the tabs off and fab up new ones.


I have also set this tank up for future plans of going efi at some point. And I routed the internal fuel pick up tubes to all four corners of the tank and hooked up to walboro fuel pick ups


Along with a baffle so to speak in center of tank

When I first picked up this tank about 10 yrs ago from the jy, it had a drain plug in the bottom right corner. Nice idea but slightly a pita with a plug and being so low on the tank. I wanted an easier way to drain the tank if needed for servicing. So, a drain peacock was installed. Along with some added protection.


One more added feature. In order to be able to service the inside of the tank. I fabed up the top and some angle steel. After lots of measuring, welding, and lots of drilling and tapping, I came up with this.


During this fuel tank swap, I realized that the filler tube was made out plastic pos. Fortunately, I have had several metal versions sitting here on the shelf. So I swapped that out.
Also, never mind the yellow wire dangling from the right rear shackle. That will be tucked away neatly till needed. That's for an electric fuel pump that hasn't been installed yet. That will be done when I get to the point of actually going efi. Now I need to hook up all the vent and filler tube hoses.
**edit**
fixed the phot links
I have also set this tank up for future plans of going efi at some point. And I routed the internal fuel pick up tubes to all four corners of the tank and hooked up to walboro fuel pick ups
Along with a baffle so to speak in center of tank
When I first picked up this tank about 10 yrs ago from the jy, it had a drain plug in the bottom right corner. Nice idea but slightly a pita with a plug and being so low on the tank. I wanted an easier way to drain the tank if needed for servicing. So, a drain peacock was installed. Along with some added protection.
One more added feature. In order to be able to service the inside of the tank. I fabed up the top and some angle steel. After lots of measuring, welding, and lots of drilling and tapping, I came up with this.
During this fuel tank swap, I realized that the filler tube was made out plastic pos. Fortunately, I have had several metal versions sitting here on the shelf. So I swapped that out.
Also, never mind the yellow wire dangling from the right rear shackle. That will be tucked away neatly till needed. That's for an electric fuel pump that hasn't been installed yet. That will be done when I get to the point of actually going efi. Now I need to hook up all the vent and filler tube hoses.
**edit**
fixed the phot links
Last edited:
Scooter
Active member
Finally getting something accomplished. Trans rebuild is complete. Now I need to pull out the pos used tranny that I made the mistake of purchasing. Might just get busy doing the trans swap next weekend. Unless I get sidetracked with playing with my new plasma cutter, when it comes in next Thursday. I had already rebuilt the d-20 transfer case awhile ago, that's sitting on the shelf waiting patiently. Just several things being checked off my laundry list of things to do to make this Scout road worthy.
As some May recall in another thread elsewhere, I have a defunct wiper motor. The plastic gear is buggered up and apparently made of unobtainium. Plus, the motor is in need of a rebuild. Through another local IH member, who turned me onto a possible source, I ordered a 2 speed wiper motor that has the potential of a being a good Scout II replacement. I will post up more about it next week when it comes in. Unless I'm doing the tranny swap, then it will be a week or two for me to know for sure if this new wiper motor will work or not.
that I made the mistake of purchasing. Might just get busy doing the trans swap next weekend. Unless I get sidetracked with playing with my new plasma cutter, when it comes in next Thursday. I had already rebuilt the d-20 transfer case awhile ago, that's sitting on the shelf waiting patiently. Just several things being checked off my laundry list of things to do to make this Scout road worthy. As some May recall in another thread elsewhere, I have a defunct wiper motor. The plastic gear is buggered up and apparently made of unobtainium. Plus, the motor is in need of a rebuild. Through another local IH member, who turned me onto a possible source, I ordered a 2 speed wiper motor that has the potential of a being a good Scout II replacement. I will post up more about it next week when it comes in. Unless I'm doing the tranny swap, then it will be a week or two for me to know for sure if this new wiper motor will work or not.
Attachments
Scooter
Active member
Been a few months since I posted my last update. Rebuilt trans is installed and half filled with fluid. I still have another gallon of red juice to add. Within the last few weeks, I changed the pan gasket on the motor. New oil awaitng to be poured in. Also replaced the heater hoses along with a new plastic heater control valve. Spent half the day today completely piecing my drivers door back together with power windows. Passenger side is having issues with power up. Currently struggles and stops half way up. The chrome frame in the wind wing is cracked. And the roll up/down window is starting to do the same. So, I plan on swapping the glass out with some spares that I have laying around. Recently, since my manual choke cable was so long, I ended up cutting roughly two feet off the end just to be able to have a decent routing to the carb with out kinking it. Also, since most the work on motor is mostly done, I mounted the air cleaner. And awhile ago, I took the time to install the fan shroud.
Attachments
Scooter
Active member
Finally been able to get a little wrench time in the last couple weeks. Found out last week that my alternator was bad. So I ended up getting a rebuilt one from a local repair shop a couple days ago and installed today. Roughly 14.8 volts at idle. I would take it out for a test drive, but I don't exactly trust the battery enough to start back up if stalled out. Plus, I need to reinstall the gauges.
Scoutboy74
Moderator
That seems a fuzz high at idle, Kimball. 13.8 to 14.4 is more typical depending on battery status and current loads. Might wanna keep a close watch on that.
Scooter
Active member
Indeed. Might be due to an extremely low battery. Started off with just over 10v on battery when I had to jump off my 2002 yoda. After idling for about half an hour, several times, battery was holding just over 12v.
Just one more thing that I plan on replacing soon, is the battery. My current one doesn't have enough gogo cranken juice.
Just one more thing that I plan on replacing soon, is the battery. My current one doesn't have enough gogo cranken juice.