

You are using an out of date browser. It may not display this or other websites correctly.
You should upgrade or use an alternative browser.
You should upgrade or use an alternative browser.
34 Hot Rod Pickup
- Thread starter jetfxr
- Start date
Dealbreaker74
Member
Man this is an awesome build. I can't say all the chrome is my cup of tea, but the whole concept of the truck is sweet. Should look great. I look forward to pics of it every time I check in!
Robert Kenney
Super Moderator
Robert,
I like it even has a v spreader bar but in binder you could call it a cattle bar.
Just one pointer on the buggy springs. They like to move around and work well being trapped in the upper mount. An inverted "u" that captures the leaf sides. If you don't trap then they will shift and bind the shackles. On your setup shoot for a 45 degree shackle angle after being fully loaded with the tin work and engine. That makes them the most stable. Are you going to run a front or rear panhard bar? I see coil overs on the rear and think a panhard bar mount on the pass side rear.
jetfxr
Member
man this is an awesome build. I can't say all the chrome is my cup of tea, but the whole concept of the truck is sweet. Should look great. I look forward to pics of it every time I check in!
The chrome is a big expense but that is what a hotrod is all about, this is not a ratrod. If it were a rat there would be no place for the chrome. I am not a fan of the ratrods to me they look like cobbled together junk, but to each there own. I am really trying to make a statement that harvesters can be just as cool as a sbc and with all the machine work done on this one should be just as fast

jetfxr
Member
Robert,
I like it even has a v spreader bar but in binder you could call it a cattle bar.
Just one pointer on the buggy springs. They like to move around and work well being trapped in the upper mount. An inverted "u" that captures the leaf sides. If you don't trap then they will shift and bind the shackles. On your setup shoot for a 45 degree shackle angle after being fully loaded with the tin work and engine. That makes them the most stable. Are you going to run a front or rear panhard bar? I see coil overs on the rear and think a panhard bar mount on the pass side rear.
On the mock up the front axle looked good, the spring is captured by a plate and four grade 8 bolts, but I will be looking closely at it when I do the build up. The rear does have a pan hard bar along with the hair pins and coil overs.
The rear is a Ford 8.8, I really wanted to use a 60 from a Travelall but the 8.8 already had a set of 3:73 and disc brakes, and I only paid 150 bones for it.
And being here in montana the spreader bar would defiantly not work as a cattle bar, it would contact a cow at the ankles


Dealbreaker74
Member
Can't wait until this thing runs. I've been squirreling parts away to someday do the 304 crank in a 392 thing kind of like you. With good knowledge of how a normal sv behaves, I'm anxious to hear your report of how this one runs. Keep up the posts!
can't wait until this thing runs. I've been squirreling parts away to someday do the 304 crank in a 392 thing kind of like you. With good knowledge of how a normal sv behaves, I'm anxious to hear your report of how this one runs. Keep up the posts!
It'll run darn good.
hear it run on youtube
It had less blingy chrome then, just a 500cfm 2bbl, and no roller-tip-rockers, but you can hear it at 6300rpm (where the valves floated) in that video, both from outside and from inside the cab. Same engine, about two overhauls ago.
Pulling duty in Robert's hot-rod is like putting a thoroughbred out to pasture, with the occasional duty of taking the grandkids for pony rides.
..unless Robert and inbred decide they're both taking their toys to the bar..
jetfxr
Member
Ok here's the disclaimer, I already posted on the bp. This is the motor Tom companioned in "little devil" it is a proven power plant. Tom had rebuilt it and I bought it from to get my 34 on the road sooner. Tom is building a fire breathing 392 for his new chassis. I have a bad ass 304/392 that I have a blower for but the coin and r&d have keep it slow going.
And now Tom what a great retirement, I'm sure I will let it eat on occasion. But in the mean time it will be Sunday dressed and always the bell of the ball.
And now Tom what a great retirement, I'm sure I will let it eat on occasion. But in the mean time it will be Sunday dressed and always the bell of the ball.
Dealbreaker74
Member
Oh jeez. I didn't know this was a Tom madera project. Well, its impressive for sure. And it'll be a lot of fun on unsuspecting victims at at stop lights! Can't wait for that video!
jetfxr
Member
Robert Kenney
Super Moderator
Robert, that white and chrome/stainless looks great!!
jetfxr
Member
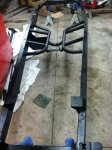
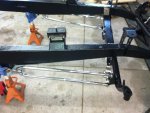
Thanks there was a lot of soul searching for a color and I thought the old school demanded black but I also knew the 1934 cab was rough so white should be classic. Here is the frame it is back from powder coat, we used a hammered finish to hide so of the finish I was to lazy/hurried to do.
Attachments
jetfxr
Member
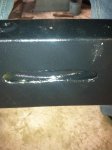
Here is a detail shot of one of the conduits that are installed inside the boxing of the frame, this will make the plumbing and wiring very clean. You can also see one of the cab mounts that is threaded in the frame. I will have to run a tap through all the threads and inserts, the powder guys didn't mask them
Attachments
jetfxr
Member
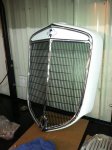
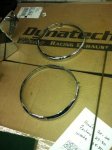
Here the windshield frame it has two inches chopped out and I had it powder coated also, sense it will open and close I was concerned that paint would be easily damaged. I already sent the support brackets out for chrome. I still need to come up with a seal and have the windshield cut and installed. I had a chat with the guy I have do all the tint work for me and I am thinking about doing a tint on the windshield. I am not real sure, I don't see driving a lot at night but it would be a little dicey with a dark tint.
Attachments
jetfxr
Member
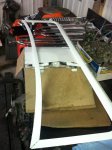
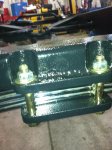
Here is a detail of the spring hanger on the front axle. The mount is on the cross member, and has a center mount hole like the mount plates on a parallel leaf set up. You can also see the detail on the mount, very nice metal work, if I do say so myself.
Attachments
jetfxr
Member
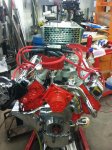
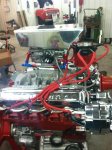
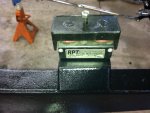
Here is a shot of the motor mounts, these are over the top. Jeff can hook you up with a set, I'm sure if they will stand up to what I put them through rock crawlin then the hotrod will be a walk in the park. You can also see the detail on the powder coat, the hammered finish really hides the age of the frame.
Attachments
Tahoedonner
Member
Sick!!
Tiny Yokum
Member
Where do you put the oil in?
jetfxr
Member
where do you put the oil in?
Wow someone is really looking at the build.
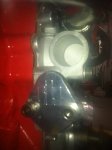
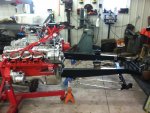
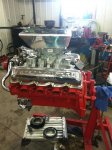
 I wanted to use the older valve covers because (a) there are no baffles (b) they have no stamping other than the ~International~ (c) they also have the four in a row plug wire holder. Bad thing is there are no provision for the oil filler. My plan was to use a push in type breather, however the roller rockers leave no clearance for them. So I opened a hole up in the valley cover where the pcv valve would have been and have a breather installed there, if you look you can see it in this picture just past the rear of the intake manifold. This is where the oil will be serviced. My biggest concern is if there will be enough ventilation, I will be watching this and May have to add some kind of breathers on the valve covers. I really want keep the motor as clean as possible for the hotrod. I really want nonih folks to see the really neat possibilities of using something besides a sbc to power a true hotrod.
Attachments
Tiny Yokum
Member
Cool.