1965 D1100 4x4 driver/project

Oops big thumbs tiny buttons..... The other pic
 

Attachments

  • 20170812_114600.jpg
    20170812_114600.jpg
    39.6 KB · Views: 420
That's too bad it was cobbled in and in bad shape. A fan shroud is well worth having. You might be able have your parts truck radiator rodded out. It would at least be worth having a rad shop take a look at it, unless you know of or can see an obvious structural issue with it. I don't think there is a drop in/bolt in option for the C series trucks. I've heard of some folks experimenting with some Ford truck offerings. With enough futzing, they were able to make them work. Hose fittings tend not to be precisely where they're needed, etc. Its another rabbit hole to plunge down.
 
If I went with an aluminum core it would have to be via a"xb" measurement, and weld on some anchors. I have the ability to tig weld so welding aluminum isn't a big deal. I would like to optemize the cooling system if I could, I know these things run cool anyways but why not be an ice cube? Might be able to have this one rebuilt/patched properly? No idea what that would entail other than a rad shop, or how much money. That may be an option if I determine I can weld on some mounts. As far as the parts truck goes, just assume EVERYTHING is unknown. Im not even sure if this truck was EVER in running condition. It looks like something the interns may have built on a weekend, half the parts dont belong together, like a 4 on the floor and a column shifter.
 
That rad and shroud look like a matched set. An intact shroud like that one is probably as rare as hens teeth and worth twice its weight in gold boolyawn. Not unheard of for folks to convert their three on the tree to a floor shift and then leave the column shift in place. Kind of a pain to remove if its not bothering anything.
 
Good to know on that weird combo. So I guess that means I shouldnt hack up the nice shroud I picked at the salvage yard? No rad with it, but its in nice shape, paid maybe $20 for it. I gueeeees I could try and make one? And use another radiator? The deeper in I go the more lost I become it seems.
 
An optimized cooling system is one that first allows the engine to reach normal operating temperature fairly quickly and then allow regular up/down fluctuation throughout a safe range during all driving conditions. The safe operating range for these engines is roughly between 170 and 205. Anywhere between 180 and 195 is ideal. Coolant temp must rise above 160 to begin cooking off the condensation that accumulates in the crankcase. Running too cool really isn't advantageous and can actually be harmful in the long run. The radiator, shroud, fan blade, water pump, and thermostat are all vital pieces of a cooling system capable of maintaining a "goldilocks" temperature scenario.
 
Quick update, I retrieved my truck from the barn this morning, a bit slugish to start without daytime heat(took a bit for the fuel to re pump) but turned over great as always. The ammeter did something odd. When turning over it read half way from neutral toward charge, this made me think that perhaps I mistakenly hooked up the gauge backwards, since the needle idles dead center. The minute the engine roared to life(more so yawned rolled over and tried to ignore me, but eventually back to life(normal for this thing)) the needle bottomed out draw, and after a moment slowly came back up to about half way between neutral and draw. When I shut down in my driveway there was an oddd buildup on the back of the lense of the gauge on one side(charge side). It looked like condensation, a bit odd though since it literally built up on half the lense. It disapeared mostly before I could get a picture of it unfortunately(attached pic you can barely see a cloudy whiteish spot under the hash mark for charge). No idea about that bit but does the rest of this make sence in that I conected the poles inverted? Let me know your thoughts, I finally have the fuses I need so today begins trouble shooting.
 

Attachments

  • 20180723_093528.jpg
    20180723_093528.jpg
    54.9 KB · Views: 388
That does seem abnormal. No doubt some electrically generated heat was present. The appearance of condensation indicates a sudden temperature differential. Localized heat is never a good thing where that ammeter gauge is concerned, as it doesn't take much to let the smoke escape. It looks to me like you had all your circuits labeled under the dash. The diagram specifies which circuits go to which gauge terminals, so...what about that detail?
What wires do you have connected to the #1 and #2 Alternator terminals?
How long would you say you were starter cranking before the engine finally lit off? Is the choke functional on this carb?
 
So (I think) the wiring diagram basically veiws instruments from the top down, vehicle pointed to the left, and each pole left and right (steering wheel perspective) points toward the front of the vehicle. I hooked up the circuit labels acordingly. It sat for about a month, and it wasnt hot outside when I cranked it, so maybe 30-45 seconds? Turned real strong as always, didn't get slugish. It will start first turn now that the fuel is there and its hot out. Choke works ish. Helps in the morning when its cool but not if it hasnt run in a week. Ive had the batt disconected finishing up a couple things, got the tail/stop lights done, was going to see if the signal magically works before I mess with pig tails like I was going to, also wired my marker lights over to the slot on the fuse box where they belong. I'm not sure if I can be sued for copyright if I post a pic of the diagram? Otherwise I would.
 
EDIT disregard what I said about the orientation of the gauges........ Its reeealy hot out here ok?
In efect that would be a fool proof way of doing it and I thought thats how it was but no. It veiws gauges from the back with no indication of left or right. (Kinda hard to explain without a pic so heres a partial....) Front of vehicle is left side(relative to readable text). As a side note, where da' heck is my cig lighter supposed to plug in? And in side note to the side note, I don't smoke, so should I try a cell phone charger in it? If not then I dont care lol.
 

Attachments

  • 20180723_124903.jpg
    20180723_124903.jpg
    50.6 KB · Views: 371
If you can make out the pole markings on the back of the gauge...yes, you should be able to...and if you can make out the pole markings on the diagram...legibility depending, then left Vs. right gauge orientation matters not a tinker's damn. Plus goes to plus and minus goes to minus. That's the foolproof way. And in this case, there is no ground. Plus is positive and minus is also positive.
Power for the cig lighter can be sourced from any convenient constant hot source, including the proper ammeter gauge post, or any circuit breaker location that is constant hot and not already overloaded. That's if you want the lighter always powered, which is generally how that has been handled since the dawn of time. Or, if you preferred it to be a switched feed, then you would just tap to a convenient IGN - ACC feed, preferably fused. The choice is yours. In either case, it would work fine for charging your hi-tek tawky tweeter.
What about those alternator wires I asked about? Don't be dodgin' me now!
 
Ok, I think (even in my noobieness) I may be on to something. First in regards to the alt, its externally indistinguishable from the 90amp unit it replaced, accept the hole for the plug is coverd over on the 90. I conected the heavy positive wire to the same post as it was on the 90 amp unit, see pic. The 2 wire plug only goes in one way. The gauge isn't marked and the diagram is questionably legible. I did find a couple pics I grabed for reference of a gauge on ebay that was simply cut out of the wire. The pole with 3 leads is on the left(steering wheel perspective) in its case. (See pics) I would think even with both poles being positive power will still have to flow properly? I hooked it up 3 wires on the right so perhaps I did it backwards.
 

Attachments

  • 15323781625794516285818164755316.jpg
    15323781625794516285818164755316.jpg
    69.9 KB · Views: 416
  • 20180723_130743_HDR.jpg
    20180723_130743_HDR.jpg
    64.9 KB · Views: 390
  • 20160404_173702.jpg
    20160404_173702.jpg
    28.9 KB · Views: 382
  • 20160404_173711_HDR.jpg
    20160404_173711_HDR.jpg
    25.5 KB · Views: 375
Also on the splash guard specific diagram, they edited it for the 10si, and I did confirm, circuit 4(Plug pole 2) goes to starter. Acording to the rest of the diagram and edits, circuit 1 goes to firewall plug in circuit 129(normally circuit 1 goes into voltage regulator, then into circuit 129) 129 goes to the key switch.


*EDIT* I think I found my issue. IF and again IF the diagram showes pole conections from the BACK of the gauge, then I did them ALL quasi backwards because I incedentily did this upside down, with the gauge cluster leaned out if that makes sence.(it doesn't to me, but I've run out of words/hydration)
 
Last edited:
Ok, todays result, unplug everything and VERY CARFULLY do it over. Using my diagram as I probably would have, look at the back of the gauge and reference terminals that way. Most of the conections were reversed when I went over this the first time. Likely the cause is that I cant really look at the back of the gauge right side up accept through the windshield. So basically I did them backwards because Im looking at them upside down.... Maybe I was dyslexic before but I'm ko now :crazy:
I'm blaming the sun btw
 
Slow down a little and help me get on the same page with you on a couple things:
#1 "Splash guard specific diagram"... WTF is this in reference to?
#2 What other 90 amp alternator with a covered up plug hole are you talking about?
 
The 90 amp unit I referenced is the one I replaced with the new 10si. The right splash guard diagram is just that. The diagram for the right splash guard wire bundle(ie alt/horn/lights for right side front)

*EDIT I've been inside where it's cool for a bit and now I'm realizing that when boiled my brain speaks gibberish lol
 
Last edited:
Ok. I've just never ever in 20 years of playing with these rigs heard it referred to that way. Seems very obscure to the point of a misnomer, but whatever.

The original alternator that required an external voltage regulator was not capable of 90 amp output. Maybe 50 amps max...maybe. Probably less. The 10si is available in a host of max amp output ratings from 37 to 63, but never 90 amps...at least not in unmodified form. Now, there are some vendors out there offering increased output/Hi-Po alternators in a 10si configuration. I've not had any personal experience with any of these offerings myself, but I have heard about them. What I've heard has been mostly negative. So if you popped for one of those "Hopped Up" 10si, you might want to rethink that choice.

Brings me to the next point. Your stock ammeter gauge was not designed to have high amperage loads across it. 60 amps is probably the maximum it was designed to handle. Now that 90 amp alternator, if that's indeed what it is rated to deliver, is a maximum number. It won't put out that much most of the time. Only when a heavy electrical demand has occurred, such as starter cranking for 30 seconds at a time. That's a practice you should modify going forward, but I digress. You should ask yourself if you really need an alternator with that high of max output. Are you going to install electric engine cooling fans? Are you going to have a big ass electric winch that you'll be doing some hard pulls with on a regular basis? Are you going to have a mega sound system with a wall of amplifiers that all go up to ellevendybillion?
 
Ok..... Let me start over... Sorry, brain no workey good when hot. I know it had an externally regulated generator. The guy who had it before me hacked it for a GM one wire 90 amp, and the ammeter was disconected. I replaced that for an off-the-shelf-orielieys 10si, and since I'm rewiring, I want everything to work. I'm begining to think I may be asking too much though lol. Its so dad-gum hot, its 101 in the shade here... :cryin:
 
I hear that. It is ball-sweatin' hot.:yikes: 
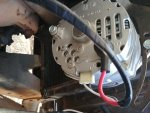
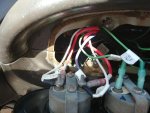
That makes guder sense. PO was at least wise enough to realize that his hi-po alternator might could start him a nice mallow-roasting fire up under the dash sometime, hence the ammeter bypass. You should be okay with hooking your gauge to an off the shelf O'wrongleez 10si. Probably 61 amp max output. Ammeters were a great match for old school generators...I'm talking pre-1965 charging systems. As generators became obsolete and got replaced by alternators, which are wound much differently BTW, ammeters were a hold over form of measurement that still worked fairly well for low amp output alternators. As time went on, cars got more sophisticated, electrical demands increased and alternator outputs had to increase in kind. That's when ammeters began to show their dark side. As you are now aware, the entire electrical load must pass across both ammeter terminals, inside the cabin, via a very long and relatively small gauge wire, before getting back to the battery. All domestic automakers did it this way for a time. GM and FoMoCo realized the downside of this combo early on and switched to voltmeter gauges for charging system measurement. Mopar and IHC instead chose to maintain the status quo. IH stuck with it through end of production in late 1980 and Mopar stuck with it well into the 80's, which is crazy to think about. Lot's of stranded motorists in 80's era Mopar products were left shaking their heads and reaching for fire extinguishers.
Voltmeter gauges are much more simpatico with alternators, especially when you start talking about max outputs approaching 100 amps and beyond. A voltmeter is essentially just an accessory that is connected to switched voltage. It does not have the entire electrical system load passing across it. With your truck having the individual round gauges, it would be easy for you to ditch your ammeter in favor of an aftermarket voltmeter. True, the gauge face would not match your other gauges, but...cue the vibrating, spittle-laced tongue/raspberry sound effect. Obviously I'm unapologetically biased against ammeters in favor of voltmeters. I recently went through a charging system failure in my '74 Scout in which the perfectly functional ammeter gauge gave me exactly zero, zip, zilch, nada, nunca indication that I had a problem. The warning I got was from the lights getting progressively more dim, the radio wigging out and the engine stumble-bumbling along because I was running off a battery that wasn't being replenished by the alternator. A voltmeter gauge would have indicated this issue well before any of those devices began shutting down. Don't take my word for it though. Check out websites like Madelectrical and others that do a far better job of explaining the situation than I ever could.
Now, to your starter cranking process when the truck has sat for awhile...You should try to limit your cranking intervals to no more than 15 second bursts at a time, with plenty of pedal pumping in between as you pause the starter. Less is more. A little trick you can do when the situation allows, is to prime the carb from above with a small amount of clean gas poured in. That should light the engine off right away. Now, it may not stay running that first time. You might have to lather, rinse, repeat, but that will get the engine running much faster with a minimum of starter cranking, which is the goal. Why is this happening? Your fuel pump isn't holding pressure, so the fuel drains back to the tank. Its a common issue with mechanical fuel pumps, unfortunately. How have people dealt with it? Several ways. One is to rig an auxiliary electric fuel pump back near the tank on a momentary switch just to prime the fuel line in advance of starter cranking. Another method involves installing a check or one-way valve in the fuel line between the mech pump and the carb. That prevents the carb fuel bowl contents from draining back into the tank. I like this option. Lots for you to digest here. Hopefully you can do it in climatized comfort.
 
Last edited:
Yyyeeea. So, Im gona try it tomorow with the gauge wiring reworked. And double check while its cool. Anyways I know the ammeter could be replaced, you have to keep my CDO in mind though. Honestly with the 63 amp 10si I'll trust it untill I have more severe issues directly related to it..... More popcorn..... Potato chips.... Fire extinguisher..... I don't mind the quirks so much like the fuel draining back into the tank, I like it as a reminder of times past... Even if all my friends in their ricers laugh at me, it blows a cloud of blue smoke in their face as it lights off one random cylinder at a time, makes it worth it lol. Also at the end of the day this thing is what will be pulling their suicidal rear ends out of ditches. :dita: 
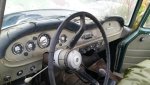
Duely noted on the 10-15 second bursts, it was one of those mental, "this is probs not good but screw it" things. Maybe a fuel pump rebuild would help? Kinda one of those things I would do anyways eventually. My carburator is encased in jb weld also so I assume maybe I'll upgrade or rob the one off my parts truck(v266? Compatable?) Also considering now the posibilities regarding a hydraulic motor on my ramsey 8k. Has anyone done that before? Or more trouble than its worth? I'm going for a sort of resto mod ish thing. Its never gona be like it was originally, but improving it while keeping it looking original and not cut up/hacked is my goal. I don't drink, but rewiring this truck might start the list of things I drink to forget. I'm thinking about cheap(ish) summer things I can do without temporarily killing it. I'd love a bed rack that was modular, maybe a way to carry a canoe then change it to have a half round canvas cargo cover if I wanted. (Would be awesome since I hunt and rain is a thing) anyways, geting better bit by bit. I may add some auxiliary guages(voltage may be among them) also I have a couple old aircraft gauges(altimeter and manifold pressure) I thought would be cool to add on the bottom of the dash. I'm just dreaming at this point- I'm also really tired and I ramble when I'm tired hopefully this is one of the times its semi entertaining, more madness to come, stay tunned.
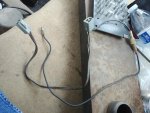
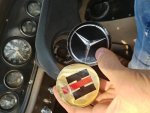
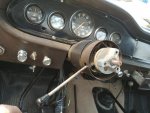
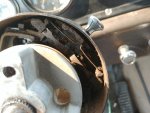
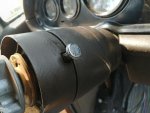
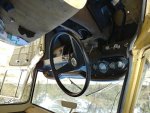
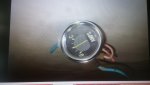
 :icon_rolleyes:
 
Back
Top