

You are using an out of date browser. It may not display this or other websites correctly.
You should upgrade or use an alternative browser.
You should upgrade or use an alternative browser.
152 rebuild
- Thread starter Mastiff
- Start date
kyleandhisIH
Member
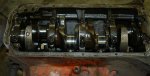
I think I found my first serious casualty. Check out the crank where the #3 rod was removed. It's seriously scored. The rod was attached with different bolts than the others, though it seemed tight. Someone was messing with it. Can I recover from this, or do I need a new crank?
Again up to the machine shop, I suppose, and what they can do for you concerning your level of damage. Due to the construction of these cranks, you should be able to have them ground down to a pretty deep undersized bearing - that would be your limit as far as repair can go. Not to mention that would likely promote healthy cost.
Depending on the depth of the gouging and the condition of the other journals, though, you might have what is considered "reman"-able material.
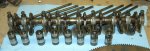
a few more pictures. One of the whole crank as it stands, another of the removed rockers.
Looks like you have the preferred rocker setup. Depending on the condition of your pushrod and valve contact points, as well as the shaft's exterior, this might be doing okay. Pretty sure I read that a "verified good" setup is available from ihon if necessary.
Also - I think you can buy replacement plugs for the rocker shaft, so it might be a good time to find a shotgun cleaning brush to sterilize the inside of that shaft. Something I should have done to my 304 ages ago, just as a preventative maintenance sorta thing.
Robert Kenney
Super Moderator
Don't worry about what you are finding. While not desired the cylinder wear and rod journal damage is an easy detail to fix. The old bearing shells hav a number stamped into them telling the under size if not then it is still standard and bearings are availible in -.010 -.020 etc to -.040. No issue with streagnth at all. Iirc 100 bucks to gring a 4 banger .010 under rods and mains. First go guy a 2-3" micrometer so you can measure the crank to determine if you need to go under size.
You will probably need to wack the rod with a soft face mallet to get them past the ridge and accumulation of carbon. Just rotate the crankout of the way. Some times a wood block helps to persuade
You will probably need to wack the rod with a soft face mallet to get them past the ridge and accumulation of carbon. Just rotate the crankout of the way. Some times a wood block helps to persuade
Mastiff
Member
A few more questions: the manual talked a bunch about the special bolts that hold down the rocker arms... Something about a nylon bead or something like that. They looked like normal bolts to me, though the manual said that in no circumstances should regular bolts be used. Anyone know about this?
The other thought I had was whether one of you ihon affiliated guys would be interested in doing the head rebuild? I was thinking of taking it someplace local, but shipping it really isn't a big deal, and you guys (michael, Robert) really understand the IH stuff.
Should a competent local shop be able to check out the crank for me?
Last question is how I should proceed with the cylinders. I'll have the block checked out, but if it needs to be bored out a little, what's the best approach, bore it over a little and get oversized rings for the same piston, or bore enough over to get bigger pistons? Are bigger pistons attainable?
Thanks.
Michael Mayben
IHPA Tech Moderator - Retired & No Longer Online
a few more questions: the manual talked a bunch about the special bolts that hold down the rocker arms... Something about a nylon bead or something like that. They looked like normal bolts to me, though the manual said that in no circumstances should regular bolts be used. Anyone know about this?
The other thought I had was whether one of you ihon affiliated guys would be interested in doing the head rebuild? I was thinking of taking it someplace local, but shipping it really isn't a big deal, and you guys (michael, Robert) really understand the IH stuff.
Should a competent local shop be able to check out the crank for me?
Last question is how I should proceed with the cylinders. I'll have the block checked out, but if it needs to be bored out a little, what's the best approach, bore it over a little and get oversized rings for the same piston, or bore enough over to get bigger pistons? Are bigger pistons attainable?
Thanks.
The IH admonition regarding the "special bolts " for the rocker shaft is fine. But certainly not needed! I use replacement bolts in either grade 5 or grade 8 weekly...we also have several "sets" of used bolt...those bolts are not a "high stress area since they are clamping aluminum towers. The threads of the bolts get treated with a sealant when ready to re-install as some of them thread directly into the intake ports. The bolts do need hardened washers under they heads though, re-use the oem if they are present.
My advice would be to have one machine shop do all your work as a package, that makes them responsible for the work. Just the cost of shopping a head is unbearable in my world! Doing a valve/head build is not something any different than doing any other head as long as the machinist pays attention to detail, most especially setting up the installed valve height on the IH heads due to the non-adjustability of the hydraulic valve actuation system.
That shop will measure the bores and determine if a bore job is needed. If so...all cylinders are then bored to the oversize tolerance based on the actual size of each of the matching replacement pistons, then the appropriate oversize rings are fitted after verifying the end gap of each ring set in it's dedicated bore and "adjusting" the gap if needed by hand filing. That is called attention to detail and separates an "ok" engine build form the "outstanding" engine build!
The same machine shop will determine the condition of the crank and then either polish it if doable, or regrind it and supply the correct size rod and main bearings or tell you which size bearings to order for making the final assembly.
The same shop will "clean" the parts, and install the soft plugs if desired. Same for installing the cam bearings, that operation is beyond the doability of most diy'rs and requires special tooling setup and much attention to detail.
Once the engine has gone through the machine shop cleaning phase, then the hand work really begins regarding cleaning all passages and threads to remove any possible microsopic contamination. Any yahoo can assemble (or attempt to do so) an engine short block...it's attention to cleanliness and detail that makes the work successful.
Mastiff
Member
I called a local machine shop that I bought a 350 Chevy from once a while back. When I told him what I had he seemed totally familiar with it (IH 152). My plan is to strip the block the rest of the way and bring him that plus the head and the crank next week. I'll probably go ahead and bring him the cam and rod/pistons too so he can see the whole situation and help me figure out what to do.
The pistons came out easily with just a little persuasion from a rubber mallet and piece of wood. I pulled the cam and to the eye it looks to be in fine shape. I used some sort of gear puller to get the harmonic balancer off, borrowed from the parts store.
At this point all I have left is the crank. I'm stuck at the main bearing since I don't have the right puller. I'll go looking for that tomorrow.
I decided to start tearing into the front of the trans. I pulled the bellhousing first, even though I'm not sure it's necessary. I wanted to get a look behind it, plus it'll be fun to clean it up and put on a coat of paint.
If this spot is leaking, where would it be coming out, at the case or up the shaft and out the end? I'm not sure what to expect when I pull the little cover off.
Attachments
Mastiff
Member
Mastiff
Member
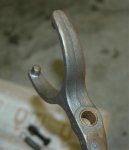
I bought this fork off e-bay a while back, figuring I'd need one some day. It's got a little bit of a flat spot on the prongs, but not much. Does it look decent as far as you can tell from a picture? There's a small amount of play on the bolt, but not much.
Attachments
Michael Mayben
IHPA Tech Moderator - Retired & No Longer Online
I called a local machine shop that I bought a 350 Chevy from once a while back. When I told him what I had he seemed totally familiar with it (IH 152). My plan is to strip the block the rest of the way and bring him that plus the head and the crank next week. I'll probably go ahead and bring him the cam and rod/pistons too so he can see the whole situation and help me figure out what to do.
The pistons came out easily with just a little persuasion from a rubber mallet and piece of wood. I pulled the cam and to the eye it looks to be in fine shape. I used some sort of gear puller to get the harmonic balancer off, borrowed from the parts store.
At this point all I have left is the crank. I'm stuck at the main bearing since I don't have the right puller. I'll go looking for that tomorrow.
I decided to start tearing into the front of the trans. I pulled the bellhousing first, even though I'm not sure it's necessary. I wanted to get a look behind it, plus it'll be fun to clean it up and put on a coat of paint.
If this spot is leaking, where would it be coming out, at the case or up the shaft and out the end? I'm not sure what to expect when I pull the little cover off.
Take every part that has a "spec" to the machinist so he can measure everything and determine what needs to be done. That way the machine shop is responsible for everything!
Your 152 does not use a "harmonic balancer...it uses a crankshaft "hub" that was individually matched to your engine at the time of manufacture, same as the flywheel. That hub has been drilled for balance factor for the engine rotating assembly as it currently is. Your machinist will advise at what point the rotating assembly needs to be "re-balanced" if a bore job is needed. But in my world, even if you just end up ringing the motor, a full balance job is well worth the money and will greatly improve upon the "factory" balance work.
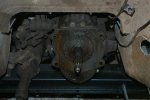
In your picture, we're looking at the input shaft and input shaft bearing retainer. There is a gasket behind the retainer along with a seal. All soft goods needed for "sealing" the transmission are contained in a gasket set for that trans...some parts in the kit are not used in your version of a t-90.
The transfer case is addressed as a separate item...it also has a dedicated gasket/seal kit for it that contains many parts that are not used on the s80 version of the d18 case but that is the way the kit is sold...it also fits a d20.
Michael Mayben
IHPA Tech Moderator - Retired & No Longer Online
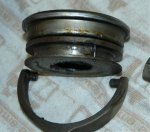
here's a pic of my throwout bearing assembly. It's go a decent divot out of it where the fork contacts it. The bearing part itself is really sloppy, it must be shot. Does ihon sell these as an assembly, or bearing and collar apart?
The throwout bearing is a separate item from the collar and those parts are new. The collar as well as the fork are parts that are reconditioned by me on an exchange basis. We will have additional reconditioned parts available this week...the fork is complete with a replacement pivot bolt set. The collar will be modified. Those parts are not available new unless some fortunate individual in the world has some that are nos...and we're always looking for that kind of treasure!
Michael Mayben
IHPA Tech Moderator - Retired & No Longer Online
I bought this fork off e-bay a while back, figuring I'd need one some day. It's got a little bit of a flat spot on the prongs, but not much. Does it look decent as far as you can tell from a picture? There's a small amount of play on the bolt, but not much.
That fork needs serious attention, the engaging tips must be round and full width in order to remove all slop from the throwout system.
I have a bucket full of forks just like that one that I use for reconditioned items...unfortunately some of those have been heated and "bent" by po virus when some dipshit tried to re-establish proper clutch release/travel. Those are wasted as they will break unless reinforced, I use those only on my personal rigs and we won't sell crap like that to any customer.
Michael Mayben
IHPA Tech Moderator - Retired & No Longer Online
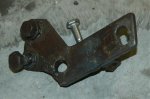
check out this slave cylinder mounting bracket. Is this even close to how it's supposed to be? It has been working for me, but it looks like a mess, and I'm not sure my geometry is as it should be.
It's hard to tell from your pic if that one is suitable. But the bottom line is...the slave mount must be aligned so that the pushrod travels in a straight, linear path. The oem design prevents that and is what makes the pushrod bend or break repeatedly since it aligns at an oblique angle. Works "ok" when new...but the slightest amount of slop or clutch disk wear then accentuates the issue and it's all down hill until something breaks or the slave leaks repeatedly due to the piston cocking in it's bore.
Mastiff
Member
it's hard to tell from your pic if that one is suitable. But the bottom line is...the slave mount must be aligned so that the pushrod travels in a straight, linear path. The oem design prevents that and is what makes the pushrod bend or break repeatedly since it aligns at an oblique angle. Works "ok" when new...but the slightest amount of slop or clutch disk wear then accentuates the issue and it's all down hill until something breaks or the slave leaks repeatedly due to the piston cocking in it's bore.
Is there an alternative? Have you guys figured out something to make it work better?
Mastiff
Member
in your picture, we're looking at the input shaft and input shaft bearing retainer. There is a gasket behind the retainer along with a seal. All soft goods needed for "sealing" the transmission are contained in a gasket set for that trans...some parts in the kit are not used in your version of a t-90.
The transfer case is addressed as a separate item...it also has a dedicated gasket/seal kit for it that contains many parts that are not used on the s80 version of the d18 case but that is the way the kit is sold...it also fits a d20.
I'm thinking I'll service the trans and t-case now, while I have all this apart. How do you suggest getting the stuff out? I thought I might lift them out of the tunnel with the hoist, but it sure looks tight, I'm not sure the t-case would clear? The other option might be to take the top of the trans and then take everything else out from the bottom. What do you think?
By the way, it looks almost like my leak is actually coming from the sport below the input shaft where a secondary (idler?) shaft comes through the case. Is this possible, and what could be done about it if so?
Last edited:
brained
Member
I'm thinking I'll service the trans and t-case now, while I have all this apart. How do you suggest getting the stuff out? I thought I might lift them out of the tunnel with the hoist, but it sure looks tight, I'm not sure the t-case would clear? The other option might be to take the top of the trans and then take everything else out from the bottom. What do you think?
By the way, it looks almost like my leak is actually coming from the sport below the input shaft where a secondary (idler?) shaft comes through the case. Is this possible, and what could be done about it if so?
I just completed a t90/d18 to t18/d20 swap. To get the t90/d18 out I removed two bolts from opposite corners of the the transmission top, put those bolts thru the ends of a short chain and then reattached them. Once everything that held the trans and tcase in place was unbolted I straddled the trans with my feet where the seats had been and lifted it out. I set it down in the passenger side. I left the d18 attached the whole time and left the top on the Scout as well.
The t18/d20 was way to heavy to do this way, the tcase and trans came out separately.
Mastiff
Member
I just completed a t90/d18 to t18/d20 swap. To get the t90/d18 out I removed two bolts from opposite corners of the the transmission top, put those bolts thru the ends of a short chain and then reattached them. Once everything that held the trans and tcase in place was unbolted I straddled the trans with my feet where the seats had been and lifted it out. I set it down in the passenger side. I left the d18 attached the whole time and left the top on the Scout as well.
The t18/d20 was way to heavy to do this way, the tcase and trans came out separately.
Great, so it will fit up through. Since my top is off and I have a hoist handy (and I'm a smallish guy) I'll just hoist it up. Thanks.
Mastiff
Member
I dropped everything off at the machine shop today. Still waiting on the final verdict on the crank, but the guy "thinks" it'll probably be salvageable. I think I'll find out tomorrow.
I asked them to go ahead and check the cam for me, but the guy I talked to (not the guy who does the work) wasn't sure if he had the specs he'd need. I figured they'd be in the manual, but I couldn't find anything. Well, I found the specs on the journals (is that the right term), but nothing on the cam lobes themselves. Is it in there someplace?
I've started looking at the stuff I have laying around here to figure what I should do while I wait. Is there anything I can or should do with the water pump? It doesn't look like they are obtainable anymore from regular sources, is that right? It's amazing this thing has lasted since the 60's when modern ones are practically regular wear items it seems.
Anything else I should check over while everything's apart? Oil pump maybe?
This is probably a good time to switch over to a spin-on oil filter adapter. Is there any reason why that wouldn't be a good idea?
Thanks for the help.
Michael Mayben
IHPA Tech Moderator - Retired & No Longer Online
You won't find any "specs" for the actual cam lobes. I measure 'em simply with a dial caliper or micrometer and look to see that they are all the same or within a few thousandths.
I have a near new oem cam here now, the lobes are measured from the base circle to the top of the lobe. That dimension is a nominal 1.730" on all lobes with a 0.001>0.002" "slope" ground across the lobe which promotes lifter rotation.
The other "junk" cams I have (cores) that are being shipped to the cam grinder vary tremendously due to extreme wear. A few lobes measure 1.730" nominal. The rest of 'em are all over the place... From near "round" (that is a flat cam!) to down by 0.10">0.040" under spec. That is why those engines would have had a noticeable loss of idle quality due to out-of-sync valve timing.
So...for a nominal lobe dimension for comparative purposes, we're gonna use the 1.730" number for our "standard" lobe dimension.
New water pumps are a dime-a-dozen anywhere! Either from us here at ihon or at your local parts house. They are exactly the same as the water pump for an sv motor, you want the one with the "eight hole" hub that fits either fan blade bolt pattern...sometimes referred to as the "bolt-on" clutch hub...but you will not use a modulated fan clutch so disregard that designation.
With your engine hard parts order, also specify an oil pump rebuild kit, all parts are included in the box.
A spin-on oil filter adapter May seem to be easier to service...but as far as functionality, there is nothing wrong with the cartridge filter system you currently have...but do not loose the pre-load spring inside the canister! I use only wix or hastings filter elements.
