Today I disassembled the passenger side rocker shaft and found 2 badley worn spots on the shaft and the corresponding 2 rockers with bushing material worn away. In searching for replacement assemblies I found first of all they were in high demand and that reconditioning existing shafts costs as much as new ones. So---- I ordered replacements. More to come gordon


You are using an out of date browser. It may not display this or other websites correctly.
You should upgrade or use an alternative browser.
You should upgrade or use an alternative browser.
I-4 and SV Engine Non-Oiling Rocker Assembly
- Thread starter Michael Mayben
- Start date
Robert Kenney
Super Moderator
Robert today I received two new rocker shafts with the boat or cup type rockers these are different to mine (the welded kind) I assume they are interchangeable ??
Adding to fd's "ball/ball pushrod" requirement,
on your welded rocker shaft, the rocker arm oil hole was positions up, on the boat rockers it needs to be positioned down.
When you install the new parts, you will have 9 stands. I don't know if your new shafts have 9 bolt holes. The later shafts that were used with boat rockers had only 5 stands. 5 is fine but you will need to plug the extra bolt holes. They go into the intake runners. A bolt and copper crush washer works well. Make sure you locate the stand so the pushrods don't rub the pass through holes in the heads.
Pg 3 of this post has the best detail.. http://forums.IHPartsAmerica.com/showthread.php?t=868&page=3
Last edited:
Perfect thank you for the quick reply. The push rods should be here tomorrow so I will be very interested to see how it works out I ordered some 3 inch by 11" brake shoes for the front of the pick up. Of cause they were not the same as the ones I took off. Starting with the upper mounting point (flat on the old cupped on the new. That was cured by tapping off a small steel wedge exposing the pin to accept the cupped area. Secondly the upper return springs were hooked on a tang protruding from the underside of the shoe. That was solved by drilling an extra hole in the shoe spine to accept the original spring. Determined not to be beaten I also had to drill and thread a pivot point for the self adjuster. On top of all got two sets , one riveted and one set bonded. I decided to use the riveted set and wouldn't you know it I got one side fitted and I had 2 trailing shoes. I double checked the one I had retro fitted and the were correct. Short in front long in back.
dkminors
Member
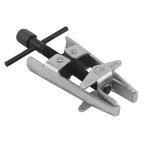
As soon as I posted that I realized it wasn't what you were asking about. That is the tool I use to pop in the push rods. I don't think I used an specific tool to remove the springs. As I recall it was a bit ugly using a few different tools for leverage. I did it with the heads still installed and using compressed air to keep the valves in place.
Robert Kenney
Super Moderator
Robert Kenney
Super Moderator
In the simplest of terms, it's a waste of money.
The IH sv can be brought up in power, but not like you would expect (for example) from a small block Chevy.
A simple porting/polish won't not do anything.
The IH sv can be brought up in power, but not like you would expect (for example) from a small block Chevy.
A simple porting/polish won't not do anything.
harrywt
Member
Yes, low rev engines.
in the simplest of terms, it's a waste of money.
The IH sv can be brought up in power, but not like you would expect (for example) from a small block Chevy.
A simple porting/polish won't not do anything.
harrywt
Member
That's a tough one. If the truck has been sitting you definitely want to spin the oil pump with a drill motor. Ideally you verify that oil is flowing up to the rockers. The only way to do that is to remove the valve covers. Ideally you have a set of half covers to keep oil from running all over the place.
Rocker noise is likely to be from lifters so re assembling rocker arms wont fix them. If you remove lifters and put them back remember that everything has to go back where it was!
If you are going that route post here at IHPA and get opinions. There are plenty of people here that know more than me.
Have fun
Is the disassembly of the rocker being advised for all engines that have been sitting for a long time or just ones that are knocking?
Looking to see if I can get some input from the group. It's a long story and I will try to keep on point.
Like many I was bitten recently by the IH bug. Started with one, now I have 4 in all levels of condition. I really don't have much time for these with work, kids, life but these things get under your skin so I find time. I'm also not a trained mechanic I just love doing the stuff and learning as I go. I am technical and mechanical by nature but no formal training.
I bought a 70 SR-2, all original but rotten pretty good. Needs a new tub but drive train all there, engine, etc. 304, auto from factory.
I started the process of resurrection knowing nothing about the vehicles history. I found the OP of this articles saved PDF, Old iron comes to life and have been trying to get my arms around it with my first attempt as a failure. I'm also not following it exactly, and by that I did not hook up an oil pressure gauge because I didn't have one and not sure where to get one although it might be simple. My goal was to just make sure I see the oil coming out the 3rd rocker on each side like he explains and go from there. Before I put a lot of time and money I need to fire this engine and before that I need to do this procedure.
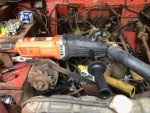
So, here is where I am at after going through 2/3 cheap drills I bought a big $300 1750 rpm drill to use in the dizzy opening to get to the oil pump.
For the first minute or so the drill was going backwards and I hope I didn't do any damage but it's done if so. Then after that I switch the direction and let the drill run on hight for 3 minutes. Nothing coming out of the heads at all anywhere.
I regrouped and pump the drill on for another 5 minutes and same result, no oil coming out on top. At that point I quit and said OK let me ask for help. I think I need to get one of those portable oil pressure gauges but not sure where or what type of line/fittings I would need as well.
It is also very possible the engine is toast but I was able to move the crank a very little bit and it was easy to turn. I didn't do much more than make sure it wasn't seized after reading MM article to be clear.
So, any help from the resident experts?
Like many I was bitten recently by the IH bug. Started with one, now I have 4 in all levels of condition. I really don't have much time for these with work, kids, life but these things get under your skin so I find time. I'm also not a trained mechanic I just love doing the stuff and learning as I go. I am technical and mechanical by nature but no formal training.
I bought a 70 SR-2, all original but rotten pretty good. Needs a new tub but drive train all there, engine, etc. 304, auto from factory.
I started the process of resurrection knowing nothing about the vehicles history. I found the OP of this articles saved PDF, Old iron comes to life and have been trying to get my arms around it with my first attempt as a failure. I'm also not following it exactly, and by that I did not hook up an oil pressure gauge because I didn't have one and not sure where to get one although it might be simple. My goal was to just make sure I see the oil coming out the 3rd rocker on each side like he explains and go from there. Before I put a lot of time and money I need to fire this engine and before that I need to do this procedure.
So, here is where I am at after going through 2/3 cheap drills I bought a big $300 1750 rpm drill to use in the dizzy opening to get to the oil pump.
For the first minute or so the drill was going backwards and I hope I didn't do any damage but it's done if so. Then after that I switch the direction and let the drill run on hight for 3 minutes. Nothing coming out of the heads at all anywhere.
I regrouped and pump the drill on for another 5 minutes and same result, no oil coming out on top. At that point I quit and said OK let me ask for help. I think I need to get one of those portable oil pressure gauges but not sure where or what type of line/fittings I would need as well.
It is also very possible the engine is toast but I was able to move the crank a very little bit and it was easy to turn. I didn't do much more than make sure it wasn't seized after reading MM article to be clear.
So, any help from the resident experts?