152 rebuild

here's a pic of my throwout bearing assembly. It's go a decent divot out of it where the fork contacts it. The bearing part itself is really sloppy, it must be shot. Does ihon sell these as an assembly, or bearing and collar apart?

The throwout bearing is a separate item from the collar and those parts are new. The collar as well as the fork are parts that are reconditioned by me on an exchange basis. We will have additional reconditioned parts available this week...the fork is complete with a replacement pivot bolt set. The collar will be modified. Those parts are not available new unless some fortunate individual in the world has some that are nos...and we're always looking for that kind of treasure!
 
I bought this fork off e-bay a while back, figuring I'd need one some day. It's got a little bit of a flat spot on the prongs, but not much. Does it look decent as far as you can tell from a picture? There's a small amount of play on the bolt, but not much.

That fork needs serious attention, the engaging tips must be round and full width in order to remove all slop from the throwout system.

I have a bucket full of forks just like that one that I use for reconditioned items...unfortunately some of those have been heated and "bent" by po virus when some dipshit tried to re-establish proper clutch release/travel. Those are wasted as they will break unless reinforced, I use those only on my personal rigs and we won't sell crap like that to any customer.
 
check out this slave cylinder mounting bracket. Is this even close to how it's supposed to be? It has been working for me, but it looks like a mess, and I'm not sure my geometry is as it should be.

It's hard to tell from your pic if that one is suitable. But the bottom line is...the slave mount must be aligned so that the pushrod travels in a straight, linear path. The oem design prevents that and is what makes the pushrod bend or break repeatedly since it aligns at an oblique angle. Works "ok" when new...but the slightest amount of slop or clutch disk wear then accentuates the issue and it's all down hill until something breaks or the slave leaks repeatedly due to the piston cocking in it's bore.
 
it's hard to tell from your pic if that one is suitable. But the bottom line is...the slave mount must be aligned so that the pushrod travels in a straight, linear path. The oem design prevents that and is what makes the pushrod bend or break repeatedly since it aligns at an oblique angle. Works "ok" when new...but the slightest amount of slop or clutch disk wear then accentuates the issue and it's all down hill until something breaks or the slave leaks repeatedly due to the piston cocking in it's bore.

Is there an alternative? Have you guys figured out something to make it work better?
 
in your picture, we're looking at the input shaft and input shaft bearing retainer. There is a gasket behind the retainer along with a seal. All soft goods needed for "sealing" the transmission are contained in a gasket set for that trans...some parts in the kit are not used in your version of a t-90.

The transfer case is addressed as a separate item...it also has a dedicated gasket/seal kit for it that contains many parts that are not used on the s80 version of the d18 case but that is the way the kit is sold...it also fits a d20.

I'm thinking I'll service the trans and t-case now, while I have all this apart. How do you suggest getting the stuff out? I thought I might lift them out of the tunnel with the hoist, but it sure looks tight, I'm not sure the t-case would clear? The other option might be to take the top of the trans and then take everything else out from the bottom. What do you think?

By the way, it looks almost like my leak is actually coming from the sport below the input shaft where a secondary (idler?) shaft comes through the case. Is this possible, and what could be done about it if so?
 
Last edited:
I'm thinking I'll service the trans and t-case now, while I have all this apart. How do you suggest getting the stuff out? I thought I might lift them out of the tunnel with the hoist, but it sure looks tight, I'm not sure the t-case would clear? The other option might be to take the top of the trans and then take everything else out from the bottom. What do you think?

By the way, it looks almost like my leak is actually coming from the sport below the input shaft where a secondary (idler?) shaft comes through the case. Is this possible, and what could be done about it if so?

I just completed a t90/d18 to t18/d20 swap. To get the t90/d18 out I removed two bolts from opposite corners of the the transmission top, put those bolts thru the ends of a short chain and then reattached them. Once everything that held the trans and tcase in place was unbolted I straddled the trans with my feet where the seats had been and lifted it out. I set it down in the passenger side. I left the d18 attached the whole time and left the top on the Scout as well.

The t18/d20 was way to heavy to do this way, the tcase and trans came out separately.
 
I just completed a t90/d18 to t18/d20 swap. To get the t90/d18 out I removed two bolts from opposite corners of the the transmission top, put those bolts thru the ends of a short chain and then reattached them. Once everything that held the trans and tcase in place was unbolted I straddled the trans with my feet where the seats had been and lifted it out. I set it down in the passenger side. I left the d18 attached the whole time and left the top on the Scout as well.

The t18/d20 was way to heavy to do this way, the tcase and trans came out separately.

Great, so it will fit up through. Since my top is off and I have a hoist handy (and I'm a smallish guy) I'll just hoist it up. Thanks.
 
I dropped everything off at the machine shop today. Still waiting on the final verdict on the crank, but the guy "thinks" it'll probably be salvageable. I think I'll find out tomorrow.

I asked them to go ahead and check the cam for me, but the guy I talked to (not the guy who does the work) wasn't sure if he had the specs he'd need. I figured they'd be in the manual, but I couldn't find anything. Well, I found the specs on the journals (is that the right term), but nothing on the cam lobes themselves. Is it in there someplace?

I've started looking at the stuff I have laying around here to figure what I should do while I wait. Is there anything I can or should do with the water pump? It doesn't look like they are obtainable anymore from regular sources, is that right? It's amazing this thing has lasted since the 60's when modern ones are practically regular wear items it seems.

Anything else I should check over while everything's apart? Oil pump maybe?

This is probably a good time to switch over to a spin-on oil filter adapter. Is there any reason why that wouldn't be a good idea?

Thanks for the help.
 
You won't find any "specs" for the actual cam lobes. I measure 'em simply with a dial caliper or micrometer and look to see that they are all the same or within a few thousandths.

I have a near new oem cam here now, the lobes are measured from the base circle to the top of the lobe. That dimension is a nominal 1.730" on all lobes with a 0.001>0.002" "slope" ground across the lobe which promotes lifter rotation.

The other "junk" cams I have (cores) that are being shipped to the cam grinder vary tremendously due to extreme wear. A few lobes measure 1.730" nominal. The rest of 'em are all over the place... From near "round" (that is a flat cam!) to down by 0.10">0.040" under spec. That is why those engines would have had a noticeable loss of idle quality due to out-of-sync valve timing.

So...for a nominal lobe dimension for comparative purposes, we're gonna use the 1.730" number for our "standard" lobe dimension.

New water pumps are a dime-a-dozen anywhere! Either from us here at ihon or at your local parts house. They are exactly the same as the water pump for an sv motor, you want the one with the "eight hole" hub that fits either fan blade bolt pattern...sometimes referred to as the "bolt-on" clutch hub...but you will not use a modulated fan clutch so disregard that designation.

With your engine hard parts order, also specify an oil pump rebuild kit, all parts are included in the box.

A spin-on oil filter adapter May seem to be easier to service...but as far as functionality, there is nothing wrong with the cartridge filter system you currently have...but do not loose the pre-load spring inside the canister! I use only wix or hastings filter elements.
 
Does this look like the right water pump?

5591413-01.jpg


If so, I take it you reuse the "back half" of what I'd consider the whole water pump assembly.
 
Most likely your water pump housing needs to see alotta luv!

If you are going to have your machine shop do a bake and blast job on the block for cleaning, have them do the pump housing also.

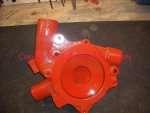
The housing in this pic is going on the stroker 152 Robert and I keep jawwin' about. It was considered scrap and beyond use when I found it in a pile of parts...heavy corrosion internally and the volute appeared to be badly eroded. Turns out it was all surface contamination, the volute machined into this housing is absolutely perfect.

Spent two hours with rotary wire brushes inside the casting and it's now near virgin. That's not paint on it but a version of "glyptal" I use inside these engines and castings. The stuff I use now comes from a local electric motor rebuilder, called "insulating epoxy coating" from aervoe industries. About $10 a can.

welcome!

Another type I keep here comes from a local electronic supply house..."red-x corona dope", from gc electronics. It's a polyester-base product, the other stuff is epoxy-base.
 

Attachments

  • Water Pump Housing.jpg
    Water Pump Housing.jpg
    91.5 KB · Views: 737
Great info. I'll tear into the water pump tonight.

Can you give a more specific link to the "paint" you are using? I can't seem to find it. Is it good for high temps on the block, etc.?

What coating do you like for the exhaust manifold?
 
great info. I'll tear into the water pump tonight.

Can you give a more specific link to the "paint" you are using? I can't seem to find it. Is it good for high temps on the block, etc.?

What coating do you like for the exhaust manifold?

This is a link directly to the aervoe product:

insulating epoxy - aervoe industries incorporated

The inside of all engine castings I work with gets coated with this stuff. You must wear a respirator and ventilate the area extremely well when working with it. I do not use it for a topcoat on anything external.

As for exterior engine paint...I use whatever I can find at my local parts house that they have on "special" (they deal in alotta bankrupt stock/salvage/etc.). In fact, many times I use wallyworld housebrand rattlecan stuff that is $1.06 a can! No need for "high temp" on the engine!

On the high end Ford fe motor Todd and I built this past winter we used the aervoe engine paint which is very highdollar. I was not impressed with it vs. Wallyworld rattlecan and will not ever use that stuff again...waste of cash!

The only thing that will stay on an exhaust manifold is to have it done in ceramic after it's properly prepped. And about the time you go to that expense, when ya install the head pipe one of the mounting ears will break off or it will crack! I put nothing on the exhaust manifolds, just clean 'em up and install.

For any external engine work that requires the use of "red" paint, I now use only van sickle implement paint from the local farm supply in "case/IH red, p/n 455 70". Extremely high in solids...while it takes more than 48 hours to cure, once it's kicked it's indistinguishable from powdercoat. Same for their general purpose black or other colors.

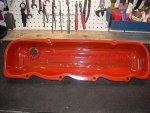
This pic is a "reclaimed" valve cover that had been under water for some time and was really rotten. The baffle was totally clogged and grunged. Took about an hour of labor to make it useable again since I needed one with the baffle and an oil filler port along with the threaded boss. This is glyptaled inside...the exterior was shot with van sickle rattlecan.

 

Attachments

  • Glyptaled Valve Cover.jpg
    Glyptaled Valve Cover.jpg
    100.4 KB · Views: 735
So, high temp engine paint really isn't needed? Everyone seems convinced that specialty paint is required for this. If you guys are confident that van sickle IH red will work for the whole engine, I'll go that route. Is that what you have on your engine Robert? It looks like IH red in the pics.

I've been going back and forth between ideas on the color. The red would be cool, but I also thought it might be cool to paint the whole thing the industrial gray machinery color... Possibly also black for the block and IH red for all the accessories and covers. Decision decisions.
 
I used a iternational harvester red sold by car quest. Just a normal implement paint. Jeff also stocks a good IH red paint. If you buy parts from him have him send you a couple of cans.

On small parts that will fit into the oven I bake @ 150 - 175 f for 2 hours. Wait untill the paint dries to the touch before cooking. It increases gloss and hardness.

If you want a grey, how about lycoming gray. :yesnod:
 
If you want a grey, how about lycoming gray. :yesnod:

Of course, why didn't I think of that? I just got back from buying six cans of IH red though, so I guess I'll stick with that. I should have my first batch of clean parts back today. No time left to waffle.

I bought primer... Do you guys prime?
 
I do not prime for rattle can paint jobs. Only time I prime is on a block with prior corrosion and they I use the rust converter primer then re coat the next day to ensure all solvents have flashed off before adding color.

For anything that really must look "show" quality I spray automotive grade catalyzed finish paint and add a flattening agent for a semi gloss look over etching clear primer/sealer.
 
I don't prime engine/transmission unless it's trailer queen stuff.

I force dry the van sickle rattlecan on occasion using halogen work lamps.

With the underhood temps, oil mist/leak, engine coolant mist, fuel vapors, and watermud no engine paint work stays fresh for long. Then throw in the corrosive crap that comes off the highways in wintertime.
 
Well, the shop has my block clean and checked. They are going 0.03 over on the cylinders and will be able to save the crank. New pistons are on order. I had the bumpy shaped extra compression pistons, and the new ones will be like that. He said he found flat tops too, but the compression is only 8:1 or so with those.

Everything I have at home is painted and ready to go. Meanwhile I'm rebuilding the trans and t-case and redoing the electrical. I have other threads going on those.
 
I had the bumpy shaped extra compression pistons, and the new ones will be like that. He said he found flat tops too, but the compression is only 8:1 or so with those.

The "bumpy shaped" pistons are also known as the "special contour design", or "non-e", they net the same cr when used with their corresponding head. To switch to the "flat top" piston you would need to switch to it's corresponding head.
 
the "bumpy shaped" pistons are also known as the "special contour design", or "non-e", they net the same cr when used with their corresponding head. To switch to the "flat top" piston you would need to switch to it's corresponding head.

Good to know. What is the cr when things are matched right?
 
8.0-1 for both setups.

A note on the pistons. Only one piston mfg retains the stock height so you will retain your compression ratio. Those are silvo-lite. All others from what I have seen are decompressed .020 so you will net a lower cr.

Also due to the fact that your engine's c-ratio is based on the original steel head gasket, when you use the available composite gasket that has a compressed thickness of .040 you need to remove .020 from the deck to retain the already low 8-1.

This is easy for your machine shop and they should be cleaning the deck surface anyway.
 
Back
Top