Power Problems

No motocrafts, the 2 carbs I have are holleys with manual chokes. I will try to get some pics tonight if its not to late when I get home. Oh.. And thanks for the homework. Lol

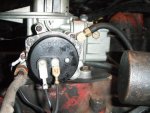
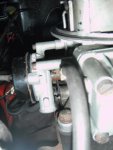
ok, here are some pics. Suprisingly no wires on starter are burned..... But the battery is toast, it wont even make the selodoid click. I put my spare in and it cranked up. With some help from my foot. I didn't play with it to much, I still need to trace all the wires and verify their connection are correct.

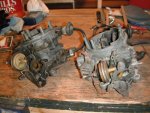
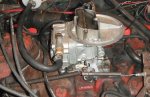
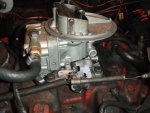
I will load the pics starting with the carb on the rig and then of my two manual carbs.
 
Last edited:
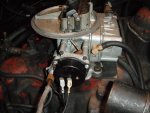
I owe you one more pic, the one I really wntd didnt come out.
 

Attachments

  • Carb 1.jpg
    Carb 1.jpg
    66.7 KB · Views: 466
  • start 1.jpg
    start 1.jpg
    65.6 KB · Views: 403
  • old 4.jpg
    old 4.jpg
    77.2 KB · Views: 374
  • old 3.jpg
    old 3.jpg
    86.3 KB · Views: 381
  • old 2.jpg
    old 2.jpg
    82 KB · Views: 389
  • old 1.jpg
    old 1.jpg
    76 KB · Views: 381
  • carb 5.JPG
    carb 5.JPG
    145.6 KB · Views: 407
  • carb 4.jpg
    carb 4.jpg
    69 KB · Views: 415
  • carb 3.jpg
    carb 3.jpg
    54.4 KB · Views: 419
  • carb 2.jpg
    carb 2.jpg
    73.2 KB · Views: 407
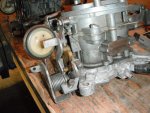
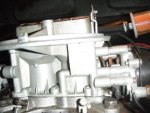
Here is the last pic, the cam that is in there has no steps, I tried but cant get a good pic of the cam without pulling the choke off.
 

Attachments

  • scout 004.jpg
    scout 004.jpg
    29.3 KB · Views: 426
Oh goody. I have plenty of remarks to make about what I see. Shocking right?

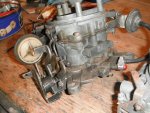
Carb pic 1: you have an electric choke, so the hot air tube is now redundant. It May also have the effect of heating the thermal spring inside the black plastic cover up faster than necessary which might be pulling the choke plate open too soon. You can remove that hot air tube with no ill effect and place it above your mantel as a souvenir if you'd like.

Carb pic 2: is the power for the electric choke coming from a key switch on source other than the coil + terminal?

Carb pic 3: you can see the fast idle cam adjustment screw in the lower right corner of the pic. Does it engage the amber colored fast idle cam at all?

Carb pic 4/5: the vac lines seen in the lower right of the pic...they're connected to the vacuum tree under the throttle cable bracket right? They're hideous and can be discarded. They're not serving any purpose. The bottom of that tree penetrates a coolant passage and reacts to heat as the coolant warms. It was part of your original emission system, which is long gone now. So long as nothing is connected to it, all of the ports can be left vacant. It won't create a vacuum leak since it requires a manifold vacuum line connected to it in order to function in the first place.

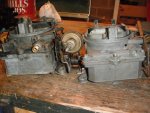
All old carb pics: those are Holley 22xx models and are quite different from your 2300. None of the parts will transfer over. About the only value in them is to some Scout owner who's ride is still subject to under-hood visual inspection for smog certification.

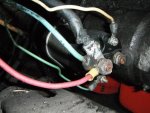
Starter pic: wow! Look at the crispy battery cable! No wonder you've lost cab power. There's where you lost it. That damaged chunk will need to be hacked off and a new ring terminal crimped on...or might be better to replace the entire cable.

Supplemental carb pic: well, the provision for fast idle is there. It is either out of adjustment or the supplied fast idle cam is incorrect. They can be changed.
 
Good evening...
Inspection went better than expected.
The wires all checked out. They are run where they need to be.
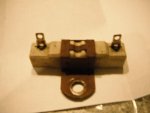
No unreasonable breaks other than that brown and white resistence wire which has those two round connectors, which by the way I think I found the resistor that belongs to it. Short story I got a bunch of extra parts with the rig when I bought it 8+ years ago. Ye I have neglected it as it was orginally only going to be a plow truck. My intent was to run it in the ground and then take it for scrap. I only paid $700 for it and that was with a plow. The resistor is only showing 2.4 ohms with the meter set on 200. Pic attached.

I had to take the choke off in order to see the steps. The screw only touched the highest step and missed the rest. I adjusted it to hit all but the last one, but it is so tight that it won't let the choke pull steps down. I will try to adjust it more tomorrow night. When it is a cold engine again.

I removed the hot air tube. And got rid if the bhc's all together. They are all spliced with wire connectors. I know this sis not the preferred method, and I have no intention of keeping it that way, I just needed to eliminate the groddy bhc and get to clean wires.
 

Attachments

  • resistor 003.JPG
    resistor 003.JPG
    105.8 KB · Views: 422
Last edited:
Glad the inspection went well. That is a porcelain ballast resistor and with the 2.4 ohm resistance, I don't think you will have much use for it, but you can keep it stashed away if you'd like. It is not meant to be used in conjunction with the small gauge resistor wire which runs between the alternator #1 terminal and the bhc that has been modified.

Part of the auto choke adjustment involves the black thermal cover. By loosening the set screws, that cover or dial can actually be rotated in accordance with some index marks for a more Rich or lean setting. It takes some trial and error to get it set properly. And of course, what works well in the dead of winter May be overkill in the warmer months, which means more adjusting for those conditions.

I'm still perplexed as to why your battery cable got hot enough to sizzle like that. My speculations are: a. There is significant build up of lead acid corrosion hidden inside the cable. Corrosion creates electrical resistance. Electrical resistance creates heat...ergo crispy cable. Solution...replace the cable. Or b. The alternator is putting out too much current and that union at the starter solenoid is where things came to a head electrically speaking. With your intermittent power disruptions, option a seems to be the most logical scenario.

Are you waiting to take voltage readings at the coil + with the key off until you can get the battery cable replaced? That would be a good idea, but I still want to hear those results from you.
 
Thanks, we always expect the worst with our inspections.
Ok, so here are the nembers, and I don't think you are going to like them.
First. The coil is getting nothing with the key off. Goody!
Engine running: 14 on the resisted wire and 13 to the dizzy.
Alt: engine running as follows. Red 14.8, black 15.6, blue 15.4.
Key off blue and red 12.35.

Selonoid, engine running: white 0, pos + from bat 14.8, green 13.7.

I cut about 2 inches off the end of the pos cable to the start and replaced the end, auto store didn't have a cable in stock long enough. Suprisingly the copper wire inside was fairly clean, just a touch of tarnish, but no corrosio

I adjusted the choke and idle cam screw, it still seams real tight and doesn't let the choke pull it down. I did just a little adjusting of the carb mixing screws because it was idleing rough. It is smoother now, but I am sure far from where it needs to be. One step at a time.

I know it seams like I am jummping around, but I really am just trying to work on one issue at a time. It just seams like an adjustment in one location effects 3 others.
 
Zero at coil + with key off is what we want.
I don't like the coil + gaining voltage while the engine is running. It should display less than 12 volts through the resistor wire.
Your alternator should output a maximum of 14 volts at engine speeds above 2k rpms. A couple decimal points above that...probably not a big deal. Upper 14's and above with engine speed below 2k rpms shouldn't be happening. I know you said you had this alt tested, but a good alternator would not produce readings that high. You have another alternator, right? Its a pain, but I think you need to swap alts and retest.
 
Swapped the alt. Had to swap the pully as well, I couldn't get enough tension on it.
Here are teh numbers, warm engine, at idle of approx 700.
I hope to get a tac for Christmas..
Alt red 14.8, black 11.8, blue 14.8.
Coil: 12.2, 9.3 to dizzy..
I will get the alt model numb for you later. I have to run out.
 
Well I think that's better. The 14.8 is still a bit higher than I'd like to see, but might be good enough that your battery cable won't turn into chicken fried steak. Might be time now to run it for a while with a sharp eye and nose trained on the solenoid area for any signs of excess heat/smoke.
 
Wow! So thats it for now?
I can't run it on the road, it's not even close to being ready for an inspection, but at least I can use it to plow when the snow starts falling. I started it up and ran it for about 1/2 hour. The fast idle cam is still to tight,, its not letting the it move when the choke opens, I will continue to play with that for a while.
When I kick it down it does run nice and smooth.
Honestly this rig has never, since I have had it, run this good...

I greatly appreciate all the help working out this issue.
Next. Where do I go to get help figuring out what to do with all the vaccume ports?????
 
Weeeell, I'm not ready to declare that your electrical boo-boos are all healed just yet, but you can take a very cautious "run 'er, but watch 'er" approach. Keep an extinguisher handy. If you notice any weird behavior similar to before, shut 'er down quick as you can. I'm glad you're beginning to see some positive results from all this monkey business. Two steps forward, one step back. If I can get some time soon, I'm going to take some voltage readings on my 13 letter shit-spreaders for comparison against yours. Both of my electrical/charging systems are pretty sound (knock on wood).
Sounds like you're fairly happy with your engine idle once you get the fast part kicked down, but if you feel like trying some fine tuning, here you go:
get the engine warmed up and shut it down. Take your standard screw driver and gently turn each idle mix screw in clockwise until you just feel it bottom out...then stop. Count how many turns it took to hit bottom and make note. Back each screw out an identical 2.5 turns. Connect your vacuum gauge and start the engine. If you are anywhere close to sea level and the engine is reasonably healthy, you should see nearly 20hg steady on the gauge. You have 17 now, which isn't horrid, but it can be better. Monitor the gauge and first turn in one, then the other screw one quarter turn at a time. The idea is to get the reading as high and steady as possible with a smooth and purdy idle quality. If you go to far, (lean) the engine will let you know, by stumbling and fumbling. You also want the screws to be within a quarter turn of each other (identical is even better) when you finish.
 
Just so I understand correctly. I turn one screw 1/4 turn, and then the other 1/4 turn. Until the rig pushes out 20hg or close to.
Also, do all the vacumme ports on the air cleaner need to go anywhere?

Thanks again for all the knowledge.
Things are slowly comming back and making sence.
 
Yes, after you have them both out the identical 2.5 turns as a starting point. I suggested you count how many turns it takes to bottom them only to satisfy my morbid curiosity as to where they are set right now.
Vacuum ports on the air filter...are you saying you have an oe style filter canister that fits this carb? Even if you do, it is not necessary for you to have any lines connected to the canister body ports. Just leave them vacant. As long as you have a small line from the highest port on the carb to your distributor vacuum advance, a larger line in the rear feeding your vacuum assist brake booster, and a larger rear line feeding your pcv valve, you're set. Just make sure the lines aren't cracked or split anywhere and the fitting ends are snug.
 
Actually, yes I do have the air canister, but it is not connect because the lines are shot. Thats why I removed it from the ec. I don't need to put it back in right?
 
I think we must be talking about two different things. What I assumed you were asking about is the air filter housing that sits atop the carb. What have you got there? An aftermarket open element (aka rock strainer), or a mostly enclosed tin can with a small snorkel opening? Is this what you were wanting to know about or something else? Pics to clarify perhaps?
 
Yes we kind of are. I was first referring to the air filter housing that sits on top of the carb. Yes it is the original and yes it does fit on top of the carb perfectly. It just seams like there are alot of places for vaccume lines and nothing running to them.
You mentioned the canister which I thought was the plastic filter that looks like a coffee can mounted to the fender wall, which I removed because the lines were either broke or missing.
So, there is one vacumme line comming from the front of the carb on the very bottom that I have plugged. If that is good, then I understand what needs to be connected as far as vaccume lines to this point. As far as all other vaccume ports comming from the engine, I will be buying some caps to plug them all. I suspect at least one of them will have some kind of leak.
 
Okay, the coffee can looking item is a charcoal canister. Since it has already been removed, go ahead and leave it that way. Plenty of folks have done the same. It was part of your emissions system. It has no effect on engine performance.
As for the vacuum fittings on your filter can, you May decide you want to try completing that plumbing. It is meant to aid cold start warm ups. Then again, once you get your choke dialed in, you May decide it isn't worth the trouble. You don't need to worry about it right now.
 
I tinkered around with adjusting the carb for a while this morning. One side was 3-1/4 turns out, the other 3 turns.
I took them in and back out the 2-1/2. The more I turned them in the worse the vaccume got, and it was running rougher.
I took the screws out 1/4 at a time until it started running smooth.ended up being 3-1/4 turns each and a max stable vaccume of 18. I don't know if that is good, or what else I can do to get it higher. I do hear just a slight click fron the passenger side but can't tell where its comming from. I hope its not a lifter, if it is would that affect the vaccume pressure and performance?
Still working on fine tuning the choke, but I think I'm getting real close.
 
We normally expect to see the screws end up between one and two turns out, so three plus turns out seems a bit abnormal. 18hg steady isn't bad, so that's a positive. If you had a manifold vacuum leak, your reading wouldn't get that high. The guesstimated idle speed is a potential influencing factor. It would be nice to know what your dwell angle is, but that requires a handheld dwell/tach meter connected, which would also show us the idle speed. I have one, but I can't toss it that far.:frown5:
did this carb come with a spec sheet indicating what size the jets are? If not, how do you feel about removing the fuel bowl for a looksee at the size number stamped on the jets? I'm wondering if they might be on the small side, thus requiring the mix screws to be further out as compensation.
The noise you heard could be an exhaust leak or a lifter tick. Minor valve train noise is usually no cause for concern. The exact source of the noise is often difficult to pinpoint. Persistent, loud clatter that is most prevalent during high rpm intervals, then gradually subsides as engine speed is reduced could be a sign of trouble. What weight of oil are you running? In fairly chilly climes, 15w40 is a good choice. 20w50 works well in moderate climes. 10w30 is a bit on the thin side unless you're in the antarctic. What brand of oil filter? If its a fram, chuck that sucka. Are you running 1 quart over the full Mark on the stick (roughly 7 quarts total at lof time)? This is a recommended practice for sii's with the oddball double sump oil pan.
 
Full synthetic, yea I know laugh..... 5w30.
It's what both my other newer cars take, so it's what I used.
Probably not what it should have, but I don't know a darn thing about oil. I don't remember but I think the filter is puralator??
I willl have to check on that one. I put 6-1/2 quarts in it when I change the oil, so should be good there.
 
Purolator filters are alright. 5w30 works in modern engines with their tighter tolerances, but I can't recommend it for your 304. Too damn thin. Go with the 15w40 before putting this rig into regular use. You might just notice your little tick noise disappears afterwards.
As for removing your fuel bowl, its a pretty simple process. The fuel line must be disconnected. Then you have the four pan head screws that retain the bowl to the metering block and carb body. This will spill a half-cup of raw fuel, so be prepared! Depending on the composition and quality of bowl gasket the re-manners used, it will either be destroyed in this process or be perfectly reusable. The blue, neoprene coated gaskets from Holley are meant to survive numerous fuel bowl r & r's. Other types, maybe not so much. Removing the bowl exposes the metering block. There are two small brass jets threaded into the block, one on each side. They are slotted for removal with a special tool, or a flat blade screwdriver that fits well in the slot. Hopefully, you will be able to see the two digit number without having to unscrew a jet from the block.
 
I will get the oil changed before I do to much running. Do you recommend any additives like mystery oil etc..?

I pulled the carb and looked at the jets in the comfort of my basement becasue I was "lucky" enough to have the crappy black sticky felt gasket that looks like a puff pastrie when you pull it apart. The carb has 51 jets..... From what I have read, I am thinking that I should have 56 or 57 for my altitude. I run anywhere from sea level to about 2500feet.

Is it likely to get a new gasket locally, or is it an item that I will have have to special order.

I do have some high density cork gasket material??? Please don't slap me, just looking for a temporary fix until I can get the real deal, weather man is calling for a chance of snow, and with the way they predict onw never knows what we will get.
 
The only additive you need to worry about for these older engines is a little thingy called zddp, which is short for a bunch of long words that you don't need to worry about. There's been quite a bit of discussion on the subject over the past six years or so. In a nutshell, commercially available oil used to contain sufficient quantities of the stuff, but pressure from greenies and lobbyists among others has forced the oil companies to gradually remove it from the oil you can buy off the shelf. Their claim is that it leads to accelerated catalytic converter failure...bla bla bullshit. Just another effort towards forcing older vehicles off the road as I and many others see it. This compound forms a very critical sacrificial layer of protection on parts that are subject to high friction, such as bearings. Swepco oil available from IHPA is an independent producer that is not subject to the same rules and restrictions as the big oil companies. Their oil is a superior product with all the zddp our old engines could possibly need. Considering your location, I'll back channel you some alternatives that while perhaps not as top shelf, will get the job done and be a bit more practical in your situation. Now back to the carb...

F'n cheap bastards! If they used those crap gaskets, that means they scrimped elsewhere as well. I'm betting they didn't use any genuine Holley service parts in that thing. Damn them!
I was secretly predicting the jets would be 51's. Since you play below 3k feet and you're burning cornskweezin alkyhawl shit for gas, you should at least change to 53's and maybe even 55's. I wouldn't recommend going larger than that until you can do some road tests at cruising speed. Do you have any decent parts stores nearby? Any parts house worth their weight in shit should have these items available. The same place you are able to find the jets sold in pairs is where you will find the blue neoprene impregnated bowl gaskets in a Holley package. Accept no substitutes. I'm skeptical that your homemade gasket would form a leak free seal. You don't want a raw fuel leak anywhere near the hot engine.
 
Understood.
The carb parts have to be ordered. Apparently few people in the area work on carbs anymore. The guy knew exactly what I needed and knew half the part number. Parts will be in on Friday, so I'm stuck for a couple days.
I kinda figured the homemade gasket wouldn't work, thats why I asked before I put any effort into trying to make one.
Thanks again for all the help.
 
Back
Top