My 14th IH owned, the '73 1110 4WD T-all

Well, I got just about everything done and the engine is running. It's even running off either fuel tank without the use of the electric fuel pump I hooked up but have not wired yet.

Tranny is verrrryyy sluggish and you have to give it quite a bit of gas to get her rolling. I hope to try and get under her to adjust the bands tomorrow, if not, Tuesday. Sure hope that takes care of the tranny, as I'mm not anxious to spend much more on it right now until my wagonmaster sells.

Looking for an air cleaner for a 2 barrel Holley if anyone knows of one.

Should be able to put the hood back on, too, then give a good washing and drive it around the neighborhood a bit. It's gotta look good even if it ain't running perfect yet!
 
I went ahead and bought a metal heat riser gasket and metal donuts through super scouts. I wasn't able to find them anywhere else, and from what I understand, the fiber ones you can get break down rather quickly. Prices were $12 for heat riser gasket and $19 each for the donuts.

I doubt the metal heat riser gasket (IH# 212013r1) is availabe from the generic auto parts store...

Both are IH parts (gasket and donuts from sss) and should be available from any light line dealer.

There are aftermarket donuts availabe - different people prefer different ones -- two are shown in the ihon online store.
 
well, I got just about everything done and the engine is running. It's even running off either fuel tank without the use of the electric fuel pump I hooked up but have not wired yet.

Tranny is verrrryyy sluggish and you have to give it quite a bit of gas to get her rolling. I hope to try and get under her to adjust the bands tomorrow, if not, Tuesday. Sure hope that takes care of the tranny, as I'mm not anxious to spend much more on it right now until my wagonmaster sells.

Looking for an air cleaner for a 2 barrel Holley if anyone knows of one.

Should be able to put the hood back on, too, then give a good washing and drive it around the neighborhood a bit. It's gotta look good even if it ain't running perfect yet!

The trans did not show signs of overheat when I checked the oil, but no doubt it needs a complete service as we know. You are going to find the rear (low/reverse) band very "loose".

Looking back, I think the problem I was having with no fuel delivery was actually caused by that electric tank selector valve either not switching or "hanging". That is a cheezeball Ford-type aftermarket replacement item and no doubt is affected by this shit e10 fuel. If it were mine, I'd replace the oem tank selector valve with a rebuilt from us, but first pull the cover off of it and verify that the cable system for the oem valve is functional.

I didn't realize you did not have a correct air filter set for that 2210 carb! I should have found one and included, I don't have any left here now though I do still have a few for the 4v Holley with the industry-standard 5-1/8" opening. Jeff has many of those Scout II/2210 air filter housings on hand though.

Check your other post in the electrical tech sub-forum for an update. Also, did you get the oem ignition switch operational again?
 
Since malcolm has decided to mount an oem fuel tank selector valve, and the po has hashed the plumbing to accommodate the electric valve, we need to define the plumbing arrangement to put this stuff back stock!

For reference, this pic shows the hashed Ford-type electric fuel selector valve on the vehicle under discussion. The feed hoses from the tanks have been previously "converted" for use with barbed fuel hose fittings, that is not an oem deal, but it certainly is an ok way to do this. So we're gonna retain the "soft hose/barb" plumbing when the oem valve is re-installed. In order to do that, he'll receive a freshened oem tank selector valve that has had 5/16" hose barbs installed already.

The next problem is making a positive id as to which hose is which on the current electric valve setup. So here's the analysis malcom:

the top (single) hose in the pic is the "fuel out" to the fuel pump. That is easy to see!

Of the bottom two hoses, one goes to the passenger side front tank (what we refer to in a d series Travelall as the "#2 tank" or auxiliary). From that picture, I can't determine which hose that is, but malcolm should be able to figure this out using a flashlight and following the hose run down the top of the passenger-side tank.

Once the passenger side tank feed is determined, then of course the other hose goes to the driver-side rear tank and is what we will call the "#1" or primary tank.

This is important...if the hoses are connected in reverse sequence, then the placard for the manual fuel tank selector control on the dash will be incorrect which leads to all kinds of confusion when selecting tanks and selecting the correct tank fuel level sender!!!

Next post....
 

Attachments

  • Ford Fuel Valve.jpg
    Ford Fuel Valve.jpg
    74.7 KB · Views: 309
Though I've done many of these selector valve rebuilds, I have only this one pic of the oem valve mounted in the correct position! And...it also has had the tank connection plumbing fudged with hose barbs, so it is a close match for what malcolm should end up with.

This valve is clearly marked on the casting as "1" (on the left), "2" (on the right), and "out" (the center fitting).

The cable anchor and the position of the selector valve actuator lever can't be seen as it's on the rear of the valve and hidden. And there is only one way the cable can connect to the lever and housing anchor.

So to correctly plumb the tanks to the valve, the rear tank goes to the #1 port, and the front tank goes to the #2 port.

And before anyone says something, the convoluted hose in that pic is a proper liquid fuel-rated hose made for the purpose of "universal" plumbing of the fuel filler neck, p/n 23934. The correct gates p/n for an oem-type molded replacement for that hose would be 24715 and would have to be trimmed to fit.

This pic and the p/n info are courtesy of our ihon member here, "ccctrumpet".
 

Attachments

  • OEM Tank Selector Valve.jpg
    OEM Tank Selector Valve.jpg
    94.3 KB · Views: 318
Hey, mm. Thanks for the care pkg. It looks like the choke in the box is the right part number for a '73 with a 304/345 2bbl, so it should work. Still have to find me a 4mm impact hex to remove the painted over bolts in the 345, though, before I test fit it.
Also, I'll have to remove the fuel selector cable and switch from the wm and put that on the t-all in order to use the new selector. Apparently that was removed when the po put in the electric model. I haven't found where in the firewall the cable pops out, but it shouldn't be too hard once I get under there and root around.
I'll send back over the stuff I don't use and the rebuilder selector next week.
I've run the t-all up and down the street once or twice but don't want to get too far from home yet, with me using my boat tank in the front seat! The tranny is markedly better but I'm not yet convinced it's gonna be ready to go without someone who knows more about them than me takes a look. We'll see after I get some dependable fuel running to the carb, though.
 
Here's what the engine compartment looks like now. A bit of tidying up to do, and still need to hook up the choke stove and fuel selector cable. Hoping to get it on the road this weekend for a bit to blow out the cobwebs. I May need to take it on a 130 mile one way trip 2/7.
 

Attachments

  • DSCF0030.jpg
    DSCF0030.jpg
    87.8 KB · Views: 317
  • DSCF0031.jpg
    DSCF0031.jpg
    87.4 KB · Views: 309
  • DSCF0032.jpg
    DSCF0032.jpg
    91.5 KB · Views: 307
Well, I drove it around the block (a little over 2 miles) and then got brave and ran it down to the closest gas station. Filled up the passenger tank (it only took about 4 gallons-thanks for the almost full tank, po!), and then vacuumed out all the debris from the under the rear seat. It must have been used to haul yard debris and/or firewood given the amount of compost back there.
I then drove it home, checked and topped off tranny fluid level, oil and antifreeze. Tranny was low, but I wasn't exactly sure how much to put in after dropping the pan and making the band adjustment, so I expected as much.
The tranny shifts first to second only at about 20-25 mph, and it doesn't much want to go out of 2nd to 3rd until probably 45. So, it seems even though I thought I adjusted things appropriately per the great instructions on this site, I still did something wrong. Basically, I believe after turning in/out the set screws, I screwed it in to 72 in-lbs, then backed off 2.5 turns and locked them down.
Any thoughts on what I should check out to correct this?
 
I'm sure you did your band adjustments properly. Not much you can screw up there if you follow the directions. The bands don't have nearly as much to do with your shift points as does the throttle pressure control arm, more commonly known as the kickdown rod. That's the first adjustment I'd be looking into. What you describe leads me to believe the rod is adjusted too long which is causing your shift points to happen at a higher than optimum speed under normal acceleration. I gotta believe the proper procedure for making that adjustment has been outlined multiple times in the transmission tech subforum. The way I've always done it is this: I crack the throttle open all the way while observing the movement of the adjoining control arm down on the transmission. What I'm looking for is full actuation of that arm at wot, but no more than is necessary to make it so. Then I test drive and make fine tune adjustments from there. I've been satisfied with the results. Under normal acceleration I experience smooth upshifts at reasonable speeds. When I get on it like I mean business, the thing runs out hard and strong and the shift points are a good deal higher than normal. That's the way its supposed to be.
 
Good to know. I'll read into the tranny tech a bit. That sounds like the issue, as I made no adjustment to that when I reattached it.
 
So here is my setup. Everything is on my '73 t/all with the exception of the 345 and the Holley carb.
I cannot seem to adjust the throttle cable to allow wot, with or without the kickdown rod in place. I feel like an idiot.
When I adjust the clevis to allow the rod to be in a neutral position, I can't really work the throttle at all. It seems all bound up. Any thoughts based on the pics? Note the throttle cable is not in any particular position here. I don't have the cable locked down.
Should I post a thread in another spot?
 

Attachments

  • DSCF0147.jpg
    DSCF0147.jpg
    90.8 KB · Views: 291
  • DSCF0148.jpg
    DSCF0148.jpg
    88.7 KB · Views: 294
The slotted throttle to kickdown linkage arm where it is attached to the throttle linkage needs to ride loosely on the hub of the throttle cable stud. If it is firmly attached, there will be a bind every time.
 
Ok, I have adjusted and locked down the throttle cable so I can press the pedal and obtain wot. However, when I attach the kick down after spinning the clevis to alow me to put in the pin in a neutral position, when I try pushing the pedal again, it barely moves the throttle. Is there something I might need to do down at the tranny end of the kickdown linkage?
 
ok, I have adjusted and locked down the throttle cable so I can press the pedal and obtain wot. However, when I attach the kick down after spinning the clevis to alow me to put in the pin in a neutral position, when I try pushing the pedal again, it barely moves the throttle. Is there something I might need to do down at the tranny end of the kickdown linkage?

Nothing down at the throttle lever on the tranny other than a "keeper". All adjustment is done topside.

With the throttle at idle, the throttle rod to the trans is closed. As you open the throttle slowly, the throttle lever runs parallel so that at wot the throttle rod on the trans is all the way back. That is the simple way to state this!
 
Have you tried actuating the kickdown rod manually with it d/c'd from the throttle linkage? Does it travel free and easy? I think your issue lies in what I mentioned in my previous post. Sure, you are now able to achieve wot with the kd rod d/c'd, if it takes 3 tons of force to do it, that dog ain't gonna hunt. You should be able to operate the throttle to wo fairly easily by hand, yet the return spring should have enough tension to snap the throttle black to full close without hesitation.
 
It's all clearly listed in mm and other folks' threads. There can be nothing touching the kickdown rod. Well, in my case there was! When moving backward, the rod lightly touched against a wiring harness. It looked to be clear of it, but I guess it was just enough to screw me up.
It should be good now. I will drive it again in a couple days and see how it up shifts. I am reasonably satisfied that will be the end of that.
In fact, this prompted me to put the little l bracket back below there to attach the wiring harness onto it.
 
I had a bucking problem when taking it on recent test drives, and thought it mught be tranny related. Turned out to be fuel delivery from the passenger tank. The driver side is so far working out nicely (as did my boat tank in the floor!).
I am taking it in this week to have a guy replace u-joints. The front shaft is rusted and froze up. It is definitely noticable when driving it. I am going to have all of them replaced at once so that won't be an issue again.
I found a mechanic in town who used to work for the gov't in tampa, and their entire fleet was IH's. So, he's worked on about every model IH, every issue, and he is reasonable price-wise. I might even give him mm's 'short list' of things that needed to be done, and just have him take care of the remaining items that I have not already done.
I wanna get this thing roadworthy and trustworthy! Until then, I have been driving my '73 1010 wagonmaster.
 
A couple pics of one of the u-joints. Sorry for the blurry one. They were all in pretty dire straits. Note how out of round it is. As you can guess, it drives like a different vehicle now.
 

Attachments

  • DSCF0388.jpg
    DSCF0388.jpg
    45.2 KB · Views: 300
  • DSCF0387.jpg
    DSCF0387.jpg
    80.9 KB · Views: 267
  • DSCF0386.jpg
    DSCF0386.jpg
    52.3 KB · Views: 277
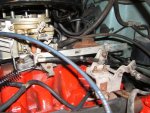
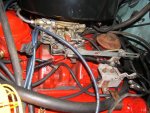
I got the a/c up and running. Turns out it wasn’t the blower motor necessarily but the off/low/hi vertical switch on the head. If you jiggled it around, it would kick in the fan, but then blow the fuse because it was a bit burned up inside. I am trying to find a replacement for that switch but until then have a simple toggle switch to power it on.

Also, on the a/c, the paper/wire vent ducts would break up pretty well upon disassembly/reassembly, so I duct taped those suckers up.

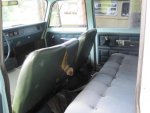
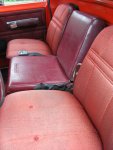
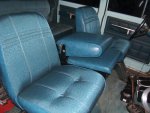
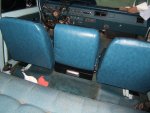
On the interior, I am about to buy up some of the factory blue fabric and vinyl to reupholster the front bucket/console seating. I am excited about that. Got a quote of $250 to do the front with me buying the fabric. I think that is a pretty fair price considering the other quotes I got here locally. Plus, I saw the guy’s work and it is pretty good. Also, my wife ok’d me buying carpet and headliner. So, when the seat is out, I will try to coordinate the other interior stuff. I am still playing around with the tailgate handle so that it works properly. Not sure if I will bother painting that cover, or buy the full carpet, which will cover it up. I bought a ¼” rubber bed cover from tractor supply ($65) that is for a chev 8’ bed that fits the entire cargo area pretty darn good with the rear bench down. I’ll keep that regardless of whether I buy the full carpet or not.

Exterior – believe it or not, there is a pretty good match from walmart on the blue paint color in spray cans. Good enough for those touchups where the paint chipped around the side trim. I got the front bumper aligned better and the psgr front qtr pulled below the tank filler that was pushed in a bit. I also used some of the extra wood grain vinyl to patch the area under the filler and misc knicks in it all around the vehicle.

Mechanically – nothing going on right now. Will definitely need to drop my fuel tanks once I get them low enough in fuel to make it easy. I found a place in town that will hot tank ‘em for me. What’s a reasonable price for something like that?

Other than that, I am still pretty happy with things, and, who knows, with this much time and effort into it, maybe I will own it for more than a year! Maybe!
 
Back
Top