My 14th IH owned, the '73 1110 4WD T-all

I've been concentrating on homestead chores man and haven't spent much time around here this weekend. I see ya called sometime yesterday tjough!

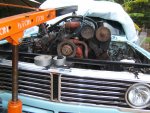
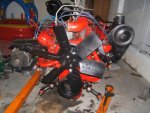
Prolly got the motor out by now,...but there are four bolt that retain the torque converter to the flex plate that enter from the "front" of the flexplate after you remove the dust cover. Those need to be removed so the torque converter can stay inside the bellhousing, we'd rather the tc did not come out of the trans at this point.

Then the engine will come forward about three inches as you come up with it by manipulating the lift. Keep the engine level coming out and when going back in (level means that if the front of the truck is raised up for access, then the front of the engine has to be raised also as it comes up).

Normally the oil pan can stay in place since you move it right up against the crossmember before lifting out of the hole, if it touches the crossmember, that is no big deal, just don't let it bang hard and dent it, you are gonna need that pan!
 
Weeeelllll,
thanks for the reply. I took off the oil pan and oil pump, but didn't take off the torque converter. It still came out straight and a lot easier than I thought it would be for just one guy doing it. Hope I didn't damage anything.
Note I already put on my new 31x10.5's off the wagonmaster onto the rims I just snagged. I couldn't wait.
Here are a couple pics...
 

Attachments

  • DSCF9562.jpg
    DSCF9562.jpg
    93.6 KB · Views: 386
  • DSCF9569.jpg
    DSCF9569.jpg
    89.1 KB · Views: 350
  • DSCF9573.jpg
    DSCF9573.jpg
    74.4 KB · Views: 379
Get the snout of that torque converter sealed up using that duktape! Do the same on the input side of the tranny, ya gotta keep any kinda stuff out of both at all costs!

Go ahead and remove the torque converter now, if you turn it "hub down" you will drain oil out the snout so be careful.

Once everything is cleaned up and you are ready to install the other motor, then you will need to install the converter onto the trans first, making sure it's fully engaged, and then put some sort of retainer on one of the small dust cover holes to keep it pushed back until the motor is bolted completely to the bell, then you will bring it forward and engage with the flex plate. See these threads so ya don't end up breaking the inner rotor on the tranny oil pump:

http://www.forums.IHPartsAmerica.com/transmission-tech/5136-2-differant-727s.html

And:

http://www.forums.IHPartsAmerica.com/transmission-tech/1679-727-tc-r-r.html
 
Open bell housing is sealed up, converter, too.
Putty knife and degreaser is working like a charm on the frame and stuff. Almost 1/8" thick in spots! Yummy!
Mm, I think you mentioned black satin paint does the trick in the engine compartment but can't recall the name you prefer. I think you also mentioned the one close to IH red if I elect to paint the oil pan once I clear that out. I imagine the brand they sell at the local tractor supply that's IH red is more for exterior where there isn't much heat or oily conditions.
Any thoughts on rattle can ceramic hi-temp on exhaust manifolds? What sort of prep should I do on them first?
Not trying to make this rig look too spiffy, just better than it did.

Oh, and to answer a previous question - the choke stove/connecting rod is on the 4bbl Holley on the 392, but there isn't one on the 345. Will that work?
 
Last edited:
Ok, I'll send you the proper choke stove setup for a 345/2210 carb. The one on the 392 could be made to work though the bend in the rod is not correct and I hate to butcher stuff that you are going to use in the future if you build that engine.

The "red" paint I use is van sickle implement enamel from most farm/ag supply stores. It's the case/IH red stuff, I'm not particular as to which of the eight or so different "IH red" formulas I use, but the van sickle stuff is definitely a superior product. I use it for all engine "paint" applications, but it will eventually burn off any exhaust manifold. No need at all for any "engine paint" formulation, that stuff is a waste compared to implement enamel.

I've also tried to use the stuff many commercial engine builders use, that "aervoe" stuff and find it nowhere near in the same league as van sickle, so I'm done with that product.

Personally, unless the exhaust manifolds are done in ceramic, I think anyone is just wasting time. To have any luck with the various rattlecan coatings, they need to be media blasted and then run through the dishwasher to remove the blasting dust from the pores. Then the stuff will burn off anyway, just takes longer.

The semi-gloss or "satin" black I use and keep here is plain old krylon "rust tough" in "semi-flat". It's an absolute perfect match to that high end "chassis black" you see on frame-off restos. Some refer to that stuff as "GM chassis black". I've used the chassis black in rattle cans, locally I find it at the only auto body supply warehouse in the area, it's a specialty/trade product used for touch-up and is about $12 a can, the krylon is absolutely the same color/tone and appearance when applied over that stuff.

I've also put a couple of sticks of that welding rod in the box for ya in case ya need to rebuild the tailgate latch system. Mine totally took a dump again last Friday, so I had to gutout the tailgate again, remove all the latches again and polish everything this time and give the schnizz some deep lubrication. So I replaced the latch "wires" again and now it works like new.
 
Here's a quick update -
I've pressure washed the engine compartment, rattle canned the frame and such in black semi gloss. I've also removed the flexplate and flywheel from the 2 engines. I will likely reuse the bolts and will clean them with a wire wheel first. Also, I've swabbed out their bolt holes with alcohol using q-tips. I'll use permatex #2 when I put those items back together.
I also have everything off the 392 and cleaned up, ready to put onto the 345. Oops, except for the dipstick.
And, today I got a few minutes to pressure wash the 345.
Still haven't seen that care pkg with the carb and the oil pump tool for prelubing the engine!
I think that is about all I can do until the box shows up.
 
here's a quick update -
I've pressure washed the engine compartment, rattle canned the frame and such in black semi gloss. I've also removed the flexplate and flywheel from the 2 engines. I will likely reuse the bolts and will clean them with a wire wheel first. Also, I've swabbed out their bolt holes with alcohol using q-tips. I'll use permatex #2 when I put those items back together.
I also have everything off the 392 and cleaned up, ready to put onto the 345. Oops, except for the dipstick.
And, today I got a few minutes to pressure wash the 345.
Still haven't seen that care pkg with the carb and the oil pump tool for prelubing the engine!
I think that is about all I can do until the box shows up.

I just finished a second 2210 carb for your "experiment". The first one turned out to be shit!

I'm rushing now to get the box to the p.o. In the big city so it will leave tonite, but I May not make it. We've been hit with some snow over the last two days and the roads are now clearing up some so I don't know what the sitch is in town.
 
Today I dropped the oil pan in the 345, removed the oil pump and fitted the pump from the 392 onto the 345.
I also removed the valve cover gaskets in preparation for running my electric drill on the oil pump for 10 minutes and getting the 345 lubed up, following the procedures laid out in the 'old IH iron' doc.

Questions: how do I remove the dipstick tube off the 392 (that is in the front passenger spot adjacent to the fuel pump), and how do I remove what appears to be a metal plug in the same spot on the 345?
 
today I dropped the oil pan in the 345, removed the oil pump and fitted the pump from the 392 onto the 345.
I also removed the valve cover gaskets in preparation for running my electric drill on the oil pump for 10 minutes and getting the 345 lubed up, following the procedures laid out in the 'old IH iron' doc.

Questions: how do I remove the dipstick tube off the 392 (that is in the front passenger spot adjacent to the fuel pump), and how do I remove what appears to be a metal plug in the same spot on the 345?

The dip stick tube on the 392 "front stick" is simply "pressed" into the block with a light interference fit. Gently work it back and forth and around while pulling up, you May need to rig a prybar on it with a pair of vise-grips for a pry-point, but do so gently.

This is the "topic" I was trying to remember to discuss with you yesterday when the battery died on my phone!

The "plug" in the 345 block is either an aluminum plug or a steel plug that looks like a rivet (I think it originally was some pattern of a rivet).

By far, the easiest way to deal with this is using a long drift from inside and driving the plug up and out. Even if there was room to clamp on vise-grips, I don't think you could pull the plug out.

Use that same sealant you used on the flex-plate bolts and wipe some on the dip stick tube before inserting into the 345 block as insurance.

This is the "topic" was trying to remember to discuss with you yesterday when the battery died on my phone!
 
Getting pretty far along here. I put on the dipstick, checked for proper lubrication of left and right rockers by going thru that 'old IH iron' doc, buttoned back up the valve covers, mounted the a/c bracket and alternator, and power steering pump, and pulleys. The fan is just loosely bolted for the moment.
I've also been cutting new heater hose, etc, getting ready for the new hookups.
I have the rpt engine struts mounted and think I am about ready to drop the engine back in place. The rebuilt carb showed up last week (thanks mm!) and things are looking good to put her this weekend.
Though I've been trying to do this as cheaply as possible, I am trying to get this replacement engine in with as few snags down the road, so it is taking a bit longer to get in than I'd like.
Oh yeah, I am going to adjust the 727 transmission bands before I put the engine back in. I hear it's a lot easier to get to the kickodwn one that way. Just waiting for my in/lb torque wrench to show up from harbor freight. Should be here in time for this weekend.
 
Last edited:
Michael,
you don't know the part number for that choke thermostat for the carb, do you? I think you were gonna send one down, as I don't know if the one from the 392 is the right app.
 
Mm - thanks for the heads up on proper seating of the torque converter. I've got the 345 bolted in, but lost too much daylight on it to get much further. If it doesn't rain much tomorrow, I might get a chance to bolt the torque converter on to the flywheel, put on the cover and do the exhaust and radiator bolt on. Next will be the carb, linkage and vacuum hoses, then electrical. But that's a dream getting all that done tomorrow. I used up too much 'me' time today getting the engine in. But it was worth it!
 
Does anyone have a part # for an exahust regulator gasket number, ,a.k.a. Heat riser gasket?
I haven't found a hit at napa or rockauto.com. Wonder if I can get one from anywhere besides sss?
 
I went ahead and bought a metal heat riser gasket and metal donuts through super scouts. I wasn't able to find them anywhere else, and from what I understand, the fiber ones you can get break down rather quickly. Prices were $12 for heat riser gasket and $19 each for the donuts.
 
Well, I got just about everything done and the engine is running. It's even running off either fuel tank without the use of the electric fuel pump I hooked up but have not wired yet.

Tranny is verrrryyy sluggish and you have to give it quite a bit of gas to get her rolling. I hope to try and get under her to adjust the bands tomorrow, if not, Tuesday. Sure hope that takes care of the tranny, as I'mm not anxious to spend much more on it right now until my wagonmaster sells.

Looking for an air cleaner for a 2 barrel Holley if anyone knows of one.

Should be able to put the hood back on, too, then give a good washing and drive it around the neighborhood a bit. It's gotta look good even if it ain't running perfect yet!
 
I went ahead and bought a metal heat riser gasket and metal donuts through super scouts. I wasn't able to find them anywhere else, and from what I understand, the fiber ones you can get break down rather quickly. Prices were $12 for heat riser gasket and $19 each for the donuts.

I doubt the metal heat riser gasket (IH# 212013r1) is availabe from the generic auto parts store...

Both are IH parts (gasket and donuts from sss) and should be available from any light line dealer.

There are aftermarket donuts availabe - different people prefer different ones -- two are shown in the ihon online store.
 
well, I got just about everything done and the engine is running. It's even running off either fuel tank without the use of the electric fuel pump I hooked up but have not wired yet.

Tranny is verrrryyy sluggish and you have to give it quite a bit of gas to get her rolling. I hope to try and get under her to adjust the bands tomorrow, if not, Tuesday. Sure hope that takes care of the tranny, as I'mm not anxious to spend much more on it right now until my wagonmaster sells.

Looking for an air cleaner for a 2 barrel Holley if anyone knows of one.

Should be able to put the hood back on, too, then give a good washing and drive it around the neighborhood a bit. It's gotta look good even if it ain't running perfect yet!

The trans did not show signs of overheat when I checked the oil, but no doubt it needs a complete service as we know. You are going to find the rear (low/reverse) band very "loose".

Looking back, I think the problem I was having with no fuel delivery was actually caused by that electric tank selector valve either not switching or "hanging". That is a cheezeball Ford-type aftermarket replacement item and no doubt is affected by this shit e10 fuel. If it were mine, I'd replace the oem tank selector valve with a rebuilt from us, but first pull the cover off of it and verify that the cable system for the oem valve is functional.

I didn't realize you did not have a correct air filter set for that 2210 carb! I should have found one and included, I don't have any left here now though I do still have a few for the 4v Holley with the industry-standard 5-1/8" opening. Jeff has many of those Scout II/2210 air filter housings on hand though.

Check your other post in the electrical tech sub-forum for an update. Also, did you get the oem ignition switch operational again?
 
Since malcolm has decided to mount an oem fuel tank selector valve, and the po has hashed the plumbing to accommodate the electric valve, we need to define the plumbing arrangement to put this stuff back stock!

For reference, this pic shows the hashed Ford-type electric fuel selector valve on the vehicle under discussion. The feed hoses from the tanks have been previously "converted" for use with barbed fuel hose fittings, that is not an oem deal, but it certainly is an ok way to do this. So we're gonna retain the "soft hose/barb" plumbing when the oem valve is re-installed. In order to do that, he'll receive a freshened oem tank selector valve that has had 5/16" hose barbs installed already.

The next problem is making a positive id as to which hose is which on the current electric valve setup. So here's the analysis malcom:

the top (single) hose in the pic is the "fuel out" to the fuel pump. That is easy to see!

Of the bottom two hoses, one goes to the passenger side front tank (what we refer to in a d series Travelall as the "#2 tank" or auxiliary). From that picture, I can't determine which hose that is, but malcolm should be able to figure this out using a flashlight and following the hose run down the top of the passenger-side tank.

Once the passenger side tank feed is determined, then of course the other hose goes to the driver-side rear tank and is what we will call the "#1" or primary tank.

This is important...if the hoses are connected in reverse sequence, then the placard for the manual fuel tank selector control on the dash will be incorrect which leads to all kinds of confusion when selecting tanks and selecting the correct tank fuel level sender!!!

Next post....
 

Attachments

  • Ford Fuel Valve.jpg
    Ford Fuel Valve.jpg
    74.7 KB · Views: 366
Though I've done many of these selector valve rebuilds, I have only this one pic of the oem valve mounted in the correct position! And...it also has had the tank connection plumbing fudged with hose barbs, so it is a close match for what malcolm should end up with.

This valve is clearly marked on the casting as "1" (on the left), "2" (on the right), and "out" (the center fitting).

The cable anchor and the position of the selector valve actuator lever can't be seen as it's on the rear of the valve and hidden. And there is only one way the cable can connect to the lever and housing anchor.

So to correctly plumb the tanks to the valve, the rear tank goes to the #1 port, and the front tank goes to the #2 port.

And before anyone says something, the convoluted hose in that pic is a proper liquid fuel-rated hose made for the purpose of "universal" plumbing of the fuel filler neck, p/n 23934. The correct gates p/n for an oem-type molded replacement for that hose would be 24715 and would have to be trimmed to fit.

This pic and the p/n info are courtesy of our ihon member here, "ccctrumpet".
 

Attachments

  • OEM Tank Selector Valve.jpg
    OEM Tank Selector Valve.jpg
    94.3 KB · Views: 379
Hey, mm. Thanks for the care pkg. It looks like the choke in the box is the right part number for a '73 with a 304/345 2bbl, so it should work. Still have to find me a 4mm impact hex to remove the painted over bolts in the 345, though, before I test fit it.
Also, I'll have to remove the fuel selector cable and switch from the wm and put that on the t-all in order to use the new selector. Apparently that was removed when the po put in the electric model. I haven't found where in the firewall the cable pops out, but it shouldn't be too hard once I get under there and root around.
I'll send back over the stuff I don't use and the rebuilder selector next week.
I've run the t-all up and down the street once or twice but don't want to get too far from home yet, with me using my boat tank in the front seat! The tranny is markedly better but I'm not yet convinced it's gonna be ready to go without someone who knows more about them than me takes a look. We'll see after I get some dependable fuel running to the carb, though.
 
Here's what the engine compartment looks like now. A bit of tidying up to do, and still need to hook up the choke stove and fuel selector cable. Hoping to get it on the road this weekend for a bit to blow out the cobwebs. I May need to take it on a 130 mile one way trip 2/7.
 

Attachments

  • DSCF0030.jpg
    DSCF0030.jpg
    87.8 KB · Views: 375
  • DSCF0031.jpg
    DSCF0031.jpg
    87.4 KB · Views: 367
  • DSCF0032.jpg
    DSCF0032.jpg
    91.5 KB · Views: 361
Well, I drove it around the block (a little over 2 miles) and then got brave and ran it down to the closest gas station. Filled up the passenger tank (it only took about 4 gallons-thanks for the almost full tank, po!), and then vacuumed out all the debris from the under the rear seat. It must have been used to haul yard debris and/or firewood given the amount of compost back there.
I then drove it home, checked and topped off tranny fluid level, oil and antifreeze. Tranny was low, but I wasn't exactly sure how much to put in after dropping the pan and making the band adjustment, so I expected as much.
The tranny shifts first to second only at about 20-25 mph, and it doesn't much want to go out of 2nd to 3rd until probably 45. So, it seems even though I thought I adjusted things appropriately per the great instructions on this site, I still did something wrong. Basically, I believe after turning in/out the set screws, I screwed it in to 72 in-lbs, then backed off 2.5 turns and locked them down.
Any thoughts on what I should check out to correct this?
 
I'm sure you did your band adjustments properly. Not much you can screw up there if you follow the directions. The bands don't have nearly as much to do with your shift points as does the throttle pressure control arm, more commonly known as the kickdown rod. That's the first adjustment I'd be looking into. What you describe leads me to believe the rod is adjusted too long which is causing your shift points to happen at a higher than optimum speed under normal acceleration. I gotta believe the proper procedure for making that adjustment has been outlined multiple times in the transmission tech subforum. The way I've always done it is this: I crack the throttle open all the way while observing the movement of the adjoining control arm down on the transmission. What I'm looking for is full actuation of that arm at wot, but no more than is necessary to make it so. Then I test drive and make fine tune adjustments from there. I've been satisfied with the results. Under normal acceleration I experience smooth upshifts at reasonable speeds. When I get on it like I mean business, the thing runs out hard and strong and the shift points are a good deal higher than normal. That's the way its supposed to be.
 
Good to know. I'll read into the tranny tech a bit. That sounds like the issue, as I made no adjustment to that when I reattached it.
 
Back
Top