1964 Travelall and 1967 Travelette All Wheel Drive's

Pulled the front drive and a u-joint cap came off along with all of the needle bearings tossing around on the floor. Washed them needles and the cap off real good and in my own solvent mix. Greased the id of the cap and loaded the needles back in place. Problem avoided.

Man, :crazy: I don't usually complain about getting dirty but that front drive shaft yoke was a friggen mess. Took 1 hour to chip the 47 years of crap including rocks from around the yoke nut and retainer nuts. Impacted the nut off, pulled the seal/bearing retainer and next weekend she goes back together.

Anyone know were to buy a np202 front output bearing retainer gasket? I used moto seal to eliminate the rear output bearing cover gasket. This is typically what I use when the gasket thickness is of no consequence to bearing preload. I'll probably do the same with the front if no source emerges.. :icon_lol:

yeah I had limited time so didn't get any pix but the process is reasonably well out lined here... Sorry. :icon_sad:
 
Robert, have you ever "banged" out a gasket. You can make perfect gaskets with the gasket material of your choice and a small ball peen hammer.

With a big enough piece of gasket material to cover the part. Start by holding the gasket in place and tapping with the ball of the hammer around a bolt hole. After that hole is open use a hand tightened bolt through the hole to hold that side of the gasket in place. Now do the same again with hole on the opposite side of the part and add a locating bolt.

Now you can tap around the inside and outside of the entire part to cut a perfect fitting gasket. It works great, it just takes time.
 
I've made gaskets every way you could think of. :d
including but not limited to, the hammer method, wire edm, cnc, water jet, laser and razor blade.
Thanks for the hint.
 
Last weekend:
I ended up making a bearing retainer gasket because the snap ring on the front drive shaft yoke was net at nest to the clearance afforded by the cover. No more leakes.
I also changed the engine oil while I was dirty.

This weekend,

I set the new bed on the chassis and all of the mount holes lined up perfectly.. Then I cut up the rubber sheet with cloth in it for the mounting point pads and slipped them in along with new hardware.. Looking more and more like a pickup every weekend...

DSCN0130 (Medium).jpg

DSCN0124 (Medium).jpg

DSCN0123 (Medium).jpg

DSCN0122 (Medium).jpg
 
Last edited:
Hi rob,
interested in both, the tail light pigtail that attached to the back of the bulb location is important.

I would like to see a couple of photos of the bumper. Is it a factory bumper?
 
Ran new wiring from the oem harness to and across the rear of the for for the lights. I aquired a pair of nos backup lights ( also 1958 buick), nos grote 420 tail light lenses (with the IH cast into them). The backup lights are the earlier version but I like them. I have begun to buy the parts for the later 68 bu lights.
Painted the inside on the tail light buckets white for more reflected light.
I also have

mounted the plate and began to install the 7 pin trailer connector. I will install a brake controler for the electric brakes.

Took her for a long highway drive and again I'm impressed by how good it's road manners are..

photo 2 (Medium).JPG

photo 1 (Medium)fix.JPG
photo 3 (Medium).JPG

photo 4 (Medium).JPG

photo 5 (Medium).JPG
 
Last edited:
Finally for the front window back in. I had the right and left front drip rail, and the right side windshield opening brow rust fixed. Not easy but it came out nice. Takes a talented metal guy.

Installed a new old stock Robert shaw thermostat and replaced the coolant. It had trouble maintaining thermostat operating temperatures and did have the wrong stat in it but turns out that the radiator is fouled with deposits but still solid. It doesn't over heat but struggles none the less. After using the truck to move my stuff in to the garage from the hanger I'll pull it and descale it..

photo 2.jpg

photo 5.jpg

photo 6.jpg

photo.jpg
 
Interesting that after installing the new correct t-stat and putting 150+ miles on the truck it is running perfectly cool. Staying right on the stat temp with-in a needle width or two depending on outside temperatures.

I think I have made 6-7 trips to the hanger and back to my house now and another couple road trips, she is still running great and has not used a drop of oil. Also not dripping anything.

My last trip was to pickup my 67 suzuki, stopped to grab lunch and had to take a picture...
IMG_1434.jpg
 
Got stuck driving home from a bbq last night and my wiper motor was frozen. I knew this was bad already but how friggen often does it rain in the summer???? Well it did and hard. Actually raining cats and dogs now.
Thought I'd do some fixin today.

The motor was not going to go easily so I pulled the armature and stator out. What a rusted up mess. Had to unsolder the power fires from the gear box and totally disassemble it. Got it all de-rusted it the best I could and verified the windings were ok. There is still enough oxide on the stator windings that it would probably leak to ground if it were high voltage but at 12 volts it is ok for now. Back together working now and ready for some rain.

I also had a cracked and leaking right side fuel filler hose. Pulled that apart and replaced the upper flanged rubber hose along with a new filter and fuel line. Now I have 30 gallons onboard and all is good.
 
So I had some time today waiting for the city inspector on the garage so I spent some quality time on the t-ette.

I have about 1600 lb. Of granite counter tops that my sister bought and had delivered to my house. The problem is that it is still here 6 months later. So I offered to haul it to mammoth lakes CA in my travelette. I now have a few things to do before the trip.

To catch up on the last few week ends.
1) removed radiator, to accomplish a good descaling. It was pretty ugly in side.
Descaling involves hooking a circulation pump to the radiator so an acid/water mix could be pumped through it until it is clear. This mix is 1 gallon of pool muriatic acid 17.5% (dilute hydrogen chloride) hydrochloric acid and 3-1/2 to 4 gallons of tap water. Photo of the rig is included. I don't recommend this process to anyone unless they understand the risks 1000%. Acid is very dangerous and can injure or harm the persons involved. Safer to take it to a radiator shop and have them rod it out or whatever they do. I am doing this myself.

Some before and after photos that my phone could see. I used a see snake to view the tubes not visible through the openings and saw them consistently blocked some % like the photos and worse.

2) adjust the brakes. Done!
3) change the differential oil (tomorrow)
4) straighten and replace the front bumper. 1/2 done today. Straightening setup photo included. Pie cut the outer skin and welded it up after the desired couture was reached.
5) vacuum the air conditioner system and recharge with r**. Done! Works like a champ sniff test found no leaks. Well not yet.
6) replace the upper speedometer cable. Done!
7) pack up spare parts and tools for the trip.
8) make tailgate support chains. Tie downs scared me. Done! There should be a set coming. From what I've been told.

IMG_1465.jpg

IMG_1479.jpg

IMG_1467.jpg

IMG_1480.jpg

IMG_1475.jpg

IMG_1471.jpg

IMG_1484.jpg

IMG_1485.jpg
 
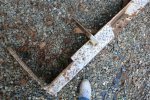
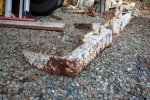
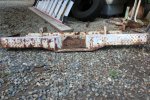
Finally got the bumper straight, primed and color sanded twice and, painted. I like the silver better than a white or black. Fits nice. Had to pie cut the top flange on both sides including the po added braces on the back side. Welded them locked straight and ground them flat. Cain't even tell now..

With a big help from a friend I got the payload loaded and secured. Guessing 1500 pounds.

Got all or the emergency rations (tools and supply's) loaded for the trip to mammoth.

Re drilled and mounted the passenger side sun visor that was removed when the drip rail repairs were done.

Actually washed the dirt off with soap and water and, a large green scotch brite pad. Looks better.

While trying to figure out fuel capacity the sales literature says the aux tank is 14 gallons and the 19 gallon tank that is the standard single tank is swapped out for a 15 gallon tank... This was listed on the LST as having the aux tank along with the selector valve and gauge switch which it does..
Upon looking at the tanks I could see that the right side tank is significantly deeper than the left.. So I measured them to come up with close volume. The right and left were the same except for the depth. Right= 7d-13w-50l 4550 in3/231=19 gallons, the left is 5d-13w-50l 3250 in3 = 14 gallons
my measurements and calculations took some liberties for rounded corners and shape intrusions in to the volume of each tank.. I feel they are accurate.
Seems like the original standard tank was left in from the factory or put back in some time in it's history. So happy to say I have 34 gallons on board.. Based on 8 miles/gallon I can go 232 miles with 2 gallons left in each tank. I'm hopping for 10. :crazy:

tomorrow, all that's left to do is suck out and replace the diff. Oil.
It is a bit dark. Probably quite old. Will have to wait till the trip to test this old IH out.

IMG_1488.jpg

IMG_1489.jpg

IMG_1493.jpg
 
Last edited:
The trip to mammoth went great, no issues what so ever. Averaged 12 mpg up and 13 round trip. Didn't use any oil that I could see on the stick.

The photo of the dash was about 1/2 the way up the sherwin grade after having to shift out of 4th to 3rd. Big gap between those two gears. I was wot in 4th for the entire 1/2 of the grade holding 50-55 then the grade increases just enough to knock the 304 out of it's sweet spot.
I ended up at 3500 rpm doing 35 mph as you can see at about 1/3 throttle. The temp a tad above mid way was ok. Never went above that in fact started dropping after being in 3rd for a while to below 1/2.

I think the old goat has proven her self..
IMG_1502.jpg

IMG_1505.jpg
 
I set the new bed on the chassis and all of the mount holes lined up perfectly.. Then I cut up the rubber sheet with cloth in it for the mounting point pads and slipped them in along with new hardware.. Looking more and more like a pickup every weekend...

24453d1396224610-1964-Travelall-1967-travelette-all-wheel-drives-dscn0130-medium-.jpg


Robert,

where did you get the parts to mount the bed? Mainly the springs. I just acquired a short bed for my project and it needs all new hardware to mount it up. Mine is a 1973 so some of it May be different. I know they use the springs like yours has though.
 
Last edited by a moderator:
Back
Top