Limited disassembly of a 1980 IC 196

Just to point out that this has nothing to do with anything you were/weren't told to look at, or anything you did or did not do. It also has nothing to do with Jeff or IHPA . I suggest calling Jeff Monday and see if he can get specific detail on the way the cam was ground.
 
Robert,
I agree 100%. Just to reinforce to anyone who might have thought otherwise, I was not implying anything negative about anyone or any product. That had not entered my mind at all and wasn't my intent. This has been a fun build otherwise and I have been appreciative of the advice, comments, and interest along the way. Unfortunately, these are mechanical devices and things don't always go as planned in spite of best efforts.

My only wish is to get this sorted out and the this engine up and running again.

So I was needing to give Jeff a call, anyway. :gringrin:
 
the piston ring is placed into the groove on the turbine shaft and the special plastic sleeve slipped over it so that the expanded ring won't snag (and ruin) itself and gouge the tight bore it rides in. In use, it does not rotate, but the shaft's groove rotates around it. It keeps oil out of the hot side. When you slide the turbine shaft "home", the plastic is forced off but isn't otherwise removed. When the turbo first operates, it will melt and blow away. I am not including pics of how the thick iron heat shield and special spacing spring is compressed so the turbine shaft can slide home, but one must be very careful with this step. I used a combination of 6" vice and a big c-clamp. Then the impeller is slid on....

The 5/16 - 24 nut that holds the impeller to the shaft is left hand, and torqued to 80 inch-lbs. The compressor housing's six bolts are likewise torqued to the same amount.

Most of these old turbo's turbine housings have been sand blasted, and that keeps the heat shield from compressing enough and it will then ride against the back of the turbine, which isn't a good thing. A special stainless steel ring is made to bring back the needed spacing, and is placed between the heat shield and the turbine housing. Then a special fiber gasket goes between the central housing and turbine housing, and the stylish v-clamp is torqued to 10 inch-lbs. I say stylish because this was the first clamp offered and shows in the parts books. Later production went "cheap" and a simpler band was devised. This happened to the corvair as well. Both IH turbos I acquired had the cheapie band, but I had an early style on hand. :thumbsup:

this is the gist of how a trw 300 series turbo goes together, and isn't a complete tutorial. But if you actually do this yourself, follow the manual. I left out some pics and steps.

If I can do this, any one can. I'm also including some pics of what I started with in the next posting....


Shifting gears here a bit. I wanted to include these pics of how the radial play is measured, because I did have some difficulty with the new (reproduced) bearing not being right and having to have the vendor spec one out for me and compare it to an oem reference piece. Radial play is the total side-to-side play taken at the compressor nut after reassembling the rotating assembly. It is a "combination" measurement and infers adequate tightness of the bearing's od to the housing bore, and the turbine shaft clearance to the bearing's id. It should not be more than 0.022". I was getting readings all over the map and found I didn't have my dial indicator mounted correctly. After fixing that situation, I zero the tip to one of the nut's "flats", then press away from the indicator, then pull it backwards on the same axis. Here I had 0.013" one way, and 0.004" the other, then did a cross-reading 90 degrees to this. No total measurement came in worse than 0.019". End play of the assembly was also within spec, what, 0.008". Also, impeller blade-to-housing clearance (blade at the inlet) when pushed to its worst position was 0.005". There's no spec for this other than "you either hit or don't", so I believe my running clearances will be okay. So I'm calling it all good. IMG_0497.jpg

IMG_0498.jpg

IMG_0499.jpg
 
Last edited:
Robert,
I agree 100%. Just to reinforce to anyone who might have thought otherwise, I was not implying anything negative about anyone or any product. That had not entered my mind at all and wasn't my intent. This has been a fun build otherwise and I have been appreciative of the advice, comments, and interest along the way. Unfortunately, these are mechanical devices and things don't always go as planned in spite of best efforts.

My only wish is to get this sorted out and the this engine up and running again.

So I was needing to give Jeff a call, anyway. :gringrin:

Kinda what I figured but it's easy to miss interpret the typed word, so I made my creepy little statment.

Mark we appreciate you putting in all of the time, sharing your project with us.. Very well done indeed.. :icon_up:
also I hope we have been able to help in return.
 
kinda what I figured but it's easy to miss interpret the typed word, so I made my creepy little statment.

Mark we appreciate you putting in all of the time, sharing your project with us.. Very well done indeed.. :icon_up:
also I hope we have been able to help in return.

All is well

edit: Sunday afternoon. Pulled the camshaft. It's easier to do when an engine is on a stand, you know. :) but not too bad after you get the grille and radiator out. Hopefully will have an opportunity to take this shaft down to sac to the folks that ground it, to see what's going on (week after this coming week).

Edit/update: this past week took the shaft and lifters to the shop that did the work. These folks were super helpful (I think I must have been dealing with the owner). He took the time and went over everything about the shaft, how it was ground, and the lifters, and took the time to explain all the issues involved. We don't know why that one pushrod stopped spinning, but there was no evidence that the lifter itself actually had stopped; he showed me how the surfaces told him so. The bottoms of the lifters were crowned and not scuffed, you could see where it had bedded and rode in the right location. Lobes weren't scuffed. One thought is that the lifter body itself kept turning around the lifter plunger, which stopped for some reason. Can happen and hurts nothing. In any case there was no reason to do otherwise than "put it back in and drive it". The ring on the bottom of the lifter appears to be just a circular scratch from a bit of trash but does not justify replacement. Couple others had similar marks. With all that, I'm content to clean it all up, coat the lobes and lifter bottoms again with break-in lube and go for it. It's been pouring here this week so this will have to wait till the weather clears! Just to be clear, no evidence anyone or anything had been done wrong; this May be just one of those things but I'm gratified that those involved took the time to look into things. Better safe than sorry, you know.
 
Last edited:
In follow-up to the update above, not exciting, but a couple of pics of the task ahead for a truck sitting out in the open. Raining for days but I have the hood closed and a tarp tucked in around the front clip waiting for an opportunity. Just rounded up the gaskets needed to do the job. Will clean the camshaft at the last minute...IM002247.JPG

IM002248.JPG
 
Last edited:
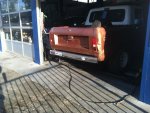
Finally on the road! Got the paperwork almost Done - I have it insured and a temporary plate, pending smog and the vin verification. So this morning drove it up to the little market for a tank of gas. Yesterday I drained out the last few gallons to make way for fresh gasoline. Tahoe is in the mountain range behind the truck. Note the multi-color paint. I think the original color was that tahitian red, and russett interior (per line setting ticket), but I had to replace a previously damaged left front that had been badly repaired, and also the lower valence. The right rear quarter is also smashed in, and right door dented. Like someone was drunk and sideswiped something. That's why this is my long-term project. But otherwise everything is now fairly straight.

What is good: the thing is a rattletrap but has no padding, carpet, door panels, etc. And the mud tires howl @ 55 mph. Suspension works great (for a Scout II) with all new spring eye and frame bushings, and the t19n I rebuilt shifts very nicely, but the detent spring that keeps you out of the reverse gate when shifting from 2nd to 3rd is soft. Usual weird sounds like a ringing (rattle) that I think is linkage or some such, but anyway, driving it several times down the foresthill road the seven miles to driver's flat and back reminded my why I love driving a Scout instead of my '85 jimmy. It's the relative coziness of the interior where you feel closer "to being one with the machine".

What is bad: it runs like crap. In all the years I've driven a cars and trucks, most with carbs, I don't believe I've encountered what I think Is a "lean surge" or roughness like this. Timing is set 5 btdc (instead of 0 per sticker) so that shouldn't be the problem. All the smog stuff is hooked up and working. Coming back up the grade from driver's flat (a sweeping curve about one mile or so long that goes from roughly 1200 feet to 2000 feet elevation, and the uphill grades subsequent to that, under moderate load the engine does pull, but misses like it's coughing - those brief, momentary losses of power. Does this with or without the egr. So….here's what I think, and welcome additional conjecture:

1) the carb is a 1940 but had been beaten up. I think I've got it back to where it should be working okay, but apparently not. Has the stock jet called for (#712) and since this was the last year of the smog motors, probably very lean, and without egr, too lean. Maybe I have a vacuum leak somewhere, but honestly, the only place I think left to leak is the intake manifold underneath - I don't find anything around the carb by using starting fluid. Or somewhere else! This is one thought.

2) the other is that I put in a brass float instead of the nitrophyl job, which sunk. Although they are interchangeable, could the brass float sit higher and has made my fuel level too low, giving a lean running condition? I'm going to pull the carb and add a bit more "level" to it. (thinking here from running tqs and the brass replacements had instructions to set them slightly different this way).

3) ignition is breaking down? It has the presolite w/internal module, but do those hard fail or can they go soft fail? There's a red mallory coil from the p.o. But I don't know if that's just chasing my tail to replace. Plug wires are new, running autolite 85s. How would I rule this out?

:mad2::mad2::mad2:

and a final reflection: I drove a '75 xlc w/345 up and down this road a thousand times. A 196 is not A 345! :lol:but I knew that going into this. So….when I get this all sorted out and smogged and my "plates", then I can set about improving the little engine's breathing. That was the whole point of this.

Update: carb mounting nuts seemed not very tight, replaced thick base gasket with thin one, bolted carb down tight. Thought if this was a vacuum leak, check this first. Checked plugs, seemed okay, put champion 12s back in. Went for test drive back down the hill - didn't get that far. Started running worse under any loading, occasional backfires it never had before. In fact, it wouldn't even get out of its own way. I think I have a prestolite ignition module failure going on that's now accelerating (an ironic way to put it). Why I think this is that after putting the camshaft back in and tried firing it up, it wouldn't, after a bunch of cranking. Doh!!! I had forgot to put the spark plug wires on. Cranking this style ignition without paths to ground isn't a good thing, and I'm leaning towards damage to the module. If that's the case I still need to get this thing smogged and don't want to spend any more than needed to rectify this, which probably means a pertronix.IMG_0524.jpg

IMG_0525.jpg
 
Last edited:
Mark, leaving the plug wires unhooked and open will usually beak down the secondary coil winding. Once the winding carbon tracks from jumping to ground internally it is done and susceptible to miss firing. This failure cause will usually not affect the trigger.
 
A big thanks, Robert. Got a new coil from napa (what's called for in the book) and put it in. Wow! Problems went away, all the backfiring, flat spots, and missing. The idle is even improved. A nagging flat spot that's bugged me all along is now gone, so I guess the word is that secondary voltage can break down and cause missing. A 196 is still a slug compared to the 345s I'm used to (but still better than the 152 I soldiered on with for years in my old model 80). So it looks like I am still on tract to take Friday off and get it smogged and vin verified at dmv.

The new coil measures 1.5 ohms across the primary terminals, and the msd blaster I took out was at 0.9 ohms, so I suppose it was dying.

Thanks again for pointing out a solution. I get to keep about $80 in my pocket, or rather, get to put it elsewhere into the Scout.
 
Got smogged today and passed with amazing numbers. I posted the ordeal over on the bp site, but regarding the engine, I'm pleased how clean it was. Of course, a rebuilt should be clean! I'm thinking that the quench (0.043") has something to do with it as well as the cat, but these numbers were about as good as my recently smogged 2003 camry! And this was done on the treadmill, not idling or run fast while stationary.

15 mph was co2: 13.0, o2: 2.5; max hc is 192, mine: 1 (not a typo); max co 1.36, mine: 0.00; max nox 1456, mind 575.
25 mph was co2: 13.3; o2: 1.7; max hc 115, mine 13; max co 1.16, mine 0.00; max nox 1316, mine 303. These numbers tell you the overall state of an engine and I think mine's good.

Now I get to put some of my upgrades on, until the next smog cycle in two years. Then that will be the last time it will need to pass California smog.
 

Attachments

  • IMG_0526.jpg
    IMG_0526.jpg
    77.6 KB · Views: 374
It's good to see a four-popper ihc live again but your statement that you only have to pass smog one more time troubles me.

As far as I know and unless I'm wrong, all '76 and newer cali vehicles will have to be smogged bi-anually. An '80 Scout is not exempt, unless the laws have changed just recently.

If the smog laws have changed, I'm unaware of such a change. I know I've passed on a number of '76-up scouts that have exhibited po disease under the hood that I didn't want to deal with.

Link to what appears to be accurate info; smog requirements

Ray
 
Ray,
I appreciate your pointing out the regulatory requirements, but that only applies to vehicles registered in California. In a little more than two years I'm moving to my property in the ozarks, where the smog laws are more relaxed. :lol:
 
Update: after re-installing the crank-fire system and removing the egr (left the smog pump intact because the engine stinks badly with the cat in place and no air injection), I've been driving it around and playing with the ignition map. The engine didn't have a good feel when using brained's map (other thread - lots of pinging) or the one bill-usn1 posted, which was worked out for efi. The takeaway is that each engine is different. I am zeroing in on a curve of my making that emulates the oem curve with some judicious tweaks in timing where I have determined, via data logging, where the advance is too great. In general, this Engine does not Like a lot of advance. Max mechanical at 3,000 rpm is 30 btdc and I've given it 32 @ 4,400, if I ever rev it that much - which I haven't! Today drove it around and stopped by IHPA, which is about 40 miles from me. This is the first time I've driven it where it runs well and I actually feel good about its performance, such as it is for an engine slightly less than 200 ci for a vehicle weighing 3,800 lbs with the aerodynamics of a billboard. The elevation changes in today's trip ranged from 800 ft to over 2,600 ft.

My first tank of gas, with aggressive driving, returned 18.6 mpg. We'll see if that is a fluke or a dependable reality. Also, Jeff commented that the engine sounds quiet, so that's a different set of ears and I'm feeling good about that, too.
 
Update: preparing the turbo exhaust hardware for installation. This includes the unique upward-dumping 3-bolt manifold and "the wedge". These items use two of the shim-style gaskets (one between the head and wedge, the other between the other side of the wedge and the manifold). Because this assembly must mount solidly to the head and cantilevers the weight of the turbo back to the head, I need to ensure the mating surfaces are flat and bolt up solidly. I detected obvious warpage so today took the items down to moore's machine shop in Auburn for surfacing. It turns out the wedge is within something like <0.004" flat, either side, so we'll pass on surfacing that for now. However, the exhaust manifold, like its 2-bolt brethren, is found to be severely warped. Moore will need to take 0.020" off the four exhaust port pads and the two buttons to flatten things. Since the shim gaskets are only 0.015" thick, not counting the raised embossing, leakage would soon ensue after bolting up. Right now I'm running the 2-bolt unit pictured, but am using a thick composition exhaust gasket to prevent leakage. I know it is warped to at least this degree. If you look closely at the picture of the manifolds, you'll notice evidence of leakage to the ports just left of center. This tells me that these manifolds warp in the same manner, I.e., the end ports bolt down tight and seal, and the center ports - the center casting - bows out somewhat and leak.

Here are pics of the parts I'm talking about.Turbo man with head spacer (Small).jpg

3 bolt vs 2 bolt backside (Small).jpg
 
Last edited:
Hi Mark, you might be interested in this. I'm running a set of stan's headers on my Scout. They would blowout the composite gaskets on a regular basis. About 12 years ago I made some copper gaskets out of some 3/4" soft copper pipe and there's been absolutely no leakage since then. My theory is that the copper provides good heat conduction between the header and head which keeps the temps both lower and even. I think this would work well on your precious turbo manifold.

To make the gaskets, I straightened the tube, slit it down the side and flattened it out. A steel gasket was used as a template and spray paint marked the areas to be removed. It only took about an hour to make both gaskets.

Thanks for the update, I've been following this with interest.
 
I am aware that there are thicker (more conformable) gaskets out there, in fact I am using my last corteco gasket. The problem isn't finding such a gasket so much as needing the wedge and manifold to bolt solidly together due to the tremendous leverages working to loosen them. The turbo and carb mount on the cast iron elbow, about a foot long, and 'cantilever' through the buttons on the manifold through matching fingers on the wedge, which, in turn, press against the side of the head. If you look at the normal 2-bolt job, you'll recognize that it doesn't just bolt flat against the four exhaust port pads, but also the shim gaskets have extensions to go between the head and buttons. So there are, in fact, six mounting surfaces to ensure a solid, rigid mount. I wonder how solidly the buttons press against the head once the warping takes place. As I noted above, the center ports appear to bow outward, I.e., there will be a gap between port and head in this area.

In short, slight flexing is acceptable with the normal mounting but is unacceptable for the 152t manifolding. I can see where even slight loosening of any of these components will lead to parts cracking and failure. I suspect this was not an unheard of situation with the original application.
 
you might consider using a remflex 5002 (4 cylinder)header/exhaust manifold gasket. I've seen these used with good results on both stock exhaust manifolds and headers.

Here is a link: exclusive features

Also look here: header gasket for IH 152/196/266/304/345/392 engine - International Scout parts

IHPA sells these and they look similar to the remflex.

I made the unfortunate mistake of buying remflex gaskets for a ridged flange (similar to oem) exhaust application.
First, they are too soft to retain any meaningful clamping loads and just crush continuously till they squeeze out.
Second they are too thick and if used on cast iron will break the manifold..

Just stay away from remflex for anything but the most warped crap ball headers.

Fyi, the IHPA gaskets listed are nothing like remflex and totally acceptable for normal oem applications that leak. I would not however use them on marks turbo application because of the over hung load.
 
Robert,
thanks for the confirmation. I have long envisioned the need to add an extra brace or two for added insurance. Next up is sharpening my poor welding skills to fab the first 3 feet of 2.5" exhaust tubing. I have the sharp 90 degree output flange and about one foot length (from a corvair spyder) to graft on new piping. In sac there is a performance exhaust vendor that sells mandrel bends so a trip down the hill is in order....:d then I will put the finishing touches on the wooden pattern to cast the adaptor I need between the side draft yh and the compressor inlet. Haven't turned on my furnace for over a year now...
 
Back
Top