Torqueflite 727 Guapo

Re: Speedi Sleeve for output bearing spacer?

I've got an output bearing spacer (Scout II 4x4 727) that has some grooving where the twin opposing lip seals ride. Is there a speedi/reddi sleeve for this app?

And should one apply some type of sealer to the inner bore of the spacer to prevent atf *creep* along the output shaft?

Here's a "typical" catalog page for a repair sleeve. The oem spacer od is a nominal 1.750". So yes...a sleeve can be used. However, you will have to be very exacting in where the sleeve is located on the spacer when it's installed to insure that the width of the sleeve lands on the spacer where the seal lips can ride:

shaft repair sleeves on daemar inc.

Atf migration is not a problem, don't put anything on the spline or bore. But do not use rtv between the transfer case and the trans, use the proper gasket!

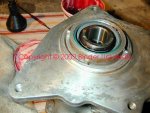
The is quite a bit of fudge factor on where the two seals can land in the transfer case adapter bore when installing. With careful measurement, you can install the seals so that they do not contact the worn portion of the spacer and land on un-worn material. Just make certain to not block the vent hole in the seal mounting bore.
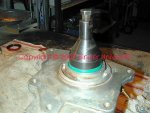
 
Thanks for the response, mm

the current trans in the Scout is the leaking one. Atf seeps from the vent hole when driving on the freeway, and a small amount of atf eventually migrates into the t-case. I just removed the t-case and input gear last night, so I haven't inspected the sleeve. The sleeve I'm referring to is the one from my (removed) original 1975-built trans., that wasn't leaking when it was in service on my friend's '79 Scout a few years ago.

The current in-service trans is from a '78 Scout, that I had rebuilt about 10 years ago. A year or so after the rebuild, I needed to replace the shift shaft seals, due to leakage. The seals were ok, but the rebuilder (small, local shop) didn't sufficiently clean off the old *seal smear*. A quick polishing with crocus cloth and a pair of new seals cured the leak.

I know about the output bearing info/issues, but at this time, investing in a new bearing is not in the plan. I'm hoping that a cleaning of the current sleeve (or swapping it for the other sleeve) and new seals will solve the leak. I'll consider slightly shifting the seal contact locations on the sleeve. I'm also installing a tapped brass fitting in the vent hole.

I create my own case/trans gaskets using a stock gasket as a pattern. They've worked quite well.

I'm trying to get this rig leak-free (relatively) for the trip to the IHSFR next week.
 
thanks for the response, mm

the current trans in the Scout is the leaking one. Atf seeps from the vent hole when driving on the freeway, and a small amount of atf eventually migrates into the t-case. I just removed the t-case and input gear last night, so I haven't inspected the sleeve. The sleeve I'm referring to is the one from my (removed) original 1975-built trans., that wasn't leaking when it was in service on my friend's '79 Scout a few years ago.

The current in-service trans is from a '78 Scout, that I had rebuilt about 10 years ago. A year or so after the rebuild, I needed to replace the shift shaft seals, due to leakage. The seals were ok, but the rebuilder (small, local shop) didn't sufficiently clean off the old *seal smear*. A quick polishing with crocus cloth and a pair of new seals cured the leak.

I know about the output bearing info/issues, but at this time, investing in a new bearing is not in the plan. I'm hoping that a cleaning of the current sleeve (or swapping it for the other sleeve) and new seals will solve the leak. I'll consider slightly shifting the seal contact locations on the sleeve. I'm also installing a tapped brass fitting in the vent hole.

I create my own case/trans gaskets using a stock gasket as a pattern. They've worked quite well.

I'm trying to get this rig leak-free (relatively) for the trip to the IHSFR next week.

Good deal!

It's about time we git an actual face-to-face at the rallye after all these years!
 
Ok: I've got the extension housing out, and the bearing and seals removed. The spacer had some discoloration on the sealing surface that cleaned up nicely with oiled crocus cloth. No fingernail-hooking grooves on the surface.

I've cleaned up the bearing and seal bores in the housing, and now I want to install the seals.

What is the best way to install the twin seals? Should I drive the inner and outer seals in from the outside, or would that wipe too much of the sealing paint off the od of the inner seal?
Should I use a section of thin-wall pipe to drive the outer seal (or both seals) in?
I can't ever recall driving in an oil seal *backwards* (using the inner surface).
 
Here's a pic of the first seal going into the transfer case adapter. I know you are dealing with the output shaft sticking out so it's more tedious!

So the first seal goes in with the lip pointing towards the liquid side, just like you would install any other side to retain liquid/grease/etc. Drive through from the bull gear side, don't sweat rubbing the peripheral coating off, that don't matter!

Tap it in until the case of the seal just clears the vent hole...don't go too far!

Definitely use some type of driver, the one in the pic is a flywheel puller for a bevel gear-drive ohc ducati single motorcycle engine, circa mid-70's!
 

Attachments

  • Tranny side seal.jpg
    Tranny side seal.jpg
    95.1 KB · Views: 1,667
The second seal goes in upside down!

Drive it in until the case edge is flush with the bore chamfer. That will create the dead air space between the two seals that the breather hole "breathes" through!

Then lube the spacer with atf and insert carefully without tearing the seal lips, install the bull gear, and tighten the hell outta the nut and use loctite on the threads!

This pic shows the "upside down" seal driven in flush and the spacer re-installed.
 

Attachments

  • Upside down seal installed.jpg
    Upside down seal installed.jpg
    75.4 KB · Views: 1,852
...drive through from the bull gear side, don't sweat rubbing the peripheral coating off, that don't matter!... ...definitely use some type of driver, the one in the pic is a flywheel puller for a bevel gear-drive ohc ducati single motorcycle engine, circa mid-70's!

Mm-
I have the ext housing on the bench. I was going to try the seal change in the vehicle, but figured pulling the housing out was worth the extra bit of effort to be clear of the output shaft and not be reaching up from a creeper (gettin old).

I do know which way the seals go (but thanks for the reminder).

Seeing that I've never driven a seal in from the *wrong side*, should the driver edge sit *in* the seal, between the turned-up metal side and the rubber lip, or should it touch only the outer edge (of the turned-up side) of the metal part? I don't want to distort the seal, and the old ones were a b!+@# to drive out (= tight fit).

Thanks for working through this. I'll be an expert after this.

Are there any manuals that clearly show this process? The IH manual has very limited info, and the munroe book and the atsg 727 manual I have don't specifically show a 4wd extension housing.
 
That driver in the pic fits the od of the seal case perfectly so that it pushes on the "edge" but will slide into the bore, that was just luck when I chose that for a tool! The seal case is pretty thin so driving inside the rubber portion is prolly not a good idea.

In the sii service manual cts-2304, look in the cts-2620 section on page 40 under "output shaft oil seal". That describes the process though it involves the use of several special tools we don't have access to. And it covers both the 2x4 and the 4x4 version kinda at the same time so it's a bit confusing.

I don't think you will find any process information other than what the cts 2304 offers, though it might be possible some Jeep service manual might go deeper into the procedure???

As an aside...when replacing the bearing (once ya dig the retaining ring out!!), I heat the adapter in the oven to about 400f for 30 minutes...the bearing will normally fall out. Then clean the housing and prep for the new bearing.

For bearing install, I re-heat the case again, the new bearing falls right in with no need to even tap it! That prevents any damage to either the case or the bearing when doing the r&r.
 
Didn't see this question (well, questions) addressed directly after a lot of reading, unless I missed it somewhere, so here goes...
I'm swapping a 345 for my tired 304 and figured since I was pulling things apart, I'd relocate the vent in the otherwise well-working, non-leaking 727 tranny too (excellent write up Mike!). The only issue I've had with this tranny is that it is sluggish to get going when cold. I figured it just needs a band adjustment (?)

anyway, while steam cleaning it, I had it right side up on a cart, I lifted the tail to get under it and fluid came rushing out the front shaft. I neglected to drain this puppy when I pulled it, but figured I could do that after I tidied it up a bit, so no big deal. Anyway, the oil is coming out the space between the oil seal and the shaft. Normal?

I later drained it and flipped it upside down on the stand to get better access to the pan etc. And it is now leaking a slow drip from the same area. Being a tranmission newb, I'm guessing that this is normal and is just where the torque converted usually rides?? Nothing to worry about? Haven't checked the end play yet if that makes any difference (though just a little wiggle by hand shows a little side-to-side play and very little in-and-out).

Secondly, in the vent write up, you seem to imply that the o-ring for the pump can be re-used (or maybe you were referring to damage to the o-ring on a previous installation attempt?). Cts says replace and that's my general rule of thumb, so I think I'll go that route unless you say otherwise. Ought be replacing some seals anyway, I suppose, while it's out. (oh, and methinks that 727 book you mention will come in handy too).

Lastly, (and dummy me forgot to take a picture - I'll learn) when I dropped the pan, there was some particulate matter in there, centered under the filter, just where it should be. Some fine sand-like organic and some metallic about the same size or slightly larger, but still sand-like. I'm assuming that this is fairly normal sluff? Oil was a little dark, but smelled good and had no water.

Thanks in advance.
 
Last edited:
The torque converter snout establishes the seal for the pump and input shaft. Without the tc in place, any oil inside will run right out if stood on end. Same thing if you turn it over on it's back with oil in it and the tc in place, oil will run out the vent located at the top of the pump housing externally (along with the dipstick hole/tube).

Anytime I remove a torque converter for any reason, the front seal gets replaced. And the pump bushing should be replaced also, that is standard practice and can be done from the outside without removing the pump from the case.

I never re-use any rubber component unless it's a dire emergency. But you'll not find individual rubber components anywhere unless some tranny shop has leftover stuff from soft parts kits. Seals are available individually.

Particulate in the pan is perfectly normal. It gathers there right below the "suction" point of the filter and drops out when the tranny is shut down. The surface area of all the friction materials is rather large in these units, so a considerable amount of debris can accumulate over time which does not indicate the frictions are worn out. That is exactly why the bands are adjustable (but not the clutches).
 
Thanks Mike,
pretty much as I thought. Nice to have someone as experienced as you to holler at. I don't see anywhere here or on bp an explanation of the bushing removal with the pump in the unit. The cts only shows it with the pump out. Is it safe to tack it with a mig to shrink it? Or best to pull it out?

Gonna go hit up b&n tomorrow to see if they have the munroe book. If not, I'll order it online.
 
Last edited:
thanks Mike,
pretty much as I thought. Nice to have someone as experienced as you to holler at. I don't see anywhere here on on bp an explanation of the bushing removal with the pump in the unit. The cts only shows it with the pump out. Is it safe to tack it with a mig to shrink it? Or best to pull it out?

Gonna go hit up b&n tomorrow to see if they have the munroe book. If not, I'll order it online.

Front pump seal replacement is covered in this thread, beginning in post #49. However, I did not show pics of r&r of the bushing:

http://www.forums.IHPartsAmerica.com/transmission-tech/2043-t407-tf-727-diy-reseal-2.html

Once the seal is out, then the hook tool and the slide hammer is used to pull the bushing. If no hook/slapper is available, then the bushing is simply carefully "collapsed" on one side with a small, thin chisel and then pulled out with pliers, do not damage the bore the bushing seats in.

A replacement bushing is simply tapped into place, I don't have the special hollow seal driver for this, I just use a piece of appropriate od/id pipe or whatever. Once the bushing is properly seated in it's bore, then it gets "staked" with a blunt punch at the two points machined into the bore for that purpose.

All this is covered in the munroe book, I don't think B&M markets any "paper". But any full service book store sells that stuff in the "diy" section and of course it's easily obtained online.
 
Thanks Mike.
I read the reseal previously and like you said, you didn't cover the bushing r&r, so thats why I asked. Wasn't sure how delicate the race was to scoring using a hook & puller or to the heat of a mig, which I've used to shrink bushings on other things.

When I said b&n, I meant barnes & noble, not the B&M shifter folks. :icon_wink:

the cts has a good picture and description of how to stake the bushing. So I'm good with the installation procedure.

Thanks again for the info. You are a great help with the little details.
 
thanks Mike.
I read the reseal previously and like you said, you didn't cover the bushing r&r, so thats why I asked. Wasn't sure how delicate the race was to scoring using a hook & puller or to the heat of a mig, which I've used to shrink bushings on other things.

When I said b&n, I meant barnes & noble, not the B&M shifter folks. :icon_wink:

the cts has a good picture and description of how to stake the bushing. So I'm good with the installation procedure.

Thanks again for the info. You are a great help with the little details.

Shit man...I can't hear, can't see, can't read, can't crap, can't ...a buncha stuff no more.

Don't use any heat on the boss, it's not needed at all. That bushing comes out real easy...and knocks back in easy too.

I did a front pump bushing just last week, I shoulda took pics of that. I have more to do in the coming days so I will update that thread with bushing r&r if I can find the bushings, the tools, the trannies, the shop, the light switches, the house...my ass, etc. In the meantime.

Ya oughtta see me trying to learn linux/android today on my new droid x cell when I've been a symbian dude for years now! And win7 hates 'em both!
 
Strike one. Got the seal and bushing out after some fits. My puller didn't have a jaw that I could fit behind either one, so I had to get creative, but got 'em out.

But, ruined the bushing trying to get it in. I used a piece of exhaust pipe the same size to try to get it to seat evenly, but I managed to let the bushing get caught on the lip of the pump and before I noticed it, I was one hammer hit past the point of recovery and deformed the bugger. Off to the bushing store to get another one.

Of course, working without the proper tools isn't ideal, but I'm now thinking that something the same diameter as the bushing, but with a wider lip would be a better driving tool. Any suggestions? Might hit up home depot to see what they have on the pvc shelf. At least this bushing wasn't expensive.
 
strike one. Got the seal and bushing out after some fits. My puller didn't have a jaw that I could fit behind either one, so I had to get creative, but got 'em out.

But, ruined the bushing trying to get it in. I used a piece of exhaust pipe the same size to try to get it to seat evenly, but I managed to let the bushing get caught on the lip of the pump and before I noticed it, I was one hammer hit past the point of recovery and deformed the bugger. Off to the bushing store to get another one.

Of course, working without the proper tools isn't ideal, but I'm now thinking that something the same diameter as the bushing, but with a wider lip would be a better driving tool. Any suggestions? Might hit up home depot to see what they have on the pvc shelf. At least this bushing wasn't expensive.

Various pvc and abs fittings and pipe can be real handy for making drivers like this!

Since all I do anymore is bench work involving total rebuilds, I don't have need to drive pump bushings over the input shaft and reaction shaft support. I do have a driver for the bushing, it's actually a ducati motorcycle flywheel puller from the 60's and 70's! The seal itself I just tap in with a brass hammer by dancing around the seal case. Of course the pump housing is also laying flat on the bench!
 
I didn't know how to search for this particular problem, so sorry if it has been covered.
I recently dropped my 727 from my 1973 Scout II to replace the rear main engine seal. When I did this the torque converter separated from the input shaft, but I didn't think much of it at the time. After resealing my Dana 20 I put everything back in the Scout. Now I have no gears! I know the tcase is back together right and works, but the tranny isn't doing anything. The fluid is at the same level it was before, and all the linkage is reconnected, but when I shift gears I can't "feel" the tranny engaging in the different gears. I have looked to make sure the shift cable is moving the lever that goes into the tranny and it moves, so I don't think it's the shift cable.
I read somewhere that this might be from the pump being damaged, and wanted to see if there is any way to start troubleshooting this before I have to take the tranny out. Any thoughts? Can I just check the tranny cooler lines and see if there is any pressure or what would be the next step?
 
Last edited:
Sounds like you probably didnt engage the converter to the pump fully. This shoulda caused you problems with the reinstall but who knows I'd try to remove the converter bolts and see if you can get the con to slide back and take the pump drive if not you gotta drop it or slide it back far enough to do so. You'll be lucky if ya didnt fubar the seal. But you May get lucky.
 
Yep, the torque converter pump drive tangs aren't engaged in the pump rotor. And most likely the pump rotor drive tangs are broken off so the rotor must be replaced which means pulling the pump out of the trans case. This is a very common issue and something I deal with about four times a year regarding diy stuff like this.

When the trans was bolted to the engine, the pump tangs sheared, there is not enough clearance for the converter to enter the case, then the trans to mount to the trans without causing damage when the trans was forced onto the engine at the bell.
 
yep, the torque converter pump drive tangs aren't engaged in the pump rotor. And most likely the pump rotor drive tangs are broken off so the rotor must be replaced which means pulling the pump out of the trans case. This is a very common issue and something I deal with about four times a year regarding diy stuff like this.

When the trans was bolted to the engine, the pump tangs sheared, there is not enough clearance for the converter to enter the case, then the trans to mount to the trans without causing damage when the trans was forced onto the engine at the bell.

Not the good news that I was hoping for. :icon_cry: I will mess with it some more tomorrow and hopefully can get the converter to engage with the pump. Otherwise I will just pull the tranny and wait for the $$ to get it rebuilt.
How much does a pump usually go for? And since that would need to be replaced I might as well have it freshened up and do the Jeep tailshaft conversion at the same time. Boy, the wife is going to hate me.
 
Back
Top