The Sonjamotor Lives!

Michael Mayben

IHPA Tech Moderator - Retired & No Longer Online
Some of ya have followed the saga of the sonjamobile over the last three years over on the bsb. That's the shitball 345 that started me onna quest to get to the bottom of why these pos motors crap cam bearings outta the blue.

Much of the information and supporting data for this thread:

http://www.forums.IHPartsAmerica.co...I-4-sv-engine-non-oiling-rocker-assembly.html

Came from my "learning experience" regarding the sonjamotor. Ron also alluded to that rather extensive analysis in this thread:

http://www.forums.IHPartsAmerica.co...IH-lifter-rattle-syndrome-what-do-I-have.html

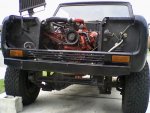
Life has happened for both sonja and us too dam many times in the interim (going on four years???)...but today that all ended and a new chapter has begun. This rig means alot to her especially in light of all the bullshit she went through to hold onto it over the last several years. The original plan to build a "cost no object" motor has now turned into a cheep but quality build. In other words, a motor job that anyone can do in their own kitchen.

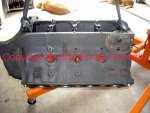
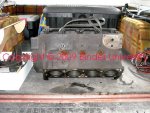
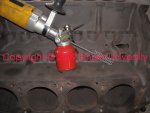
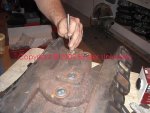
So today a plan was laid and cash was throwd down the parts hole. Over the next week the gutout of the motor will be completed and the critical measurements taken so that hopefully a very minimal (if any) machine operation will be needed.

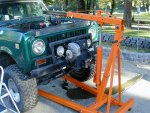
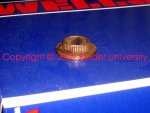
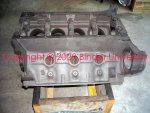
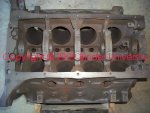
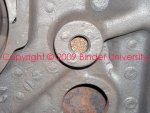
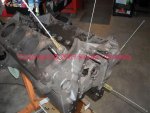
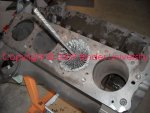
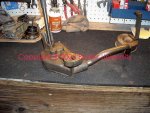
Here's a shot to kick off this motor build so ya can see how it was left a few years back. Once the motor is all the way down and measured, then I'll go through a complete step-by-step build operation that anyone could do if so inclined. We don't anticipate anything "special" going into this engine, and all the new componentry we'll use is available everyday on the shelf at ihon! The budget for this project is tighter than tight which makes it typical for most of us!
 

Attachments

  • DSCN0010.jpg
    DSCN0010.jpg
    128.4 KB · Views: 2,337
Dang, I can't believe the saga goes on:icon_eek:
glad to see she getting around to having it fixed.
I was just hoping you could slap on some rebuilt rockers and replace them cam bearings, and then your good to go. I'm sure you know this but there is not much room for your hands to install them cam bearings with the lower end still in there. I bought a nice cam bearing install tool off e-bay for like $120.00 I keep it a few months and resold on e-bay for the same price. You need one that is very long to balance it. I put the extension attachment on and that made it way eaiser to hold steady. I practiced on removing and reinstalling the old cam bearings quite a bit. The other hard part was getting light in the right place to see good. I found my camera could get in there and snap a pic and then I would look on the camera:sosp:
maybe somebody has a bore scope you could use:gringrin:
 
...here's a shot to kick off this motor build so ya can see how it was left a few years back...

Yer not gonna pull the motor like that, are you?

When I r&r-ed the motor on my Scout a few years back, I removed the wheels and lowered the entire vehicle onto short jackstands. The drums and rotors were only a couple inches off the floor. That made it easy to lift that chunk of sv up and over the radiator...
 
yer not gonna pull the motor like that, are you?

When I r&r-ed the motor on my Scout a few years back, I removed the wheels and lowered the entire vehicle onto short jackstands. The drums and rotors were only a couple inches off the floor. That made it easy to lift that chunk of sv up and over the radiator...
Would have been much easier to pull the radiator and core support. Sorry about going off topic michael. I too have been following the saga for the past 3 years. Glad it's finally coming back together.
 

Attachments

  • scout 2.19.8.JPG
    scout 2.19.8.JPG
    181.3 KB · Views: 2,289
Last edited:
The motor was jerked out of sonja's rig more than two years ago.

Clears everything just fine with the oil pan off (it had been previously been removed to verify the cam bearings had grenaded). That is why I pulled the motor outside the shop, I didn't have enough overhead height/clearance at the time to pull it with the rig inside. There was a camper shell hanging from the shop ceiling that I wasn't willing to move out just to pull a motor.

The radiator was removed. And pulling the motor was no problem, no reason to pull the winch or anything else. Sonja fabbed the bumper system herself a few years prior and it's welded to the frame in order to stiffen the frame laterally (sii design flaw imho), thus it's not gonna come off!

The short block has now been moved into position in the shop to complete teardown and measurement, hope to do that Sunday. Dave has a cam bearing tool we'll use, and the cam bearing spit holes will be properly aligned (this will be documented in this thread). The oil drain backs on each side will also be "matched".

This engine is now going to get attention in only the areas needed, otherwise it's an r&r process just like any typical shop would do (only do it right!).
 
I bought a nice cam bearing install tool off e-bay for like $120.00 I keep it a few months and resold on e-bay for the same price. You need one that is very long to balance it. I put the extension attachment on and that made it way eaiser to hold steady.

This description leaves me scratching my head!???, what "balance" is needed for a cam bearing installation tool? The tapper on the edge of the bearing guides it into the hole and the cone on the shaft keeps the other end centered.
 
The sonjamotor is still in "inspection" process.

The bores are all extremely nice, along with piston-to-cylinder clearances. So a hone and ring operation is all that will be done.

The crank is in perfect condition as is the cam, I "might" have the crank micro-polished, don't know yet.

A Ford fe block 390 has pushed it's way to the forefront right now for toddjo's recent acquisition, a '75 or so Ford f250 highboy. And those motors are remarkably similar in overall design to the sv motors except for the cam drive scenario. This rig is gonna be really kool, we're gonna mount up a real nice '66 f100 body on it, most likely with a flat bed.

And the Ford motors have exactly the same issue regarding plugged/restricted oil feed to the rocker shafts as the I-4/sv motors. While this motor has had an isky cam installed in the past, along with very expensive replacement isky rockers (non-roller), the fookin' rockers shafts were shit! New ones are on the way included in the engine kit.

Got the fe iron chunk back from the bake and blast operation at the machine shop Friday...I'm not impressed with the work they did, though magnaflux did show an insignificant crack. But it did clean the water jackets very nicely, this one was maybe the worst example of clogging/corrosion I've ever seen. Todd worked about 4 hours straight through Sunday on the thread chasing and oil galley cleanup...and that is just the rough work after the bake and blast. Once the hone job is completed it'll really be sterilized and then the interior glyptol'd

so the same treatment is now on the schedule for sonjamotor.
 
We got about two hours run time on the hot rod fe motor now, so it's time to turn some luv back on the sonjamotor.

Popped all the core plugs and thread-ins out and while it's not the worst water jacket I've ever seen, it's plenty bad!

The cylinders are serviceable after a hone job, so all that will happen to the block is a bake and blast followed by a careful purge of all threaded holes and oil galleries
 

Attachments

  • Nasty Sonya 345.jpg
    Nasty Sonya 345.jpg
    110.5 KB · Views: 2,066
So sonja's all loaded up for a trip to the southworth machine shop and day spa where she's gonna undergo a sauna, a stimulating exfoliation, and then a few days relaxing on the floor in the recreation area.

Bitch needs a vacation bad!
 

Attachments

  • Sonya to the spa.jpg
    Sonya to the spa.jpg
    112.5 KB · Views: 2,055
Always...remember to remove the oilite bronze distributor shaft support bushing that is installed in the block below the distributor drive gear before sending a block out for machine work!

This bushing is lightly serrated so that it simply taps into position in the hole in the block above the oil pump shaft and stabilizes the oil pump drive/distributor shaft interface.

That bushing must be in proper position when the engine is reassembled, and verified every time the distributor is removed/replaced.

If it goes to the machine shop and is left in the block, you will never see it again.
 

Attachments

  • Distributor Support Bushing 002.jpg
    Distributor Support Bushing 002.jpg
    95.4 KB · Views: 2,066
Sonja took an extended vacation at the southworth spa...it's was well worth the extra time spent, them dudes did an outstanding job of taking 20 years off her life!

The bake and blast process on sonja was much improved over what we got with the fe block. And I also found out "why", so that kind of cleanup work will be unacceptable in the future.

These pics make the block look like it's already started rusting away, but that is the lighting...this block is immaculate.

The water jackets are absolutely sterile internally.
 

Attachments

  • Bake and Blast1.jpg
    Bake and Blast1.jpg
    107.9 KB · Views: 2,019
Another shot down into the gut compartment.
 

Attachments

  • Bake and Blast2.jpg
    Bake and Blast2.jpg
    90.6 KB · Views: 2,004
Here's what happens if ya forgit to remove all the plugs! No big deal though.

This is the walnut shell blasting media residue in an oil gallery so ya can see what the stuff looks like.

So now sonja's gonna git her butt upriver and lern how to chase threads, douche oil galleries, perform a hone operation on both the cylinder bores and the lifter bores, knock in the cam bearings and then majikly align the spit holes with a looooong drill bit and a die grinder, mask the bearing saddles, and then glyptal the insides. If she does good, then she can knock in them fresh brass core plugs too.

Since sonjachickadee is well versed in washin' dishes (yes a very sexist statement) she gits ta scrub the block before applying glyptal. Then if she does real guud, she can fook up the cam bearings when she knocks 'em in...that's ok, we gotta spare set!

In other words, sonja's gonna do the grunt work while I take a nap.
 

Attachments

  • Bake and Blast3.jpg
    Bake and Blast3.jpg
    134.6 KB · Views: 1,982
Last edited:
This shot shows alotta busy work to do.

It's imperative that every hole and orifice in any engine block be cleaned after returning from the machine shop/cleaning operation.

I use the very inexpensive brass and steel brushes sold in sets at harbor freight. Chop the handle end off and chuck in a cordless drill if need be. Then using atf or solvent, the various brushes get run through all penetrations, oil passages, and galleries in the block to get rid of any possible contaminant.

Next ya use the appropriate tap with solvent/atf to chase every thread in the block, including the ports closed off with npt plugs (previously removed before the block went in for bake and blast).

Every hole and penetration in the block must be cleaned and inspected.
 

Attachments

  • Thread Chase_Gallery Clean.jpg
    Thread Chase_Gallery Clean.jpg
    80.8 KB · Views: 1,331
Next up...I hone each lifter bore using a flex-hone of the appropriate size from brush research:

brush research manufacturing: industrial brushes, flexible honing tools, wire brushes

Depending upon the material I'm prepping with these tools, I use various honing liquids. In this case, I've got a mixture of atf and hydraulic oil in the squirt can.

Each lifter bore gets the treatment just long enough to establish a light crosshatch and clean up any burrs left from the machine shop and cleanup.
 

Attachments

  • Lifter Bore Hone.jpg
    Lifter Bore Hone.jpg
    73.4 KB · Views: 1,357
Last of all, the cylinder hone process. I've used the flex-hones for nearly all honing/internal hole prep work since around 1970.

This block does not need to be bored, just cylinder prep for re-ring.

If the block needed to be bored, I would have the machine shop bore each cylinder to it's mating piston, and then machine-honed to final piston-to-cylinder clearance as spec'd by the piston manufacturer.

Each cylinder gets approximately 30 in-and-out strokes while being flooded with the oil mix from the squirt can. That keeps the individual hone "balls" from loading up and makes for a perfect crosshatch.

Once all honing operations are complete, each cylinder is scrubbed out using an abrasive type power cleaner such as comet. Surface rust will start forming immediately if allowed to dry. The block will then be douched one last time with a degreasing agent and then powerwashed with the high pressure spray directed through every gallery and hole. Once that is done the block immediately gets blow-dried using a leaf blower, again directed into any penetration.

Next up, the block is masked and prepped for coating internally with an epoxy resin material commonly referred to as "glyptal".
 

Attachments

  • Cylinder Bore Prep.jpg
    Cylinder Bore Prep.jpg
    90.1 KB · Views: 1,319
We're onna roll again...sonja's #1 mainsqueeze (good ol' boy from tejas) has joined the team and we're smokin'!

Bill's first j.o.b., clean up the oem 2v intake maneefol and install the replacement welch plugs.

Bill (assisted by sonja's son wyatt) has done nice work in parts cleaning and prepping the tin for paint.

And sonja got all the rings on the pistons without breaking any!!
 

Attachments

  • Intake Manifold Welch Plugs.jpg
    Intake Manifold Welch Plugs.jpg
    90.8 KB · Views: 1,275
While the kidz did all the dirty schnizz, I rebuilt the oil pump with a melling kit supplied by ihon.

The pump rebuild kit will work on any variation of the ihc I-4 or sv oil pump, it's supplied with all three sets of mylar shim gaskets for setting the endplay/clearance. The gear/shaft set supplied in the kit is common to all the variations of pump bodies, only the gaskets are different and must be matched to the pump body being serviced of course.

The pressure relief valve was shimmed to provide an additional oil pressure factor of approximately 12psi hot.
 

Attachments

  • Rebuilt SII Oil Pump.jpg
    Rebuilt SII Oil Pump.jpg
    124.6 KB · Views: 1,267
Back
Top