

You are using an out of date browser. It may not display this or other websites correctly.
You should upgrade or use an alternative browser.
You should upgrade or use an alternative browser.
The "Fuel Tank" Thread
- Thread starter Michael Mayben
- Start date
Michael Mayben
IHPA Tech Moderator - Retired & No Longer Online
anyone ever install a new fuel pick up on a plastic stock size tank? I just put in a autometer fuel sending unit and it does not have a fuel pick up line attached. Thanks.
79' Scout II 304
Aftermarket fuel level senders such as supplied by autometer and others are not intended to be an exact replacement unit for an oem sender. They will not have the "dip tube" for fuel liquid pickup as part of their design. They are intended for generic installation in marine tanks, auxiliary tanks, etc. That use a separate dip tube/feed to the fuel pump.
It might be possible to fabricate a dip tube assembly and install in that sender if there is sufficient clearance. Post a pic of both sides and I'll look at it. Otherwise, a separate dip tube will have to be fabbed and installed in some safe manner.
Are you also installing the companion autometer fuel gauge? The autometer fuel gauge and it's companion/matching sender are powered directly from switched b+ and cannot be run from the oem constant voltage regulator (cvr) instrument reference signal on the oem sii instrument pod.
antonsone
Member
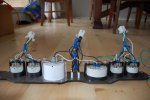
I connected all of my new sensors into the old harness, is the issue with the cvr that you just mentioned evident?
Also I might try and install a bung on the lower side or top and dismantle my old fuel pickup and drop it in.
Also I might try and install a bung on the lower side or top and dismantle my old fuel pickup and drop it in.
Attachments
Michael Mayben
IHPA Tech Moderator - Retired & No Longer Online
The oem cvr is mounted on the rear of the oem temp/oil pressure gauge pod and connected to the oem fuel gauge through the oem instrument harness and printed circuit boards.
So after seeing your setup which requires b+ for gauge power and does not involve the oem cvr, it should be correct if the sending unit is the proper resistance range match for the fuel level gauge. I believe the autometer gauge requires the companion "0>90 ohm" sender,...the oem sender won't work with that aftermarket gauge since it's resistance range is different. The isspro aftermarket gauges we sell here at ihon do use the oem resistance range, so the oem fuel sender can be used with those, that is why we handle that line.
So what you are doing is simply using the oem body harness/wire to connect the replacement sender to the replacement gauge, that will work fine as long as the grounds are rigged properly for both the sender and the gauges.
Likewise for the temp gauge, the oem engine sender is not the correct resistance value for the autometer gauge, so ya use the sender that came with the gauge which is the correct value.
Those aftermarket poly tanks use "spin-welded" bungs for the vent taps I believe. That is a process that can't be duplicated at home, but some rv shops can install those since the process is used on rv poly holding tanks and marine tanks. Most replacement rv tanks are "blanks" and the installer simply installs the penetrations/fittings where needed for each replacement.
Also, one of the poly tank "vent" bungs do I see at least two of those in the pics??) could possibly be adapted to mount a fabricated dip tube as long as it was done in a safe manner. I've not tried to do that but look at that and see if it's feasible.
Korllach
Member
Mr. Mayben,
I got the aluminum dash panel and isspro gauge set from ihon.
I though I remembered Jeff saying that the fuel gauge from that set is compatable with the Scout II oem sender, but I am unclear.
Can you clarify if it is infact compatable? Or will I need to get a separate sender from isspro? I have not dropped the tank yet to hook it up so I am just checking to see if I will need extra hardware.
Thank you sir!
Michael Mayben
IHPA Tech Moderator - Retired & No Longer Online
We musta just bumped heads on this issue!
Yes, the isspro gauge from ihon is a match for the oem fuel sender used on all the IH light line vehicles all the way back to the beginning. That is why we market that particular series of isspro products.
So to reiterate (I know this issue is confusing, you should see the volume of email I get on this same subject!!):
1) all aftermarket fuel gauges (any trade name) I'm aware of use a switched b+ power source and cannot be powered from any oem-type cvr.
2) "most" aftermarket fuel gauges use a sending unit resistance value that is not the same as oem ihc-produced senders. You must pay attention to that detail when looking at instruments for upgrades. There are two "common" sending unit values used for aftermarket gauges and neither are the same as the oem ihc product. The sender value must match the gauge being installed and only the manufacturer of that "package" knows what that is (and is called out in the specs and instruction sheet).
The isspro line of instruments we sell here at ihon for ihc apps do use the oem sender value,...that is somewhat unusual and is exactly why we prefer to offer those as it's a simple install for our customers if their oem sender is functional. However, isspro also offers many other instrument lines for various applications that use senders that are not the same as the oem ihc stuff...again, the instruments and the sender values are not "all the same"!
3) the autometer stuff, as well as the stewart warner aftermarket stuff (also sold under many private labels such as napa and carquest) cannot use the oem ihc sender value.
So yes, you do have the good/right stuff! I've installed a few of the isspro fuel gauges now integrating with the oem sender through the vehicle harness, they work perfectly (if the sender is clean and functional and the float is not "sunk)! The only change is powering all your isspro gauges from switched b+, that totally eliminates the use of the oem cvr for any reason, pass it on to someone else who needs one!
Korllach
Member
Thank you mr. Mayben!
I also ordered a complete 14 circuit kwikwire so all the wiring is new and done by me.
I must say... That kwikwire product is fan freaking tastic.
If I get a chance to do another one I will do a detailed write up on installing it because it really is that simple.
My only qwerks were figuring out how to power the electric choke (which turns out you run a hot lead off the + from the wiper connectors)
and proper way to route the wires to the rear of the vehicle. Everything else was plug and play!
Rover/Scout
Member
Ok guys I have a fuel tank leak problem that is driving me nuts!!!!!
I have 76 scoutii with the 19 gallon stock tank and can not get this thing to stop leaking at the sender o'ring. I have dropped the tank twice now and the last time I used a brand new o'ring (the square cut one), I put in dry the first time, greased the second and was carefull both times and still leaked. I have about had it with this leak that I can not stop, any help would be greatly appriciated.
Doyle
Rover/Scout
Member
does the lock ring go on "easy"?
"lock tabs" might be bent...
Do not know the correct size (diameter / thickness) o-ring, but you May need a larger diameter (thickness) o-ring...
Assume ihon probably has the correct size o-ring...
Hey Robert, thanks for the input. The lock was tough the hole way on. I did notive the new sender was rotating a little while I was tightening the lock ring. It seems as though the oring was/has folded over. Do you or anybody else have an idea where to get a round not cylinder flat oring? I have done this oring replacement twice now with the same result-- leaking tank!
I do like the idea antonson came up with.
Thanks again
doyle
longmont, co.
Craig
Active member
I will put a dab of silicone grease on the o-ring and rub that on, then install. This allows it to slides and not bunch up. You can get o-ring silicone grease from pool supply places for like $2 or check the automotive store. Don't use petroleum jelly as that will break down the rubber over time. If nothing else is around you can use the tire black/ amoral stuff too.
1972ScoutII
Member
I have an aftermarket gauges as well, so I used the passenger side corner vent as a pickup. I think it May be too small as my clear fuel filter does not fill all the way with gas and drops level when you reve it 2500 rpms. I am still working through this issue and will let you know what I find.
I have the all the other vent tubes plugged as I do not have any evaporator or canister. I have the main vent to the fill neck only and it makes it really hard to fill the tank fast
I have purchased a "rollover valve and plan to coil some fuel line and attach it at the end as a vent.
I will let you know how it goes
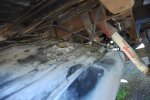
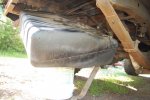
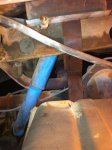
I just became a proud Scout owner today. I am pumped, but it was one of the most stressfull days I've had in along time. I flew from fl to tx to pick up my new ride. I had it on the road by noon and did not get 5 miles before I noticed that fuel was leaking out at the red light. It did not continue once it was parked, but as soon as the brakes were applied after moving forward a good bit of fuel would leak out. After the blowout on the interstate and the tow truck ride to sam's club to get some new BFG's rugged terrains I finally made it to my Mom's house to check out the gas tank with only an hour of daylight left. I was able to get the tank off (all hoses, but I left the sending unit on) I was able to clearly see where the gas was coming from. It was in the front drivers side corner of the tank. On the diagram of the 19 g tank on here it just says that those two up front are vents, so I need to figure out how to reattach them or just plugg them until I get back home...? I took a picture and attached it so you can see the hole I speak of. I hope I can find all these hoses at the parts store becuase many are damaged after this thing sat for close to 20 years with little exercise. I would love any help y'all can offer as to what each hose does and if I need to remove the back driver side quarter panel to access where these hoses go...? My plan was to drive it back tomorrow, but that is most likely going to be delayed and even May have to consider shipping it if I can't get it right. I am also concerned about the age of the belts, but am weary of tackling that chore alone and also the amout of tranny fluid that is sitting on the driveway. Thats all for now. Need to sleep and get back at it in the morning.
Attachments
towpainter3
Member
Since you hae the tank removed from the Scout, plugging the hole from the vent shouldnt be too bad. If the nipple is broken off and you want to temporarily repair it to ge it home there are a few 2 part epoxies you can purchase at a local parts store to do the trick. If the tube is still there and its just the hose, replace them. Most hoses on these consist of 5/16 and 3/8 fuel hose that is readily available at any parts house.
If the nipple is just cracked or has a hole in it you can apply some of the epoxy around it and seal it then reattach the vent. These vent hoses were used for emissisions crap and im guessing some were there to aid in putting fuel in the tank. Mine burps fuel something awful.
As far as the belts go, changing them is not to difficult and they should be available, the trans issue is another . Try to isolate where is originating from, pan gasket, front seal, or a case gasket, driving it while leaking will not hurt it. Just keep it full. And if its leaking all over the bottom of the Scout just look at it as rust proofing the dirt.
After you get home you can start the daunting task of going through the Scout from head to toe.
Hope I've helped a little bit, surely someone else will chime in, with some more info or possibly a better way to get you mobile. It,s early too many beers!!!
Thanks for the reply- that does help. I do see now where the entire nipple has come loose from the tank and is still attached to the hose. I am going to try to just push it back in and maybe put some epoxy I got around it to help hold it on. I'm waiting for the parts house to open to go and pick up some hose and new clamps.
As for the belts, I have them in my possession, but I noticed that the new ones have teeth on the back side where the 20 year old ones have 2 smooth sides. Is that ok?
This texas heat is awesome! I'm soaking wet already.
Thanks,
cliff
As for the belts, I have them in my possession, but I noticed that the new ones have teeth on the back side where the 20 year old ones have 2 smooth sides. Is that ok?
This texas heat is awesome! I'm soaking wet already.
Thanks,
cliff
Scoutboy74
Moderator
There is an access panel located inside on the driver side bed wall behind where the spare would be mounted. Once removed, you'll see a black plastic vapor recovery item in there. You can temporarily remove it for a little better access to the hoses. All those hoses should be replaced as they are no doubt beyond rotten. As tow said, new fuel hose is readily available and can be purchased in bulk. You just need to know how much and what inside diameter to get. Use dexron iii, iv, v trans fluid. Check the fluid level with the rig on a level surface, wheels blocked, and engine up to operating temperature. Cycle through the gear positions a few times and then place it in neutral before pulling the dipstick. Do not overfill! That's worse than running it a bit low. For top off purposes, your dealing with pints rather than quarts.
With my Mom working as my assistant mechanic, we have the tank removed and all of the hoses replaced that are running to the tank. I took advantage of this and emptied all of the gas from the tank. Any suggestions on how to clean it out good? I also removed the sending unit, but don't know enough about it to tell what I should do with it. I think I read on here that these sending units are not available in local stores, so I guess it will have to wait. The guy I bought it from said it was one of the few things that had been replaced in the past 20 years, but he could never get the dash gauge to work. I'll post some pics of our work later.
My Mom has talked me out of driving, so a trasporter is going to scoop it up in the morning and save me a lot of stress at the expense of a roadtrip.
My Mom has talked me out of driving, so a trasporter is going to scoop it up in the morning and save me a lot of stress at the expense of a roadtrip.
Scoutboy74
Moderator
Assistant mechanic...sage adviser...sounds like a good Mom.