Michael Mayben
IHPA Tech Moderator - Retired & No Longer Online
For background information on how momma's new-to-her dd came about, review this thread:
http://www.forums.IHPartsAmerica.com/I-h-s-t-o/2938-ihcs-needs-your-help.html
We have sworn to have no street-legal motor vehicle owned by us ever again that was manufactured after January 1, 1980. We're through with throwaway, gasoline-powered computers masquerading as transport devices.
And just in time...the chunk came along.
Ken and Mike had been jackin' with kathy about this one for awhile, she saw it right after it was pulled off the bisio lot and expressed some interest, though I did not want to take on yet one more junkiron project. And at that time the pos dodge 'rango (with heated seats and the $10,000 dual ac system) had not taken it's first of many 100,000 mile dumps that are programmed into the os.
Then the boyz drove it to our last club meeting and my interest was renewed...mikee bein' a soopersales scum/dirt flipper, really knows how to market shit and he sukked me right in.
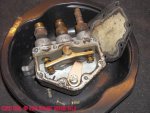
I reconditioned the carb several months ago, not thinking that this rig would ever live again, but what the hell, that carb can always go on sumthin' else.
But the roth boys have cleaned this one up a good bit since then and made it actually go down the highway (within reason), they even conjured up a title and tags for it.
So last Thursday, Mike and ken just "happened" to drive it to u-joisey where we planned to hook up for a few minutes while they were recovering that latest barn door t'all. So there was no way I was gonna let 'em attempt to drive it back home knowin' I'd have to end up makin' a rescue late at nite.
I rounded up Todd to help me make the shuttle and now the rest of the story is gonna emerge. First t'all Todd had ever driven so he thought it was real thrill though a definite handfull to herd upriver!
This rig was originally sold through the "factory branch" in portland, not bisio motors...so it was not an ernie original though he and ron had certainly made a livin' off it over the years!
Here's the lineset so's ya can see what we're dealin' with...
http://www.forums.IHPartsAmerica.com/I-h-s-t-o/2938-ihcs-needs-your-help.html
We have sworn to have no street-legal motor vehicle owned by us ever again that was manufactured after January 1, 1980. We're through with throwaway, gasoline-powered computers masquerading as transport devices.
And just in time...the chunk came along.
Ken and Mike had been jackin' with kathy about this one for awhile, she saw it right after it was pulled off the bisio lot and expressed some interest, though I did not want to take on yet one more junkiron project. And at that time the pos dodge 'rango (with heated seats and the $10,000 dual ac system) had not taken it's first of many 100,000 mile dumps that are programmed into the os.
Then the boyz drove it to our last club meeting and my interest was renewed...mikee bein' a soopersales scum/dirt flipper, really knows how to market shit and he sukked me right in.
I reconditioned the carb several months ago, not thinking that this rig would ever live again, but what the hell, that carb can always go on sumthin' else.
But the roth boys have cleaned this one up a good bit since then and made it actually go down the highway (within reason), they even conjured up a title and tags for it.
So last Thursday, Mike and ken just "happened" to drive it to u-joisey where we planned to hook up for a few minutes while they were recovering that latest barn door t'all. So there was no way I was gonna let 'em attempt to drive it back home knowin' I'd have to end up makin' a rescue late at nite.
I rounded up Todd to help me make the shuttle and now the rest of the story is gonna emerge. First t'all Todd had ever driven so he thought it was real thrill though a definite handfull to herd upriver!
This rig was originally sold through the "factory branch" in portland, not bisio motors...so it was not an ernie original though he and ron had certainly made a livin' off it over the years!
Here's the lineset so's ya can see what we're dealin' with...