The DD Known As "Chunk"

here's the vacuum hose routing diagram contained in service letter slf72-41 in .pdf format.

My intention at this point is to maintain this vehicle under the hood as original as possible since all underhood systems are functional (or at least semi-functional) right now. While the internal engine mechanicals are certainly not original in configuration, the rest of it is. It is not very often that we get a chance to work with such an unmolested vehicle under the hood!

Checked your pdf... It matches a page in my cts-2303 service manual (without the pretty colors and slightly different (but same meaning) verbage in the description) and it matches the decal on the air horn of the air cleaner on my t/a (73 392ca smog).

Pulled the orig Holley 4bbl out of the box and the throttle "plate" matches the pdf with 5 vacuum ports... (80457s only has 2). (actually decided to take the fuel bowls off to see what lurks there - after 9 years.)

checked my LST against yours (chunk's) and found one difference in emissions: exh emiss nit oxide (12824/0002)

does chunk have the orig "smog" carb?

Maybe it is "different" from a CA smog carb.

My "smog" carb is 448668c91 list 6777 0413

hth
 
There is only one "chunk" and it isn't a Travelall.

truffleshuffle.jpg
 
checked your pdf... It matches a page in my cts-2303 service manual (without the pretty colors and slightly different (but same meaning) verbage in the description) and it matches the decal on the air horn of the air cleaner on my t/a (73 392ca smog).

Pulled the orig Holley 4bbl out of the box and the throttle "plate" matches the pdf with 5 vacuum ports... (80457s only has 2). (actually decided to take the fuel bowls off to see what lurks there - after 9 years.)

checked my LST against yours (chunk's) and found one difference in emissions: exh emiss nit oxide (12824/0002)

does chunk have the orig "smog" carb?

Maybe it is "different" from a CA smog carb.

My "smog" carb is 448668c91 list 6777 0413

hth

Your Holley 80457s is not on the same planet as the oem 4160c. That mixer is an aftermarket replacement carb (with electric choke) and is not "smog legal" in kali as it carries no carb exemption number. The "s" designation means nothing as far as claibration is concerned, it simply means "shiney" (originally polished zinc which starts to oxidize within a few hours). The jetting is also nowhere near the same, you cannot compare those two carbs at all! They are both the 4160 design series, that is where the similarity ends. List on this one is 6444 as it's a 49 state mixer. I also have a list 6777 that was oem on my pickup as it was a kali-emissions rig originally out of san rafael.

Your current 80457s is jetted huge compared to the oem carb, and it's even huger now since it left my shop and is running on the live engine!
 
your Holley 80457s is not on the same planet as the oem 4160c.

I guess I should not have brought the 80457s up... I was just comparing the number of vacuum ports in the throttle / butterfly base -- mostly in case you put one on chunk...

your current 80457s is jetted huge compared to the oem carb, and it's even huger now since it left my shop and is running on the live engine!

Yeah, I know. I will send you an email...
 
Lot's of details to continue to attend to in order to make this pile reliable in dd service.

The steering damper was shitcanned, that made a huge difference in road tracking. While a damper May have use on a rig that has much larger/heavier wheel/tire assemblies, they have no use whatsoever on a stock rig with a correct tires/tie rod ends/ball joints/hub bearing adjustment/wheel alignment/etc.

Spent way too much time on the carburetor, but it's as good as it's gonna get at this point. In going through the stack of receipts spread back to 1978, I find the carb has been "kitted" at least five times, even after the engine build. So it's obviously either been "mis-diagnosed" over time or never was done correctly in the first place.

This carb is never going to be right for use with the cam installed in this motor, that is the biggest issue on top of the smog calibration which is not compatible either....this is a loosing battle that has obviously been fought several times before. Contrary to what the cam manufacturer May state, in the 392 this cam is definitely lumpy, and that is "assuming" it was installed correctly when the motor was done. I've got several options for carbs to use, I'll deal with that later since right now, the pile is driveable except for idle quality.

I also shitcanned that bogus-fabbed air cleaner. It interfered with everything, no way to adjust the carb with it mounted...and in order to finalize carb adjustment, the air cleaner must be installed! It also prevented the throttle-actuated primary bowl vent from operating, creating a slight throttle hangup on occasion.

Nearly all the vacuum hose connections were incorrect and the hose ends rotten/leaking, egr was applied all the time, no way to make an idle with an active egr! All that has been corrected and fresh tubing installed. The all-too-familiar "air pump moan" has now been restored to it's proper volume.

Both rear wheel brake cylinders are puking since the fronts have been replaced...so new replacements are on the bench now. According to the receipts, all brakes have been serviced many times in the past, so it's pretty obvious something was not being done correctly! At 56k miles you should not have done four brake jobs, I think the po(s) were so naive they were really being soaked by several different shops (not bisio). The brake combo on an 1110 is a powerful set of stoppers, in fact, overly so in my opinion when operating properly.

This rig needs to be capable of having multiple trailers connected and gone at a moments notice, so that area got some luv.

I have no idea what leads the po breed to do shit like this (or have done!). A second "receiver" had been booty-fabbed onto the primary using the wrong size tubing that was then "plated" on the inside to neck it down for a 2" stinger!

Also, in this pic ya see a "remote" hydraulic slave cylinder that was plumbed on it's own feed from the master cylinder at one time (not from the previously-installed kelsey-hayes oldskool trailer brake control). The slave is mounted in a "holder" made for that purpose to keep it out of the way until connected. This is a dry-break slave which pushes a "pushrod" on the mating actuator when connected with some sort of "gladhand" connector. I've seen these before on really old stock/horse trailers that had hydraulic brakes that were not "surge"-design actuation.

All this crap is now lying in the scrap pile outside the shop door to haul off to recycle.

The receiver system itself is part of the oem-option "towing package". This receiver is not of the "torsion tube" design prevalent over the last twenty years for receivers, this one mounts to the frame at three distinct points using two additional crossmembers. That oem-option receiver was not actually manufactured by IH, but is an out-sourced item from reese, still the big gun in the towing products industry.
 

Attachments

  • HydraulicTrailer Brake Connector.jpg
    HydraulicTrailer Brake Connector.jpg
    63.5 KB · Views: 835
Last edited:
Keep in mind, this ride was ordered with the "factory"-installed tow package. That means the trailer lighting connection point was integrated into the vehicle harness in a semi-engineered fashion. And back then, the typical nylon/delrin harness connectors we use today in towing applications didn't exist, the units were steel which rotted away quickly in salt-slush road environments, just like the rest of the IH stuff.

But, the oem connector has survived even though the mounting bracket had been scab-welded back in place a few times! And internally, it was totally rotten, no way it could be used.

Because this rig had been shot with oldskool asphalt undercoat back in '88 on top of everything, it's a bitch to dig all the stuff out and make proper repairs. Once the trailer harness was dug out of the tar, I thought I'd find maybe a pristine, original connection point for the vehicle wiring harness, something I've never seen before...wrong! Like all other po virus-induced workarounds, this one has been botched many times instead of simply repaired correctly! Then swaddled in layers of electrical tape and shot with undercoat!

Let's see, there are three different types of crimp-on butt connectors, several scotchloks (those suk!), and some wire runs added that are duplicates of the what was already inside the oem harness. On top of that, the wire gauges used for the repair are all mixed up! The oem fusible link for the trailer battery(s) charging feed has been eliminated, resulting in no system protection for that wire run.

So all this shit was ripped out and the oem vehicle wiring harness prepped for resto. A fresh seven/flat rv connector has been properly mounted and will be wired in along with two new feeds from the engine bay once I've installed an auxiliary electrical sub-panel for connecting electrical add-ons. The feeds for the trailer brakes and the battery charging wire run will be protected by circuit breakers per standard practice.
 

Attachments

  • Toad Harness.jpg
    Toad Harness.jpg
    92.5 KB · Views: 745
Here's a shot of the dry break hydraulic brake slave on the bench. Yes, the piston is frozen even though the tubing was still loaded with hydraulic fluid.
 

Attachments

  • Hydraulic Trailer Slave.jpg
    Hydraulic Trailer Slave.jpg
    79.7 KB · Views: 766
so all this shit was ripped out and the oem vehicle wiring harness prepped for resto. A fresh seven/flat rv connector has been properly mounted and will be wired in along with two new feeds from the engine bay once I've installed an auxiliary electrical sub-panel for connecting electrical add-ons.

What are you going to use for your sub-panel?
 
Aren't old vehicles "fun"? :skep:

a comment -- the rear shocks look a "little short" ("too compressed").

You could mount them to the middle hole in the crossbar. Give you a little more shock travel.

I used the middle hole for monroes -- Darren mounted the bilsteins now on my t/a to the top hole in the crossbar. But, they are a slightly longer shock than the monroes.

Might check the front shocks, also. The original front top shock mounts (1210 t/a) had 3 holes in them, also.
 
what are you going to use for your sub-panel?

I think this item is the best bang for the buck, been using 'em for years.

N=6 atc fuse slots, rated at 30a max each slot, total panel ampacity is 100a simultaneous pass-thru. Connected with scrap 4 gauge battery cable, I don't toss out anything that has to do with wire! The buss p/n for this one is bp/15600-06-20.

Ihon also has the kwikwire version of a similar device available.

The electric brake control gets wired with 10 gauge and protected with a 20a circuit breaker (never a fuse!) for a dual axle/4 wheel brake set on the trailer. The charge lead back to the trailer connector for battery charging is also a 10 gauge run with a 30a circuit breaker. The remaining open slots can be used for anything up to a 30a load, one will be wired to a surface-mount 12vdc plug tap under the hood for auxiliary plug-in devices.
 

Attachments

  • Buss sub_panel 001.jpg
    Buss sub_panel 001.jpg
    74.6 KB · Views: 752
There is something really wrong under that hood!

Are you sure that is a real 'binder?

I don't think I have ever seen an inner fender on a square body that didn't have some rust showing.
 
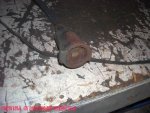
This ride obviously spent most of it's early years kept inside. But there is plenty rot to deal with at some point.

Every one of the poorly finished assembly body panel seams has cancer, there was no effort put into these bodies at the assembly point to truly seal the seams in an effective manner. Thus any corrosive element migrates through any seam but is hidden for many years until a bigazz patch of rot falls out.

This rig had the oem carpet treatment originally, then a replacement carpet set was custom done at some point, both front, rear, and cargo area. But no effort was made to repair/kill the existing rot in all the seams and flat surfaces.

Then...on 8/17/87, russ's auto laundry in portland did a "rustproof undercoat/paint as needed" treatment using the old roofing tar shit to the tune of $330 1987 dollars. So that encapsulated all the rot so it didn't show...the term "encapsulate" is key...that is impossible to do chemically! So the rot has been working on all "protected" sheetmetal all these years it set outside on the lot at ernie's place. And yes, like all IH vehicles, this one leaks like hell around the cowl, the door weatherstripping, window seals, etc. So the carpet is rotten though it looks nearly new.

As I've mentioned, the two pos that we have the documentation for have spent exorbitant kinds of bucks over and over for the same thing over about a four year span in the 80's while the vehicle accumulated hardly any miles relatively speaking. Odo reading when the last repair order was written that we have a copy of on 11/2/88 was 67410, odo right now reads 68129, and the last 200 miles have been run out in the last three weeks.

On that ro, we have: a repair to the wiper motor gearbox to rethread (it's still loose and banging around at the link arm), replaced all the exhaust valve seals and valve springs again after the engine build, and then installed an aftermarket wiper delay module that does not operate. Motor was also run onna scope and gas analyzer, obviously there was something going on that was an issue (can we say carburetor???). Two weeks later, the carb was "kitted" for the fifth time and then run for a deq certificate. Cost for the smog tax? $7.00.

The engine was built over a three month period at milage 64340. The heads were surfaced and blueprinted (per the ro), exhaust guides replaced, a three-angle valve job performed at the time the comp cam kit was installed with all the block work. Obviously from the paperwork something about that valve job did not work out.

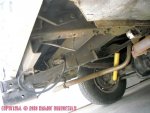
At the same time all tie rod ends were replaced, all shocks replaced, the front wheel hubs serviced, etc.

It's my "opinion"...after the $6k++ was spent on the motor and peripherals with the independent garage, it never really performed as it should (drivability-wise)...so the unsatisfied owner then took it back to bisio's to have it "fixed" (whatever that would entail). We have no ro copy for the intake of the rig at ernie's after that point, that would be a clue as to why it was left there all these years and then the roth krew recovered it last October.
 
Gittin' real close to chunk bein' relegated to dd status.

Got the kumho 265x16 snoflake meats mounted Saturday, ended up going with the load range "e" afterall. That way, if we end up not likin' 'em they will mount on the beater dually wheels. Shopped hard for meats, the kumhos are by far the most bang for buck out there right now, at least locally, the prices are all over the place when ya "shop".

The dude that slapped on the fresh meats at tire factory in springfield has just acquired a Scout II for a dd and it was parked in the back lot. So I ended up recruiting a new IHSTO member and I'm sure he'll pop up here on ihon soon too.

This ride will occasionally see trailertote duty, so "e" rated meats are imperative.

Now, the entire suspension/steering/axle sets/brakes/tires all have less than 3k miles on 'em since total refresh with all new parts. Even $230 (1988 dollars) for new warn premium locking hubs.

When ron at bisio's slapped in that d60 axle back in '88, I think he mounted it in the wrong spring perch hole, the wheel doesn't center in the wheel well properly, but I'll deal with that later. The rear springs were custom-fabbed items at that point also, it May be that they did not have the exact spring center location since these springs are not usually symmetrical (or they are turned around backwards/side-to-side).

The rear brakes are now fresh with new cylinders, when they were last done in '87, new drums were installed on the rear along with riveted shoes. A replacement new master cylinder is waiting in town right now so once that's stuck on, the brake work is done.

The tailgate system was totally refreshed yesterday. Mikee had already installed a manual window regulator on it which I adore! But the latches were frozen and the pull rods for the release handle rotted through.

When the rig was painted at some point, the latches weren't masked, so paint had really messed 'em up...but carb cleaner will remove anything. The tiny coil trip springs for the rotary latches were also rotted away so I fabbed replacements and made new pull rods out of welding rod.

Now the rear window and the tailgate operate just like a modern rig so we can hawl dawgs and groceries. And the rear cargo light works off the switch just like it's supposed to.
 

Attachments

  • Kumho Snoflakes 002.jpg
    Kumho Snoflakes 002.jpg
    47 KB · Views: 693
in '88, I think he mounted it in the wrong spring perch hole, the wheel doesn't center in the wheel well properly, but I'll deal with that later.

I do not think the rear tire was ever centered. Mine (1210 t/a) are not -- though I have new (20 years ago) "fabbed" rear springs, also.

The rear wheel well opening is not symmetrical...

Plus, the original h78-15 tires were only about 28" in diameter;:d the original 9.50 x 16.5 tires on my t/a were probably only about 29" in diameter.
 
On the way back from town last week, the rig was havin' a hard time maintaining a line down the road, and the driver side front hub had a clicking sound comin' from it even I could hear.

Tore into it and found the locking hub (warn premium lock-o-matics) well fooked. Since I hate them dam lockos with a passion, I decided to toss 'em, one of 'em was destroyed anyway.

Once the busted guts were extracted, I could see the scruuee "lock nut" for the hub bearings was backed out and and mangled. Ended up rigging a slide hammer on the remnants to remove that. And of course, because all this shit got jammed up at 60mph, the end of the spindle was toast as well.

A few hours with the dremel and I was able to finally extract the inner adjusting nut and remove the hub. And then discovered that the new hub bearings installed back in '87 had been packed with a dam grease gun or sumthin', the entire hub cavity was filled with grease! All this damage was caused by incorrect locko installation and service procedures back in '87 when this stuff was done.

Replaced the spindle with the last spare I have on hand, and used new "normal" inner /outer spindle nuts to set the preload.

Found a very reasonable set of "open box" superwinch lock hubs locally and slammed them on after servicing the other side.

Then it's time to wing the rig on the highway with a trip up to the monthly IHSTO meeting, that's a round trip for us of about 225 miles.

Trip up no problem, cruises real nice down the I-state and points straight.

Return trip at midnite...shit hit the fan.

Pulled off for fuel and heard the rear axle having a meltdown (new d60 semi-floater with about 3500 miles on it at this point). So I decided to milk it and head on home at reduced speed and see how far I could git before callin' for a rollback. The po really got sold a bill of goods when this d60 was swapped in...what a waste. The oem d44 has a load capacity/rating of 3200lbs. The d60 has a load rating of 3500lbs. That ain't hardly an "upgrade"! Sum folks have much more money than they got common sense.

Shortly thereafter, I noticed a really strange chirping noise from under the hood. Pulled over again and could see the fan wobblin', so I knew the water pump was havin' death throes.

So now chunk is offline for a few more days, the rear axle bearings are on the shelf here, water pumps are an ez grab from my local warehouse.

Again...this whole story points up what happens when a dam vehicle sets unmoved for 22 years and is then put in service. This one was virtually new front to rear, including new warn hubs, brakes, bearings, axle, engine (including water pump), wheels/tires, etc. Settin' is a whole lot more difficult on machinery than usin'!
 
Last edited:
Wow, chunk is the poster child for inactivity...

I would not expect all those things to go bad...

Re d60 maybe the prev owner was convinced by his "expert(s)" that a semi-float d60 was as good as a full-float d60. Also, the semi-float would be the one used as an option on a 1110, correct? The full-float was only "officially" on the 1210s / 1310s I think - not 1110s.

Funny thing about the hub full of grease... That is a "solution" corvair people came up with to supposedly prolong the life of the rear wheel bearings on 65-69 corvairs. They put a zirc fitting in the hub and filled it with grease. Never made sense to me -- especially in my experience where the bearings lasted well over 100,000 miles...
 
Been to busy to dedicate any time to chunk lately. Bitch is up on stands in the shop and will need to go outside in the next few days.

Since I gotta do the water pump, I've decided to now rip off the entire emissions hardware set and box it for burial. This one has had four sets of thermo-control vacuum switches replaced over the years as obviously no one (including the bisio folks) could ever make it play nice. And I'm not gonna have stuff onna dd that will leave anyone stranded due to a drivability issue. I've gone back and forth on this since it is original...but this built motor with this dam cam will never be right unless it's finally dialed in with the right carb and ignition system. The po was certainly sold a bill of goods on this one!

As for the rear axle, it wasn't the axle bearings that were toast after all, it's the r&p and trac-lok. The so-called "new" d60 semi-floater (with less than 3k miles on it) is actually a boneyard unit with two diff cover bolts twisted off and boneyard paint pen markings.

So it's a good thing I still have the d44 that came outta the beater. It'sa 3.73 also, with an experienced late model trac-lok that functions perfectly. So it'll git hung under chunk in the next few days so I can move it out of the way. Brakes on it are fresh also, I'll build this d60 later when I got more time and cash to deal with it.
 
Got chunk moved out of the shop today, mendomikee's c-1 peekup is coming in from American spirit hot rod tomorrow with it's bright coachwork so the power unit can be stuffed back in. And it can't sit outside at all.

Ended up using the 2" rear axle riser blocks from the beater truck that matched the d44. The d60 axle install was somewhat of a cobble job I've now determined, it's been set aside for future rebuild.

Issue now (trickledown) is that when the d60 was installed, it must have had a companion driveline stuck in at the same time. It's an inch too short for my liking with the d44, but I don't have time to deal with that right now and I do not wanna invest in another driveline to use for just a short while. So it's gonna run off the front axle for awhile like I did with the beater truck.

Next up, get the underhood stuff squared away...again using a proper carb to match the motor, it's in the soak can right now.
 
you're regressing!!!! Forward progress man!! Forward!!!!

I'm trying!

On a more positive note...kathy did buy a new steering wheel on her last visit home! But it's not installed yet. And I gotta dawg barrier ready to install also so I can keep rain outta the driver's seat when we stop for grub when traveling. She's such a controlling bitch and constantly wants to take over the wheel.

By one 1ayem this morning, I had all the emissions guapo ripped out and the vacuum system re-plumbed ...again. The crapped waterpump is ready to jerk out of the hole.

The deeper I get into this motor, the more fooked I find it. So someone built this engine and invested nearly $5k..but the fuckin' builder didn't even replace the original water neck gasket and then installed it with rtv???? In fact, it appears the entire water pump assembly including housing was simply removed from the short block, set aside, and then re-installed with no service performed at all! The oem water pump gasket is in place and it also has been slathered with rtv in the past, so it has been disassembled at some point, the four retaining bolts were nearly rotted away from corrosion though and should have been replaced long ago. But it's got a $600 oil pan????? Which is a worthless pile of turkeeturds along with a doubleheader remote oil filter setup?? Priorities here??
 
Sounds like the "lazy mans" rebuild to me. It always amazes me that some dudes will take the time and effort to put a new engine together and then do stuff like............re-use the old clutch, or as in your case the old water pumper, without even a thought as to wether it should be at the very least check out! :shocked:
 
that's why you don't take apart a running motor. :confused: just drive it till it comes apart on it's own. :dita:

let me know when you are ready to put a 350 in there....:cornut:

It did come apart! You should see what a water pump that is fixin' ta toss cookies through the radiator looks like! Let's see... Fullsize radiators are priceless, bignut fan clutches are priceless, water pumps are a dimea dozen.

So whadda ya think...the vibratin'/oscillatin' water pump took out the differential...or the vibratin'/oscillatin' differential took out the water pump? And don't concentrate on that "vibratin'" word too long, otherwise sumthin's gonna explode at yore end!
 
/start hijack

Mike, I need an ejumacator for my 350 in my Scout. Would like to get it out of the Scout tear it down go through it and see what is good and what needs to be replaced. Dont really know anyone around locally to school me.

Any takers? I have been known to buy good beer and pizza, turn wrenches well, and lift heavy objects.:cornut:

/end hijack

I'll pm you..:cornut:
 
Back
Top