Limited disassembly of a 1980 IC 196

Thanks, Robert. I'm not going away, but must re-order certain things.

I still want to pick your brain when the need arises!
 
Hey Mark, I've been living vicariously through your project, you can't stop.;-) In fact there is an 800 with a pickup top right down the road from me I've been keeping an eye on.

Anyway congratulations on your retirement. May you retire early and often and may you enjoy good health and prosperity.
 
I am back! Last Friday I finally retired from state service, and the following morning began the three day drive to my new digs outside of Houston, Texas. I have a monumental task ahead of me with getting settled and all that, and establishing my man cave, which will be one-half of a large garage. Wifie gets the other half as a studio. Happy wife, happy life, as we all know. Will beat having trying to do anything under one of those outdoor 10x20' canopies!

I am beginning to make contacts with the local Scout group, and hope to resume my Scout project fairly soon. Robert - looks like the turbo project will advance again! So much to do!
 
Last edited:
Yes, good to see you back here.
I didn't realize how complicated retirement could be! Been hemorrhaging $$$ on getting my house livable, getting a son into a house, helping a daughter with needed repairs on hers, etc., etc. Actually drove the Scout today, using it to ferry 2x6s, plywood, and pegboard from Home Depot (I live in a rural area and the closest anything is 12 miles away) to build a workbench - the first opportunity I have had to do anything for myself since I got here end of June. Still looking for my tools, and need to get an electrician out here to run 100 amp service and 220V, to the garage that will be my man cave. Gotta have it to run my big compressor. Then I will revive the conversation as to how to proceed with the turbo project.
 
I always say, You should retire early and retire often. Because you can find so many interesting things to do when you have the time. I am in the midst of starting a new company https://winecountry-bbq.com to make wine infused oak bbq pellets. Good to hear you are relaxing and enjoying your new life. ;-)
 
Exactly. Getting the new infrastructure in place is key. Also recognizing that just sitting around is a slow-mo death spiral. Applying for substitute teaching job at the local school, also potential to work remotely, part time, from my old job. It is raining today, a desperately needed break from the unrelenting summer heat, and a chance to put together a work bench.
 
Got the workbench done. Got one quote from an electrician, and it seems my house service has some serious issues to be fixed before the feed to the spare garage can be considered. Getting another quote on Monday, but the bottom line is this: Considering what fixing the electrical will probably cost, I should foregone college and spent the past 45 years as an electrician! In my ongoing unpacking, cannot find the huge 1/2" drill needed to drill holes in concrete to anchor my two-stage 80 gallon compressor. Looks like it will be 2 steps forward, 1 1/2" steps back for a while. But I did take the Scout out for a drive in the country. Sad as its condition is, it was still a wonderful thing to do, and motivation to keep moving forward.
 
For those still following my project, I have crossed the Rubicon. Not the famous trail in the Sierras, but in choosing which fork in the road to take in resuming my turbo project. I think it will be helpful to detail the issues one faces in adapting a turbo to a 196 mounted in a Scout II. Here are the good and the bad, summarized from all that has gone before in my build:

First, the good. I ended up with a turbo that worked quite well. In the runs I made, I discovered, through the datalogging feature in the Megajolt/EDIS crank fire ignition system I was using, that I could get boost as low as 1,800 rpm, and could pull a minimum of 8 lbs. I say minimum because at that particular measurement, I had "run out of road" and it was still pulling, and at that using a restrictive Carter sidedraft carb. With my fresh rebuild, I was only able to crest that grade at 45 mph, in third gear (T19 narrow). I think that calculated out to around 3,200 rpm with my 3.73 gearing. With 8 lbs. boost I hit that same point at 65 mph, in high gear. That is a substantial improvement by any standard. In short, performance met my expectations. Also through datalogging, I determined I was running an A/F of 11.4:1 under boost, so that was also where it needed to be. This all tells me that the turbo was properly sized and that with minimal tinkering, good A/F could be had under boost.

Second, the less than optimum. Scout II's don't have large engine bays and airflow through them isn't really all that great. In running the 152T manifolding, the airflow through the passenger's side was pretty much gone. The turbo was very close to the underside of the hood and had I kept that arrangement, I was planning on cutting out a section of that under hood reinforcing web, and seriously considering cutting a hole in the hood and grafting in a "blister". The fit of the turbo's outlet pipe was also quite tight, and put a tremendous amount of heat into the passenger's side firewall and foot well even though it was wrapped. So much so in fact that the dynamat style pads I had installed had melted. That was unacceptable. I was imagining solutions that would have involved clearancing the inner fender, etc. That would potentially reduce clearance with the front tire in a hard right turn. Running the larger (2 1/2") exhaust pipe under the bell housing and maneuvering around the clutch linkage was also problematic. I did it but wasn't happy with it. Since I put in a D300, another possibility would have been to simply run the pipe straight back on the passenger's side but that wouldn't fix the tremendous heat load on the passenger's side firewall, etc.

This all brings me to considering mounting the turbo on the driver's side of the engine. Two examples, with a few pictures and a short video, of this approach have been seen recently on BP. I reached out to one of the parties and have learned additional details of how they did theirs. They were both "blow through" systems that now run EFI. One runs a generic T4/T3 turbo, the other I haven't been able to learn more about. I have no idea what trim levels or A/R ratios are involved with either turbo. What I do know are that these are Model 800 196 engines mounted in either Model 80 or 800 Scouts. Those engine compartments are markedly different than that of the Scout II and also have major differences in ancillary equipment, or lack of (power steering, power brakes, for example). The Scout II "double sump" oil pan is also a major difference from the front-sump 80/800 pan. As the pipe that feeds the turbo must come under the oil pan, this difference is significant. Their pipes cross under in the relatively shallow portion of their pans and pose no clearance issues with the front axle. A pipe coming under a Scout II pan must pass through the "notch" placed there to accommodate the motion of the front axle. A solution to this I've puzzled through is to clearance the rear of this notch ("notching the notch") so that the pipe will clear the axle, which would articulate forward under extreme flex, assuming stock shackle location. The turbo itself is mounted to a simple bracket bolted across the large boss that the now-unneeded mechanical fuel pump previously bolted to. Easy-peasy!

Turbos have successfully used cross-under (and cross-over!) pipes to feed turbos for years, so this approach isn't unique here. So what about the intake side? Those two conversions both had their turbo intakes facing forward, with large intake tubes and air filters mounted either to the driver's side inner fender where the Scout II battery was located, or somewhat free-standing in the area where the Scout II P/S pump is located. There were variations on getting the compressor outlets coupled to the carb or throttle body "hats". It is a very busy, comgested piece of real estate, complicated by the 196 T-stat bypass hose. Moving my battery isn't an option and I don't care for the other solutions. After giving this a lot of thought it occurred to me that I was coming at the problem backwards. I asked myself: Why do I assume that the turbo must have its compressor section mounted forward? And the answer was easy: Turbos don't have a front or back! So for the past few weeks I have been taking measurements and trial-fitting up a left over TRW center section and turbine housing and believe that this is the best solution for me. The space I have to work with goes from the rear outrigger of the Scout II 196 motor mount, to the rear of that horizontal "shelf" protruding forward from the back of the block (has numbers cast onto it). If I cut off the mount outrigger, and weld it to the forward edge of the bolt tab it was cut from, I can gain about another 1 1/2". From this new surface to the rear of that "shelf" I have 17 1/2" to work with. Within that distance will be the forward edge of the turbo outlet pipe, and the rearward edge of whatever vertical compressor inlet piping I come up with. There should be much more room available for a carb or throttle body in the area to the right of the P/B booster (between the booster and engine) and the firewall rear of this.

The turbo itself will need to be quite compact. In a recent discussion with a friend who trafficked extensively in turbos, I laid out these issues. He said that since I once had a TRW turbo that performed exactly as desired, why reinvent the wheel? (disclaimer: he no longer runs old turbos and has gone "modern"), but kept coming back to simplicity and going with what you know works. What kind of nailed it for me was the fact that I started looking at the physical dimensions of a variety of turbos, and the distance between the TRW turbine outlet face and compressor inlet face was tough to beat - 6 3/4". In contrast, a GT2252 is 10.6". Those are precious inches lost. Add the plate to the turbine to which to mate the exhaust pipe, and I'm already running out of room. I got tired of chasing my tail on this and after a search, turned up two Rayjay F flow turbos that had been rebuilt years ago, put in storage and forgotten. I had the B flow turbine needed to give me the quicker spooling, so after the Rayjays arrive next week, I can swap turbines. Easy. This solves the problem of sizing a turbo (what's old is new?). The only thing I will need to figure out is the compressor inlet boss. I earlier had machined off a Corvair F compressor inlet (triangle shape) to bolt an aluminum disc to to serve as a mounting surface. This one is circular and I don't know if there is enough wall width to serve as a mounting flange if I likewise machine it down.

I've put a good deal of thought on fuel management but this is as far as I can go today. Discussion will have to wait until next time. Hamilton EFI is a wish-list item, but a carb is still on the table. Projects must sometimes bend to the demands on resources, time, and other priorities.

Robert -

My hope is that you will still be available to give valuable guidance when needed. 2021 will have to be the year that one of our projects comes in for some sort of landing! This point was poignantly made clear this weekend when I was at a Saturday "wrench-a-thon" for the Gulf Coast Binders. A couple of older members noted that for some of us, time is not on our side to do the things we want to do. :oops:
IMG_4593.jpgIMG_4599.jpg
 
Last edited:
I am going to begin removing my smog equipment. Scouts are "smog exempt" here in Texas, although annual safety inspections need to be done on all vehicles except for those bearing "antique" plates. I don't mind the annual inspections. Question: I will need to bolt a bracket to the four-banger fuel pump mounting boss. Those on the IC 196s are undrilled for obvious reasons. I therefore need to drill and tap two holes. I believe those were 5/16 coarse bolts. Did they go all the way through to the crankcase, or were those blind holes? I will purchase a block-off plate to use as a drill guide.
 
I am going to begin removing my smog equipment. Scouts are "smog exempt" here in Texas, although annual safety inspections need to be done on all vehicles except for those bearing "antique" plates. I don't mind the annual inspections. Question: I will need to bolt a bracket to the four-banger fuel pump mounting boss. Those on the IC 196s are undrilled for obvious reasons. I therefore need to drill and tap two holes. I believe those were 5/16 coarse bolts. Did they go all the way through to the crankcase, or were those blind holes? I will purchase a block-off plate to use as a drill guide.
Is the FP pad on the front cover? From a leak free perspective they are blind.
 
Is the FP pad on the front cover? From a leak free perspective they are blind.
No, here
IM002147.JPG
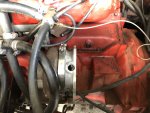
on the side of the block, like on your 152, but undrilled or tapped. The area on the driver's side of the block is the piece of real estate that will be home to the new turbo. I am also imagining that I will be needing to recast a variation of the aluminum intake elbow sitting atop the intake. My engine presently isn't a purdy as this.
 
Last edited:
Here is a picture sent to me about how a turbo was mounted to the boss. To the right you can see the block off plate under the angle iron bracket, which, in turn, is mounted to the boss. The key to fitting a turbo in this area is getting it high enough so that the compressor inlet, and whatever inlet elbow I fashion, clears that "shelf" to the right of the FP boss. If you can imagine it, that shelf is roughly level with a horizontal line drawn through the centers of where the FP boss bolts would be go. Mounting a turbo in this location should also provide an excellent oil drain path. It may be possible to locate the drain in the oil pan just forward of dip stick boss, or even use that boss instead, if needed, and move the dip stick boss rearward a few inches. One other thing to sort out - which may not really pose any issue - is that you see here the turbo base is mounted at the same angle as the angle iron bracket to which it is mounted. This angle is what, 15 degrees from vertical? (this is a Model 800 196). My IC196 sits in the normal position as a V8, so its FP boss surface is 30 degrees from vertical. The turbo exhaust housing does not need to mount "horizontally" about the axis of the rotating assembly, so I have flexibility here.
Turbo bracket copy.jpg
 
Last edited:
Glad to read of progress, Mark.

I was reading your struggles with finding space and you were thinking of a hood blister to fit it all..

It might be something to consider as a solution to your "where can I put the intake" problem.

Cowl induction.
 
Turbos arrived yesterday. They appear to be every bit as nice as promised. Since I am turning one of them into a TRW/Rayjay "F/B" (F flow compressor/B flow turbine), I need the "B" turbine and matching exhaust housing. The turbine should be arriving Monday, and wonder of wonders, the "junk" housing I've been using for mocking up distances turns out to be one, and not an F housing as I had believed. For those wondering about this F/B business, it is where one can mix-and-match certain compressors and turbines. The modern version of this trick is the very common T4/T3 turbo, where a larger compressor is mated with a smaller turbine to spool up quicker. Corvair people were doing this in the '60s! In my case the F compressor has proven to give the correct flow for the slow-turning 196.

I took a quick measurement of the wall thickness of the compressor's inlet. Outer diameter is 3", and it is tapered inward down to the diameter of the compressor's blades. If I have the excess length cut off, say, to 1/4" or so to where the blades begin, it looks like I would have a circular mounting pad about 0.625" wide. That should be enough width for 5/16" mounting bolts used in any intake flange I fashion.

About where to put the intake. For now my goal is to configure placing the carb or throttle body in the vicinity to the right of the PB booster. It looks feasible at this point to be able to use a stock IH air cleaner in this area (if Hamilton EFI) although it would be tight. This would also allow retention of the snorkel hot air hose, snaking around to the hot air stove. Another option would do a variation on the air cleaner I used for my first turbo iteration. That was grafting an IH snorkel, with air valve, to a Corvair turbo air cleaner, turning it around so that the snorkel is centered to the rearmost portion of the firewall and against it, cutting a hole so that air comes in from the cowl area. I had already considered something like this but really don't want to hack up the firewall unless it is necessary or beneficial. I could then run a hose from the air cleaner to a hat on the carb or TB. I am seeing that early Corvair turbo air cleaners are still out there. I prefer the early version that isn't chromed since my snorkel isn't chromed. These air cleaners are compact, versatile, and obviously provide adequate air flow.
 
Robert,
Looking for an answer to an earlier question so I don't have to go to the difficulty of dropping a pan to clean out debris from drilling holes in the FP boss, if I break through. I snagged this pic from your thread. From what I can tell, it looks like there is a lot of meat to either side of the main hole. Are these tapped holes blind? Are these holes blind?. If I can tap 1" of threads, I should be good to go. Once I get the holes tapped, I can fab a mounting bracket for the turbo and begin to fit things up. The vehicle won't have to be undriveable while I do this.
 

Attachments

  • IMG_1811.jpg
    IMG_1811.jpg
    59.3 KB · Views: 316
Had a brain fart thinking those might have been 5/16" bolts. 3/8" bolts are better to secure a bracket, in any case. Thanks again for checking. Today my B flow turbine arrived, so I will have a conversion to do after the Holidays.
 
Had a brain fart thinking those might have been 5/16" bolts. 3/8" bolts are better to secure a bracket, in any case. Thanks again for checking. Today my B flow turbine arrived, so I will have a conversion to do after the Holidays.

Depending on which side you're on, fortunately it was a brain fart, but not yours, mine. They are 5/16 NC not 3/8. .257 tap drill size. :crazy:
 
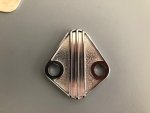
It's a new year and progress resumes....slowly. I need to take care in drilling and tapping those two holes. I don't have the skill or confidence to do it "free hand" so I decided to make a jig from a block-off plate, assuming I can pilot off the holes in the plate. Towards this end I got a plate that fits a Mopar 383/440, since the Felpro gasket number is the same for it as for the SV. The holes in this are 7/16", and I have drill bushings on order from McMaster-Carr with an OD of 7/16" and an ID of 0.257, and 5/8" high. Pressing those bushings into these holes creates a jig of sorts that I will lightly epoxy onto the unfinished surface of that boss so it doesn't shift. Using a F letter bit is just right to drilling and then tapping for 5/16" thread. Chisel off the plate and I have a mounting surface to bolt to.
 

Attachments

  • IMG_4624.jpg
    IMG_4624.jpg
    64 KB · Views: 296
That's getting pretty fancy, a transfer punch would do the job and a set is useful for lots of other things.
 
Back
Top