DEPLOYMENT BUILD UP

DocG

Member
This thread is about my 1964 Scout 80 my wife bought me about three years ago. It's a long story, and since I'm currently deployed to afghanistan, this is the only way I can "work" on my truck, and keep from going crazy. I plan on posting a few pictures each day and telling the story form the beginning. Spoiler alert! By the end of the thread I will bring you up to date on the work my friends are finishing up for me. The project should have been done before I left, but my sandblaster absconded with my truck for six months this spring, and I had to threating to report it stolen to get it back. But I am getting ahead of myself... This is what I started with. A clean unmolested truck from California. A local vw restorer here in wilmington nc bought it as a shop truck, but because of the 4.88 gears (more later) put it up for sale.

DAY ONE.jpg

day one top off.jpg

ENGINE BAY.jpg
 
Last edited:
REAR SHOT.jpg
One of the cool features of the truck is the cab top. I thought it was stock at first, but have never seen another like it. Looks like one f the previous po cut the travel top down to make a half cab. It is very well done, but for the life of me I can't think of a practical purpose to having a lift gate on the back of a pick up. Beer pass through maybe?
 
Last edited:
The truck ran great when I got it. The po who restores vw's went through the mechanics: carb, brakes, tune up, so on. I put in a new clutch for good measure and headed to the north end of carolina beach. I grew up driving in the snow in michigan but nothing prepared me for driving in deep beach sand. With the smallish skinny tires, airing down was the key.
The "corona" shoot
Corona shot.jpg
 

Attachments

  • ON THE NORTH END.jpg
    ON THE NORTH END.jpg
    72.8 KB · Views: 1,349
Thanks josh. In the picture above you can see a little rust starting on the rocker and rear corner. Three years of driving it on the beach did not help this. As you can see she is very solid and 100% there, a real survivor. Over the years she has had a repaint. The original yellow was covered with a non clear coat paint so I'm guessing 1970's or 80's. I love the patina, but I'm going have to do something about that rust... (see where I'm going with this?) in this shot you can see some of the original yellow paint in the door jam and the unmolested interior.

THROUGH DRIVERS DOOR.jpg

Bucket seats (recovered?), heater, dual tanks, throttle control and hazard light switch options. You can just make out the volt meter in the radio block off plate. The wiring looks factory, or dealership maybe... Wondering if this was part of the upgraded electrical system? Anybody?
 
. You can just make out the volt meter in the radio block off plate. The wiring looks factory, or dealership maybe... Wondering if this was part of the upgraded electrical system? Anybody?

Yeah I know exactly where you are going with that. As far as you voltage meter. Check you line set ticket it could tell you. Have you got your line set ticket yet?

Here is the link to get the line set tickets if you wasn't sure where to go.

http://www.superscoutspecialists.com/store/pc-406-21-line-setting-ticket.aspx
 
Last edited:
I do. I will put it up in a future post. It shows the 32 amp alternator with regulator and the 60 amp battery. The volt meter always puzzled me because the wiring looked so stock and the mounting was nicely done. By stock I mean the wires were of the same gauge, color, style and connecters as the factory wiring harness. I guess who ever put it in, po or dealership, did a great job. It was still working after all of these years.
I worked at a Ford dealership through out the 90's, and we always prided ourselves in duplicating the factory wiring when installing accessories. No scotch locks or tape used. I guess nelson machinery in hemet, CA was just as proud. Based on what I have read about their service manager at the time, I am not surprised. I have some articles about him, the dealership and the cavalcade that I will post in the future.
 
I have been waiting for my wife to send me my pictures off of my phone of the frame and engine on the stand to keep the story in order. I guess I will skip it for now. I went to back the truck out of the driveway this spring and anti-freeze started pouring out of the drain hole in the fly wheel cover. Crap! Figuring it was the rear freeze plug rotted out, I pulled the motor to have a look see.
EMPTY ENGINE BAY.jpg

Now since I had just dropped $60 on a season pass for the beach, you think I would have just put a new freeze plug I and enjoyed my summer, but nooo! Not this guy.

Me to wife, "now that the engine is out, this is a good time to detail the engine bay and get it painted, so I don't have to pull the engine out when we get it painted someday."

wife to me, "why don't you just get it painted now?" good wife!
So, one thing leads to another (one doesn't just get a truck painted, does one?) and by easter, my truck looks like this:

PASS RKR LWR FNDR REMOVED.jpg
Here it is all loaded up and off to the sand blaster. Should be done by the weekend... Little did I know this was the last I would see of the truck for 6 months!
 

Attachments

  • OFF TO SANDBLAST.jpg
    OFF TO SANDBLAST.jpg
    82.3 KB · Views: 1,284
Here it is all loaded up and off to the sand blaster. Should be done by the weekend... Little did I know this was the last I would see of the truck for 6 months!

Wow 6 months! What a bummer they took so long to perform a less than one day worth of work.

Thanks for the feedback on the lift kit doc and stay safe!
 
wow 6 months! What a bummer they took so long to perform a less than one day worth of work.

Thanks for the feedback on the lift kit doc and stay safe!

Thanks Jeff. I am staying safe on camp leatherneck. After all most 10 years and 5 deployments, I landed a desk job, so I have time to bother y'all.

The sandblasting should have only taken a day or two, but the guy had some family trouble and bailed on me. The only trouble is I couldn't get a hold of the guy, and when I did, he would always say he would bring it back the following week end. I had used him before and wanted to give him a chance.

While training in twenty nine palms for 8 weeks, I finally got the frame back. My friend who is doing the painting got the blasted frame painted in por15 before I got back. When I returned is when I ordered the CPT suspension kit.

I had pulled the head the year before for a gasket and the cylinders looked great, they still had cross hatching and no lip at the top of the cylinder. Since she was running well and not burning any oil, I put a gasket kit and freeze plugs in and rattle painted her up all pretty.

I figured by time I got the suspension, engine and transmission back in, the body would be ready. Wrong again. I had to call the sandblaster and tell him he had three days to return the rest of the truck before I reported it stolen.

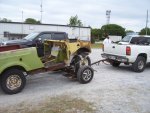
The truck came back with everything but the steering wheel that he had dropped on the road while towing the truck, but still was not sandblasted.

A few phone calls and $80 an hour got me a new sandblaster, but with a few delays and a couple of trips back and forth, I got the tub back, but the underside was still not done! With the rocker cut out they where afraid to lift or turn it over, so with the help of a friend who built a custom rotisserie and some extra bracing, I took a week off before deploying and finally did it myself. If you want something done right...


Back from blaster #2. Still not done
100_0864.jpg

Inspection hole cut in drivers rocker. No rust. Pained inside with por15 and welded back up (I make purple gloves look hot)
100_0868.jpg

Bolted up in back
100_0883.jpg

Bolted and clamped in front
100_0888.jpg

Ready for finial blasting and head to afghanistan! Note new floor pans installed by Robert at kings marine. Robert also whipped up the rotisserie for the Scout in about six hours!
100_0887.jpg
 
Last edited:
After all of the sandblasting set backs the goal was to get the engine bay and under side of the tub painted and bolted back on the roller. We came close but no cigar. I left he project in the capable hands of my friend Matt at outlaw customs who was to do the painting. Matt has painted all of scott britts custom choppers and has won best paint in dayton and I believe a second at sturgis. Matt has helped me out a ton on this truck so I wanted to give him a shout out. About a month into my deployment Matt sent me some pictures of the truck. The day before I left we loaded the roller up at my house and took it to Matt's shop. The picture on the trailer with the tub is the only photo I have here of the frame redone with the CPT suspension on it.

Frame in por15 on 33's and new CPT suspension
scout 2.jpg

Factory d44 confirmed on LST and CPT suspension under carriage primed with silver por15 and top coat sprayed while still tackey for good adhesion.
sscout 4.jpg


I guess I need to blast and paint the fan now. Looks shabby compared to the rest of the truck
scout 3.jpg

Tub on new suspension with new rocker on 33 inch tires. Note "x" brace behind front tire. Robert from kings marine who did all of the metal work drilled out the spot welds and repaired these before tacking back in.
scout 1.jpg

Compare how 225's fill rear wheel well on stock suspension. Note cut out rocker and fender
PASS AIR DUCT.jpg

Ps: for the record this color looked totally different in the catalog. I have not seen it in person, but I don't think I will lose it at the beach!
 
Last edited:
I got these pictures of the body panels in primer a couple of days ago. Off to the paint booth.

Looks like a whole lot of sanding. Glad I'm at the war!
20121204_130150.jpg

Had to cut through the back side to pound out a big dent in the front right corner that was filled with bondo, then weld the piece back in. Looks better.
20121204_133329.jpg

I think this is one of my favorite parts of the truck. It will look great with the new tailgate cables from IHPA!
20121204_135217.jpg

Why didn't somebody tell me how expensive this was going to get? All of this because of a leaky freeze plug!
 
Thanks josh.

I haven't been in touch with the guys back home to know how the tub is doing. It needs some light body work where we welded in the new panels before it gets painted. I have a new wiring harness that I am going to have put in by Robert who did the metal work and built the rotisserie. I'm hoping to be able to put it all together and fire it up when I get home.

I'm trying to balance having work done so I can finish it in time for summer and doing it myself. Sometimes you just have to let it go...
 
Picture 018.jpg

Since I don't have anything new to post, here is a picture from 2010. Getting ready for a "pig pickin" for my 40th birthday.

I have been trying to decide if I was going to put the hitch back on after the paint, but how can I not after seeing this?

Good times...
 
No new pictures to post, but I thought I would type up an update.

I talked with both of the guys who are working on my truck this week and got an update. All of the body work is done, and Robert and Matt are going to re-hang the doors for one finial fit before paint.

Robert spent a lot of time before body work lining up the doors and getting all of the sag out of them, but after welding in the new rocker on the passenger side, he wasn't happy with the bottom seem. He is planning on drilling out the hinge hole a bit to get the seem to line up.

Once the panel alinement is finished they will blow it all apart one last time before the tub is painted. Once that is done Robert can start putting in the new wiring harness.

My one regret on this build was that I went with a stock style wiring harness and not upgrading to a new style with a fuse box. The only accessory I will be running is a stock am radio I picked up at the dixie regionals last summer. Of course I will run in inline fuse, but still, just sayin'.

Next up is putting rear brakes on and getting the emergency brake functional again, that is if Jeff and I can figure out what axle I have in this pig...

That should be just about it until I get home and put it all back together. I hope I keep up with the build thread once I'm home. I should have more cool pictures to post then if anyone is still following along.
 
Last edited:
I just went back through and reread the post and looked at all of the pictures.

Its weird that the passenger side was so much more rotted then the driver side. Up north the drivers side always rust worse due to passing traffic splashing salt on that side.

Since this truck is from California, I was wondering,

do y'all drive on the other side of the road on the left coast? :icon_eh:
 
As I mentioned in an earlier post, the infamous sandblaster that absconded with my truck bounced my steering wheel off of the road at 35 mph. When I finally got my poor little Scout back he swore on a stack of bibles that I had kept the steering wheel (witness the photo of my truck on the dolly being towed off).

Needless to say I was in need of a tiller, so I called up my new friend howard that I had meet at the dixie regionals (y'all know howard) who lives in north carolina and has helped me out before when I need some small little part. I bought a pile of hard to find "junk" from him in charlotte.

Well, he had this wheel, sent me these pictures and it was coming out of the back of the little brown truck in no time.

securedownload.jpg
As you can see, she is not nos. I had good luck with the por15 steering wheel repair kit when I re-did a wheel for a friends 49 Ford f2 and fortunately there is more then enough material in the kit to do multiple wheels!

securedownload (3).jpg
These cracks are no problem, nor is the big chunk missing from the horn hub. The two part epoxy is easy to mix and if you do it right, gives you a good working time.

After hogging the cracks out with a hacksaw blade and triangle file, I started stuffing the putty into the small cracks first, then as the putty got stiffer, I worked up to the larger cracks before finally filling in the chunk on the hub. I had fabbed up a metal band to put behind it, but didn't need it as the putty had enough strength to hold the shape.

When I get home I will find the rest of the pictures and do a new thread on a wheel repair.
 
Last edited:
Here are copies of the line setting ticket (LST).

Some of the questions I had hoped to answer concerned the d44 rear axle and the 4.88 gears. The LST provided a quick answer to the d44 question, but the gears remained a bit of a mystery. The LST shows the typed axle ration scribbled out and 4.88 written in in pencil.

After reading the thread about LST's, I believe these were added at the dealership and the information was updated on the LST. At first I couldn't make out what ratio was typed, but thanks to info on the thread I was able to decode the last entry on the second page. This code list the axle ratio and the paint code together. Here you can see that the ration was 4.27 along with the code for the original yellow that you can still see in the dismantled pictures of the truck.

View attachment FC82438-1.pdf

View attachment FC82438-3.pdf

I started another thread, "IH dealerships" discussing nelson machinery and their early involvement with the cavalcade in hemet. I was hoping for some stories about the early days of scouts in socal and stories about your scouts dealership. Check it out.

Now if I can just get a straight answer about that prototype line...
 
Last edited:
My wife sent some pictures of the truck the other day. They look a lot like the other pictures, but have the doors hung, so I wont post them all.

Robert (metal work, fabricator, old obsolete parts mechanic) got the rear drum pulled to do the inspection and to take some measurements of the parts so I could order new ones. It gets kind of confusing when you are dealing with these early scouts with optional equipment. We weren't sure what size brakes came on the factory 3500# d44. Turns out it has the 11x1.75 brakes, and yup, they are all shot! I figured as much since I couldn't adjust the e-brake enough to hold her!

The po that owns the vw shop wasn't sure how to get the rear drums off so he didn't do the back. After reading some of the post about guys trashing these axles by not knowing what they are doing, I'm glad he didn't try too hard! Fortunately for me Robert is a senior citizen who spent years working on these axles in his younger je#p days. We will forgive him since he is falling in love with my Scout.

I spoke to michael today who patiently walked me through ordering the brakes, drums, seals and all of the accessories to get the old girl stopping again.

Deluxe brake kit, $130, drums, $200, seals and bearings, you don't want to know. Not wrecking your overly restored 50 year old Scout? Priceless!

Driver side door alignment. Robert is a bit of a perfectionist. Beter then new!
0114131631-00.jpg

Here you can see the body work on the rear panel that needs to be addressed before paint
0114131631-01.jpg

Inside shot showing door and surface rust that has started since sandblasting. Not too much for por15. Some folks say it sticks better with a little rust. Thats what I keep telling myself.
0114131631-02.jpg
 
Last edited:
Back
Top