inherited a 304a engine and I am preparing to do a compression test on the engine. What should I be looking for in terms of compression in terms of psi? What is the standard compression for this engine and does anybody know the service limit? In terms of max percentage of difference in compression between cylinders is 5% the standard allowable? Am I on the right track in term of the information I'm looking for? Thanks.


You are using an out of date browser. It may not display this or other websites correctly.
You should upgrade or use an alternative browser.
You should upgrade or use an alternative browser.
Compression test on 304A
- Thread starter Ari
- Start date
There are a lot of variables when doing a compression check. Starter speed,engine temp etc.
The pressures should be nearly the same.
Say they are all around 120. Some May be 115 and another 125. This would be aceptable.
If you have 6 that are 120 and 2 that are 60 thats bad.
Adding oil will raise the compression some if the valves are ok. If adding oil raises it up 10 or 15 psi thats normal.
If adding oil brings a cyl to 150 from 105 thats bad rings. If adding oil makes no change then you have a leaky valve.
The pressures should be nearly the same.
Say they are all around 120. Some May be 115 and another 125. This would be aceptable.
If you have 6 that are 120 and 2 that are 60 thats bad.
Adding oil will raise the compression some if the valves are ok. If adding oil raises it up 10 or 15 psi thats normal.
If adding oil brings a cyl to 150 from 105 thats bad rings. If adding oil makes no change then you have a leaky valve.

Michael Mayben
IHPA Tech Moderator - Retired & No Longer Online
Ihc never published definitive diagnostic information such as compression test limits (hot and cold), leakdown rates, etc.
The compression ratio of a 304 is just a tad higher than a 345, but lower than a 266. So baseline compression numbers would vary to a degree amongst the sv engine family.
My testing over the years tells me that an "average" condition sv motor (or I-4 for that matter) will make a "cold" compression number of a nominal 165psi. A broken-in freshly-built motor with tight valve work and fresh cylinders might give 175psi cold with a oem cam spec.
A "worn" engine (typical 80>100k miles) with no particular internal damage other than worn rings and typical valve/seat condition will show a nominal 135>145psi cold.
If a "hot" compression test is then performed, those cold numbers will bump about 10% if there are no internal problems.
Since all sv motors used the same basic camshaft spec, then cam timing variations does not enter into this picture unless ya have a cylinder(s) that are way off and a worn cam lobe(s) are suspect.
If the motor in question has been sitting non-rotated for some time, then I'd advise ya to do the "pre-oil" procedure described in this thread, post #3 before ever allowing the crankshaft to turn:
http://www.forums.IHPartsAmerica.co...I-4-sv-engine-non-oiling-rocker-assembly.html
Quick and dirty version of a compression test setup:
1) all plugs removed.
2) disable ignition electrically (disconnect coil primary, never crank over an electronic ignition system without a "load" on the coil secondary as in removing just the coil secondary cable).
3) block throttle and choke plates to wide open position.
4) fully charged battery.
5) compression gauge installed in cylinder under test tightly to prevent any compression leakage.
6) rudimentary "chart" to record compression test data results.
7) crank engine for each cylinder test until highest reading is obtained for each cylinder and record data. That should not be more than say a 10 second crankover, let the starter "cool down" between cylinder tests!
8) if battery charge levels drops so that brisk cranking cannot continue, then set up a battery charger or jump it for the duration of testing.
Do not introduce any additional oil to the cylinders before performing the cold compression test. If you did the pre-oil procedure, there will be more than sufficient oil film to create a ring seal for a cold compression test.
If compression numbers are way low or just "low" you can scruu around for hours trying to determine "why"...but at that point who cares??? The motor needs to come apart and be refreshed, including all that goes along with that scenario. Yeah...ya could find a blown head gasket but if the motor has been running with coolant in the oil, it needs attention internally, so band-aiding a head gasket is a waste of resources.
The compression ratio of a 304 is just a tad higher than a 345, but lower than a 266. So baseline compression numbers would vary to a degree amongst the sv engine family.
My testing over the years tells me that an "average" condition sv motor (or I-4 for that matter) will make a "cold" compression number of a nominal 165psi. A broken-in freshly-built motor with tight valve work and fresh cylinders might give 175psi cold with a oem cam spec.
A "worn" engine (typical 80>100k miles) with no particular internal damage other than worn rings and typical valve/seat condition will show a nominal 135>145psi cold.
If a "hot" compression test is then performed, those cold numbers will bump about 10% if there are no internal problems.
Since all sv motors used the same basic camshaft spec, then cam timing variations does not enter into this picture unless ya have a cylinder(s) that are way off and a worn cam lobe(s) are suspect.
If the motor in question has been sitting non-rotated for some time, then I'd advise ya to do the "pre-oil" procedure described in this thread, post #3 before ever allowing the crankshaft to turn:
http://www.forums.IHPartsAmerica.co...I-4-sv-engine-non-oiling-rocker-assembly.html
Quick and dirty version of a compression test setup:
1) all plugs removed.
2) disable ignition electrically (disconnect coil primary, never crank over an electronic ignition system without a "load" on the coil secondary as in removing just the coil secondary cable).
3) block throttle and choke plates to wide open position.
4) fully charged battery.
5) compression gauge installed in cylinder under test tightly to prevent any compression leakage.
6) rudimentary "chart" to record compression test data results.
7) crank engine for each cylinder test until highest reading is obtained for each cylinder and record data. That should not be more than say a 10 second crankover, let the starter "cool down" between cylinder tests!
8) if battery charge levels drops so that brisk cranking cannot continue, then set up a battery charger or jump it for the duration of testing.
Do not introduce any additional oil to the cylinders before performing the cold compression test. If you did the pre-oil procedure, there will be more than sufficient oil film to create a ring seal for a cold compression test.
If compression numbers are way low or just "low" you can scruu around for hours trying to determine "why"...but at that point who cares??? The motor needs to come apart and be refreshed, including all that goes along with that scenario. Yeah...ya could find a blown head gasket but if the motor has been running with coolant in the oil, it needs attention internally, so band-aiding a head gasket is a waste of resources.
Michael Mayben
IHPA Tech Moderator - Retired & No Longer Online
Who knows where the old "motor's" publisher, chiltons, bentley, etc. Come up with stuff. I never take anything any of 'em publish as fact, but they serve only as a reference.
Was this motor's information taken from "standard engineering data"? Or did it come from actual diagnostic processes performed over and over on many sample motors to come up with real world numbers that were validated through engine/component failure analysis?
I have the same information "specifications" segment published inna chilton's compiled reference from that era, reckon both publishers developed that information together in the same room?
What I spout about is real-world, hands-on diagnostic work. And stretches back over many years regarding many engines. I could care less about "spec" other than what was original sizes/tolerances as engineered in order to determine wear limits. The only thing that matters when looking at engine guts is what the parts and the diagnosis data tells ya.
The ihc-produced service references are very lacking in many respects...the "blanks" were filled in actual mechanic training sessions, with bulletins, and visits from field service personnel in the dealerships. Ihc spent an exorbitant amount of ink and paper over and over regarding how to service hydraulic lifters...which are a throwaway part and were back in the day! But no effective engine fault diagnostic data.
Was this motor's information taken from "standard engineering data"? Or did it come from actual diagnostic processes performed over and over on many sample motors to come up with real world numbers that were validated through engine/component failure analysis?
I have the same information "specifications" segment published inna chilton's compiled reference from that era, reckon both publishers developed that information together in the same room?
What I spout about is real-world, hands-on diagnostic work. And stretches back over many years regarding many engines. I could care less about "spec" other than what was original sizes/tolerances as engineered in order to determine wear limits. The only thing that matters when looking at engine guts is what the parts and the diagnosis data tells ya.
The ihc-produced service references are very lacking in many respects...the "blanks" were filled in actual mechanic training sessions, with bulletins, and visits from field service personnel in the dealerships. Ihc spent an exorbitant amount of ink and paper over and over regarding how to service hydraulic lifters...which are a throwaway part and were back in the day! But no effective engine fault diagnostic data.
Thank you for your insightful direction. I am planning to run the test tonight after work and I can post up the results after it is complete for discussion. I wanted to run one more thing by you all. I have the engine on a palate; it’s not in the rig. I’m sure that it is possible to run the test with the engine in this state, I got to be honest though, I want to be sure that I set the battery to the starter correctly and engage the starter correctly so I don’t cause any damage to it or myself. I started playing around with it but after some sparks and wiff of ozone, I thought I better seek direction before going any further.
Michael Mayben
IHPA Tech Moderator - Retired & No Longer Online
Make sure the engine is secured to "whatever" so it won't "torque-over" when cranking.
Using a good, heavy set of jumper cables and a fresh/fully-charged battery:
1) connect the battery negative terminal to a solid, clean ground point on the engine block.
2) connect the battery positive terminal to the heavy lug on the starter solenoid...that is the typical 5/16">3/8" copper stud. When you connect that cable nothing should happen!!! No sparks!
3) using either a "remote starter button" or a homebrew momentary contact switch with jumper leads (14>16 gauge wire is just fine, this is not high current), connect one of the switch jumpers to that same battery jumper cable positive connection point on the starter solenoid.
4) connect the other jumper from your remote switch to the top terminal on the starter solenoid, that is the terminal normally marked with an "s" symbol. Again, no sparks should fly.
5) when you press the momentary contact switch, the starter should energize, the solenoid will shift the starter drive, and the engine will crank over.
6) when you release the switch, the starter will stop. There is no current draw through the battery cables unless ya push the button...so it's ok to leave all the wiring connected until you have finished doing your work. But...if the battery is not up to snuff, then ya need to rig a charger on it to boost it while doing the tests. The motor needs to crank over as fast as possible for a meaningful test, just like you were going to have fresh engine in a state to "start" and run.
Using a good, heavy set of jumper cables and a fresh/fully-charged battery:
1) connect the battery negative terminal to a solid, clean ground point on the engine block.
2) connect the battery positive terminal to the heavy lug on the starter solenoid...that is the typical 5/16">3/8" copper stud. When you connect that cable nothing should happen!!! No sparks!
3) using either a "remote starter button" or a homebrew momentary contact switch with jumper leads (14>16 gauge wire is just fine, this is not high current), connect one of the switch jumpers to that same battery jumper cable positive connection point on the starter solenoid.
4) connect the other jumper from your remote switch to the top terminal on the starter solenoid, that is the terminal normally marked with an "s" symbol. Again, no sparks should fly.
5) when you press the momentary contact switch, the starter should energize, the solenoid will shift the starter drive, and the engine will crank over.
6) when you release the switch, the starter will stop. There is no current draw through the battery cables unless ya push the button...so it's ok to leave all the wiring connected until you have finished doing your work. But...if the battery is not up to snuff, then ya need to rig a charger on it to boost it while doing the tests. The motor needs to crank over as fast as possible for a meaningful test, just like you were going to have fresh engine in a state to "start" and run.
I ran mine in the bed of my pickup! Chained to the sides. Checking the compression should be easy with it out of the truck. Just make sure that it cant roll over onto you.I wanted to run one more thing by you all. I have the engine on a palate; it’s not in the rig. I’m sure that it is possible to run the test with the engine in this state,
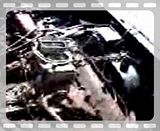
well, I guess the compression is the least of my worries at this point; the motor seems to be seized up. I’m not quite sure how this has happened, I drove the vehicle it was in 4 weeks ago. I tried turning it over by hand with no sucess. I suppose I'll need to break everything down and take a look.
Last edited:

Robert Kenney
Super Moderator
Ari,
pull the plugs and see if there is any water or corrosion on the plugs. Possible that your engine has a leaking head gasket. Also see if your oil level has gone up due to water in the pan. If you loosen the oil drain plug and unscrew the water will come by the threads first.
Have you put a socket on the crank pulley and tried to turn the crank?
pull the plugs and see if there is any water or corrosion on the plugs. Possible that your engine has a leaking head gasket. Also see if your oil level has gone up due to water in the pan. If you loosen the oil drain plug and unscrew the water will come by the threads first.
Have you put a socket on the crank pulley and tried to turn the crank?
okay, I pulled the spark plugs when I attempted the compression test, they we’re clean, no evidence of any corrosion/rust, no build-up. The oil level was where it should be, no evidence of water in the oil; I did drain this after I ran the compression test as I knew I was going to tear into it. I did put a socket on the crank pulley, it wouldn't turn with any ease and I didn't want to put too much on it and snap the bolt off; it was obvious it wasn't gonna budge.
Here’s where it gets interested, when I pulled off the valve covers there was evidence of some corrosion on the rockers and push rods, there was a pretty good build up of white/rust colored gunk on the top of the rocker assembly and push-rods. This could suggest at some point in the motors history that water or coolant had contaminated the oil via a bad head gasket I'm thinking.
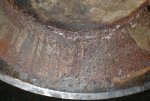
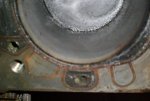
I continued to pull off the heads, I inspected the head gasket for any failure or defect which would allow coolant into the cylinder; everything looked normal. When I inspected the tops of the cylinder’s I discovered all the bores where very clean with the exception of the # 7 hole; I’ve attached a picture which shows what looks like some serious damage, more than just bad corrosion. I looked at the # 7 intake valve which had evidence of rust on it. Somehow water must have gotten into the engine and the #7 intake valve happened to be open and water ran into the hole.
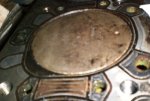
The puzzle to me is that I did ran this engine 4 weeks ago before I had it pulled out of my Scout II, so I’m not quite sure how since that time that it has seized up. I did find out that after it was pulled it was steam cleaned; I don’t think any provisions to keep water out of the carb which sounds like eventually made it into # 7. Looking at the damage however looks a lot more serious than just some surface rust, that’s a fairly large gouge in the wall and it appears to me that the piston is wedged in the hole. The cylinder walls are very clean in comparison, virtually no scoring, wear, build-up; I’ve attached a picture for comparison.
One other interesting thing, I noticed on the flex plate that material has been removed via drill as if it has been balanced. When I took the heads off it appears that the deck has been taken down to zero. The bad thing is that doing a quick measurement on bore size, it appears to be close to 3-15/16 which would suggest it’s been bored .06 over if I have the original bore size strait of 3.875. So at this point, I don’t know what my options are. What do your guys read of it?
Here’s where it gets interested, when I pulled off the valve covers there was evidence of some corrosion on the rockers and push rods, there was a pretty good build up of white/rust colored gunk on the top of the rocker assembly and push-rods. This could suggest at some point in the motors history that water or coolant had contaminated the oil via a bad head gasket I'm thinking.
I continued to pull off the heads, I inspected the head gasket for any failure or defect which would allow coolant into the cylinder; everything looked normal. When I inspected the tops of the cylinder’s I discovered all the bores where very clean with the exception of the # 7 hole; I’ve attached a picture which shows what looks like some serious damage, more than just bad corrosion. I looked at the # 7 intake valve which had evidence of rust on it. Somehow water must have gotten into the engine and the #7 intake valve happened to be open and water ran into the hole.
The puzzle to me is that I did ran this engine 4 weeks ago before I had it pulled out of my Scout II, so I’m not quite sure how since that time that it has seized up. I did find out that after it was pulled it was steam cleaned; I don’t think any provisions to keep water out of the carb which sounds like eventually made it into # 7. Looking at the damage however looks a lot more serious than just some surface rust, that’s a fairly large gouge in the wall and it appears to me that the piston is wedged in the hole. The cylinder walls are very clean in comparison, virtually no scoring, wear, build-up; I’ve attached a picture for comparison.
One other interesting thing, I noticed on the flex plate that material has been removed via drill as if it has been balanced. When I took the heads off it appears that the deck has been taken down to zero. The bad thing is that doing a quick measurement on bore size, it appears to be close to 3-15/16 which would suggest it’s been bored .06 over if I have the original bore size strait of 3.875. So at this point, I don’t know what my options are. What do your guys read of it?
Attachments
Robert Kenney
Super Moderator
Ari, sorry for the bad news. Not what you wanted to find.
as you said all of the corrosion and white residue you found says water has been in the oil.
By the looks of the deck surface the engine had steel shim type head gaskets on it. They can be troublesome if not correctly installed. They can weep coolant but not show obvious signs of the leak. I would have the head for #7 checked real close for cracking also.
Is the piston really at 0 and truly flush with the deck? If so that is setup incorrectly for shim head gaskets. The gaskets are only .020 thick after torquing and would leave your quench distance (piston to head deck surface when piston is at tdc) at .020, it should be at .040-.050 so the piston does not hit the head. For the shim type gaskets the piston would need to be set .020-.030 in the hole.
The bore at .060 over is ok as it was normal to bore sv engines to .080 at the IH rebuild shops. I doubt the bore on the bad cylinder is going to clean up with out going up another size. May even need to go up .020 more.
as you said all of the corrosion and white residue you found says water has been in the oil.
By the looks of the deck surface the engine had steel shim type head gaskets on it. They can be troublesome if not correctly installed. They can weep coolant but not show obvious signs of the leak. I would have the head for #7 checked real close for cracking also.
Is the piston really at 0 and truly flush with the deck? If so that is setup incorrectly for shim head gaskets. The gaskets are only .020 thick after torquing and would leave your quench distance (piston to head deck surface when piston is at tdc) at .020, it should be at .040-.050 so the piston does not hit the head. For the shim type gaskets the piston would need to be set .020-.030 in the hole.
The bore at .060 over is ok as it was normal to bore sv engines to .080 at the IH rebuild shops. I doubt the bore on the bad cylinder is going to clean up with out going up another size. May even need to go up .020 more.
no, not exactly what I wanted to find but I think there is a glimmer of hope in what you say. I was a worried that I wouldn’t be able to find off-the-shelf pistons for .080 over, and I agree, I don’t think it will clean up without going bigger, so as long as this is the case, I’m not completely heart broken.
The gasket did measure in at .0225 at tdc according to the marking on the wall of the cylinder has about the same thickness as the gasket, if we say that the total quench distance at tdc is .045 (would need to be accurately measured), I’ve heard that the chamber cc’s is 68cc, a bore of .08 over @ 3.955, stroke of 3.218, piston volume of zero, I come up with a total of 9.4:1 and 317 cu in, again, everything needs to be measured up accuratly.
If a po owner has gone though this much trouble of machine work and pistons, surely they swapped out the cam, I’ll be looking at this today. My brother bought the Scout 2 years ago, I always felt that the engine was very strong and had a ton of power. Riders would always be impressed; they would always ask if the IH motor had swapped the motor out for a sbc. I guess the downside, as obvious is that the motor has probably taken some abuse. It will be that much more important to have all components properly inspected.
The gasket did measure in at .0225 at tdc according to the marking on the wall of the cylinder has about the same thickness as the gasket, if we say that the total quench distance at tdc is .045 (would need to be accurately measured), I’ve heard that the chamber cc’s is 68cc, a bore of .08 over @ 3.955, stroke of 3.218, piston volume of zero, I come up with a total of 9.4:1 and 317 cu in, again, everything needs to be measured up accuratly.
If a po owner has gone though this much trouble of machine work and pistons, surely they swapped out the cam, I’ll be looking at this today. My brother bought the Scout 2 years ago, I always felt that the engine was very strong and had a ton of power. Riders would always be impressed; they would always ask if the IH motor had swapped the motor out for a sbc. I guess the downside, as obvious is that the motor has probably taken some abuse. It will be that much more important to have all components properly inspected.
Robert Kenney
Super Moderator
Ari,
after looking at the bad cylinder image again, I would pull the bad piston. Buy a bottle brush type of hone 220 grit +/- and see what you get after a quick licking with wd40 being sprayed as you hone. The rest of the cylinders really look good and if you can get the rust out sooner than latter it May be shallow enough to leave only fine localized pits that will not hurt engine life. Leaving the rust will make it worse.
Removing the stuck piston: soak with a penetrating oil of some sort for a few days. Remove the bad cylinder rod cap and rotate the journal away from the rod. Then using a wood block drive it down first, enough to clear the rust from the upper portion of the cyl, and tap out through the top. The piston is most likely fine needing only a good cleaning.
Ps be sure to keep the honing run-off from contaminating the rest of the engine.
after looking at the bad cylinder image again, I would pull the bad piston. Buy a bottle brush type of hone 220 grit +/- and see what you get after a quick licking with wd40 being sprayed as you hone. The rest of the cylinders really look good and if you can get the rust out sooner than latter it May be shallow enough to leave only fine localized pits that will not hurt engine life. Leaving the rust will make it worse.
Removing the stuck piston: soak with a penetrating oil of some sort for a few days. Remove the bad cylinder rod cap and rotate the journal away from the rod. Then using a wood block drive it down first, enough to clear the rust from the upper portion of the cyl, and tap out through the top. The piston is most likely fine needing only a good cleaning.
Ps be sure to keep the honing run-off from contaminating the rest of the engine.
unfortunately I have to go back to reality and won’t be able to tear into it this next weekend . I’ve soaked the heck out of it with some pb penetrating oil; this ought to losing it up. I’ve cleaned as much rust as I could with wd40 and a shop rag, it didn’t clean up too bad but there’s some build-up, enough to think that this wasn’t a problem that developed in the last 4 weeks. We’ll see how the bottom end looks next weekend.
Oh, I pulled out the cam and the only numbers I could find on it was:
1516
85r5
I truely appreshiate the assistance.
. I’ve soaked the heck out of it with some pb penetrating oil; this ought to losing it up. I’ve cleaned as much rust as I could with wd40 and a shop rag, it didn’t clean up too bad but there’s some build-up, enough to think that this wasn’t a problem that developed in the last 4 weeks. We’ll see how the bottom end looks next weekend. Oh, I pulled out the cam and the only numbers I could find on it was:
1516
85r5
I truely appreshiate the assistance.
I was finally able to get back at it on Saturday morning. I ended up tearing the entire motor apart since there were seized pistons on either side of the block; I couldn’t pull the cap and rotate the crank away from the rod in the stuck cylinder.
No. 6, 5, & 7 were completely stuck in the holes and it took some hard persuasion to get them out. I pre-soaked everything for a week in penetrating oil. On # 7, the worst of them all, I had to remove the crank and work the piston in and out of the hole applying penetration oil to try and get the walls lubed up. I ended up having to place the piston in the bottom of the hole and throwing a hone in the hole to knock off the build-up of rust. A couple more back and forth movements and more oil and it finally came out.
Bore came up standard at 3.875, contrary to my original thought it had been bored .06; mains and rods were standard. I’m a little nervous about re-using the pistons giving the effort that it took to get them lose and given the rust issue, I think it’s probably best to have it bored given the conditions of the bores.
At some point the entire assembly was balance past what I believe came from the factory. There’s material that has been removed from the fly-wheel as well as the counter-weights and new pistons would mean re-balancing.
I’d like to know what you guys think of it.
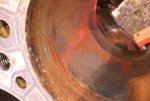 N0. 5 before hone
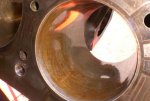 No. 5 after hone
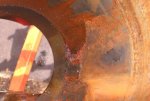 No. 7 before hone
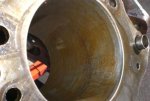 No. 7 after hone
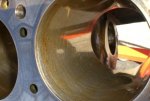 Typical wall after hone
No. 6, 5, & 7 were completely stuck in the holes and it took some hard persuasion to get them out. I pre-soaked everything for a week in penetrating oil. On # 7, the worst of them all, I had to remove the crank and work the piston in and out of the hole applying penetration oil to try and get the walls lubed up. I ended up having to place the piston in the bottom of the hole and throwing a hone in the hole to knock off the build-up of rust. A couple more back and forth movements and more oil and it finally came out.
Bore came up standard at 3.875, contrary to my original thought it had been bored .06; mains and rods were standard. I’m a little nervous about re-using the pistons giving the effort that it took to get them lose and given the rust issue, I think it’s probably best to have it bored given the conditions of the bores.
At some point the entire assembly was balance past what I believe came from the factory. There’s material that has been removed from the fly-wheel as well as the counter-weights and new pistons would mean re-balancing.
I’d like to know what you guys think of it.
N0. 5 before hone No. 5 after hone No. 7 before hone No. 7 after hone Typical wall after hone
Robert Kenney
Super Moderator
Ari,
if it were my engine and it was in the condition yours is in, with the corrosion in more than one hole. I would bore (probably .020) it and not fool around with questionable parts. Just not worth the time to do it again in a few years.
As always cam, rod and, main bearings. Have the rods checked for big end bore roundness, twist and squareness. Pop out all freeze and gallery plugs before taking it to the machine shop so everything gets clean. Then reclean the oil gallery's with solvent and compressed air before re-assembly.
If you have any question regarding the cam, replace it and the lifters..
Just my mo, not everybody's.
if it were my engine and it was in the condition yours is in, with the corrosion in more than one hole. I would bore (probably .020) it and not fool around with questionable parts. Just not worth the time to do it again in a few years.
As always cam, rod and, main bearings. Have the rods checked for big end bore roundness, twist and squareness. Pop out all freeze and gallery plugs before taking it to the machine shop so everything gets clean. Then reclean the oil gallery's with solvent and compressed air before re-assembly.
If you have any question regarding the cam, replace it and the lifters..
Just my mo, not everybody's.
Michael Mayben
IHPA Tech Moderator - Retired & No Longer Online
Those cylinder surfaces are deeply etched. Those will never do.
Bore it and hone the cylinders to finish diameter and be done with it.
There has been water (coolant) in the engine, all finely finished bearing surfaces must be carefully inspected for etching. No doubt the cam bearing babbit surface will be etched too.
Bore it and hone the cylinders to finish diameter and be done with it.
There has been water (coolant) in the engine, all finely finished bearing surfaces must be carefully inspected for etching. No doubt the cam bearing babbit surface will be etched too.
Does anyone have a fresh link for this article referenced below. This one does not seem to be working. Thank you.
"If the motor in question has been sitting non-rotated for some time, then I'd advise ya to do the "pre-oil" procedure described in this thread, post #3 before ever allowing the crankshaft to turn:
http://www.forums.IHPartsAmerica.com...-assembly.html"
"If the motor in question has been sitting non-rotated for some time, then I'd advise ya to do the "pre-oil" procedure described in this thread, post #3 before ever allowing the crankshaft to turn:
http://www.forums.IHPartsAmerica.com...-assembly.html"

Scoutboy74
Moderator
http://forums.ihpartsamerica.com/showthread.php?t=868
PDF file is attached to post #3 of the above thread. It is the first stickied thread at the very top of this category page.
PDF file is attached to post #3 of the above thread. It is the first stickied thread at the very top of this category page.