350 Buck Truck Project engine revival

Yeah those were the original fuel pump bolts and the bolt was hitting bottom on that blind hole. Must be some sort of design flaw.

I bought hylomar on ebay so I can be like Mike on those 2 oil pan screws and the flex plate bolts. You know that big hub back there for the flex plate mounting is still on the bench. Anything special bout mounting that big old hunk of flex plate spacer on the crank??
 
yeah those were the original fuel pump bolts and the bolt was hitting bottom on that blind hole. Must be some sort of design flaw.

I bought hylomar on ebay so I can be like Mike on those 2 oil pan screws and the flex plate bolts. You know that big hub back there for the flex plate mounting is still on the bench. Anything special bout mounting that big old hunk of flex plate spacer on the crank??

The flex plate spacer should have both faces spotlessly clean! Same for the flex plate and the retainer the bolts go through.

But...carefully inspect the area around the hub boss, that is prone to cracking and same for the four mount points for the torque converter.
 
Hey mr mayben I found the perfect service truck for you or Jeff.
1000 bucks obo craigslist las vegas
bigones1.jpg

1960 metro mite

I wonder if it would fit on a Scout II chasis??
 
hey mr mayben I found the perfect service truck for you or Jeff.
1000 bucks obo craigslist las vegas
bigones1.jpg

1960 metro mite

I wonder if it would fit on a Scout II chasis??

I can't believe ya found that listing!

I've actually seen that rig (without the hood ornament with the major attractions) parked beside a building in wickenburg for many years! It set there for at least three years I can remember, I used to take the wickenburg shortcut going back and forth to phoenix/tucson and all points beyond when I was gainfully employed!

A decent mite is extremely hard to find!
 

Attachments

  • metro 80 c.jpg
    metro 80 c.jpg
    33.6 KB · Views: 1,425
I had no idea that these rocker stands were going to be such a tight fit. It seems to be a factory 9 stand setup with boat rockers on this 75 truck.

I spent some time struggling with the reassembly of a rocker shaft this morning. New rocker shaft o.d. Is .862" which matches the good parts of the old shafts. I got 8 rocker stands on the shaft starting them by hand and then using a drill press as a press for a precise position. I made some delrin fixtures to protect the aluminum stands. The last stand was a bitch and I gave up before I broke something. This one seems to be out of round by as much as .010" maybe more.

Any tips on making the rocker shaft hole on the stand a better fit? What causes this out of round condition?

Also there were some mystery brass nuts that came back from the machine shop with the rocker stand bolts ( and all the rocker arm/shaft stuff)??? I am not sure where these came from but they are the same threads as the rocker stand bolts. I sure would like to know where those brass nuts go.

Arms are sore from wrestling rocker stands all morning as I managed to start assembling stuff wrong the first time.

This is all just a practice run for when I do the other engine in my Scout.
 
Probably only .0005 or less of an interference fit. You can safely hone out the tight stands with a brake cylinder hone and wd40. A few licks in a drill press will probably be enough. Only hone to allow a hand slip fit.

The out of round condition is from torquing

I don't know about the brass nuts as they do not go on your engine assembly. I have seen the pre assembled rocker assembly come with a couple of stand bolts and nuts installed to keep the thing together during shipping.
 
The rocker stands are aluminum...dead soft aluminum castings. They are easily "collapsed" (compressed) when installing if the bolts are over-tightened, that is why we do not use a "torque spec " on those and just feel for tension. The feel of the tension is also masked by the nylon pellet inserted in the bolt along with the application of some sort of thread sealant before installing.

Every rocker stand I recondition gets "honed" using a ball hone (flex-type). That cleans 'em up just enough so that they are slip-fit onto the rocker shaft. Once they are sterile, I then carefully inspect the bores for size and the top of the stand for cracks/distortion, if any damage is noted, they get tossed in the scrap metal buckets, on average, probably one in five are no good when inspected.

Brass nutz??? You been hangin' out with monte, dboy, and mikee roth from IHSTO at the rallye??? They musta slipped ya the brass nutz, they do that shit all the time to fook with folks, the nutz they think they got are brass...but in actuality they are plastic.

There ain't no brass nuts in them motors and no nutz of any kind used anywhere near the rocker assemblies! When I recondition/assemble/ship rocker assemblies, I thread a throw-away nut on each rocker stand bolt to keep 'em in place while in transit, then the nuts are removed/discarded before installing the rocker assembly.

When I tear down these rotten rocker assemblies for reclaiming the parts, they can be a major bitch to get apart due to the collapsed rocker stand and the heavy varnish build-up.

Need rocker stands??? This a a box of about 50 that have been semi-cleaned and graded for quality, but not completed for shipping. These are all in the ihon inventory. I have maybe another 100 or so that have not been processed at all but are for future salable inventory. There are four different variations of stands in that box all mixed up.
 

Attachments

  • Rocker Stands 002.jpg
    Rocker Stands 002.jpg
    78.2 KB · Views: 1,401
Last edited:
Brass nuts ... Definitely a good joke to play on someone to leave them head scratching for a while.

Also I tell you what it was like jamming square pegs in round holes with those overtorqued stands.

I May be calling Jeff about those stands if I find any belt sanded suckers or something along those lines.
 
Last edited:
Ok I need at least one replacement oiling stand # 151181-r1. For some unknown reason, there are 2 extra oiling stands placed equally apart on each bank.

c71dc00b.jpg

bab28a61.jpg

007f3288.jpg


I should replace all of them with a matched used set that mm has inspected but this budget is going way over at this point. Depends on the price for a full set. .... wish I could deal with another $200 hit but not an appealing option at the moment.
 
Last edited:
I talked erik into letting me have a go at his 75 parts Scout. So I think we have a replacement. Looked like the valve covers had never been off. 2 things notable: another 9 stand boat setup and some grey goo oil dripped out of the borrowed rocker shaft via the oil stand.
b35bdf0c.jpg


Mmmm fresh manifolds

speaking of manifolds I recently heard that if you can locate a boneyard combine with a 345 in it you can use those manifolds to run the exhaust straight up through the hood. Too bad I can only dream about stuff like that on my daily driver in kalifornia.
 
Last edited:
ok I need at least one replacement oiling stand # 151181-r1. For some unknown reason, there are 2 extra oiling stands placed equally apart on each bank.


I should replace all of them with a matched used set that mm has inspected but this budget is going way over at this point. Depends on the price for a full set. .... wish I could deal with another $200 hit but not an appealing option at the moment.[/quote ]

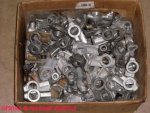
I got maybe 20 rocker stands just like that cracked one ! dam guud thang ya inspected closely ! but the cracking is not the only "failure" mode !

there are many variations of the mix and match of the rocker stands over time . and at least three different part numbers May be found on the raised casting number .

the oiler stands can be found that have oil "holes" or..."oil slots" .

then there are stands that look like oiler stands from the top (they have the cut-away mounting foot for cylinder head bolt-head clearance in some positions), but have no oil hole .

then, there are stands that have no oil hole and no cut-away mounting foot, those can be used in only a few positions, otherwise the mounting foot will hit the head of the head bolt when installed .

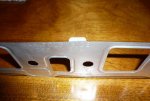
because the entire rocker assembly is totally interchangeable passenger side-to-driver side, it must be assembled so that the correct oiler stand is mounted in the correct position to cover the oil supply hole on either cylinder head...otherwise no oil to the rocker shaft ! you could use an oiler stand in every position on the shaft if ya wanted (or need) to, but that would be a waste of oiler stands ! that way there is no possibility of head bolt interference when mounting .

the gray grunge ya found in the sludge in the donor rocker is most likely a mixture of oil, moisture, and cam bearing metallic sluff-off, typical failure mode of this old non-maintained shit.
 
304home.jpg


Crawling along here. Last week I rented a 4x7 uhaul and brought the 304 home from our machine shop without incident. Tonight I just installed the lifters and micheal's 304 ball ball pushrods using a lever I fabbed out of a big aluminum bar because I already installed the rocker shafts prior to bringing the 304. I also did the valley pan tonight.

I have a question on which is the best technique to drop the intake manifold on. I will be using a cherry picker to place the manifold.

The question is: will the intake gaskets stay in place ok with a healthy dose of the copper seal spray? Or is it better to stick the gaskets to the intake instead of the heads?

I am assuming that the gaskets will be stuck to the heads good enough and that if I drop the manifold very slowly the gaskets will stay put. The valve covers are still off the heads. Also I am a gonna get all new grade 8 bolts with hylomar on the threads even though I seem to have all the copper clad intake bolts. Same with the exhaust manifolds although I intend to use anti seize on those threads.
 
Your engine looks very nice by the way.

The gaskets will try to move around, especially down..

Here is what I do.

Before applying the copper spray, I line the gaskets up exactly with the ports and bolt holes then I bend the little tabs on the upper edge of the embossed shim gaskets at a sharp 90* toward the head so they hang on the top edge of the head in perfect alignment. They stay in exact alignment during lowering the manifold. After assembly you can straighten them so the valve cover gaskets can line up on them ans stay fast also.

The copper bolts were intended for the exhaust manifolds to aid in fending off corrosion.
For the manifold the g8's are a good ider and I like to use a g8 hard washer under each head also.

Picture for reference is a 304/152 manifold gasket

9889d1274029064-350-buck-truck-project-engine-revival-p1010367-large-.jpg

9890d1274029064-350-buck-truck-project-engine-revival-p1010366-large-.jpg
 

Attachments

  • P1010367 (Large).jpg
    P1010367 (Large).jpg
    52.1 KB · Views: 1,398
  • P1010366 (Large).jpg
    P1010366 (Large).jpg
    56.2 KB · Views: 1,296
Last edited:
I can well understand the sitch steve due to your need to use that work platform from the wheelchair!

I'd install the intake before dropping the engine in! And even I use the cherry picker for doing that since I'm not supposed to lift more than 25lbs. And that intake weighs about 53lbs. I use one of the cheepee engine lift "plates" that bolt to the intake manifold flange to hang the manifold from.

Or...have erik do the intake install heavy work, he's better than a cherry picker!

Robert's described technique is the same as what I do.
 
10-4 I had a feeling there was a better way. Yeah I am praying the body won't rust off the Scout before I get this new truck/engine project fully back in service.
 
I feel your pain rs. It wasn't until I went to register my rig that I realized it had not been current since 2005....! It was supposed to be just a head gasket fix (and maybe a valve job since it was
torn down that far). You can barely tell from 20 feet that its now a completely new drive train. Oh well. Keep your head up. We've all been there and we're pulling for you to giterdun!
 
That 304 sure is looking pretty there on that stand in the garage but as the engine nears completion that old stand of doc stewarts is starting to sag a little. It’s gotten to the point that I am using the cherry picker to help with the load a little so I don’t hear the big crash in the middle of the night.
The intake is on and steady progress is happening each week but little tasks are getting blown way out of proportion along the way. Multiple forays out for hardware and parts, waiting for paint to dry, waiting on the weather cause this is a shade tree project…etc ,etc, etc have really drawn this out about 4 times longer than it should have.
Last week’s episodes included having erik over for a valuable few hours one day. Since I had the luxury of an extra hand we slid the 727 under the truck on a piece of sheet metal. With erik in the engine compartment and me underneath we lifted the 727 up into the tunnel and let the front rest on the crossmember that is normally just below the ring gear. While I supported the rear of the 727 by hand my helper slid the lincoln 1 ton big truck tranny jack (all 300 lbs of it) up under.
 
We went to install the ring gear/flexplate assembly when we got stymied by those 3/8-24 holes on the back of the crankshaft. Whatever thread sealant was used the past had somehow turned rock hard and was causing the flex plate mounting bolts to bind up and not thread in properly. The bolts began to show signs failure so I got out the bottoming tap and went to work. Luckily no metal chips were cut in the process. I pulled the oil pan again to check for debris but I only found a little black stuff in the pan. The rest was flushed out with air and solvent. No problem after that. Permatex #2 was applied to the threads and that old flexplate went right on finally.

The only other noteworthy incident was dealing with the passenger side rear dump exhaust manifold pipe connection studs. Those long 3” studs sticking out of the back of the manifolds were ugly. One was stripped of nearly all threads and the other was missing a chunk too. I really did not want to mess with this at all in fear of breaking one of these hard to find manifolds.

With a borrowed stud remover tool I got cocky and removed the really bad stud easily without much effort at all. I had been treating the treads with a product called “stay loose” (similar but not as good as kroil). Perhaps I should have left the other stud alone but the first one came out so easily I figured what the heck. Famous last words. My worst fear came to be. Without much pressure on the ratchet I heard a distinct report. At first it sounded like the stud broke loose but no such luck. That was the noise of cast iron failure. The chunk of cast iron that broke off and the manifold were gathered up and brought down to the only qualified welder dude in these parts of marin county.
 
Last edited:
Sorry I missed your call yesterday steve...I'm, down with the flu and when I dope up I don't respond to nuthin'!

Bitch regarding the manifold...but I've been there many times myself!

I would have also recommended what you have done. I've welded manifolds very successfully over the years using the nickle rod. Same on the bosses on the head when they crack off at the manifold mount points.

I don't waste time on center dump manifolds, they are numerous used and also available new. But rear dumps are not as you know!
 
Back
Top