2300 Rebuild 1966 Travelall

Beluga

Member
This is my first rebuild. The Holley kit instructions state to follow the numerical order of the "exploded diagram" to disassemble. You can't even see the numbers, fortunately you can download it from the Holley website. Nevertheless, I started to disassemble it and hope to get michael mayben's (and others) advice on a few things. So to start...

1. 2300 carb 2977, on a IH 304.
2. I have read thru a number of previous 2300 threads but I'm certainly not at the level of familiarity that it appears most everybody else is. So please put any advice at the "carbs for dummies" level. Thanks.

Here's pic of the carb.
4387d1236492290-2300-rebuild-1966-Travelall-rebuild.jpg

4388d1236492290-2300-rebuild-1966-Travelall-rebuild-1-.jpg

4389d1236492290-2300-rebuild-1966-Travelall-rebuild-2-.jpg

4390d1236492290-2300-rebuild-1966-Travelall-rebuild-3-.jpg
 

Attachments

  • Rebuild (1).JPG
    Rebuild (1).JPG
    168.5 KB · Views: 1,020
  • Rebuild (2).JPG
    Rebuild (2).JPG
    151.8 KB · Views: 942
  • Rebuild (3).JPG
    Rebuild (3).JPG
    160.6 KB · Views: 913
  • Rebuild.JPG
    Rebuild.JPG
    170.4 KB · Views: 1,384
Last edited:
I took photos of everything and am trying to keep it all in order. I need to drop most of this into the carb cleaner
4391d1236493140-2300-rebuild-1966-Travelall-rebuild-8-.jpg

4392d1236493140-2300-rebuild-1966-Travelall-rebuild-9-.jpg

4393d1236493140-2300-rebuild-1966-Travelall-rebuild-10-.jpg
 

Attachments

  • Rebuild (8).JPG
    Rebuild (8).JPG
    148 KB · Views: 890
  • Rebuild (9).JPG
    Rebuild (9).JPG
    150.1 KB · Views: 970
  • Rebuild (10).JPG
    Rebuild (10).JPG
    145.5 KB · Views: 874
Last edited:
This isn't explained in the kit, but I have seen this spacer/gasket alluded to in other posts.
This is what I found when I took off the carb.

What's the recommendation for a spacer here?
4394d1236493376-2300-rebuild-1966-Travelall-rebuild-4-.jpg

4395d1236493376-2300-rebuild-1966-Travelall-rebuild-5-.jpg

4396d1236493376-2300-rebuild-1966-Travelall-rebuild-6-.jpg

4397d1236493376-2300-rebuild-1966-Travelall-rebuild-7-.jpg
 

Attachments

  • Rebuild (4).JPG
    Rebuild (4).JPG
    171.2 KB · Views: 883
  • Rebuild (5).JPG
    Rebuild (5).JPG
    161.5 KB · Views: 880
  • Rebuild (6).JPG
    Rebuild (6).JPG
    142.8 KB · Views: 870
  • Rebuild (7).JPG
    Rebuild (7).JPG
    101.4 KB · Views: 882
Last edited:
what's the recommendation for a spacer here?
That is the base mounting gasket. Felpro makes a good one. Look for a felpro #60677 gasket. No parts with soft material like rubber, viton, or the float should go in carb dip. Pay close attention to the replacement gaskets. The throttle body to main body gasket must match the throttle body to seal the idle circuits and the metering block gasket must match also. The extras in the kit May look similar, but there's only 1 right one for your carb.
One other important thing is the accelerator pump arm, it's in your post #2, 3rd picture down; it's the part right above the throttle body gasket on the right. Sometimes they get grooved or rough where they contact the accelerator pump cam. Make sure the contact surface is nice and baby's arse smooth. A smooth operating accelerator pump makes for good pump action and carb tip-in from an idle to engine acceleration under load as say from a traffic stop.
 
Last edited:
Thanks greg.
Tomorrow I'll call around locally and see if anyone has that gasket in stock. I have found that you can't ask them to look up anything on a Travelall, almost no one knows what it is, you need part numbers, so I appreciate that.
 
In respect to the actuator arm. There is a groove. I smoothed it with steelwool and also a dremel tool. It feels smooth to the touch, so I think it's okay. A couple pics highlight the area I think you were talking about.
4399d1236529013-2300-rebuild-1966-Travelall-actuator-1-.jpg

4398d1236529013-2300-rebuild-1966-Travelall-actuator.jpg
 

Attachments

  • Actuator.jpg
    Actuator.jpg
    26.1 KB · Views: 886
  • Actuator (1).JPG
    Actuator (1).JPG
    97.8 KB · Views: 862
Power Valve

The old power valve has what appears to be 2 gaskets, both paper (for lack of a better term). One stayed stuck to the metering body and one stayed on the valve after removal.

In the pic, there are 2 new gaskets that are the potential replacements. Neither look like the ones on the old valve. Does it take both? If so in what order?

The new power valve also looks a bit different on the end that the old one. Do you think this is okay?
The kit is Holley 37-1543.
 

Attachments

  • Power Valve.JPG
    Power Valve.JPG
    161.6 KB · Views: 1,018
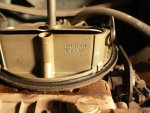
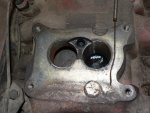
The list 2977 carb you are dealing with is an oem application for an ihc 266 motor. I have a few useable cores of that same list number in my stash now.

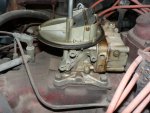
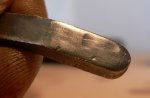
The throttle rod lashup is kinda odd, that one must have been set up for a hand throttle?? Does the rig have a pto installed???

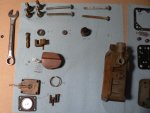
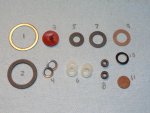
The breakdown of the carb (excellent documentation by the way!) shows to be all original parts. Many of those parts are not going to be what you find in any carb kit whether sourced from Holley or any other version.

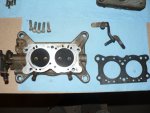
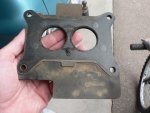
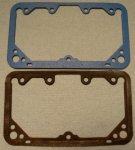
You will not find the throttle body gaskets at any parts supplier, those are specialty items available only through Holley direct in most cases. A Holley wd can order for you some of the gaskets, but the throttle body gaskets for the old oem carbs are not available, though I do have a semi-local source for some of that stuff because the guy has a Holley/rochester/carter inventory that stretches back over nearly 75 years.

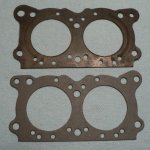
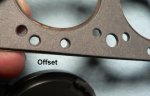
If you use the Holley "universal" kit I've alluded to many times here, you will find one throttle body gasket in that set that is very close (but not the same) to what you need. That gasket will have to to be "punched"...I do that onna daily basis. But in most cases regarding this older oem carb stuff, I simply make a new correct gasket out of modern material, takes less than 10 minutes. Again...there are many nuances and differences in all these oem list 2300 carbs used over the years, ya just gotta be creative when dealing with 'em. Two of those gaskets in your kit you describe are only for the 500cfm Holley 4412 centerhung carb, you will see the venturi holes are much too large for your throttle body, do not attempt to use either of those.

The "correct" Holley kit dedicated for that carb list has not been available in many years...though some Holley wd might still have inventory on the shelf. That dedicated kit would be Holley p/n 65r-1066-s.

In that same basic oem series, there were at least fifteen separate list numbers...each with very unique characteristics...no one kit is going to be absolutely correct for a carb that was last in production in 1968!!! Same for the "instructions"...those are just basic guidelines and the instructions you are using are very generic and for a much later variation of the 2300 series.

That is why this sub-forum exists...to share knowledge about specific Holley mixers used on specific IH apps! We discover new stuff everyday around here, but we do have a vast amount of technical resources to draw from...along with one particular individual at Holley technical service who really is helpful in dealing with "old" oem stuff, not the same as the current aftermarket replacement items.

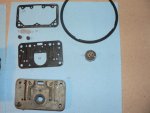
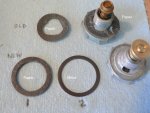
The oem power valve is the old style, those have been gone for about 15 years, those must be used with that "three-lobe" gasket.

The power valve supplied in the kit is a late design "picture window" unit and must be used with the larger round gasket. That one in the kit should be a #65 which is just fine for your carb/engine combo. The neoprene-coated "metal" gasket is for the steel fuel bowl fitting on the 2300 "center hung" carb and is not used on your carb app.

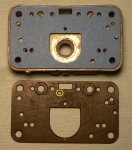
The gaskets in the kit you have should be the blue neoprene-coated "no stick" type. And that metering block you have does not incorporate a "transfer tube" which is what the two tiny "o" rings in the kit are for.

The bowl gasket in the Holley "universal" kit won't be correct for that carb, the one I see in your pic is a Holley p/n 108-83-2. Only that gasket must be used for your app, otherwise the bowl won't seal and the accel pump transfer will be blocked. Those come in 2-packs and any Holley parts jobber should have 'em hanging on the wall.

The metering body gasket in the universal kit will be correct for your carb.

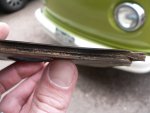
The fel-pro 60677 base gasket was an original design done for ihc back in the day only...those were later incorporated (after about 1968) by many oem manufacturers to combat percolation on emissions motors. Holley also supplies that gasket utilizing slightly different material. I do not like to use the napa version of that gasket and would never consider using any napa-supply carb kit for any Holley carb app. We have the fel-pro gasket in stock here at ihon right now.

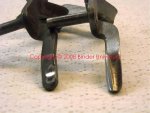
Surface the accel pump lever, it must be smooth, then you will have to change the bend on it so that the wot clearance can be properly set. Remove the nylon accel pump cam and clean very well, carb spray will not affect that cam.

I have been using only "tyme" cold parts cleaner for carb dip for the last three years (also internal engine parts go into the tyme bucket). It does not affect any rubber or composite material but it will also not strip grossly-adhered old time gaskets without some mechanical effort.

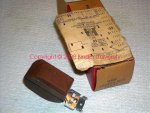
Your float is a very early "nitrophyl" item, current design nitrophyl floats are black and are greatly affected by the use of today's e10 fuel. Toss that one and replacement with a brass float currently available from Holley. All carbs I service get a float replacement now using only brass service parts, that changed about two years ago on my end. I deal with the "heavy" nitrophyl float setup on a daily basis on customer carbs.

Your item #38 in your pic is a bowl vent screen...that did not come oem on that carb and is an aftermarket part, helps prevent any fuel slosh through the bowl vent on rough terrain or during intermittent high angle operation, I put those in most all side-hung carbs I service. The original bowl vent used a very thin piece of formed brass sheet to act as a baffle at that location, held in place over those two pegs by the gasket.

If you have two accel pump elements in your kit, use the thinner one, that is for a 30cc pump. That kit you have also services a 500cfm (list 4412) version of similar carb and is a 50cc element. Also, latest production kits will have a "green" accel pump element, that is the "gflt" material designed to combat the effects of methanol, e85, and e10 fuels. Those are good! I'm not seeing any issue with the blue Holley gaskets right now regarding the use of the alkeefuels...and those are used on the Holley carbs running methanol in race apps.

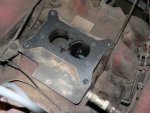
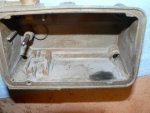
Looking inside the fuel bowl I see evidence of deteriorated gasoline and moisture! No carb dip or spray will remove that stuff, I use several methods of mechanical cleaning to make the bowls (and all other parts) sterile.

If you see some heavy "white rust" (that is an oxidation issue somewhat peculiar to cast zinc components), then I have a secret mix that aids in removing that stuff, but it also takes much mechanical effort, it's not a "dip and play" kinda thing!

What else???
 
Last edited:
That took all day to digest!!!
I had to look up names of parts and go back and forth between your post, the carb, the internet, etc. But hey, this is a learning experience and I appreciate all the help I can get.
I have a bunch of questions so maybe I'll do them in a series of posts.

1st. There is no pto, but the po told me that the "choke" lever initially will raise the rpm's when pulled out, but then after about the first inch, it starts to richen the gas/air mix. Does that make sense?

The throttle body gasket. As you said, this new one is really close, but when you line up 1/3 of the holes, the other 2/3's are offset by 1mm or less. You can't get them all to line up.

Is it easier for me to enlarge those offset holes?
Is that a no-no?

Or is it easier to fabricate a new one? I know you can do it ,easily but you probably have much better tools and certainly have done it a few hundred times.
 

Attachments

  • P1060174.JPG
    P1060174.JPG
    92.1 KB · Views: 921
Last edited:
Power Valve

Okay, that makes sense. Using that new updated power valve that came in the kit and the new gasket (#2 in the pic below).

Now this...

"the gaskets in the kit you have should be the blue neoprene-coated "no stick" type. And that metering block you have does not incorporate a "transfer tube" which is what the two tiny "o" rings in the kit are for."

so, I do not need the o-rings. Which ones are the o-rings by the way?
 

Attachments

  • P1060191.JPG
    P1060191.JPG
    156.5 KB · Views: 916
Last edited:
More questions in a bit. I don't want to get to far ahead and lose my train of thought.
Thanks!!!
 
Last edited:
Bowl Gasket

I know you said that the new bowl gasket in the kit won't work, but comparing the old one and the new one, I seriously can't see the difference. All the holes line up and the the holes themselves, when stacked on top each other, appear to be the same size. My untrained eye is missing something. Help!
 

Attachments

  • P1060177.JPG
    P1060177.JPG
    107.5 KB · Views: 950
Excellent thread man! You are doing exactly what ya need to learn stuff and help others as well!!!! And your methodology makes it real ez to reply!

That slight amount of offset in the gaskets is no concern...that is caused by "shrinkage " of the oem gasket material...I know that you also found all the screws that retain various components into an assembly to be loose!!!! We'll deal with that when you begin the re-assembly process.

If the holes basically line up, then ya got the right gasket! If the replacement is only "missing" one or two holes, then modify it accordingly. The throttle body/main body on the 2977 list carb is not the "problematic" one (concerning a replacement gasket) that is also found quite often on the 266/304 applications, so ya lucked out there! As I mentioned, I think I've counted eleven different list 2300 carbs used on those motors by IH over a five year or so span and I'm certain I haven't accounted for all! But that doesn't matter...all we care about is your carb you are doing now!

But!!! The gasket in your pic you are comparing (the new one) has a larger set of venturi holes than the oem gasket. The one in your pic is for the list 4412 (500cfm) carb I mentioned. I can see the overhang. Typically that kit has either three...or four main body gaskets to choose from. You need to use the one with the smaller venturi holes and then "correct" it as needed (if needed).

In your "gasket" pic, items 1, 3, 8, 9, and 11 are not going to be used in your carb! Do not toss that stuff out! You will need it someday on some other Holley modular!!! Or put inna envelope and send to me! I buy those same parts in bulk direct from Holley, I rarely purchase "kits" anymore unless needed.

You will use 5 and 7 (those are for the needle/seat adjusting nut and lockscrew), 2, (power valve as you have already determined), 4 (upper and lower accel pump "shooter" seals), 6 (bowl screw seals, nylon), and 10 (the sight window plug seal).

Regarding the bowl gasket...ya lucked out! The one you show will be correct!

When you re-assemble, tighten every fastener that retains the main body to the throttle body to the point of stripping. I also use loctite "blue" on those fasteners. That is the secret to keeping this carb fresh for many miles! If ya do strip one, then it's a simple operation to helicoil as needed.

The bowl screws need to be real snug, but those nylon washers will compress and split if overtightened, those are a much better design than the older fiber seals and allows the bowl to be r&r several times if needed.

Just an aside regarding the "hand throttle" deal...that was an option (or a dealer add-on) that was used to run the motor up in rpm when using a pto among other uses.

Your mechanical choke actuator adjacent to the throttle arms does have a fast idle cam as part of it's design. If the carb is correctly adjusted when freshened, you will be pleasantly surprised at how suddenly this motor takes on a new life! That fast idle cam system works flawlessly when the idle mixture is adjusted as well as the choke cable. You will learn a whole new cold engine starting sequence! The po just didn't know "how" to start the engine with a booger carb! Typical!

But before we get into the final carb adjustment phase, I hope you will give the distributor/ignition the same kinda luv the carb is currently getting! It's gonna take both to make this thing play nice!

This one is fun!
 
Summary Post

I need to make an occasional "summary" post where I can document important notes.

- to be able to put all the salient points up to this spot in one spot.
- to make it easier to refer back to one spot, rather than try to reread what May turn out to many posts.

Plus it looks like I can continue to edit old posts making it easier to update this summary.
Updated 3/14/09
1. Ordered the felpro #60677 carburetor mounting gasket. Received.
2. Accelerator pump lever. Resurfaced.
3. Power valve. Use new one with proper gasket.
4. Throttle body gasket. Correct one identified in the kit.
5. Fuel bowl gasket - the one I have will work.
6. Metering body gasket. Should fit.
7. Float - order new brass one from Holley (116-4). Received.
8. Ordered some loctite blue. Received.
9....
10. I did put a new cap/rotor, plugs, and wires in already, but if there's going to be better options/upgrades to do during the tuning phase, I am all ears. Of course, before getting into that, we'll finish the carb. Then maybe start a new thread in the distributor forum, then tires forum, then brakes forum, etc!

Craig
 
Last edited:
Metering Body Gasket

Late day at work. No carb work done today, but a couple posts.

This gasket fits great. The extra hole on the old gasket circled in yellow doesn't exist on the new one... But there's nothing it would go to anyway, so I don't believe I need to punch one there anyway.
 

Attachments

  • P1060194.jpg
    P1060194.jpg
    64.9 KB · Views: 552
Fuel Bowl

After being dipped in "gunk" carb cleaner, still have a grey residue that is mainly on the bottom, likely from settling of crud, etc. As you alluded to michael, this needs to be mechanically removed. I did a small spot with a dremel tool and a "soft" wire wheel. This seems to work and I'll do the whole thing like that if there's no objection.

Craig
 

Attachments

  • P1060184.JPG
    P1060184.JPG
    143.3 KB · Views: 497
All your bullet points are correctomundo!

Item #7, the float...

All Holley "side hung" brass floats are the same p/n which is currently hly 116-3. Those are for use only in modular carbs that have an adjustable needle/seat assembly such as yours. They will not perform correctly in carbs that feature the "non-adjustable" (so-called no trouble) needle/seat/bowl assembly.

Just for fun...I've attached a pic of an oem/nos nitrophyl float from back in the day. This one is from the collection of nos parts that are in inventory at ihon. I'm saving it for that one perfect Holley 2300 that is a restoration candidate where stuff like that matters, along with a restoration of the surface finish!!

By the way...the surface finish on your carb appears to be very nice! Go easy with the mechanical cleaning, that chromate surface treatment is very delicate! Carb dip and spray cleaner won't affect, but mechanical abrasion will strip it right off.
 

Attachments

  • NOS Nitrophyl Float 002.jpg
    NOS Nitrophyl Float 002.jpg
    94.6 KB · Views: 484
To further explain about the accel pump actuator lever...

The nylon pump cam on the throttle arm is abrasive due to microscopic grit and fuel residue that embeds over time and becomes something like lapping compound. That is what creates the divots in that pump lever which is not a "hardened" steel material.

Later versions of that arm May be found which are a delrin material, but those won't work on the oem 2300/4150/4160 carbs. And many times, the arm found on some aftermarket (centerhung) 2300 carbs is a somewhat different design which also won't work on the earlier oem carbs.

Normally the cam itself does not wear down...but if the carb has seen "fire" (very common on carbs I recondition), then the cam May be damaged or gone. Replacements are easily obtained...your oem cam is a "white" callout though it's color has no doubt changed over time to appear to be amber/tan/brown/gray/etc. Since the beginning of production of these carbs around 1955, the cam "color" has remained consistent for identification purposes, they also have a part number cast in on the back side. The very early modular carb accel pump cams were a brown phenolic material, not nylon.

The attached pic shows two arms that are identical to yours, one is from a carb with the same list number as yours.

The arm on the left is extremely worn, as is your piece! On the right in the pic is a resurfaced arm. I do that using a fine grade belt on a belt grinder. Simply roll the part against the belt very lightly until a side-to-side "radius" is obtained and the divot marks are "just" eliminated, no more! Then the surface gets polished with various items from the collection of bits/brushes/buffs/etc. For the die grinders and dremel. Then I reset the "bend" in the arm so that I can obtain full adjustability to compensate for material removal during the grinding process. This is not extremely critical, but just attention to detail the results in the perfect "pump shot" when the carb is placed in service. It's stuff like that that no commercial carb remanner (other than Holley) pays attention to.
 

Attachments

  • Lever Before and After.jpg
    Lever Before and After.jpg
    63.1 KB · Views: 485
Re: Fuel Bowl

after being dipped in "gunk" carb cleaner, still have a grey residue that is mainly on the bottom, likely from settling of crud, etc. As you alluded to michael, this needs to be mechanically removed. I did a small spot with a dremel tool and a "soft" wire wheel. This seems to work and I'll do the whole thing like that if there's no objection.

Craig

You are describing the exact process I use regarding "mechanical" cleaning!

I'm no chemist...but I believe the residue ya see is actually deterioration of the chromate surface treatment that was originally used on these cast zinc parts and is normal. Rotted fuel and moisture adds to that, but yours appears to be free of that type accumulation, no chemical "dip" will totally remove that stuff, only lots of hand labor with mechanical assistance!

Gotcha regarding the ignition stuff...sounds like ya have that handled for now. When ya wanna deal with any ignition upgrade, post a new thread and we'll deal with only your system!
 
Back
Top