You are using an out of date browser. It may not display this or other websites correctly.
You should upgrade or use an alternative browser.
You should upgrade or use an alternative browser.
1979 International Scout II
- Thread starter jrfeatherman
- Start date
jrfeatherman
Member
Here is the new back lash
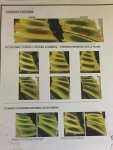
That pattern is still way off. You need to be in the flank of the gear, not the outer face of it. I would add at least .030 of shim back to your inner pinion bearing race, readjust the backlash, and then recheck your pattern the way I instructed you to. See the attached chart for the pattern you are trying to achieve.
Attachments
Last edited:
jrfeatherman
Member
That pattern is still way off. You need to be in the flank of the gear, not the outer face of it. I would add at least .030 of shim back to your inner pinion bearing race, readjust the backlash, and then recheck your pattern the way I instructed you to. See the attached chart for the pattern you are trying to achieve.
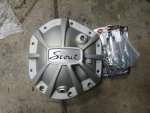
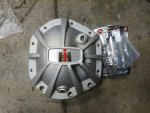
Thank you for the help Jeff, I will go at it again tomorrow after work until I get it right. I have to get the the covers I just got in the mail that I ordered from you guys. I was not planning on getting any but I am glad I did. I May have to customize the logo a little to have the IH symbol or Scout II.
Attachments
jrfeatherman
Member
jrfeatherman
Member
jrfeatherman
Member
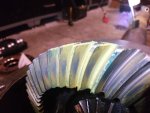
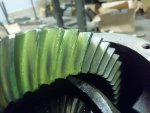
Ok so I spent roughly 7 hrs today working on getting a good gear pattern (redid front and rear axles). I could not get as good as a pattern as the picture you sent me but I was able to get within the acceptable pattern on the Yukon chart. I realized my big screw up that I have been making from when I started. I must be dyslexic or something, my brain couldnt wrap around the fact that 0.003 is not the same as 0.030. My digital caliper reads down to 0.0001 so I was writing down 0.0030 which threw me off. Frustration got the best of me on this one. I went and got a dial caliper this morning because my digital one was not giving me consistent measurements. I completely redid all my measurements and my values changed slightly. After getting my measurements I started with a 0.030 shim count for my pinon depth and got my shims for the carrier. I had a deep high coast and deep low drive. I needed to lessen the pinion depth and backlash was 0.003. So this gave me a starting point, so thanks for the heads up on the 0.030 increase. After disassembling and reassembling another 10 times trying to get a good pattern I was able to find an acceptable pattern reading. The pictures I will attach are not ideal but I had to use Prussian blue since I used up all my yellow marking compound. So you'll see a slight green tint. I hope this is good enough because I have spent too much time with this. My final pinion shim count was 0.0280, with a 0.006 backlash.
Attachments

jrfeatherman
Member
jrfeatherman
Member
jrfeatherman
Member
Outdoorman_idaho
New member
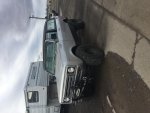
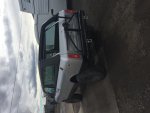
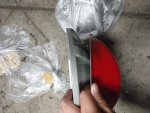
Thanks for the tips, I did have a question about the Rough Country 4 inch lift. I live chatted with a rep from RC and the springs they gave me are shorter from eye to eye than the stock springs I currently had on them by 4 inches. He gave me the specs of the RC spring and they only had 4 leaves but the pictures they had showed 6 or 7 for the front spring. A little confusing, maybe the older versions had more springs and the reason why some reviews complained about the stiffer ride? Do you know if the older version of the RC springs had more springs or where I can find that information? I looked in the suspension thread but could not find anything on the subject. The picture I am attaching is what I am shooting for.
That scout happens to be one that I built a while ago. It does not have rc springs.
It has bds 6 inch lift springs off a 1990s 52 inch long Chevy springs from the front. and 63 inch long 2002 Chevy 1 ton rear spring with the thick overload spring removed. For the rear spring on that scout
Axles were 8 lug full width Chevy 3/4 ton. Which had Dana 44 front and full float 14 bolt rear.
Last edited: