1979 International Scout II

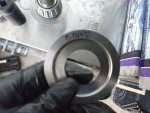
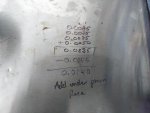
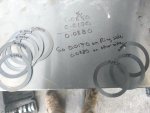
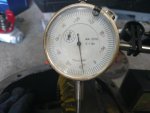
I got roughly 0.0550 for my side to side movement. My first attempt I got roughly 0.0630 and I could not get the carrier back in the housing after adding shims. So a good point to make is make sure you pick a good flat surface to measure off of or your numbers will be off. I added a magnet, as you can see in the picture. With this being added I got a consistent value of 0.0550. I adjusted my shims and the carrier fit in snug with little light tapping of a dead blow to the bearing races.
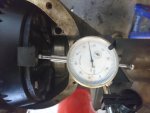
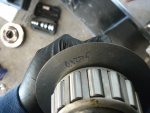
 

Attachments

  • DSC_0182.jpg
    DSC_0182.jpg
    49.2 KB · Views: 655
I then measured the oil slinger thickness because I knew it would add to the height of the pinion but youll later see I forgot add to my shim calculations.
 

Attachments

  • DSC_0161.jpg
    DSC_0161.jpg
    46.8 KB · Views: 758
I also measured for the baffle for the same reason that I knew it would add to the total pinion height.
 

Attachments

  • DSC_0162.jpg
    DSC_0162.jpg
    54.5 KB · Views: 682
I then took my numbers (except for oil slinger), added them up and subtracted my added measurement of the baffle. This number gave me a starting point for my shim count under the inner pinion race.
 

Attachments

  • DSC_0163.jpg
    DSC_0163.jpg
    37.7 KB · Views: 665
Inserted pinion setup so I can measure for distance of side to side movement from pinion and ring contact point, and bearing seat position in housing. I must have deleted the picture, but I ended up with a 0.0170" movement.
 

Attachments

  • DSC_0167.jpg
    DSC_0167.jpg
    37.4 KB · Views: 663
I took the number I got and subtracted from the total shim count I got when I measured for total movement without pinion in place. The 0.0170 went on the ring side bearing and the 0.0380 went onto the opposite bearing.
 

Attachments

  • DSC_0184.jpg
    DSC_0184.jpg
    43.5 KB · Views: 647
I used the supplied marking grease and brush that came with my rebuild kit. I applied it to a few of the teeth on the drive and coast sides.
 

Attachments

  • DSC_0179.jpg
    DSC_0179.jpg
    51.7 KB · Views: 688
Before I started to rotating the ring, I made sure to tighten down bearing caps and pinon. I learned that not tightening the pinon, the pinion would shift/catch and move a little. I wanted to get the best markings I could, especially since this is my first attempt at rebuilding an axle. I made sure that I put the correct bearing caps back to their original locations and marked with paint to high light stamps as they were hard to see.
 

Attachments

  • collage-1495431264622.jpg
    collage-1495431264622.jpg
    38.3 KB · Views: 649
I added pressure to the top of the ring and rotated front to back, while maintaining pressure. I also kept my hand on the yoke neck to keep some resistance in the pinion as I rotated. As you can see I got a high marking on the coast side and a low marking on the drive side. So with a little searching I seen that I needed to adjust my pinion height. I needed to lower my shim count, which would have been a bigger adjustment if I added my measurement of the oil slinger.
 

Attachments

  • collage-1495431710148.jpg
    collage-1495431710148.jpg
    37.4 KB · Views: 671
Last edited:
After a few adjustments and testing I got these next markings. I could not get clear markings like some of the pictures I found online but this looked to be right where I needed it. I May be wrong and would like some feed back if you have made it this far in my posts. It would be easier now to make necessary adjustments if needed. Plus I am not done with my axle build. I ran into a little hick up with bearing seals and back lash.
 

Attachments

  • collage-1495432328923.jpg
    collage-1495432328923.jpg
    35.7 KB · Views: 691
Last edited:
After accepting my markings, I did my pinion preload. (I did not take any picture of this as it was hard trying to set up pinion and take pics as I was alone doing this.) This step was the unknowing factor of this rebuild as my torque wrench only goes up to 150 ft lbs. From some searching I found that the proper torque for the pinion nut is 200-255 from two different sources. So without knowing if I got proper torque this May affect my results. With that being said I torqued down to 150 ft lbs and then did an additional 1/4 turn. I believe this should put me in the ball park. I checked my preload and got a 15.8 ft lb rotational reading. So I figured I was fine since the preload needed to be between 14 and 19 ft lbs. I then put back in the carrier and did my back lash measurements. I set up dial indicator and got a reading of 0.009" reading. This was on the high end but within tolerances (0.004-0.009 one source and 0.006-0.010 another). I figured all was good and put all new bearings on the carrier and reinserted back into housing. After checking back lash again I measure 0.0011 which put me out of specs. I am not sure how much of a difference this would make but any input would be great. I did all the same steps on the front axle but got a little better results as I got 0.006 back lash and 17.9 ft lbs pinion rotational torgue. Like I said any help is great if your keeping up with this build. One of my other hick ups is the rear inner seal is larger then the inner tube diameter. I took some measurements and the seal is roughly 2.5" and the inner tube is roughly 2.25". I am going to call and check if I got proper seals, issue is I have two sets from two kits, and both sets are too big.
 

Attachments

  • DSC_0200.jpg
    DSC_0200.jpg
    40.4 KB · Views: 697
Last edited:
A few pointers that I observed reading your posts. When you went from your test bearings to your final bearings, and the back lash changed, that happens all the time. I would open it up again and adjust that as .011 is too much and will grow bigger as the ring/pinion set breaks in. But before you do, I would suggest getting a better pattern check as I don't like the pattern you have right now. It could be because of the way you achieved getting that pattern though. This is how I check my pattern - yellow marking paint on three teeth, wrap a rag around the pinion yoke in a way that it won't snag went rotating back and forth, box end wrench on the ring gear bolt. Line up the marked teeth near the pinion, then with fast/swift actions, rotate the ring gear back and forth while pulling tight on the rag around the yoke. That will give you a solid pattern check every time.

As for the incorrect seals post up pictures of what you received so we can verify what parts you actually received.

Here are the seals
 

Attachments

  • DSC_0204.jpg
    DSC_0204.jpg
    45.8 KB · Views: 693
Received part of my rear disk brake conversion kit today and should be getting another shipment with the calipers.
 

Attachments

  • diskbrakeconversion.jpg
    diskbrakeconversion.jpg
    78.1 KB · Views: 1,136
OK after little more adjusting and finding out that after I took the new bearings off, I was missing the 0.0030 from my ring side. I have no clue how that happened. I found another 0.0030 shim and inserted and tried to get my markings again and the were the same, so I assumed I dropped it sometime when I was swapping in new bearings. My back lash was still the same too. I tried getting better markings and they were off still so I adjusted the shim count on the pinion, but in doing so, when I took the pinion back out I destroyed the the baffle so I readjusted my shim count without it. Still got a bad gear reading and so I took out all shims and started with 0. I got a good marking on the tips of the coast and drive, which after looking meant that my pinion was too far. I added .0030 to the shim and got my coast and drive to center up but still close to the tip but a little more toward the center. So I made multiple adjustments to the carrier bearings and ended up adding 0.0015 to the ring side and taking 0.0015 from the opposite side. I got better markings and reduced my back lash. I hope they are better, I kept my new bearing off and going to wait until tomorrow to make any other adjustments. So for now this is what I got now.
 

Attachments

  • DSC_0214.jpg
    DSC_0214.jpg
    59.4 KB · Views: 1,123
Back
Top