152 rebuild

Mastiff

Member
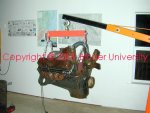
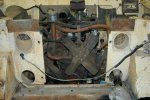
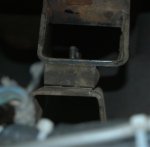
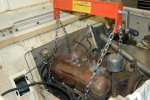
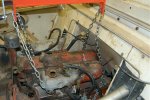
I'm still working my axle issues, but I'm also looking ahead to doing some major work on the 152. I need to pull it to address numerous leaks, plus new motor mounts. The compression is marginal and it putts and puffs some, which I assume is a valve issue. So, I figure some level of rebuild is in order. I'm thinking plain vanilla shade tree.

I have never had an engine apart before. I have some people around here who can help me with the basics, but they have no IH/Scout specific knowledge. Would you guys be interested in holding my hand through this a little in exchange for thorough photo documentation along the way? :smile5:

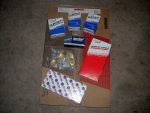
is there anything like a rebuild kit for the 152 that would have the real basics all compiled to start? I'm thinking gaskets and seals at the least, plus rings? I hope rings aren't hard to get. I noticed rock auto didn't seem to have 'em.
 
Go for it dude! We'll hold yore hand all the way!

There are several engine builds going on now, including a few of my own. There is really no difference in building a four banger as opposed to an sv, virtually the same just fewer parts!

And ihon has complete engine build kits for the 152/196 as well as virtually any hard part on hand right now. And several camshafts/grinds to chose from if needed. I really don't think you can beat the price anywhere for any IH sv or four popper engine kit or individual components. All overhaul-type replacement parts are available right now...even crankshaft "kits" if need be, we have 'em sitting at our parts supplier warehouse right now ready to ship using cores that we supplied to them for that purpose.

These are all high end/quality parts packed to our specs using brand name stuff...consequently you May not see "names" on some of the packaging...but we can tell ya the source of each component if need be. And many prices in the ihon store have been recently adjusted downward.

Ya won't see the engine kits in the online store...call for a quote regarding exactly what ya need and we'll customize a package for ya...this includes adding or deleting (or substituting) some items depending upon exactly what you need.

This engine build thread will provide you with much more than the basics:

http://www.forums.IHPartsAmerica.com/gas-engine-tech/1143-sonjamotor-lives.html

Final prep of the block gets under way on Friday I hope!

The four banger motor build is being documented here:

http://www.forums.IHPartsAmerica.com/gas-engine-tech/1144-ultimate-IH-fourbanger.html

While it's gonna be somewhat different spec-wise, the exact same build process is still the same as for a stocker.

Ya couldn't pic a better engine to learn on! Development of this skill set will serve ya really well in the future! Best advice I can give...successful motor build is all about attention to detail...and that costs no more than doing a butch job!
 
Sounds good, I'll certainly deal with the IH only folks for parts. I'll start rounding up the engine hoist and stand I'll need.

First questions: what's the best way to attach to the motor with the hoist to keep from damaging anything? The manual talks about a "lifting fixture"? I assume nobody actually uses anything like that?

Also, what's the easiest way to separate from the transmission? Should I try to remove the bellhousing to engine bolts, or get it down at the trans?

Thanks.
 
I normally use an "engine leveler" attachment for the hoist, it's a harbor freight item also and can handle well over 1,000lbs. Rig the end of the two chains at four points fore and aft. Rig the chains on the passenger side "short" and the driver side "long" so that the engine won't tilt over...if ya hit the center-of-balance just right, the motor lifts straight up and forward in the same attitude it's sitting in now. Take the motor mounts up with the engine also! Those are a bitch to deal with since they are non-symmetrical oddwads!

Pull the radiator and top portion of the core support.

On an s80, I really prefer to pull the engine separate from the bellhousing/tranny package. It's very tight to pull the motor forward and then straight up, the tranny input shaft will just clear the clutch hub when the crank pulley touches the front crossmember...then straight up!

If the rear tranny mounts are good, you can leave the tranny/bellhousing right where it is until the engine is out, then rig a ratchet strap or chain to the bellhousing to support the front of it to something on the firewall...it can't drop down or fall out!

To pull the tranny, ya need to remove the tunnel cover and the shifter top.

This shot is a swingin' meat I-4 before freshen so ya can see the leveler rig.
 

Attachments

  • I4 onna hook.jpg
    I4 onna hook.jpg
    71.1 KB · Views: 3,048
This shot shows the motor mounted onna harbor freight 1,000lb. Engine stand. All engine stands I've used for IH engines need to have an extension added to one of the mount arms to make the reach to enable mounting at four points. I have five of these hf stands bought on sale at $39 each, they will support an sv motor just fine...a "dressed" 152/196 weighs about 615, a dressed sv will come in at around 850.
 

Attachments

  • Engine stand support extension.jpg
    Engine stand support extension.jpg
    93.1 KB · Views: 3,363
Here's a fresh 152 (budget build) showing the leveler rig for the re-install.
 

Attachments

  • motor drop.jpg
    motor drop.jpg
    101.5 KB · Views: 5,595
This shot is a "typical" representation of a particular level of engine rebuild kit we offer.

These kits can easily be added-to or subtracted-from to meet each customers requirements.

This particular kit consists of a complete gasket set including all seals (some of these gasket sets will be furnished in one complete package which is a "new" variation recently introduced), a set of piston rings in the size spec'd by the customer, a soft plug kit (either brass or steel as spec'd by customer), cam bearings set, connecting rod bearing set (in size spec'd by customer), main bearing set (in size spec'd by customer), and oil pump rebuild kit or a complete oil pump (depending upon which IH engine and the vehicle the engine is going to be used in).

To this kit May be added pistons if needed, a new or reground camshaft (either oem spec or custom ihon grind), rocker assembly components, lifters, a new timing gear set, any valve train component needed, a water pump, etc.

The soft plug kit does not include the plugs for the head, those need to be ordered separately.

If you are fortunate, all your pistons, cylinder bores, crank journals, rod journals, and cam will measure out to a spec that can allow re-use after proper component prep. It's quite common to find a four cylinder camshaft with one or more "flat" lobes, not so regarding an sv camshaft.

If the crankshaft turns out to need attention, then we have "crank kits" available which are extremely well done (better than new!) re-grinds and include the proper undersize bearings, those are exchange items with a core charge that applies, same for camshafts for I-4. There are no "new" I-4 camshafts or cores out there right now...we are currently working onna supply of newly-cast camshaft blanks however that will allow us to furnish new cams in any grind with no core charge involved, but that is a ways out there right now!

For the sv motors we have new camshafts in many brands/grinds including our own, along with reground cams.
 

Attachments

  • Engine Kit Typical 002.jpg
    Engine Kit Typical 002.jpg
    378 KB · Views: 2,919
Okay, getting close to ready to go here. I've got my hoist and stand ready. I pulled the radiator and crosspiece, plus I pulled the whole front clip to make it that much easier - plus I really want to get some paint on the rusty areas in there, and battery tray.
 

Attachments

  • front_removed.jpg
    front_removed.jpg
    77.3 KB · Views: 2,934
Mastiff,
good to see the progress, and that the little Scout did not scare you away.

By the way that looks like a very solid Scout 80. It will be nice to see it brought back to life or should I say a better life.:yesnod:
 
Well, I pulled all the connections tonight, plus the carb, alternator, coil. The last things left are the exhaust pipe, bellhousing and motor mounts. I'm letting the manifold bolts soak in oil overnight before I try them. The impact gun could get the outside one, but the buried one might be rough.

I'm a bit stumped on the bellhousing though. I got the two top bolts out, but I'm not seeing how it's going to be possible to turn the drivers side one down in the corner of the tunnel. My 12 point socket can only get on at one angle, which is of course right against the sheet metal. How the heck do you get that? And I haven't even tried the passenger side ones yet. Is there some trick to getting these? I'm wondering if I'd be ahead to pull the tunnel cover and get it apart where it connects to the trans?

Thanks for the help.
 
No need to take anything else off but those bell bolts. Let me go look and I'll post back in a few minutes. I got mine apart no problemo but don't recall what I did. A quick look will jog my memory.
 
Ok it is coming back to me. I used a 3/4 swivel socket on an impact gun and an extension... But I removed the trans cross member, placed a rolling floor jack under the trans transverse and moved the engine away from the offending tunnel wall by rolling the floor jack. You only need a bit more room to get easy socket access. Moving the engine over May be enough to allow the wrench to be used.
 

Attachments

  • P1010205 (Large).jpg
    P1010205 (Large).jpg
    42.1 KB · Views: 2,781
I've been struggling with finding suitable mounting points on all four corners for the hoist. Looking at michael's picture, one the driver's side it looks to be attached to the thermostat housing and one of the valley cover (is that the right name) bolts? Is that right? I looked at those bolts and they look so puny, is that really okay? On the other side I'm not sure either. The bolts for the exhaust manifold are hanging out, but is that stout enough?

I was looking at using the motor mount on the driver's side front and the alternator bracket on the passenger side, but I'd be a little nervous that things would tighten up and damage the distributor. At the back my best idea was going all the way under with a chain so it goes behind the starter and valve cover, under the pan and back around the bellhousing. The oil pan is very flat and shallow there so it seems like it would survive. Mine's dented to hell anyway and I have a replacement for it.

Am I making this too difficult?
 
Regarding an s80, you can always tell that an engine has been out by the fact there is a hole drilled with a hole saw on each side of the doghouse to allow ya to go through the hole to the head of the bolts retaining the bellhousing. That is what I do also, no use to fight it. 1" hole saw properly piloted/located works great.

Once the engine is back in place, ya simply install a couplea rubber plugs made for blocking drain holes in sheetmetal floors to trim out the holes.

The 1/4" bolt holes and bolts will support the engine just fine when lifting if the chain ends are bolted down tightly to the block.

That is why the use of a "leveler" on these laydown motors is imperative to allow ya to pull straight forward and straight up once the tranny input shaft clears the clutch disc spline. And the front crank pulley will hit the sheetmetal lower of the radiator core support...lightly. At that point, the tranny shaft is clear and the motor comes straight up with no tilt...and if ya rigged the leveler properly, the engine is sitting exactly like it did when on the mounts.

Remove the distributor to preclude any possibility of damage!

As simple as these rigs are...the engineering regarding the engine mounting leaves much to be desired, the limited clearance at the doghouse for the bellhousing and the design of the lower core support is just plain dumazz.
 
Exhaust manifold bolt hole works well.

Or as ya can see in one of the pics, the chain wraps in front of the valve cover and is bolted into the hole where the generator/alternator bracket bolts in on top of the head. In some engines that hole is filled with a stud instead.
 
Well, I got the pain in the butt bellhousing bolts out. I did end up drilling a hole as michael suggested. I could probably have gotten it if I had been willing to repatedly climb under the truck turning 1/8th turn from the top then an 1/8th turn from bottom. Too painful for me.

So, aside from the motor mounts, it should be all loose. I'm stopping for the night, but I'm not sure how to proceed. I'm not seeing how I can free the motor from he mount or the mount from the chassis. It's nearly impossible to see in the pic, but there are two bolts sticking down toward the frame too. Is there a trick?

Once it's all loose, should I just be able to pull the motor forward by hand to separate it, or do I need to pry?
 

Attachments

  • motor_mount.jpg
    motor_mount.jpg
    21.5 KB · Views: 943
Next two posts show how I'm thinking of lifting it. I kind of cut off the bottom of this pic, but I'm mounting to the exhaust manifold mounting holes on this side.
 

Attachments

  • lift1.jpg
    lift1.jpg
    75.6 KB · Views: 879
Back
Top