You are using an out of date browser. It may not display this or other websites correctly.
You should upgrade or use an alternative browser.
You should upgrade or use an alternative browser.
73 beast
- Thread starter Scooter
- Start date
Scooter
Active member
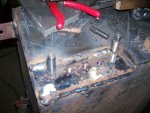
Finally getting back to working on my own rig for a change. Had to spend a couple days to refresh myself of where I had left off. Realized that I had gutted the entire old wire harness mainly due to typical electrical issues. Along with pulling out the piss poorly made roll cage that was fabed out of 1-3/4 x .090 wall hrew tubing. Too thin for my taste. My plan now is to build a new cage completely from scratch out of some 1-3/4 x .120 dom. But before I get to both the cage and a complete re-wire, I need to replace the rear floor board that has a gapping hole right above the gas tank. Even with duct tape covering the hole, gas and exhaust fumes still came through into the cab. With a combination of a spot weld cutter and plasma cutter, I started cutting the bed floor out. Tank has been completely empty for the last 6 months, and I haven't been using my plasma cutter enough to worry too much about working around the tank. I mostly have been using my spot weld cutter at this point. Next weekend, my plan is to pick up some flat sheet metal to lay in place. I'm considering 1/8" material, maybe 3/32" or 7/64". Not too sure yet. Hopefully, if things stay on track, I will be bending up some tube for the cage in the next two or three weeks


Attachments


Last edited:
Scooter
Active member
Well, turns out I needed to drop the tank any ways. I forgot that the tank straps attach to part of the floor board towards the center of the bed. And to my surprise, I actually had fuel in the tank  lucky sob that I am, since I ended up draining out about 10 gallons of fuel. Cut out most of the rear floor once the tank and fuel was completely out of the way.
Also, since I've had to go this far, I will go a step further during the build and actually install this 33 gallon tank that I picked up a few years back.
More to follow next week
Also, since I've had to go this far, I will go a step further during the build and actually install this 33 gallon tank that I picked up a few years back.
More to follow next week
Attachments

Scooter
Active member
Spent a good portion of today fitting up the 30+ gallon fuel tank into the empty hole left behind from the old 19 gallon tank. Since I didn't have 3" wide x 1/4" thick flat bar, I ended up cutting a strip off some plate that I have laying around. Drilled 3 holes into the flat bar to hold the welded in bolts for the tabs off the tank. Got the 3" bar tacked into place and tomorrow, I will drop the tank so I can burn in 100% the bar in place.
The tank itself seems to fit nicely. Doesn't drop down too much below the frame.


The tank itself seems to fit nicely. Doesn't drop down too much below the frame.
Attachments


Last edited:
Tahoedonner
Member
Hmmmmmmmm, so at 4mpg and 33 gal tank it would only cost about $120 to make the trip there and back to the all American truck show and you'd still have gas left over. Sounds like a win win.
Scooter
Active member
hmmmmmmmm, so at 4mpg and 33 gal tank it would only cost about $120 to make the trip there and back to the all American truck show and you'd still have gas left over. Sounds like a win win.
That's funny. Actually, with the stock 19 gallon tank, the mpg didn't seem too bad when I drove it home from santa cruz when I purchased this beast. Still had about a half a tank left when I got home. Speedometer wasn't working and the fuel gauge is sketchy at best. Which all will be taken into consideration when I get ready to start piecing everything back together.
Bent up the b-pillar hoop last weekend, along with some other miscellaneous work. I'm in the middle of making up a shopping list for steel material to go pickup. So the progress maybe a little more slower than I like. But when money gets kinda funny, not much one can do, but to do things one step at a time.
Scooter
Active member
Finally started fitting up the new sheet metal for the rear floor. Doing it in three sections, making it much easier for me, myself, and I to man handle the parts by myself. Plus, I didn't want the sides to collapse when I cut the last part of the old floor out, under the rear bench seat. I first tried using 14 gauge, but it seemed just a tad too thin for my taste. The piece at the tailgate above the tank seemed to flex under my own weight. I ended up going 11 gauge. Almost twice as thick as the 14 gauge.


Hopefully today, I will have the rest of the old floor cut out with the new piece installed. Then I will permanently burn in most of the floor into place. I will also need to drill a hole through the new floor for the rear seat belt, along with the 6 holes for the mounting of the rear bench seat. I'll post up more once I get a chance.
Hopefully today, I will have the rest of the old floor cut out with the new piece installed. Then I will permanently burn in most of the floor into place. I will also need to drill a hole through the new floor for the rear seat belt, along with the 6 holes for the mounting of the rear bench seat. I'll post up more once I get a chance.
Attachments


Scooter
Active member
holy cripes. Least you know that baby wont ever rust out again. Looking good scooter. To bad you wont be at rmihr to wheel with your toys
Thanks. It's work in progress.
 yea, I'm missing a lot of good trail runs. But as we all know, money gets a little funny when it comes to acquiring parts needed for our projects. Speaking of which, I just picked up a couple parts this last week, from our friends up at IHPA, that I will post up soon enough. Mostly, I'm trying to get most of the major work done first
Scooter
Active member
Out with the old, in with the new. Finally cut out the rest of the old floor where the rear bench sit goes and cut a new piece and welded it in place. Go me some cleaning up to do. I haven't welded the rear most new piece, by the tailgate above the gas tank, in place yet. There is a method to my madness which will be revealed at a later date. I still need to drill one hole in the new floor for mounting the seat belts for rear passenger/s. Along with the drilling 6 more holes for mounting the rear bench seat.


Now just maybe, I can actually start building my new roll cage. I already bent up the b-pillar hoop and made up a pair of plate brackets for the a-pillar hoop for around the windshield, along with some other cage mounting feet brackets. Currently still in fab mode, but I'll post up more at a later date.
Now just maybe, I can actually start building my new roll cage. I already bent up the b-pillar hoop and made up a pair of plate brackets for the a-pillar hoop for around the windshield, along with some other cage mounting feet brackets. Currently still in fab mode, but I'll post up more at a later date.
Attachments


Scooter
Active member
Slowly moving along. I drilled 6 holes into the new floor for the mounting brackets for the rear bench seat. Still need to drill one more for the rear seat belt.
Old piston wrist pins come in handy. Had a collection of them from when I scrapped some messed up no good motors and recycled the cast aluminum pistons.
Before I permanently mount the rear section of the floor above the fuel tank, I added a spacer in the rear most channel that the floor sits on. Basically an anti compression spacer when the bolts are tightened up. This will help reinforce the mounting bracket foot for the rear most hoop of the cage I'm building. The factory mounted spacer thingy is for the body mount bushing bolt. More photos will pop up when I actually start bending and building the cage.
Attachments
overdrivesteve
Member
today, since I had a change of plans, and had some spare time, I swapped steering wheels from my barrel rolled 74 Scout. Granted, both wheels are identical, but the old one was coated with bed liner. And I didn't care for it much. Not only that, I wanted to be able to utilize the grant steering wheel locking option I had readily available....
Now I need to find the actual locking cap. For those times when I do take the steering wheel off I can put the cap on in its place to complete the lock. The way I figure it, is that this is like the best deterent in a theft of this rig. If the steering wheel is not there, how is the thief gonna drive off with my rig.
Hi
nice trucks!
I just want to mention, based on my experience, most thieves don't drive away with a specialty vehicle like our IH's, rather they hook and book, just drive up, hook it to a tow truck and take off. I've had 3 vehicles stolen in my life, two non-driveable. Most recently was a '54 mack crew cab firetruck with locked air brakes and a partially assembled engine. My 68 Ford fairlane, without a scratch on it, but non-driveable, was stolen from my chain-link fenced front yard, and my mack was stolen from a fenced, "secure" vehicle storage yard. I just want to say don't depend on a missing steering wheel alone to prevent the theft of your trucks, that is just a deterrent.
In another forum someone had their highly modified Scout stolen. They said a neighbor saw it going down the street on the back of a flatbed tow truck but it never occurred to them it was being stolen. If I ever find that post again, I'll edit this post with its link.
Steve
Last edited:
Scooter
Active member
Thanks steve
I have actually been considering doing away with that option anyways. The adapter being roughly 6", brings the steering wheel too close to the chest. I have read pretty much all your threads, so I'm aware and sorry to hear about your loss of them. If the thieves want it(what ever it is) bad enough, they will go to any great length to get it. I have even seen a few of these hoodlems in my area, drive their own vehicle with the front suspension held on by one or two bolts without regards to safety for any one.
Even though I have two dedicated parking spaces available across the street in the parking lot for this building I'm in, I don't use them. All 5 of my vehicles are currently stored inside my man cave. If any of these crooks really want any of my non running vehicles, they would need a torch to cut open the roll up door, or crash into the brick wall to knock a big enough hole to pull out vehicles. Or have a key into the space. For added mental security, having insurance does have some piece of mind. Mainly for any type of loss, like water and/or fire damage and theft.
overdrivesteve
Member
thanks steve
... All 5 of my vehicles are currently stored inside my man cave. If any of these crooks really want any of my non running vehicles, they would need a torch to cut open the roll up door, or crash into the brick wall to knock a big enough hole to pull out vehicles. ... [/quote ]
out of sight and out of mind - I think that is absolutely the best deterrent of any . they won't want what they don't plainly see easily sitting outside .
an unrelated story - when I was in high school I was working in the corner liquor store when it got robbed . the thief was shacking so badly I could see the gun going off unintentionally, but it didn't . but he was so nervous he never saw the roll of quarters sitting on the counter at that time .
the owner then installed a silent alarm . a little later he was robbed again but I wasn't there that time, but the owner was, and he set off the silent alarm . shortly thereafter, rather than calling the police, the alarm company called him saying there was something wrong with his alarm because it went off . needless to say he was not too happy with that response .
sorry for the hijack .
steve
Scooter
Active member
Sounds like the typical car alarms that go pretty much ignored when they go off. Especially when some knuckle heads set their alarm at the gas station when they go in to pay for what ever they're getting only to come to set them off when they get back into their car.Shortly thereafter, rather than calling the police, the alarm company called him saying there was something wrong with his alarm because it went off. Needless to say he was not too happy with that response.
Steve
As a side note, I haven't really gotten much done with the beast these last two weeks. Temporarily mounted the rear bench seat in order to mock up some storage cabinets in the bed behind the seat. Overall plan is to relocate the main battery, and adding a second one, to the back. Along with other goodies. Plus, I'm contemplating having the inside of the whole tube lined with some type of bed liner. I already have been talking with a good friend of mine who works for a powder coating company that does bed liner. And this maybe something that I might do before I actually build the cage. Do to how thick or thin the liner will be
Last edited:
Scooter
Active member
Damn, I'm hating on my landlord of my man cave, along with a tenant or two that lives upstairs.  piss poor sewer plumbing that was installed when they remodeled upstairs in order to add a two bedroom apartment. The pipe got plugged up and Friday morning when they were taking what sounded like a shower, one of the common area bathrooms upstairs over flowed which leaked threw the floor and ceiling into my space. This is the second time in pretty much exactly three weeks
  I had to lay out roughly six 5 gallon buckets to collect the water, and that still wasn't enough. Inside of my space basically turned into a rain forest from the over flowing drain pipes in one of the bathrooms.
After several phone calls and emails, I was first told that the owner of the building was going to stop by, which he never did. Then I was told that the earliest that they can get to it is Monday. Wtf - so I immediately shot off a not so pleasant email asking them if they expect me to deal with these clogged plumbing issues for the next three or four days. Not only that, the mention of being totally un-sanitary, even if at the time it was just shower water. All that crap ultimately gets mixed in with raw sewage from the toilets every time ones takes a $hit or piss. So they finally caved in and called up a plumber to come in on Saturday, mid day, to snake the drain. Due to the piss poor install of pvc fittings that was combined with 30 or 40 year old cast iron pipe and fittings, the guy mentioned that he had snaked out a bunch of vegetables that got caught in the maze of fittings. I'm not a plumber, but I have been around cast iron fittings and iron pipe for almost 20 years, since the company I work for, during the week, manufactures cast iron fittings and iron pipe for the sewer lines that you see installed in buildings, and this addition of pvc tied into the old iron aint installed properly
needless to say, I'm furious about it. This over flow of sewer pipes is just one of a few issues that I have been dealing with. So, I'm actually starting to look for another place, once again, to move my cave into. And once I find another place, I'll just pack up all my rigs and tools and move out while no one is watching and not say a thing until I walk into the office to hand over the keys.
Rant over for now.
piss poor sewer plumbing that was installed when they remodeled upstairs in order to add a two bedroom apartment. The pipe got plugged up and Friday morning when they were taking what sounded like a shower, one of the common area bathrooms upstairs over flowed which leaked threw the floor and ceiling into my space. This is the second time in pretty much exactly three weeks I had to lay out roughly six 5 gallon buckets to collect the water, and that still wasn't enough. Inside of my space basically turned into a rain forest from the over flowing drain pipes in one of the bathrooms. After several phone calls and emails, I was first told that the owner of the building was going to stop by, which he never did. Then I was told that the earliest that they can get to it is Monday. Wtf - so I immediately shot off a not so pleasant email asking them if they expect me to deal with these clogged plumbing issues for the next three or four days. Not only that, the mention of being totally un-sanitary, even if at the time it was just shower water. All that crap ultimately gets mixed in with raw sewage from the toilets every time ones takes a $hit or piss. So they finally caved in and called up a plumber to come in on Saturday, mid day, to snake the drain. Due to the piss poor install of pvc fittings that was combined with 30 or 40 year old cast iron pipe and fittings, the guy mentioned that he had snaked out a bunch of vegetables that got caught in the maze of fittings. I'm not a plumber, but I have been around cast iron fittings and iron pipe for almost 20 years, since the company I work for, during the week, manufactures cast iron fittings and iron pipe for the sewer lines that you see installed in buildings, and this addition of pvc tied into the old iron aint installed properly
needless to say, I'm furious about it. This over flow of sewer pipes is just one of a few issues that I have been dealing with. So, I'm actually starting to look for another place, once again, to move my cave into. And once I find another place, I'll just pack up all my rigs and tools and move out while no one is watching and not say a thing until I walk into the office to hand over the keys.
Rant over for now.
Patrick Morris
Member
Just curious, what inspired the world-war-1 style camo pattern on those trucks?
Scooter
Active member
Not much to update. I have been kinda stalled the last couple weeks. I'm at the point now where I wished I had a sheet metal brake. Since I'm a cheap bastard, I decided to make my own, so, I spent a good part of this weekend making one. If it works for what I am working on, I will post up photos.
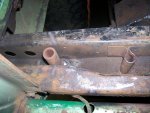
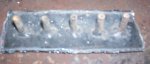
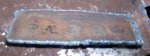
Last weekend, I did work on the 33 gallon fuel tank that I'm planning on installing. One thing I wanted to do is have the option of threading in plugs or pipe nipples into the location of the five 1/8" vent tube holes. I cut a piece of 1/2" thick flat stock and then drilled & pipe thread tapped five holes. Then had an interesting surprise when I cut out the old vent tube section. They were ultimately useless and pointless. Had I known, I probably would not have done this. Too late to turn back now.
Here's the old vents that I cut out


It's like, why even bother going through the trouble of adding those vent tubes, if holes were not drilled through the sheet metal
here's the new piece welded into place:

Last weekend, I did work on the 33 gallon fuel tank that I'm planning on installing. One thing I wanted to do is have the option of threading in plugs or pipe nipples into the location of the five 1/8" vent tube holes. I cut a piece of 1/2" thick flat stock and then drilled & pipe thread tapped five holes. Then had an interesting surprise when I cut out the old vent tube section. They were ultimately useless and pointless. Had I known, I probably would not have done this. Too late to turn back now.
Here's the old vents that I cut out
It's like, why even bother going through the trouble of adding those vent tubes, if holes were not drilled through the sheet metal
here's the new piece welded into place:
Attachments
Scooter
Active member
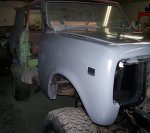
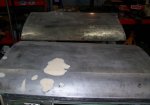
Well, while I wait patiently to win the lottery, but need to play it though, to purchase a few things for this build, I was in some ways getting tired of the paint scheme. Which kinda cured my boredom for the time being. So went to town in stripping and sanding paint down to metal. Not sure yet what the end result will be. But here's where I'm at now.


Lot more bondo on the rear left corner of the cab than I thought. The driver side front fender has semi major rust down at the bottom near where it meats the door. I May end up using the spare one on the shelf that I picked up from Mike from IHPA. But them again, I May end up beating on it on the trails. Passenger door had several 3/4" holes among a few other 1/8" holes, all from old side mirrors. Which I patched up with a weld-in plug, and I'm in the middle of minor bondo work. Just ordered up some threaded inserts so I can mount new(used) side mirrors
Lot more bondo on the rear left corner of the cab than I thought. The driver side front fender has semi major rust down at the bottom near where it meats the door. I May end up using the spare one on the shelf that I picked up from Mike from IHPA. But them again, I May end up beating on it on the trails. Passenger door had several 3/4" holes among a few other 1/8" holes, all from old side mirrors. Which I patched up with a weld-in plug, and I'm in the middle of minor bondo work. Just ordered up some threaded inserts so I can mount new(used) side mirrors
Attachments


Scooter
Active member
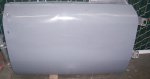
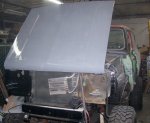
After patching up a few buggered up holes from the old side mirror mountings in the doors and the non existent moldings and a couple coats of paint, both doors, one fender(passenger side), and the hood are painted.


The driver side fender has rust issue, between wheel well and door. Debating weather or not to leave it or use the spare one that I have on the shelf. Since I most likely might bash it against a rock or tree") crazy: hope not) I May just use the rusted one. In the mean time, when the paint dries, I will re-install the door handles and locks. Along with mounting side mirror brackets.
crazy: hope not) I May just use the rusted one. In the mean time, when the paint dries, I will re-install the door handles and locks. Along with mounting side mirror brackets.
The driver side fender has rust issue, between wheel well and door. Debating weather or not to leave it or use the spare one that I have on the shelf. Since I most likely might bash it against a rock or tree
crazy: hope not) I May just use the rusted one. In the mean time, when the paint dries, I will re-install the door handles and locks. Along with mounting side mirror brackets.Attachments

Scooter
Active member
I have mountains of respect for the work you do scooter. You are one of the most talented crazy basket cases I know.
Mega IH points.
Dont expect my posts to be this kiss assy all the time. I have a reputation to uphold here
Thanks for the atta boys. Not sure about the talented part, but a crazy basket case I can agree with. You're young enough to stick with it and learn a lot of this stuff too. I wouldn't expect any body to be kissing my butt, unless I didn't like ya and when I need to go pinch a loaf

this build is just a taste of what I have been tinkering with for years. Mostly all self taught, with a little taste of hanging out with other gear heads. If I actually owned a few other pieces of equipment, I'm sure I would add a little more twist. For now I currently have access to a vertical mill and lathe at work, only on my own time, which I learned on the job how to use.
As far as the paint job goes, it's all gonna be rattle canned. When I started stripping old paint from the exterior of the tub, lots of bondo was uncovered. And both end caps, that hold rear tail lights, are all beat up. Passenger side worse than the driver side. Yesterday, I was talking with another tenant here in the building who does body and paint on mostly ole classics and offered to help paint my rig. But, since I plan on hitting the trails with this beast, I most likely will be bashing it on a few rocks and trees here and there. I will just carry a spare rattle can and maybe a band aid or two for a little touch up when needed.