The "Fuel Tank" Thread

I pulled the tank in hopes I might repair the leaks. I'm hoping someone might know of a replacement tank. Thanks in advance.

1975 loadstar 1700 dump, 392 gas, auto, 18+ gal passenger side gas tank, fills in rear behind passenger seat.

Tank is 12"x12"x38" pinched in rear

I use to see some loadstars at the junk yard. But not lately. Metal rescue will take off the rust. Por15 will coat the inside. Some patch panel out of 20ga would fix a bad spot.

Or build a new tank. Which is a lot of work!

I'm sure someone has a tank. Post in the wanted section here and binder planet
 
5052 aluminium tank build
 

Attachments

  • IMAG0394.jpg
    IMAG0394.jpg
    62.5 KB · Views: 1,211
I've seen a late seventies southern California rv products replacement tank for sale and was wondering if anyone knows anything about them? Are they baffled and what is the cost of boiling it out and sealing it plus fixing any leaks?
 
I quickly read the last 6 pages, my Scout is a major pain in the butt to fill up. After trying to see a problem, I think it is the short gas nozzles fill up my breather tube in the filler neck so it creates a giant air bubble in the tank and just fill the filler tube and breather. I'm thinking a new filler neck without the breather built in and a breather tube with a 1 way vent tied up next to it will solve my problems.
 
I usually have pretty good luck by rotating the filler nozzle so the hose is pointing up at about 10:00. Seems to help a lot, although its a pain to hold it up there while filling the tank. Didn't have that problem in so cal earlier this year, the frigging pumps there didn't shut off until the tank, filler neck, and expansion tank were full. Unfortunately the little hose at the bottom of the expansion tank was loose and started dripping gas onto my exhaust tip. Wonderful feeling when its over a 100 out and your 500 miles from home. Took about 20 minutes watching with the fire extinguisher handy for the filler neck and expansion tank to finish dripping.
 
Vapor separator repair, was Re: The "Fuel Tank" Thread

[please move to a better thread if there is one]

The liquid/vapor separator on my '72 has broken at the
fitting going to the charcoal canister. Since all the fluid
leaks are now fixed and the gas cap now seals, that's
the last leak remaining in the fuel system.

So far I can see three choices:
1. Fix the separator
2. Buy a used separator for ~100$ http://www.IHPartsAmerica.com/store/up-419124c2.html
3. Fabricate something that does the job.

Idea 1 seems to be a very long shot; no known glue will
stick, welding is possible but tricky and the part is subject
to at least a little strain from the hose.

2 makes me cringe. Anything I buy will be 35 years old,
and while likely in better shape than mine it's unlikely to be good.


3 looks like a possibility. One could try for a physical replica
of the original, but that's difficult and maybe unnecessary.
A ring of six tubing tees (4 down, to connect to the tank vents
and two up, one to the tank and one to the charcoal canister)
seemed like a fairly easy thing to try.

It turns out that 5/16" hose tees are not in stock locally and
around $3 each. By the time I order the tees, clamps and some
hose the cost and hassle are enough to make me seek guidance
before trying.

If anybody knows this won't work please warn me, if you've
tried and it worked even a little bit I'd be grateful if you'd share
what you learned. If there's a better way, please do tell.

Thanks for reading,

Bob prohaska
 
I had pretty good luck fixing one with marine tex. Need to rough the area up pretty good with some 80 grit to give it some tooth.
 
Can you describe the repair?

I could imagine gluing a crack or hole, that isn't subject
to mechanical strain. If you fixed a broken hose fitting
that's a real wake-up for me.

Thank you!

Bob prohaska
 
For the time being I've installed a hose manifold in place of
the liquid/vapor separator. It seems likely to work fine so long
as the tank isn't grossly overfilled. I can always put a transparent
fuel filter in the vent line at the charcoal canister to serve as
a sight glass to check for liquid carryover.

Repairing the separator might not be quite as hard as I feared.
Somewhere along the line a reducing hose barb got stuffed in
the hole left by the broken nipple. It feels reasonably solid, so
the mechanical strength of the repair isn't such a big worry.
The real problem is getting a good seal.

There's some discussion of "flame treatment" of plastics as
an adhesion promoter, mostly for painting and printing. If
it helps in that case maybe it'll help achieve a mechanically
sound joint. Combined with abrasive
pre-treatment it just might be enough.

If anybody has thoughts I'd be grateful for your counsel.

Thanks for looking,

Bob prohaska
 

Attachments

  • IMG_0001.jpg
    IMG_0001.jpg
    58.4 KB · Views: 584
  • IMG_0002.jpg
    IMG_0002.jpg
    54.2 KB · Views: 563
  • IMG_0003.jpg
    IMG_0003.jpg
    59.7 KB · Views: 573
I'll see if I can find it. Napaonline does not list it under that number but does show a product with the same description.
There doesn't seem to be much comment online.

The very fast cure time is a bit off-putting. I've worked with a great variety of epoxies, and fast cure is usually associated with inferior finished properties; lower strength and worse adhesion.
The best products had to be oven cured at around 200 f.

Still, the putty formulation is helpful, it can be sculpted into a
sort of bandage or splint to join the hose barb to the tank.

Thanks for posting, I didn't know the stuff existed.

Bob prohaska
 
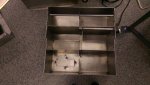
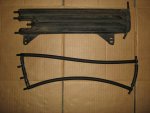
for the time being I've installed a hose manifold in place of
the liquid/vapor separator. It seems likely to work fine so long
as the tank isn't grossly overfilled. I can always put a transparent
fuel filter in the vent line at the charcoal canister to serve as
a sight glass to check for liquid carryover.

After thinking rather hard about what could go wrong with my
hose manifold setup the only scenarios seem rather implausible.

Foaming fuel would be one, but the amount of shaking needed
would make the passengers foam long before the gasoline. Fast
venting (combined with high fuel level) might be another, but
filling the tank is the only time levels change rapidly, and that
venting occurs through the fill vent, not the charcoal canister.

Apart from racing and rock crawling, it seems to me the hose
vent manifold ought to work fine.

Have I missed something?

On the repair, it turns out that decent adhesion to normal 24
hour epoxy can be obtained by:

sanding with waterproof 220 grit sic paper and acetone
lightly flaming the surface with a torch, with minimal heating
rinsing with isopropanol
promptly applying the epoxy (within a few minutes)

the test bond came apart only by prying with a sharp knife.
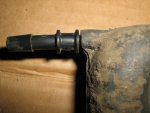
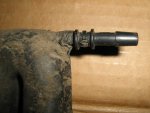
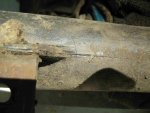
On a joint like the one pictured, with good overlap, if the
gap between hose fitting and tank fill it'll stick better than well
enough. The epoxy is curing now.

In the meantime I'm planning to leave the hose manifold in
place just to see what happens, unless somebody points out a
likely problem. It's clear the hose setup can't be as good as a
purpose-built liquid separator, but the need is unclear to me.

Thanks for reading, and all your counsel.

Bob prohaska
 
I got my Dad's 1966 IH 1000a 2wd custom out of the barn and running like a top. Soon noticed the gas tank was rusted through several places on the top side. Any recommendations as to where I can find a replacement tank either poly or metal? It is about 50 some odd inches long and roughly 14" wide. Located on the passenger side of the truck underneath the cab. The fill spout comes out the top of the tank at an angle and runs through the cab behind the seat to the outside of the cab. I'm considering having the old one fixed but its very rough and paper thin.
 
You might consider the host of this forum......

I got my Dad's 1966 IH 1000a 2wd custom out of the barn and running like a top. Soon noticed the gas tank was rusted through several places on the top side. Any recommendations as to where I can find a replacement tank either poly or metal? It is about 50 some odd inches long and roughly 14" wide. Located on the passenger side of the truck underneath the cab. The fill spout comes out the top of the tank at an angle and runs through the cab behind the seat to the outside of the cab. I'm considering having the old one fixed but its very rough and paper thin.
 
Old thread, new problem:
'74 scout II, 345, original tank and set up as far as I can tell, with new mechanical fuel pump and inline filter a several months ago, ran fine. Been parked a couple months while I did brakes, bearings, suspension, etc., without running it. Wouldn't start last weekend. The fuel pump wasn't filling the filter (between the pump and carb). Disconnected the fuel line prior to the pump and filter and put it in a portable fuel tank and it started right up after fuel got to the carb. Concluded the pump wasn't drawing from the tank. Can blow air back through the line into the tank. Haven't re-hooked it up yet to see if the pump will now draw fuel from the tank. I might have cleared an obstruction with the air. However the air hissed into the tank as if into the airhead, instead of bubbling, as through liquid gas. I suspect the pump is just drawing air. Can some part of the pickup/sending unit fail to give these symptoms? I did access and manipulate a bit the evap container in the rear quarter panel while it was parked but that shouldn't affect the fuel pickup hose. Any suggestions? I'll hook the line back together and see if the air cleared something, but I'm doubting it.
 
Sometimes the hose to the tank is rotted or the pickup tube in the tank has a hole rusted through the side of it. So basically, you are going to need to pull the tank.
 
Looks like my plastic fuel tank filler has developed a crack, apparently
as a result of strain from the 33 gallon tank installation. It's above fuel
level, but vapor loss is something I'd like to minimize.

My first preference is to replace the filler, ideally with a steel one
from a later Scout 2. While I'm looking for a good candidate, does
anybody have thoughts on the wisdom or folly of trying to patch
this one?

Tips, techniques and horror stories appreciated!

Thanks for reading,

bob prohaska
 

Attachments

  • cracked_scout_fuel_filler.jpg
    cracked_scout_fuel_filler.jpg
    72.2 KB · Views: 683
Back
Top