Project Karma

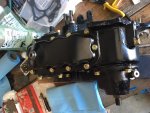
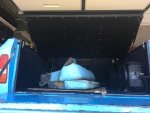
Just as I had all my cooling issues ironed out and took the truck on a 30 mile drive I decided it was time to make her inoperable again. I had a decent leak coming from the t case and didn't have the confidence in taking the truck long distances until I resealed it. It was pretty much leaking out of every orifice. Also wanted to know if the seal between t case and transmission was leaking. Pulled it out, ground off at least 3 inches of crud from all sides, pulled it all apart, and put it back together. Was a relatively easy deal. While the t case was out it was the perfect time to change out the transmission mount and clean/paint the crossmember. Old one was about as bad as it could get. Picked up an rpt transmission mount from IH parts awhile back. Seal between t case and transmission wasn't leaking for the first couple days but after I replaced the trans mount I noticed the next morning it had started to leak. Glad it took me so long to clean, paint and reseal the damn thing.

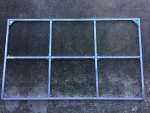
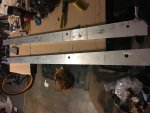
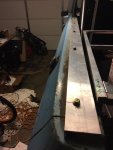
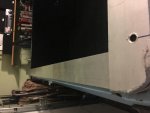
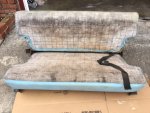
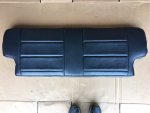
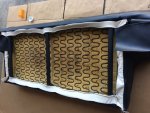
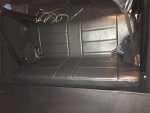
Trans mount old and new
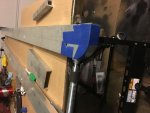
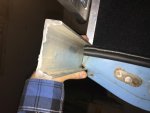
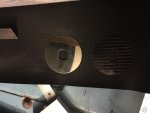
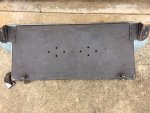
index.php


index.php


T case old and new

index.php


index.php


index.php


index.php


index.php


index.php


index.php
 

Attachments

  • image.jpeg
    image.jpeg
    149.6 KB · Views: 1,535
Lookin' good. I got to compliment you on the craftsmanship and attention to detail. Even made an old xfer case look nice!!!:icon_up:
 
Been working on a custom tonneau to cover the area from the backseat to the tailgate. I decided to make a frame out of square aluminum tubing. Will cover that in hardboard on both sides. All of that will be covered in marine vinyl. I'm using c channel aluminum as the rail covers as well. Turns out it's also a perfect fit to latch over the back or the tailgate. Gas struts to open and will also keep it from rattling around when down. I will use locking hood pins to secure it shut. It's not theft proof by any means but should help protect the rear carpeting and stereo components from weather and those looking to quickly snatch something out of the back.

Aluminum frame

attachment.php


Rails

attachment.php


Decided to round the corners to flow better.

attachment.php


attachment.php


The rear channel piece fits perfectly over the tailgate and the weather strip. Still waiting for full length piece to show up.

attachment.php


attachment.php


Vinyl and hood pins

attachment.php


Rough mock up

attachment.php
 

Attachments

  • IMG_2324.jpg
    IMG_2324.jpg
    113.5 KB · Views: 1,628
  • IMG_2320.jpg
    IMG_2320.jpg
    48.7 KB · Views: 1,693
  • IMG_2315.jpg
    IMG_2315.jpg
    61.4 KB · Views: 1,658
  • IMG_0380.jpg
    IMG_0380.jpg
    32.8 KB · Views: 1,728
  • IMG_2313.jpg
    IMG_2313.jpg
    42.9 KB · Views: 1,694
  • IMG_0381.jpg
    IMG_0381.jpg
    27 KB · Views: 1,639
  • IMG_0379.JPG
    IMG_0379.JPG
    78.5 KB · Views: 1,637
  • IMG_2307.jpg
    IMG_2307.jpg
    48 KB · Views: 1,572
Final piece of the puzzle showed up today. Hope to have this finished out in the next couple weeks
 

Attachments

  • IMG_2326.jpg
    IMG_2326.jpg
    32.4 KB · Views: 1,348
Got a bunch more work done on the tonneau today.

For the hinge I'm using a 2" x 1/4" bolt with nylon sleeves in all 3 pass throughs. Pass throughs are the rail and both frame holes. There's also a .5" nylon spacer on both sides creating a gap between the rail and frame. I'll have .25" "padding" underneath the vinyl, only on the frame and rail sides, to fill in the gap. It will be malleable and should mold to make it gap-less. My rear bed area is not perfectly square edit (turns out my bed is 55" at hinge and 54 5/8" pre tailgate. Nowhere near as non-square as I had originally thought) so I need some minor play side to side. I'll set the gas shocks in place for an approximate 17" opening above the tailgate. That's the angle you see in the pics. Once I can get the gas shocks set it'll be time to cover it all in vinyl.

attachment.php


attachment.php


attachment.php


attachment.php


attachment.php


attachment.php


attachment.php
 

Attachments

  • IMG_2281.jpg
    IMG_2281.jpg
    65.6 KB · Views: 1,578
  • IMG_2283.jpg
    IMG_2283.jpg
    60.4 KB · Views: 1,647
  • IMG_2279.jpg
    IMG_2279.jpg
    69.3 KB · Views: 1,584
  • IMG_0171.JPG
    IMG_0171.JPG
    116.2 KB · Views: 1,592
  • IMG_2273.jpg
    IMG_2273.jpg
    50.8 KB · Views: 1,632
  • IMG_2274.jpg
    IMG_2274.jpg
    45.6 KB · Views: 1,580
  • IMG_0172.JPG
    IMG_0172.JPG
    106.7 KB · Views: 1,590
Last edited:
Got a bit more done today. It's slow going because of all the measuring, remove, measure, replace, measure, remove, measure, replace....

Got the gas struts installed today and started with the vinyl work. Hope to have the rails and top covered by tomorrow night so I can get a good feel for how it looks.

attachment.php


attachment.php


attachment.php
 

Attachments

  • IMG_2362.jpg
    IMG_2362.jpg
    49.2 KB · Views: 1,612
  • IMG_2353.jpg
    IMG_2353.jpg
    66.8 KB · Views: 1,581
  • IMG_2358.jpg
    IMG_2358.jpg
    76.9 KB · Views: 1,632
It's in and mostly finished. The bottom cover is currently being covered in vinyl. The rail bolts are temporary as I have decided to get some black finishing washer styles to use. I ordered a heavier duty set of struts as the ones on now hold it fine but don't raise it. I'll probably end up reusing the current ones for the lift gate glass anyways.

attachment.php


attachment.php


attachment.php


attachment.php


attachment.php


attachment.php
 

Attachments

  • IMG_2307.jpg
    IMG_2307.jpg
    60.6 KB · Views: 1,525
  • IMG_2313.jpg
    IMG_2313.jpg
    68.6 KB · Views: 1,882
  • IMG_2376.jpg
    IMG_2376.jpg
    66.3 KB · Views: 1,418
  • IMG_2309.jpg
    IMG_2309.jpg
    59.9 KB · Views: 1,538
  • IMG_2306.jpg
    IMG_2306.jpg
    45.3 KB · Views: 1,541
  • IMG_2305.jpg
    IMG_2305.jpg
    60.8 KB · Views: 1,560
I'm liking the tonneau cover tool storage area you created. I have been contemplating something similar with drawers
 
Spent the last week installing a Holley sniper efi system. Took a lot of time but was worth every second of it. Hot and cold starts are both markedly improved. Throttle response is as crisp as my thing I currently drive. I couldn't be happier with the choice to go efi.

attachment.php


attachment.php


attachment.php


attachment.php


attachment.php


attachment.php


attachment.php


attachment.php
 

Attachments

  • IMG_2353.jpg
    IMG_2353.jpg
    83.8 KB · Views: 1,421
  • IMG_2352.jpg
    IMG_2352.jpg
    84 KB · Views: 1,461
  • IMG_2348.jpg
    IMG_2348.jpg
    81.1 KB · Views: 1,485
  • IMG_2351.jpg
    IMG_2351.jpg
    80.4 KB · Views: 1,467
  • IMG_2349.jpg
    IMG_2349.jpg
    74.8 KB · Views: 1,485
  • IMG_2347.jpg
    IMG_2347.jpg
    77.8 KB · Views: 1,516
  • IMG_2346.jpg
    IMG_2346.jpg
    75.4 KB · Views: 1,484
  • IMG_2350.jpg
    IMG_2350.jpg
    85.6 KB · Views: 1,446
Put almost 400 miles on the truck since efi install and I'm loving it.

Finished up the last couple parts of the tonneau. Swapped out the rail bolts for some black flush mount washer style. Really cleaned it up. Also got the bottom piece installed. Added a couple shots in the sun to get a good look at it.

Got a quote on covering the back seat and it was $950. Ouch. About double what I thought it would be. Up in the air what I'm going to do.

attachment.php


attachment.php


attachment.php


attachment.php


attachment.php


attachment.php
 

Attachments

  • IMG_2358.jpg
    IMG_2358.jpg
    32.2 KB · Views: 1,401
  • IMG_2359.jpg
    IMG_2359.jpg
    53.3 KB · Views: 1,416
  • IMG_2360.jpg
    IMG_2360.jpg
    57.5 KB · Views: 1,402
  • IMG_2362.jpg
    IMG_2362.jpg
    52.7 KB · Views: 1,359
  • IMG_2366.jpg
    IMG_2366.jpg
    48.3 KB · Views: 1,428
  • IMG_2368.jpg
    IMG_2368.jpg
    85.2 KB · Views: 1,401
Been awhile because I've been driving the rig a bunch this summer. Time to start back on the next project though. I've moved on to finishing off the interior. I'll be making my own headliner and covering it with black vinyl. I'll also be covering the top side panels, door panels, trans cover, and visors in the same vinyl. I've found an exact match to the corbeau vinyl available at Miami Corp FL3722 Enduratex Corinthian Black. The Corbeau vinyl is a ridiculous $50/yd.

I had Jeff Jamison do my rear seat and re-cover the armrest that comes with my center console in the above vinyl. It is a perfect match. Jeff did a great job. I haven't been able to install the rear seat cover yet but the armrest is in and my OCD about it not matching is now gone. Here's a couple pics of his work.

Rear seat

attachment.php


Vinyl comparison - armrest on left Corbeau seat on right

attachment.php


Couple of installed armrest pics

attachment.php


attachment.php
 

Attachments

  • IMG_2784.JPG
    IMG_2784.JPG
    75.7 KB · Views: 1,187
  • IMG_2785.JPG
    IMG_2785.JPG
    70 KB · Views: 1,198
  • IMG_2783.JPG
    IMG_2783.JPG
    124.9 KB · Views: 1,174
  • 52885742525__E04F0FE2-C755-4489-9618-81950EC0FD37.JPG
    52885742525__E04F0FE2-C755-4489-9618-81950EC0FD37.JPG
    66.9 KB · Views: 1,169
Finally got around to tackling the back seat. It was in pretty rough shape on the outside but surprisingly in good shape underneath. I soaked the foam in my bathtub full of soap and oxy clean for a couple hours. They weighed about 70 lbs when I tried lifting them out. Had to let them partially dry in the tub before attempting to move them. Pretty sure they would’ve fallen apart from the weight. Sanded down the frame underneath and painted with rust preventative. Sanded down all the brackets and painted them with Eastwood satin chassis black. Here’s a couple pics of before and after. Not completely done yet very close.

Old ratty seat

attachment.php


attachment.php


Had to make a new back plate as the old one was beat up pretty badly.

attachment.php


Painted frames

attachment.php


Backrest. Contemplating adding more foam.

attachment.php


Seat pics

attachment.php


attachment.php


attachment.php


attachment.php


attachment.php
 

Attachments

  • DB302D07-4446-410B-94FD-F75C4FD62629.jpeg
    DB302D07-4446-410B-94FD-F75C4FD62629.jpeg
    150.2 KB · Views: 1,480
  • 085E94EB-115A-4451-A29A-43A6E7830902.jpeg
    085E94EB-115A-4451-A29A-43A6E7830902.jpeg
    147.1 KB · Views: 1,439
  • 7EE39A29-1719-4748-8E42-7A462F919317.jpeg
    7EE39A29-1719-4748-8E42-7A462F919317.jpeg
    171.9 KB · Views: 1,372
  • 46329F4F-6CA8-4FF9-82FD-1FB1126E7B85.jpeg
    46329F4F-6CA8-4FF9-82FD-1FB1126E7B85.jpeg
    140.5 KB · Views: 1,446
  • F6A0E7ED-0C41-4E7F-99EF-7DAA3DD0CACA.jpeg
    F6A0E7ED-0C41-4E7F-99EF-7DAA3DD0CACA.jpeg
    85.1 KB · Views: 1,406
  • 0A270792-8D33-4911-B1F4-8BB84C60FAF4.jpeg
    0A270792-8D33-4911-B1F4-8BB84C60FAF4.jpeg
    137.5 KB · Views: 1,408
  • 9B378594-A72E-47C8-A46D-EB184D0F4D16.jpeg
    9B378594-A72E-47C8-A46D-EB184D0F4D16.jpeg
    86 KB · Views: 1,401
  • FEACC7F1-3307-44B9-A066-3A9771D171D8.jpeg
    FEACC7F1-3307-44B9-A066-3A9771D171D8.jpeg
    102.5 KB · Views: 1,383
  • 5FBC770B-8504-49F3-92D7-8B4C2160705A.jpeg
    5FBC770B-8504-49F3-92D7-8B4C2160705A.jpeg
    117 KB · Views: 1,394
  • A25A3CED-23CF-44E4-8449-BD739ED0D46B.jpeg
    A25A3CED-23CF-44E4-8449-BD739ED0D46B.jpeg
    85.8 KB · Views: 1,439
Back seat is in and looks amazing. Can't thank Jeff Jamison enough for what a great job he did on this. These aren't the best pics but I had to share due to excitement. Turns out I measured the tonneau perfectly as the back seat ends right at the tonneau lip.

attachment.php


attachment.php
 

Attachments

  • IMG_3026.jpg
    IMG_3026.jpg
    35.9 KB · Views: 1,371
  • IMG_3027.jpg
    IMG_3027.jpg
    49.3 KB · Views: 1,361
Awesome
I'm in need of redoing the rear bench seat in my 72 ole yeller scout. Which I Finally was able to drive it home a couple days ago
 
I just treated myself to 14 pages of a wonderful build. Great work. You should be very proud of all your hard work.

But now I know why my local hardware store always has a low supply of grade 8 bolts.....you bought them all!!!! I too love the finish color of grade 8. I think if you did some digging, you could probably get the same finish on grade 5 and save yourself a few bucks. But at that point you would probably have to order every size to cover yourself.
 
Back
Top