Ol' Yellar

Status
Not open for further replies.
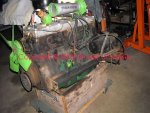
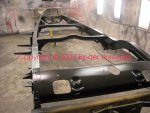
The motor is resting on a dolly which has been used many times for all kinds of heavy objects. It's a simple "mover's dolly" with a weight capacity of 1,000lbs. From harbor freight...on sale for $9.95! I gotta bunch of 'em, including the smaller units which are 500lb. Capacity...great for tranny and transfer case storage.

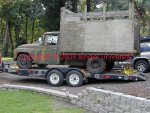
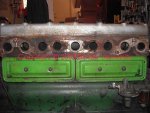
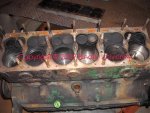
Hopefully the rolling stock will be moved to the resto-shop next week so the shop space can be freed up. Then detail work on the motor can begin. The current plan is to simply clean it up, set the valves, and re-seal as needed. Compression is excellent so it's not gonna get opened up, but the pan will come down for rod/main inspection.

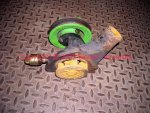
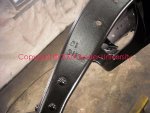
You race car boyz think "motor plates" are some recent development for the drag strip???? Think again...notice the "motor plate" front support system on this 1935 dinosaur????? It's sandwiched between the sheet metal timing cover and the front of the block...that bitch is why the motor don't wanna come out without pulling the body off! And...ya can see the "flame tracks" where this plate was flame cut out of sheet stock...by hand no doubt!
 

Attachments

  • Motor Dolly 001.jpg
    Motor Dolly 001.jpg
    86.3 KB · Views: 430
The brass dealy Bob on the engine front looks like the water pump's grease cup for "cup" grease, and seems in fine shape.
 
The grease cup and the oiler port are functional and currently operational. The gland nut for the packing is bottomed out, allowing one drip of coolant every 60 seconds or so when running.

The cooling system will actually hold 10psi continuous and engine temp is steady at 140f after an hour of running up and down the road and idling for an extended period.

The radiator itself is going to Mike over at eugene radiator who specializes in doing special interest vehicle radiators and does early Ford restos. He'll check it out and do an oem-type re-coat. I'm combing out the fins myself, they are actually in remarkable condition.
 
Last edited:
Michael and tracy/American spirit auto are cuttin' a deal now, as soon as they shake hands ed's gonna get hooked to tracy's shop in springtukee so he and his krew can start the rest of the stripout.

Once the rolling chassis is completed, then I'll bring ed back upriver for the motor install and lay in the chassis-mounted wiring. Once I've completed that, the chassis will go back to American spirit for final paintwork on the body pieces and re-assembly onto the chassis.

The oem wiring on these rigs matched the extremely robust overall construction of that era. All primary wire was done in "armoured" conductors, which is plain old rubber-insulated copper primary wire that is sheathed in a spiral-wound steel conduit. Either single. Double, or triple conductor as needed for the various wire runs to loads. Some of the multiple armoured wire runs were inserted into a fabric sheathing for additional protection which also served as the "loom". Terminations for instruments, switching, lighting pigtails, etc. Was done in an early form of crimped terminations, with a red rubber strain relief slide over the junction. After all these years, all those terminations are really rotten and have all been badly hacked with all kinds of po virus shit.

So all primary wire that will be exposed or visible is going to be run in the same stuff, even though the modern version is pvc-insulated inside the armoured conduit.

This pic shows three types of the modern version of this stuff...single and multiple conductor armoured cable and "shielded" versions of armoured cable, single and multiple conductor. This stuff is real pricey and sold by the foot...depending upon gauge and number of conductors...up to $15 per foot....so the electrical system will have to be carefully planned out to avoid any mistakes or waste!
 

Attachments

  • Armoured Primary Wire.jpg
    Armoured Primary Wire.jpg
    34.2 KB · Views: 412
This is the heart of the new electrical system...a twenty circuit load center which includes a relay(which we'll use for the horn), and two integrated flashers (one for turn signals, the other for emergency signals).

This is an outstanding unit from saint/kwikwire and sold by ihon. By far the most bang for the buck I've run across regarding any similar distribution center.

Will we use twenty circuits???? Hell no!! But they are there if we ever wanted to! The electrical system on ed will be modern schnizz all the way, including lighting that simply looks original.

Any typical street-legal ride needs only about eight individual fused distribution points. And because we'll be using the armoured wire runs, we need to be able to terminate this stuff with screw-down lugs...thus the version of the kwik wire panel we've chosen. And, this panel allows the inclusion of the oem ammeter into the system even though we'll be using a delctron 10si alternator for battery charging.

All the electrical schnizz will be mounted in the under-seat compartment, including a remote starter relay controlled by an oem-type foot-operated starter switch. Ed has had an oem-option electric wiper on the driver side only in the past, we'll install two similar aftermarket replacement electric wipers as he's gonna see highway duty onna semi-regular basis. And in front of the load center we'll install a master disconnect for the battery incorporating either a fusible link or a maxi-fuse for overall system protection.

All ground runs will return back to a ground buss mounted adjacent to the load center under the seat.
 

Attachments

  • Kwikwire TR1400 003.jpg
    Kwikwire TR1400 003.jpg
    111 KB · Views: 382
Tracy and krew came up and snaked ed today, he'll be livin' at American spirit hot rod and spa for the next few months. I'll be meetin' with tracy next Tuesday to see what the other side of his life looks like.

Goal is to have ed ready for Binder Bee 2010 in mid-July...then have him included with the ihcc chapter 30 folks display at steam up! The following two weekends. That offer just came up tonite and mikee ain't heard it yet!

And just as soon as ed rolled up the driveway, my new-to-me j&I industries flatbed (attached to a f350 junker) came rollin' in to take ed's place in the parking lot for stripout.
 
Hey mm: don't forget about the fall gathering in Loomis, I'm gonna do my best to be there this coming year. I'll either be driving grandpa earl or uncle ed. It sure is great to have choices!! And, I said driving, not towing.
Mendomikee
 
Congrats to mikee regarding making his first post on his own thread!!! Another red letter day! The boy is trainable afterall!

We're gonna have to make provisions on one of these pos for flat towing the other one. Either that...or trade that dam pc subaru for a car hauler rig that will pull both of 'em and have livin' quarters too.

I'm booking appearances now for the summer IH show season in the nw for both them rigs, then there are all those parades that ken and curt are lining up for IHSTO club participation.

The Sierra Fall Rallye 2010 will be a vacation for them rides, they'll finally git ta go home with ya! And no way you can show 'em at san quintin next fall when ya check in.
 
Finally a second voice of reason. Mr. Golick needs something that can go faster than 50mph and tow atleast 1ton.
With his admiration for IH and corn finder abilities, along with those deep pockets I think a IH cxt is a good choice.
 
finally a second voice of reason. Mr. Golick needs something that can go faster than 50mph and tow atleast 1ton.
With his admiration for IH and corn finder abilities, along with those deep pockets I think a IH cxt is a good choice.

Welcome to the ihon krew! You must be that dude that mikee sez harasses him constantly about this IH crap!

To think that someone who plays with the most politically-incorrect iron on the planet actually drives a subaru is kinda pitiful don't ya think? Subarus are wonderful rides and certainly provided me with employment opportunities for many years....but since mikee ain't no dam earthmother, treehugger, or cat hoarder, it's kinda embarassin' to roll up to the casino there in hopland in one!

We're workin' now onna real tow rig for mikee so's he can drag all this crap around when needed. This is his next project/tow rig only this one must live at someone else's place...not here! Let me introduce wilbur the horse hauler to yawl...
 

Attachments

  • Wibur the Horsehauler.jpg
    Wibur the Horsehauler.jpg
    136.4 KB · Views: 477
Harass! Awe nuts, littlelakekid is my mushroom gathering buddy, whose trying to swindle some old dude in ft. Bragg out of a 30's something IH 1/2 ton pickem up. Welcome aboard jim.
 
I've got a much better solution than buying a car hauler rig. The solution is for me to locate a compatable lady here in the north bay and invite her to ride up to the bee with me in grandpa earl. Then we'll flip a coin to see who drives uncle ed back to ukiah after all of the festivities in the beautiful north country. Hey I might even bring some redwood logs with us to have milled during steam up.

With such a fun solution I can guarantee that both rigs will be in attendance at the fall rallye.

Now it's up to mm to get all of the mechanical stuff including; re-wiring and hydraulic brakes completed on uncle ed in time.

I hope he eats plenty of spinach in the mean time so that he will have enough strength to tighten all of the important bolts and nuts during uncle ed's rebirth. Seems there have been more than a few loose screws coming out of mm' digs. Like wheel nuts and the main jet on a carb rebuilo.
 
Hey mm, is that chew stain on the drivers door of your latest addition. And to think that the little "round one" moved uncle ed out in the cold to make room for that!!!
 
I'm almost sold on wilbur. If you can explain the chew stain and get mr. Garlick to finance 50% of the corn needed to get going it might just work. On the other hand michael+IH=cash fo clunkers.
 
That chew stain is actually home grown northwest camo treatment. Some folks call it algae...some folks actually eat that shit (along with that other form of algae/fungus yawl call "mushrooms")

ed went back on the rack this week, got hiz proctological exam outta the way.

The tranny is now in storage, it's the predecessor to the warner t90 known as a "t-9". Initial looksee down in the tranny guts sez it's gonna git flushed and filled and then buttoned up.
 

Attachments

  • Tranny Gone.jpg
    Tranny Gone.jpg
    90.5 KB · Views: 442
In order to pull the bell, all the clutch guts and flywheel have to be dropped out the bottom!!! What a bitch it is to work with these power units!

Since these rigs have a "greasable" throwout bearing, someone has done one hell of a job of greasing it! There's gotta be a 50 year supply thrown all over the inside of the bell and covering the clutch assembly!

Once the brake pedal, cross shaft supports, and throwout cross shaft was pulled out, then the throwout bearing can drop free (pita #1).

Then from underneath (whole rotating the crank), ya pop the clutch cover bolts out of the flywheel (pita #2).

Hopefully the clutch cover and disk didn't take too big a chunk out of the shop floor, what a nasty/slimee clutch it is! Can't believe it actually held as well as it did! Pressure plate looks good, the clutch disc will go over to friction materials for a re-face.

Then the flywheel (retained by nuts threaded onto bolts inserted from the rear of the crank flange) came down. Two of the bolts are tapered shanks that mate with tapered holes in the flywheel for alignment purposes. The flywheel drops out the bottom also, pita #3.

Once the flywheel is off, the "wrap-around" bell housing can be removed and set aside.

Motor's hangin' on it's engine stand now for dissection.
 

Attachments

  • Clutch Guts.jpg
    Clutch Guts.jpg
    94.6 KB · Views: 461
Last edited:
Was told by a good ole boy from hanibol not to be heavy handed with the grease gun on the fitting for the bellhousing. With the load of lard yur talking about, one of the heavy handed schwabee newbees musta done the deed. Grease fitting shows best in the side view photo
 
Ripped into ed's prime mover a few days ago...the water pump is a somewhat unique design for the era...what I call a "capsule" pump.

The volute for the impeller is actually built into the housing, so it's a self-contained unit.

These pumps are rebuildable, but all this one needs is to have the packing refreshed,...the gland nut is bottomed out and it does leak a drop every minute or so when in operation.

Who knows what prompted some po to detail this motor out with the chartreuse-puke green paint???
 

Attachments

  • Capsule Water Pump.jpg
    Capsule Water Pump.jpg
    108.7 KB · Views: 411
Some detail on the delco distributor...

The reason ed showed up at Binder Bee this year was so I could look at and advise what to do about the non-func vacuum advance unit on this sparker. The vacuum can rotates the entire distributor body to achieve advance, without a functional can, there is no way the distributor can properly function...it had been "locked down" with the tension screw to prevent rotation.

I've already had the oem vacuum can remanufactured so the distributor will go on the bench for rebuild soon.
 

Attachments

  • Distributor Detail.jpg
    Distributor Detail.jpg
    98.5 KB · Views: 430
We already knew the intake/exhaust manifold gasket interface was a leaker. This manifold had been on and off a few times without having either the block or manifold surface cleaned,...and the gasket was also reused. No way this thing could seal.

At least the conical washers for the retainer studs/nuts are all installed and reusable!

The manifold set May have to be resurfaced...won't know until the preliminary cleanup is done.
 

Attachments

  • Manifold Gasket Leakage.jpg
    Manifold Gasket Leakage.jpg
    97.8 KB · Views: 431
The cylinder head/block interface is butched also.

Head has been off and decarboned at some point, but the block surface and the head looks like no attempt was made to clean!

Typical siamesed cylinder arrangement for a six-banger motor. While the head gasket is not "blown" between adjacent cylinders, it was definitely a leaker. The head gasket was slathered with coppercoat...that is the proper procedure when using a head gasket of this type...but ya do it on new, clean parts!!

The head stud torque was all over the place, some not much more than finger tight, a few gross over-torque...slight evidence of internal coolant leakage resulting from the butchered head gasket but it's of no significance.

The studs in this block are not original...they May be either industrial items or possibly sourced from arp in the past. They have recesses for use of a hex key for installation.
 

Attachments

  • Headless.jpg
    Headless.jpg
    91.8 KB · Views: 521
So yeah, this motor's been busted down in the past.

0.040" overbore.

The scratches/gouges on the tops of the pistons tell us this motor has been "de-coked" since it was rebuilt (probably using a screwdriver for a scraper!), that goes along with the botched head gasket.

Since there is very faint carbon accumulation in the combustion chambers, I'd say the motor could not have actually run more than few hours since de-coking though.

Once the pan and tappet covers are removed, we'll know much more about the overall condition and what the future holds for the motor. The head sealing surface needs to be cleaned up before it's condition can be determined.
 

Attachments

  • Forty Over Bore.jpg
    Forty Over Bore.jpg
    147.8 KB · Views: 546
Last edited:
Made a trip to American spirit yesterday to check on progress and pick up parts that I need to handle on tracey's end...

Lots has been accomplished!

The top of the cab was removed so that one piece of wood framing can be fabbed and replaced. Then cab roof goes back on and a modern type body seam sealant will be applied.

Virtually no rust of any significance has been discovered hidden...and no rot in the framing!

I helped tracy pull the interior door panels off the doors, what a pita that was in order to prevent any glass damage...definitely a very careful, two-person manipulation. Window channel material appears to be standard stuff for that era which is easily sourced in bulk and then cut to fit.

The interior of the doors is outstanding! Unlike later IH vehicles, these rigs actually had decent drains fabbed into the door.

The frame has now been painted and is hanging on the rotisserie in the paint booth. Tracy uses "GM black" frame enamel on all his restos, this is a satin finish black that can be easily touched up later on.

The frame on this rig continues to amaze me...it's very modern in design and execution, far advanced as compared to other vehicles of that era.

The rear-most crossmember is actually a heavy sheetmetal stamping that serves as protection for the top of the fuel tank when various types beds May have been installed on the cab/chassis combo.

We can now see some witness marks at various points on the frame rails, we "think" those are a manufacturer's id for the stamped rails which were most likely outsourced by IH and not done in-house...but that is only conjecture right now.

The rear axle is in pieces, the housing has been dipped and cleaned. Dave is setting up a new r&p in the dropout.

The springs have all been cleaned and painted and set aside for install later.

I brought home the front axle and several other parts that I'm responsible for refreshing, then that stuff will be returned to American spirit for final paint and install.
 

Attachments

  • Frame Prepped.jpg
    Frame Prepped.jpg
    70.5 KB · Views: 554
Another point of historical interest...the chassis number!

And...it's located in the same general area that more modern IH rigs were stamped.
 

Attachments

  • Frame Number.jpg
    Frame Number.jpg
    68.9 KB · Views: 575
Now the front axle gets turned into a pile of arts for rejuvinatin'...

The steering arms are retained to the spindles by a tapered stud. So all the threaded fasteners got treated with a dose of kroil.
 

Attachments

  • Kroiled.jpg
    Kroiled.jpg
    141.2 KB · Views: 504
Status
Not open for further replies.
Back
Top