Ol' Yellar

Status
Not open for further replies.

Michael Mayben

IHPA Tech Moderator - Retired & No Longer Online
Uncle Ed

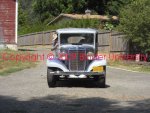
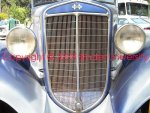
This showed up in tha parkin' lot courtesy of ken roth this afternoon.

Ihon member mendocinomike's next big deal! After takin' home gold from Binder Bee this year with granpa's l-112, mikee figgrd he'd be bored this winter and needed sumthin' to keep him out of the local assisted living projects.

He's done named tha rig ol' yellar. But since he breathes that funnyair there in mendocino county, he gits real confused sumtimes (and has perpetual munchies).

update!!!:

mendomikee has now re-thunk yellar's id and henceforth will be known as "uncle ed".

Uncle ed is gonna live here for while while mikee gits his stuff together and gits up close and personal with the new ride next weekend.

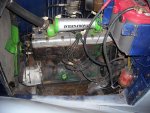
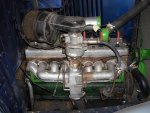
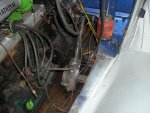
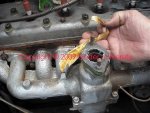
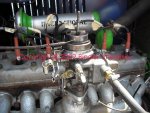
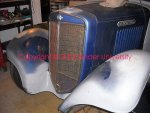
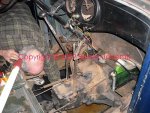
It's been converted to 12vdc witha 10si alterpumper, but the seller kept the battree. I stucka fresh optima in tha hole this afternoon, sumbitch popped to life (the original hand crank is in the bed!) so's I could put it in the shop.

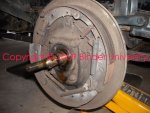
Oh yeah...rig is a '35 "c-1" (1/2 ton) model with a 213ci flathead six. Tires are new schwabees, 16" radials.

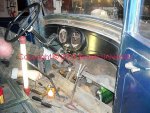
The seller brought it to the Binder Bee this year so I could look at the distributor. Only thing needed is a rebuild of the vacuum advance can. We can handle that and then maybe mikee will drive it home!

Mikee will have ta relate the rest of the story!
 

Attachments

  • Yellar.jpg
    Yellar.jpg
    532.8 KB · Views: 1,659
Last edited:
Re: Uncle Ed

Shot of the driver side of the engine...gotta ross steering gear. The vacuum can has been removed from the distributor for repair. The starter circuit issa juryrig with a starter button controlling a relay to energize the starter. The way it spins over, I'd say the starter motor is still wound as a 6vdc unit which was common in 6>12 conversions back when. It's gotta Ford boneyard coil wired in.

Much of the wiring is original but that's not gonna stay for very long and will be the first thing that gits luv.
 

Attachments

  • Yellar Motor2.jpg
    Yellar Motor2.jpg
    483.9 KB · Views: 1,645
Last edited:
Re: Uncle Ed

Here's the passenger side. Not to badly scruud over! Don't know what the carb is yet, May not be original as the casting on it has a "GM" logo. And yes...that is masking tape wrapped around the carb mounting flange to "seal" a vacuum leak no doubt!

These were very advanced motors for that point in time and is actually an IH-sourced item, not a waukesha. Rated at 78hp, with solid lifters and actually has insert bearing on both rods and mains, not the more common poured babbitt of that era.

The bumpers, side-mount spare, wire wheels, shocks, wipers, dual tail lights, rearview mirror, etc. Were all options.

Two wheelbase chassis were offered in this series, the "short" at 113", and the long at 125", yellar issa "long".
 

Attachments

  • Yellar Motor3.jpg
    Yellar Motor3.jpg
    458.4 KB · Views: 1,628
Last edited:
Mm,

nice truck!
Possible to get a close up of the steering box/draglink arrangment. Nice setup for an old school roadster. The front to rear draglink is cool out the side and exposed.

May see about finding one.
 
Re: Uncle Ed

mm,

nice truck!
Possible to get a close up of the steering box/draglink arrangment. Nice setup for an old school roadster. The front to rear draglink is cool out the side and exposed.

May see about finding one.

Will do!

I worked with the motor some more this afternoon, the choke was stuck closed! And the timing was way off but since the "movable" distributor is tightened down because the vacuum can is gone, that really don't matter right now.

I ran it for about an hour...the carb is total shit, loads up bad and the idle circuit is near dead. This carb will go away since it's not at all correct.

Water pump started leaking a bit..I gave the grease cup two turns and it firmed up, then tightened the packing gland nut and now it's dry. For you kids out there, ya know what "water pump pliers" are for???? How about cranking down on the water pump packing onna monthly basis!

Hot oil pressure holds at 15psi at idle and 30psi when the motor revs.

And see that oil can in it's holder on the firewall? That is used to oil the front bearing on the fan shaft of the water pump, oil the stater bushings, and oil the distributor bushing.

Under the removable wood floorboards, there is another oil cup for the clutch release crosshaft. And all spring shackle pivot bolts are greaseable!

The brakes take two feet and two strong laigs though!

There seem to be a bunch of the c-1 and the 3/4 ton c-10 versions out there Robert...and the prices are dirt cheep! These rigs are far more sophisticated than fords of the same era! The c-10 and c-20 versions would have had a four cylinder motor, don't know if it's an IH or a waukesha. I'm just learnin' this really old IH iron myself, but this one is a superb example!

Mikee now tells me he's leanin' towards cherryin' this ride out for a driver, the electrics will be brought up to snuff of course, that is imperative. Underneath it's real nice, much nicer than the average s80/s800 out there and it's not been worked underneath...just some scabby body work done but nothing that can't be done right!
 
Last edited:
Steering gear detail...very roddable!
 

Attachments

  • Ross Gear.jpg
    Ross Gear.jpg
    452.5 KB · Views: 1,639
Re: Uncle Ed

Here's the drag link through the fender well. Looks like a Scout 80 front spring!
 

Attachments

  • Drag Link.jpg
    Drag Link.jpg
    399.9 KB · Views: 1,551
Last edited:
Re: Uncle Ed

Driver side axle detail...it's already dropped, no need to do anything else!

And this one has those "optional" shock absorbers!

How about them cable-operated bendix brakes??? Way more advanced then the Ford rod-operated system!

Bet this one is gonna see a wilwood four wheel disc setup (under floor) real soon!
 

Attachments

  • Axle Detail.jpg
    Axle Detail.jpg
    437.2 KB · Views: 1,598
Last edited:
We had a highly successful and fun weekend with mendomikee and elizabeth here at binder u.!

Spent Saturday gittin' ed purrin'. Amazing how nice this rig is!!!

The carb was wrong and scruud on toppa that, so a jury-rig 1904 went in it's place. Had to botch the throttle linkage and used a coaster brake lever from another 1904 that team fwb forced on me at the bee.

The carb spacer had a bigchink missing and had been "patched" with rtv, so ya know what that did to the rtv detector arount here!

I have a bunch of aluminum spacers for the 2-3/4">3" bolt pattern 1904 mixers so a new one went on along with fresh gaskets. Someone previously had wrapped masking tape around the carb flange to plug the huge vacuum leak point and hold the rtv in!
 

Attachments

  • Carb Flange.jpg
    Carb Flange.jpg
    112.4 KB · Views: 1,490
Here's the fresh 1904 in place without the throttle lever extension.

This is a temporary fix while I attempt to find an oem-design carb to build for ed. This make the motor run superbly, what a treat to hear this rig fire instantly!
 

Attachments

  • Temp 1904 Install.jpg
    Temp 1904 Install.jpg
    86.1 KB · Views: 1,439
We did a hot compression test and found 110>115 across the board! Absolutely perfect for a super-low compression flathead!

We also found that the #5 and #6 plug wires had been swapped so changing that brought the motor to life.

Next up is to adjust the tappets. Oil pressure is strong, engine temp never exceeds 140f, and not a single drop of oil has hit the shop floor yet. If the lights worked I'd drive this rig anywhere right now.

We popped a front wheel off to take a gander at what it's gonna take to do a hydraulic brake conversion. Should be real simple!

The spindle appears to be exactly the same pattern/dimension as the early Ford stuff that the hot rodders all use. So we are shopping now for a brake conversion set (on the cheep) that has a "stepped" drum that will allow the wire wheels to mount. An "early" Ford-pattern disc conversion May also be considered but for right now, this is a make-a-driver project on a very limited budget.

The brake shoes have been replaced recently with bonded linings which are exactly the wrong material to use for mechanical bakes. The lining material should be a woven substrate filled with brass...same type material as used on the trans-mounted type parking brake systems.

We'll retain the under-floor oem pedal system and mount a modern dual channel/boosted master cylinder to the original crosshaft with a remote reservoir for brake fluid.
 

Attachments

  • Mechanical Brakes.jpg
    Mechanical Brakes.jpg
    90.8 KB · Views: 1,455
Next on the list is rip out the oem wiring and stash it for posterity!

A kwikwire 8 circuit harness will be installed as those are by far the best quality and most cost-effective replacement electrical product on the market.

All the instruments currently operate correctly, even the fuel gauge! One of the pods needs a lens, so we're looking at options for having this gauge set restored professionally.

The kwikwire harness will be completely hidden from view...then necessary pigtails to loads that are visible will be run in either oldskool (but modern!) cloth-wrapped material or the oem style wire that was actually in a steel-wound sheath similar to bx cable.

So this is gonna be a full-boat resto with "modern" touches where needed to make it a reliable dd.

We'll handle all the mechanical details here, then determine if the body-off frame work will be done locally or down in ukiah.

Here's a shot of mendo and dave after returning from a shakedown run with the revived motor. Sukker flies! Cruising at 50mph will be no problem at all, and just as comfortable (if not more so) as the typical Scout 80!
 

Attachments

  • Mendomikee and Dave.jpg
    Mendomikee and Dave.jpg
    122.2 KB · Views: 1,494
How's this for a classic view of uncle ed's mouth????

Once we got ed squared away and a plan for his future developed, we did a drift on the mckenzie and fish were caught!

So all in all, a highly productive weekend with great friends!
 

Attachments

  • Mouth.jpg
    Mouth.jpg
    143.9 KB · Views: 1,437
Mendomikee is spending some time here on the river doing some stripout on unka ed.

Also had a visit from tracey with American spirit hot rod out of eugene who is bidding the body and paint work, it's been determined this will be a body-off project involving acid dip.

So now we're moving ahead with removing the interior components, stripping out the electrical system, prepping the instruments for restoration by a third party, and performing a detailed survey of exactly what we got here.

The bumpers and mounts have also been removed, much of the hardware is not oem and has simply been juryrigged over the decades. None of the hardware will be re-used except for the bumper mount bolts and any special items that can be seen. IH used many square-head bolts with square nuts on these rides back in the day.
 

Attachments

  • Bumper Off.jpg
    Bumper Off.jpg
    86.6 KB · Views: 1,317
The instruments and dash are out now and I simply cut the wiring as none of the stuff will be re-used except for the original switches if servicable.
 

Attachments

  • Instrument Removal.jpg
    Instrument Removal.jpg
    126.7 KB · Views: 509
Here's a nice little surprise/historical note...

Written in grease pencil on the dash header is a note: "125 w.b.", denoting that this body/chassis is the "long" version of the c-1 halfton. The shortee is a 113" wheelbase.
 

Attachments

  • Assembly Note.jpg
    Assembly Note.jpg
    83.7 KB · Views: 552
Here the floor and toe boards have been removed without too much effort (comparatively speaking!). No rot whatsoever, all that will be needed is some simple re-glue with a penetrating epoxy, sanding, and then a paint finish to match the frame.

The oem foot-operated starter switch has been out of service for many years, that will be brought back to life but will not carry full starter current and it's only purpose will be to actuate the remote-mounted starter relay (this is a 12vdc conversion already).
 

Attachments

  • Bell and Trans.jpg
    Bell and Trans.jpg
    124.2 KB · Views: 564
How about this attention to detail from 1935?

This is a remote grease fitting which projects slightly above the toe board. Purpose is to be able to grease the clutch throwout system periodically.
 

Attachments

  • Greasable Clutch Throwout.jpg
    Greasable Clutch Throwout.jpg
    119.2 KB · Views: 543
Another quick update before the action begins...

Tracy/American spirit auto has now visited unka ed twice to make sure all the bases are covered for his estimate for the body/paint work. We've agreed as to what work I will do vs. What work will be performed by tracy's shop. All that is left now is for mendo to give the word to go and I'll deliver the rig to tracy's shop in sprintuckee.

The interior is fully gutted and all wood exposed. Tracy is proposing that the wood be stabilized in the few joints that have loosened, then the sub-structure will be removed before the body is dipped. Wood framing will be finished bright and installed after the body has finish paint, along with bright finish on the door assemblies with body-color sheetmetal.
 

Attachments

  • Gutted.jpg
    Gutted.jpg
    105.1 KB · Views: 493
Status
Not open for further replies.
Back
Top