Oil Pump Relief Valve Shimming

I'm still trying to get out in the shop and do that erl pump shim deal!

Yes...the mounting holes are for 5/16" bolts, both sides! The gasket punch sets that harbor freight sells are all "standard" uss/sae bolt/screw diameter sizes and work as well for metrics!

The actual c-to-c of the gasket and the pump casting measures 1-5/16".
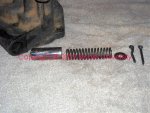
 
Here's the "shimming" detail for an ihc-produced oil pump pressure regulator for either a I-4 version, a fullsize version, or a Scout II version. While the details in the oil pump castings differ, the actual gears and shaft included in an oil pump service kit are identical for all versions. The actual "shim gaskets" included in a pump kit differ also in shape since the bodies differ, but the various thicknesses of the gaskets are consistent, those are used in a selective fit mode to set the end clearance of the pump gears when re-assembling the pump.

Simply remove and discard the cotter pin that retains the pressure regulator spring shim, spring, and spool valve. Clean these parts carefully, and also clean the oil pump pressure regulator valve bore before moving on!

The cotter pin is nothing special...just a standard cotter pin! Don't be surprised to find a finish nail, or a chunk of bobwire stuck in that hole, after all this is IH schnizz and typical tightazz IH folks will use anything to not spend a nickel for a cotter pin! No toothpicks though!!!

Notice the chamfer on the spool valve goes into the pump body bore first, do not reinstall the spool backazzwards!
 

Attachments

  • Oil Pump Pressure Regulator OEM.jpg
    Oil Pump Pressure Regulator OEM.jpg
    101.4 KB · Views: 1,707
Last edited:
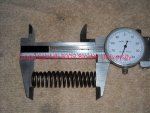
Check the free length of the pressure regulator spring to determine if it's within specification. This one comes in at 2.256". Robert already trained us that the spec for the free length is 2.250"...perfectly within spec.

If the spring was somewhat under the spec in free length, then that indicates it's "collapsed" over time and the shimming data he extrapolated will be skewed.
 

Attachments

  • Pump Pressure Control Spring Free Length.jpg
    Pump Pressure Control Spring Free Length.jpg
    96.3 KB · Views: 1,439
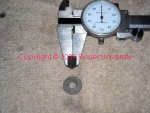
Here's the typical oem "shim" used in these oil pumps...nothing special, just a washer. Idea is to provide a "seat" between the spring end and the retainer/cotter pin...not to "calibrate" the regulated pressure of the pumps individually. This ain't even close to rocket science!!!!
 

Attachments

  • OEM Pressure Regulator Shim.jpg
    OEM Pressure Regulator Shim.jpg
    105.4 KB · Views: 1,346
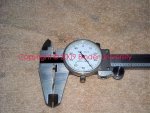
The washer in this sii pump has a nominal thickness of 0.040".

The od of the washer is 0.680"...basically a 1/4" grade 8 sae flat washer!
 

Attachments

  • 0.040 Shim Thickness.jpg
    0.040 Shim Thickness.jpg
    126.3 KB · Views: 1,259
This is where ya gotta do that hard shit called "math" before ya go to 7-11 for a big gulp and some washers.

Use Robert's data found in post #15 to determine what thickness shim ya wanna use!

You can stack another shim on top of the oem, ya can toss the original out and go with a thicker shim/washer, ya can do mix-and-match all ya want to come up with the total thickness (spring pre-load) ya wanna end up with (within reason of course!).

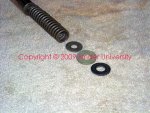
Whatcha see here is two "ideas" I use sumtime. The darker item is a metric 8mm plain old flat washer (black oxide finish), the lighter item is plain old 1/4" sae flat washer. Either of those will have to have the od reduced onna grinder until they fit inside the bore of the pump in a kinda "sloppy" fashion.

Actually...if yore gonna make a shopping excursion for some washers, then look for a 7mm flat washer, those are kinda unusual but used in many applications, I find stuff like that in the hardware assortments at the local farm supply or even them bigbox home supply operations. A 7mm flat should be just right in od and ya might wanna use two of 'em depending upon actual thickness..always take calipers when ya go shoppin'! Looks real trick stuck in yore pocket protectors.
 

Attachments

  • Alternative Pressure Regulator Spring Shims.jpg
    Alternative Pressure Regulator Spring Shims.jpg
    125.3 KB · Views: 1,611
Don't forgit to re-install all this stuff before ya re-hang tha pan! Otherwise you will be real disappointed in this mod and yore wife will look at ya like this!
 

Attachments

  • image137.jpg
    image137.jpg
    22.4 KB · Views: 1,335
7954d1260497004-oil-pump-relief-valve-shimming-image137.jpg


Ahhhhhhhhhh fuck man!!!!!! I think I am going to blow chunks all over my key board............................................................................:yikes:
7955d1260497004-oil-pump-relief-valve-shimming-images.jpg


Mayben you gotta warn us before posting your girlie pictures.:icon_mrgreen:
 

Attachments

  • image137.jpg
    image137.jpg
    22.4 KB · Views: 2,216
  • images.jpg
    images.jpg
    1.9 KB · Views: 1,384
Last edited:
Hey! Iz that'n still availuhbull? I bet sheez even got sum uh her teeth yet!. Hail, sheez an upgrade over what jerry's been grab-assin' lately. Hook me up mayben! You kin be my best man!
 
Its early, I'm trying to finish what coffee I haven't spewed all over myself after catching first view of the right hand seat passenger above:yikes: , I know I need to find a net and re-capture some missing brain-cells...

Just to confirm adequate absorption:

shim required to increase oil pressure 1 psi = .009"
shim required to increase oil pressure 5 psi = .044
shim required to increase oil pressure 10 psi = .089
shim required to increase oil pressure 15 psi = .133
shim required to increase oil pressure 20 psi = .176

if the oem washer is .040" and I want a 10 psi increase I need to add to or replace the oem in whatever combination so that I obtain around .090" tst (total shim thickness: oem + additional). Thanks! Michael the photos help!

Ok. I'm gonna go clean up my spill now. Happy Friday!
 
The shim/pressure values are added shim to the existing oil pump spring, poppet and,washer stack-up.

For a 10 pound relative increase in regulation pressure +/- 10% add .090" is what I calculate and this correlates with engines I have built /rebuilt.

I have always left the factory shim and added thickness to increase pressure. Just happened that my washer selection gave me what I need in a combo type of dealy-o and that is how I posted it.
 
Last edited:
The best thang about the blow-up chicks...ya just stick a pin in 'em if they cease to be amusing and they fade away with no backtalk. That fit's in right along with jerry don't it???

And...ya kin store 'em on the shelf right alongside the carb kits, spark plugs, oil filters, and woredown rocker shafts!

Think we'll ever hear from dave agin????
 
Well duh!

See I told you the she/it knocked me off-kilter too early this am.

"the shim/pressure values are added shim to the existing oil pump spring, poppet and,washer stack-up."

my original skewed thinking would have resulted in only a 5psi increase. And I would have finished the pan re-seal! Glad I asked and didn't get flamed for a non-thinking question. Can you imagine if I only wanted a 1 psi increase? I'd have tried to surface grind the oem washer down to .009"

I'm ok now. Whew! Is it the weekend yet?
 
01-01-2010 update:

happy new year!

Dropped the pan and shimmed the relief valve yesterday. Upon close examination I found that my relief spring had collapsed over time. It's fsm was 2.180" a departure from the 2.25" spec of -0.07". Funny that when I removed the cotter-pin I was prepared for a spring-loaded event. But nothing. It all just sat there. So basically I don't believe the relief valve was doing anything. Always letting some oil bypass. So my oil pressures were totally driven by cam bearing clearances and pump output pressure.

After a quick consult with prof mayben, I decided to augment the shim decision with added thickness. So I added 0.070" + 0.038" for a total of 0.108". No special science here. I had both thicknesses in existing washers without any grinding. With a spec fsm spring that total should provide around 12 psi increase per Robert's numbers. But with the collapsed spring I'm still hoping to hit around 10 psi.

The other interesting thing I found was that the oem spacer or spring stop is a larger diameter (mine was 0.682") than the spring or spool valve. So it doesn't actually depress any further into the housing than just enough to clear the cotter-pin. My spacers were smaller, around 0.625". They do compress the spring into the housing. Moral of the story: the oem washer must remain on the outside end of the "stack". The shims must be on the inside of the oem washer (between it and the spring). Vice-versa and I couldn't insert the cotter-pin. This time when I installed the cotter-pin I did have to depress "slightly" against spring pressure to provide clearance. So now I know there will be some relief valve performance.

The radiator is removed, getting a pin-hole repaired under warranty at griffin so I can't fire the engine just yet for a pressure test. (yeah I could run it briefly without a rad but I'd still slop what coolant is still in the block all over my garage floor.)

I'll test run and post the pressure results in a couple weeks. This also gives me a chance to paint and install a new dip-stick tube (just purchased from IH only) when it gets here next week and allows the new paint on the oil pan and mounting nuts to fully cure.

Dave
 
Last edited:
Hey, happy new year to you too!!! Looks like we made it through another one.

When I look at your posted hot oil pressure readings I can see when your relief valve was just starting to crack or uncover the return port.
Hot (195°f thermostat open after 20 min drive)
700 rpm = 10 1000 rpm = 15 2000 rpm = 30 3000 rpm = 43 4000 rpm = 45
if you plot the rpm vs pressure you quickly see the curve is linear like it should be. The pressure curve should be basically linear right until the relief valve cracks then it becomes a diminishing ratio.

From 700 to 1000 the pressure rose 5 psi or 1.6 psi/ 100 rpm
from 1000-2000 the pressure rose 15 psi or 1.5 psi/100 rpm
from 2000-3000 the pressure rose 13 psi or 1.3 psi/100 rpm
(roughly 200 rpm before 3000 at 2800 the relief valve cracked and the curve began to diminish.)
From 3000-4000 the pressure rose 2 psi or 0.2 psi/100 rpm
well there she is.

You will see the biggest change in the cracking pressure which should increase in 12 psi from 41 to 52.

Post the same telemetry during your next test and we can plot it.
 
That all makes clear sense. But there had to be very little spring pressure on the valve. Just the mass of the spool valve + mass of the spring, friction of the stack in the chamber and what little pressure the spring was providing.

Too bad new springs aren't available....hehe.

The first test run will be with the replaced 20w50 oil. Second test run will be the new swepco 15w40 oil sitting on my shelf and new wix filter.

Dave
 
This thread only reminds me how much I want id & od dial calipers, an assortment of dial bore gauges & micrometers, maybe a good dial indicator built into a heavy straightedge, a motor mount, etc...

Hundreds of dollars worth of dreams right there! I'll be taking off my oil pan just about as soon as I can get around to it, and this May be one of the things I'm interested in doing. As of right now, though, my oil pressure basically remains at the halfway point in the oem gauge. It maybe dips 1/8 of its travel below the midpoint at idle, and reflects across the midpoint by the time I'm traveling 65 in a 55. :icon_rotate:

translation? This thread got me excited about my IH equipment all over again.

I've been looking into a custom dash, too, so that I could get both oil temp and pressure gauges, but with my current figuring, autometer would set me back $400-450 and then just buying a custom-cut dash panel would be about the same price. Then again, I do have two dash panels, and I do know how to plasma cut and weld (somewhat)...

Conclusion? If it wasn't for this forum, I might not be poor! But kudos to all the factual info that we can gather at this hub from these real situations with real rigs.
 
that all makes clear sense. But there had to be very little spring pressure on the valve. Just the mass of the spool valve + mass of the spring, friction of the stack in the chamber and what little pressure the spring was providing.dave

The installed length isn't really what determines the pressure, it is the test length and force that equates to when the relief valve is compressing the spring and the poppet is uncovering the return port.

But hey the proof in it the pudding. We'll see for sure when you test.

Thanks for posting your info.
 
Yes, the autometer path is kinda costly. But I slowly incremented my set over a couple of years. Started with mech oil and mech water when the v392 went in exactly because of the fuzziness in the oem gauge readings/movements. I really wanted numbers to know what was going on. I disconnected the oem amp gauge when I went to a 140 amp alternator. So I was only using the oem fuel and speedometer. I built my own wood form and fiberglass/carbon fiber panel last year. I now run a total of 9 gauges. Two sit where a clock should be but my Scout didn't come with one.

For the curious,
left to right in my main cluster:
engine temp, radiator temp, rpm, fuel, speed, volts, oil pressure.

Down where the IH clock would be:
clock (autometer), tranny temp, outside ambient air temp (non-autometer, digital)

dave
 
Last edited:
When dave and I talked this morning, told him I didn't think there was any way to get a new regulator spring. But later I thought that maybe I'll contact melling directly and see if they would sell some in a small quantity.

I haven't torn down all that many pumps to determine if a loss of spring free length is any kind of an issue, and the ones I have gutted I didn't bother to record data at the time.

So maybe Robert can use his reference library and find a suitable replacement spring...something like he worked out regarding the replacement poppet spring for the 1904 economizer valve??

Kyle...I have done many comparisons between the oem oil pressure gauge and a mechanical aftermarket gauge tee'd into the same port simultaneously (I run one that way on my dd rig also). If...the oem gauge cluster circuit board contacts are nice and clean, and the connector male/female terminals equally as clean...and the bulkhead connectors are clean and resistance-free...then the nominal oil pressure with the needle dead in the center of the long horizontal tick Mark is 45>50psi when using either a new or recently-replaced oem oil pressure sender.
 
Last edited:
then the nominal oil pressure with the needle dead in the center of the long horizontal tick Mark is 45>50psi when using either a new or recently-replaced oem oil pressure sender.
I'll x2 that.
A couple of weeks ago I checked the 1210's engine oil pressure, I too have noticed it varied from the middle of the gauge at about 2000 rpm to just below the middle in the left part of the bar when idling. Hot idle pressure was around 20 psi, it topped out around 45 to 48 psi around 2,500. There was distinct shift in pressure around 52 psi to where it dropped to 48 psi at about 2,800/3,000 rpm.

All in all I'd say being in the bar(the gauges' range bar), is a good thing.
 
so maybe Robert can use his reference library and find a suitable replacement spring...something like he worked out regarding the replacement poppet spring for the 1904 economizer valve??

Sure, all I need I already have posted in this thread.

But I would not get to concerned with free length, simply shim to comp like you have recommended unless rebuilding the pump and then you get one in the kit. The spring rate will not change with loss in free length.
 
Back
Top