Holley 23XX Series Modular Carb Stuff

Alright. I tried to check spacing on the pump arm override screw but had a lot more the .015. Even with the top nut loosened, the spring was not long enough to stretch the cam arm down enough to create the .015 spacing with wot and pump arm pushed down. I had a lot of play left...like a lot.

I attached a picture for you to see (and make sure I am working on the right stuff here). The cam is already set on the #2 hole as it is...

Let me know your thoughts. Thanks,

-dan
 

Attachments

  • Pump Cam Arm Override Screw.jpg
    Pump Cam Arm Override Screw.jpg
    82.6 KB · Views: 2,288
Great picture dan!

I wish everyone could/would post shots like that one...including myself!

I just received two new 0-7448, 2300 mixers yesterday from the warehouse, and have two freshly-built 500cfm versions of the same carb here now. None of those have the issue you describe, which will greatly affect what ya got going on!

I've just got home from "dave the gear man"'s shop where we rebuilt yet another 2300 for a close friend's sii, he does that under my supervision every two years now. And his pump system was just as we set it two years ago. While we rebuilt the carb, dave set up a fresh trac loc and replacement r&p in Matt's rear axle.

But...your issue is ez to correct!

First, remove the retaining clip and the accel pump arm from the shaft it mounts on.

Flip the arm over and closely inspect the area where the arm rides on the cam. You will prolly find it worn somewhat...maybe two distinct "divots" in the surface? If so, ya need to carefully grind/polish that area back flat, and leave a very slight "radius" to the grind. The worn area is caused by grit wearing the steel arm once it's embedded in the nylon cam surface, kinda like lapping compound.

Attached are two shots, the first is a badly worn pump lever. The second one shows how I recondition those levers.

Then...carefully "flatten" the bend in the arm next to the pivot pump to make it slightly "flatter". I do this by simply squeezing the arm inna vise with light/medium hand pressure on the vise screw handle. Do this very carefully, and flatten just enough to take out the "slack" in the override adjusting spring/screw/nut system. Keep doing that a scosche atta time until you can easily achieve the 0.015" pump lever clearance spec.

Don't know how the bend in that lever got magnified...but it did. I have seen one of those arms not bent correctly on a new carb out of the box. So this is not a normal sitch, but with the setup as it is, there is no wonder ya can't get the pump shot dialed in!

Great work and observation!
 

Attachments

  • Worn Accel Pump Lever.jpg
    Worn Accel Pump Lever.jpg
    474 KB · Views: 1,237
  • Recondition Accel Pump Lever.jpg
    Recondition Accel Pump Lever.jpg
    377 KB · Views: 1,068
Michael:

adjusting the cam arm did the trick! I took the arm off, inspected for divits or other wear and didn't find any on either the cam or the arm. I gentle bent the arm a bit checked, bent a little more and was then able to tune the spacing in to .015 approximately. Put it back on fired it up, let it warm up and attached my vacum gauge to my new t-fitting off the back vacum port on the carb.

I was pulling about 10"hg so fined tuned the air intake screws to acheive about 12.5"hg with an idle around 540-550...the Scout just seemed to like that range better. Is 12.5"hg a good number by the way? Also, timing is set at 8* btdc. I'll power time that as I get to drive the Scout a little more. (let me know if I am off on this adjustment as well, but that seemed to be the most I could get out of the ole girl.)

on my test drive around the block, the tip in issue was gone; just nice acceleration with no stumbling or hesitation. I'll get back out there again and give a better test drive: up some hills and down some hills and really test it out, but I think the issue has been corrected.

A big thanks to you and Jeff for the advice, the patience and the instruction. I learned a lot about my carb and the proper way it should work through this exercise.

-dan
 
If ya keep chippin' away at stuff like this dan....usually ya git lucky and win most of tha time!

I been doin' these carbs for nearly 45 years now...and I learn new tricks every day! I'm real fortunate to have a great group of folks I call friends who share knowledge about old skool stuff like this, no matter what their age/background.

If there is a secret to this stuff, it's patience and doing one thing ata time and diagnose issues rather than just shotgun'in stuff like usually happens when dealing in "forums"!

On IH stuff with slushbox tranny I set curb idle rpm at 800 with full warm up, droppin' into drive should show about 600>625rpm. I bet you will gain another 1.5"hg at least with a slightly higher idle speed. But what ya got now ain't bad for yore altitude.

The power timing thing is something that is unique to each vehicle setup and I know ya can run more base timing advance at your altitude!
 
I thought I would contribute to the base here. I just picked up a rebuild kit from salem performance racing in salem, oregon. That guy has more Holley parts than any one else I can imagine. Instead of just giving him my list number I brought the carb in for exact kit fitting. Like a fine tailor he found exactly what I needed and pointed out some areas of concern right away. Then he adjusted the kit. A total of 32 bucks.

my carb:
  • list 2977 753
  • IH: 284545-c91

Holley parts kit #: 37-1543
2bbl carburetor kit

the kit came with two different size accelerator pump diaphrams. Steve took the one I didn't need and traded directly across for the proper valve seat adjuster nut and lock and didn't charge me extra. That's service!!!

performance racing equipment
2715 portland rd ne salem, or 97303-3168
(503) 371-8622
steve, owner.
I appologize if this competes with IHOnly north. Not my intention.
 

Attachments

  • IMAGE_005.jpg
    IMAGE_005.jpg
    67.3 KB · Views: 1,885
Last edited:
I picked up quite a few items from steve about two months ago when I discovered his operation, larry stuart (stuart's auto parts/salem) told me steve was a must visit operation and a real throwback to the oldtime speed shop. But then jim price turned me on to stuart's, so what goes around, comes around!

You must be certain that the main body-to-throttle body gasket you use is exactly the same as the one in the carb now. But your biggest issue with that carb is...the "kit" that is currently in it is a napa kit and no tellin' if the gasket is correct or not! In fact, out of three different p/n napa 2300 carb kits I've tried, none had the correct gasket! Napa is on my ignore list, but you already knew that!

That p/n 37-1543 is a "generic" Holley-supply kit for the list 0-7448 and list 0-4412 "centerhung", as it comes from Holley it does not have the correct main body gasket, so I hope steve fixed ya up with what ya need for your list 2977 carb. Also, the fuel bowl gasket which contains passages for the accel pump circuit in that kit is not correct for your carb. Did he swap that out as well?

Ask trever about this "gasket match" dealybob!! If it wasn't for scanners, hooty would still be onna straight air diet insteda air/fuel cocktail.

The "large" accel pump diaphragm is a 50cc pump element for the 4412 carb and cannot not be used onna 30cc pump app such as the carb under discussion, absolutely no reason to ever convert that carb to a 50cc pump.

I have a parts list going now for some bulk stuff from steve, I'll pick that up when I come up ta visit you kidz on aug. 7. And the mobile carb shop will be with me also.
 
Yessir, I can testify. Even subtle differences that didn't seem like a big deal, actually were. That carb came very close to being an expensive paper weight.
 
Here are the gaskets I have to work with. They are labeled "old gasket" for the gasket that was in use when I tore it apart, "kit 1" gasket and "kit 2" gasket for the two gasket variants that came with the kit.

I am assuming the "kit 1" gasket is the proper gasket. I am also assuming the the "old gasket" is the wrong one as well. I can see some subtle differences between them.

Edit: I should note that this is the main body to throttle body gasket.
 

Attachments

  • gasket.JPG
    gasket.JPG
    231.1 KB · Views: 1,655
Yes..."old gasket" is incorrect (came from the napa kit), that is for a list 4412, 500cfm carb. The throttle bore holes are the wrong diameter along with a few other differences.

Your "new #1" should do the trick even though is slightly "different" from the oem gasket, the difference won't many any difference! This was verified on two different list 2997 carbs I have here.

Now ya need to throw up the bowl gasket comparisons, there are at least three different gaskets used on those carbs, only one is proper and will allow the accel pump circuit to operate correctly.
 
Thanks Mike.

Here is the float bowl to metering block gasket. The kit only contained one gasket and I know there are a few variations of the gasket out there.
 

Attachments

  • DSC02944.JPG
    DSC02944.JPG
    239.1 KB · Views: 1,705
Yep, the fuel bowl gasket (the blue one) is correct for your carb list. Ya lucked out there.

And since I'm late gittin' back to this pardee, we now know that yore first evah Holley carb rebuild was a great success!

Trever and dave showed up here yesterday pm at about the same time, so we didn't get to bed until sumtime early this mornin' after a major bs'n session complete with neighborcarol buildin' us a feed last night! Trever jes' left for medford.
 
Good job drew! I dun got back tuh mexturd about 2 hrs ago. Class wuz in seshun and the bovine fecal matter was defnitlee gittin' piled high and deep at the binder u yestiday. Good times.
 
In this down economy, binder u. Will work out a schedule any time, any place!

Next extension service roadshow including ceu credit for participants will be at drew's place in aumsville on aug.8>9. Subject will be "how to use block sealer mixed with rtv to create compression in #8 hole". The afternoon session will be "make a head gasket using rtv sheetgoods".

Bring yore own shovel for bs cleanup afterwards...anna sack lunch.

If we have time, we'll also do a seminar on "making a pair of 152 motors out of a single 304 with a stihl".
 
If we have time, we'll also do a seminar on "making a pair of 152 motors out of a single 304 with a stihl".

You mean I need special instructions for that!?!? I wish you'd told me before I hacked my spare 304 in two.

I figured two motors would help me go even faster than one!:out:
 
you mean I need special instructions for that!?!? I wish you'd told me before I hacked my spare 304 in two.

I figured two motors would help me go even faster than one!:out:

Well grasshopper...if ya believe in the binder bulletin and the tooth fairy you can go virtual faster!!! With twice the mileage!
 
Interesting issue with my Holley mod. 2300 (list #7448-1) carb on the 304: I recently swapped my 2300 for the 2210c that was on the 304 (this happens about every two years...), and now the idle quality is poor and adjusting the right (passenger) side idle mixture needle does little for the idle quality. This has happened in the past, right after the swap.

So, in the course of cleaning the air bleeds near the boosters/venturis while the engine's running, I noticed that the idle quality improved when the snorkle tube is inserted in the right side primary idle air bleed orifice. I took a little blob of permatex #2 and placed it over the orifice, and now the engine idles well.

What's going on here? The last time this happened, I removed the metering block (twice) and blew carb cleaner and air through all the holes and passages. The rough idle problem went away. I'm not sure it was a blockage, but more likely a vacuum leak somewhere around the metering block.
 
Erik,

sounds like you installed it but have not removed it to trouble shoot right? So you have not re torqued the throttle body to main body screws. As you know the idle passages go through that parting line and fairly close the edge. Due to the fact that the carb was used and installed again that area is prone to leakage when re tightened on the manifold again. A shot of carb cleaner while running May show the leakage. I would also expect the condition to get better after sitting long enough for fuel to swell the gasket.

Because you have removed the main metering block 2 times to clean correctly you replaced the gasket and even if you have not replaced the gasket I would expect the lean issue to have at leased changed some what. 2/3 of the metering block is submerged in fuel so more likely than not a leak below the fuel level would give you a Rich condition. Still replacing the gasket will eliminate the possibility. The new blue Holley gaskets are great and reusable many times.

If you decide to remove the carb make sure the idle transition holes are all clean. They are at the lowest point on your carb, very small and easily plugged.

Lastly have you plugged the vac advance port to see if that changes anything? I threw that in because it is on the passenger side of the metering block

in writing this I assume you have truly cleaned the metering block well enough guaranty a blockage there is not the cause.

Robert

p.s. Ever solve your rotor run out deal??
 
Last edited:
To add to Robert's comments...

The numero uno issue I see with any Holley modular carb, whether new out of the box, a unit that is in service, or a carb sent in for overhaul is loose fasteners!

These (and most all) carburetors are manufactured from components made from cast aluminum, cast zinc, and steel fasteners. Three different "expansion" rates as their respective temperatures change when in operation. That's compounded by heat from the intake manifold, and the chilling effect of vaporizing gasoline.

When I remove new carbs from their packaging for modification/preparation, I go over all fasteners and really tighten down. Scruu the "torque specs"! The gaskets settle over time, and are definitely affected by liquid fuel exposure, though the "blue" gaskets used in Holley production stuff the last several years are affected to a lesser degree.

Same for reconditioning these mixers, all fasteners get cranked to just below the point of stripping. Ya just gotta "feel" that point and if ya miss the target...then that is what heli-coils are made for. Nearly every carb I send out has at least one heli-coil somewhere.

This e10 shit-for-gas compounds this issue as that crap will deteriorate sealing elements at an unknown rate. At this point we don't know what is happening completely, every day I see carbs with "different" issues" which I believe to be "root cause" by this alkeeshit. I'm documenting all that now and will do a write up as soon as I have enough definitive information gathered.

Regarding the e10 "pr"-bullshit, dont believe a word of it. We had/saw the same thing happen back in the 1973>1978 timeframe when the first release of "gasahol" came about. It took more than ten years for the aftermarket parts industry to phase in materials that were not affected by gasahol. The "market" and the government only care about vehicles produced in the last few years since they think everyone only drives a "new" transport device.

An example of this is the fact that the "black" Holley accel pump elements will deteriorate within a year when exposed to e10. The use of the "green" gflt accel pump is mandatory with this e10 shit now, which adds to the expense of an overhaul.

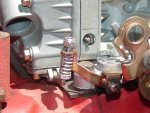
The fasteners that retain the throttle body to the main body must be cranked to just under the point of strippage. Otherwise they will loosen over time, resulting in internal vacuum and liquid leakage. I also now use red thread locker on those fasteners.

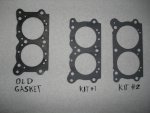
Ya can't tighten the four bowl screws that tight as you are compressing two gaskets plus the sealing washers under the screw heads. But if you pull the bowl and metering block off, I bet you will see a gasket that is distorted inna critical area as you described. Replace the gaskets after cleaning all sealing surfaces, and then tighten the bowl screw alternately inna cris-cross pattern real tight!

And for those that think that "electronic"-control fuel injection schnizz is immune to this same kinda e10-induced crap, then you are just fooling yoreself! There are all kindsa "composite" materials in the throttle body assemblies, same for the fuel storage and delivery systems.
 
Back
Top