Holley 23XX Series Modular Carb Stuff

Alright. Here is some history on the dizzy and wiring issues from a previous posts on the bb. Looks like I miss-spoke about the type of dizzy I am running:

"after many hours of tracing wires, testing voltage, etc, with no luck, I finally decided to just go with a pertronix ignitor and use an old Holley points style distributor that I had from the old engine I rebuilt. I disconnected all wires to the gold box, pulled the dizzy out, lined the #8 on compression, stabbed the new dizzy with pertronix in it back in (lined up perfectly). I then ran one 12v source wire from the bulkhead connector/switch terminal directly to the + post on the coil (which I upgraded along with the pertronix to the flame thrower). Connected my red wire from the ignitor to the + post on the coil, the black wire to the - post on the coil. Made sure my #8 plug and wire were back in properly as I had to use the thumb trick to find the compression stroke, and turned the key to run position and tested 12.9 v at the coil +."

engine cranks but doesn't fire until key is let off? - binder bulletin forums For the full story.

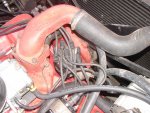
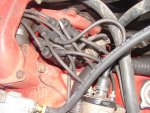
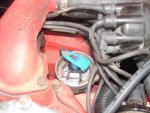
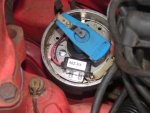
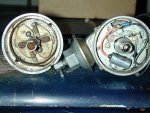
I have also attached a few pics of the dizzy with the #8 wire marked with chalk and an inside shot of the petronix. I remember doing my research to make sure I had the right petronix for my application, but that doesn't mean I got it right.

Looking forward to your thoughts. Thanks guys,

-dan
 

Attachments

  • DSC04694.JPG
    DSC04694.JPG
    177.9 KB · Views: 1,014
  • DSC04695.JPG
    DSC04695.JPG
    166.2 KB · Views: 978
  • DSC04696.JPG
    DSC04696.JPG
    156.1 KB · Views: 961
  • DSC04697.JPG
    DSC04697.JPG
    147.3 KB · Views: 1,036
Ok...

Key word in your post from the bb is "Holley points-style distributor" that you "converted".

That model uses a pertronix p/n 1481 conversion unit. Verify that is the part you purchased/used! I have two of those here, the actual number on the label on top of the pickup reads "03z-v4". That is the "base" number for the trigger unit that is attached to the 1481 base plate, there are hundreds of variations of the pertronix trigger/base plate combos used throughout their catalog offerings.

If you actually used a pertronix for a Holley electronic (gold box) distributor, then you used the wrong item! The number on the label in your pic shows a different p/n than what I have in my stash for comparison which leads me to that conclusion at this point.

There is a difference in where the aluminum plate is attached to the actual trigger module in each application,... The gold box pertronix (p/n ho-181) will not work inna Holley point distributor and visa-versa!!! That in turn screws the "phasing" of the reluctor-to-trigger all up, so that the timing can never be set correctly! The "dwell" factor created by the location of the module on the mounting plate is completely out of phase with the rotor tip-to-distributor cap terminal location.

This is the same thing that happens constantly with these folks trying to do the duraspark/GM module/Holley gb distributor deal! Similar issues arise when doing the crane xr3000 optical trigger conversion which is a universal-fit for most any distributor ever made, but is very tedious to install correctly!

The way you described the wiring...would be for a vehicle originally equipped with a points distributor. Pertronix has a different wiring pattern only for a rig with a gold box system oem and using the pertronix ho-181. The first one of these gb conversions I did (they have only been available less than 2 years) was not successful as I followed the wiring system in the enclosed packaging from pertronix which was wrong!!! After some screwing around I figgerd out the correct wiring and it worked perfectly. Their idea was make the module "plug and play" which ended up not working out!

Also...you must have two wires feeding the coil positive terminal, one is hot only in the "start" switch position, the other is hot only when the switch is in the "run" position. In the case of the pertronix unit, the "run wire" can be either "ballasted" or not, the module doesn't care. Not so if you run breaker points though!

So far today...I've found at least five different Holley gb distributors (by ihc part number) used in IH vehicle apps, since they are kinda defined by "emissions" levels throughout just the Scout II parts list, I have to say the difference in all is the advance curve!

So let's throw away the term "prestolite" here so we can eliminate that confusion!

So....verify and report which pertronix p/n you put into the Holley point-type distributor, then we'll go from that place. I "think" you have the distributor stabbed correctly, but the pertronix unit you used is wrong, therefore the "phasing" is completely outta whack (which in turn makes the base timing really scruuee)!
 
Michael,

I have two wires coming off the + terminal on the coil and one off the -. One + and the - run to the pertronix ignitor. The other + runs back to the bulkhead and ignition terminal.

I am pretty sure I purchased the p/n 1481 model pertronix. I went out to look but only could find the numbers on the top:
48z-v4. Not sure how else t verify at this point.

-dan
 
A p-tron 1481 kit would have the trigger module I mentioned above for a point distributor conversion. And the reluctor (magnet wheel) would be a press fit over a breaker point cam.

The ho-181 p-tron conversion for a gold box distributor would have the trigger mounted on the plate about 10* offset from the position on the 1481 trigger plate. And the p-tron replacement reluctor would be shaped to press down onto the "8 leg" oem gold box reluctor.

And the installation instructions which came with each are different, the ho-181 reflects the workaround for the gold box plug-in wiring mod.

Pic show a Holley gold box distributor (advance plate and trigger removed) with the reluctor or "trigger wheel" on the left. The right hand Holley distributor shows an oem Holley points distributor with a breaker point "cam".
 

Attachments

  • Holly GB_Points.jpg
    Holly GB_Points.jpg
    98.5 KB · Views: 2,244
Okay, I have a call into pertronix to try to verify my unit p/n.

Based on your description below, I am fairly positive I have the 1481 ignitor model installed on a Holley (original) points model distributor. So if that is true, then my application is correct and I shouldn't have issues with this ignition set up...which leads back to the carb, correct?

I'll update as soon as I hear back from pertronix to ensure I am 100% correct on my application.

-dan
 
Before leaving the distributor set igintion timing to somewhere around 5* at @ 700 rpm with the vacuum line disconneted and plugged off. Verify that both the mechanical and vacuum advance are working properly before heading on to the carb. Michael will have more info on tuning from here.
 
Dan...the overriding deal here is...the base timing of your distributor/ignition systems must be worked out first. If the p-tron install is correct, ya still have the funky timing factor (20*btdc) to work out. We're still trying to work out that anomaly!

If in fact, you are seeing 20* btdc at idle, and then you retard the distributor setpoint and the engine stumbles/dies, that tells us that the ignition system is definitely set up wrong! Incorrect p-tron application was something that just comes up in the diagnostic due to the confusion over "which" distributor and ignition conversion is actually being used right now!

Back to my motto:

"ignition affects carburetion...carburetion does not affect ignition"

in the mean time...simply re-stab the distributor! In fact, it appears ya need to move it one tooth only on the drive gear, you can do that easily by simply lift/twist the distributor up just until the gear disengages, then twist the rotor one tooth and drop back into position.
 
Agreed. I haven't given up on the ignition set up yet as a source of trouble. Although, I am reaching my knowledge limit on some of these tasks.

For example, I am not exactly sure how to check if the mechanical and vacuum advance are working properly...do I just turn the air mixture screws in all the way and if it dies I know the vacuum advance is working?

Let me check those first if you'd be kind enough to send some tips and then try to restab it (would that be one tooth clockwise or counterclockwise? I am assuming clockwise...).

Also, I tried to pull a vacuum reading off of the carb vacuum advance port and was reading < 5" hg...not sure if that is the correct location to pull a vacuum reading though.

I appreciate both of your help and your patience as you "school" a rookie.

-dan
 
Okay, pertronix called back and verified that I do have the 1481 ignitor. I told him my deal and he asked if the ignitor plate had a ground strap to the the dizzy housing. Mine does not. He said that could cause the ignitor to not function properly. He suggested that I do a voltage test by connecting a jumper wire from the coil - to a good ground source and then test the voltage at the positive terminal with the switch in the on position (appr. 11.5v) and then again while cranking (appr. 9.5-10v) depending on the started draw.

He also suggested testing the vacuum advance and the mechanical advance for proper function.

I haven't gotten out there to do anything yet but thought I'd post up what the tech at pertronix advised.

-dan
 
Real quick...I gotta go, two different sawbones are callin' me for the rest of the day!

The pertronix "tech" is the same tired old stuff. All distributor breaker plates needa ground, there are three small plastic bearings the top plate rides on (to which the vacuum advance arm is connected). Humor the dude and just set up a new ground strap. At least you have confirmed the correct p-tron is installed.

The "timed" or "ported" vacuum source on your 2300 carb will provide only 3"hg>5"hg at idle, as the throttle plates are opened, that vacuum signal will increase and then drop when the throttle is closed.

The only full manifold vacuum port on that carb is the one on the rear of the throttle body. That is the point you must connect a vacuum gauge in order to "read" manifold vacuum for tuning purposes.

Best way to test a vac advance can is to use a mity-vac hand-operated vacuum pump. The vac advance on your distributor provides 7* of movement when vacuum is applied (or some provide only 5*, the "factor" is stamped on the bottom of the arm), it takes at least 7"hg to begin to move the advance arm, +/- 1"hg of vacuum signal.

It's possible that the mechanical advance unit in that distributor is either sticking or frozen. Twist it by hand (turn the rotor) and make sure it moves through an arc of about 25* and moves freely returning to the retard position.

Man I wish I had that distributor on my desk right now, I could quickly tell ya what's going on! That is the down side of doing stuff like this electronically!

Gotta go...I'm late!
 
I haven't given up yet and I hope you all haven't written me off either as hopeless. I finally got out and ran though everything again based on all the threads. Here's the update:

  • Holley 7448 350 cmf w/ #58 jets and #65 primary
  • timing set to 5* btdc
  • idle at 500 rpms
  • Holley original points distributer with pertronix p/n 1481 ignitor
  • mechanic advance is Working (timing Mark advances as rmps rise)
  • vacuum advance not Working (put vacuum gauge on vacuum advance on dizzy and increased rpms: no change in vacuum).
  • orange accel cam set on the #2 hole
  • good steady stream of gas out the shooters when accelerator opened up
  • check ball under the shooter housing appears to be free and working

The unit still stumbles and hesitates upon tip in. Runs fine once past tip in. I am wondering if the accelerator pump cam needs to be adjusted to shorten the stroke? Could it be too lean on tip in and not getting enough gas to break past inertia? I am also wondering about the influence the vacuum advance has on this tip in issue...not sure if I can buy a vacuum advance or if I need a new dizzy.

As always, thoughts appreciated.
 
Hail no!!! We don't give up 'til it's either fixxed or permanent broke!

If the timing is now base at 5*btdc, then ya musta re-stabbed the distributor and got it right! Everything is now normal except for one thing.

Ya don't put the "test" vacuum gauge on the vacuum advance can nipple...if ya do, ya just removed the vacuum source from the advance unit! If you connect your vacuum gauge to the fitting on the passenger side of the metering block on that carb, you should see (at your noted altitude), between 1"hg and 3"hg at idle! That is the only "ported" vacuum source on that aftermarket carb! Once you are satisfied the ignition is dialed-in, then attach the vacuum gauge to the port on the bottom rear of the carb, that position will give only true manifold vacuum...and we need to know what that reading is at warmed up idle. That reading will be accurate only after you are satisfied that the idle mixture screws are properly adjusted and the idle speed is locked in. I'd really like to see an idle speed of 625rpm in neutral on that motor.

If the mixture screws are not set correctly, and idle speed is not set correctly, then tip-in cannot be achieved! Remember, this is a step-by-step deal, where every "adjustment" affects some other characteristic also! Tip-in/pump shot is finalized only after everything else is locked down!

To test the vac advance can for operation if you do not have a handheld vacuum pump (mity vac), then connect the advance vacuum tube to the can nipple. Start the engine and verify the timing Mark position using your timing light. While watching the Mark, suck on the open end of the hose...you can easily pull up to about 7"hg with just your lungs unless ya have emphysema (or smoke!!). While suckin' and releasin' and suckin' and releasin' you will see the timing Mark advance and retard, advance and retard, indicating it's working correctly. If the Mark does not move, then vac advance can is toast or the plate in the distributor it's attached too is frozen.

It's possible to have a vac advance unit that still operates, but has an internal leak...that will create a "phantom" vacuum leak that is somewhat hard to diagnose. All the more reason to make a mity vac part of your tool arsenal, those little gadgets are wonderful items to have for all kinds of diagnostic and service procedures!

New vac advance cans for the Holley distributors are not available from any source, we've been fighting that battle for several years now. Jeff does have some good used ones that I just recently tested and returned to him (including one for the very difficult to find parts for..."straight point Holley"). We have several more that are ng right now, but are boxed to go out to a service we use that re-manufactures those items, those will be available in the online store in the next 30 days we hope.

Adjusting the pump cam (or replacing) is gonna be the last step, we still have a few more tricks to go through though. At your altitude, it's "possible" that a different pump cam May be needed to optimize the setup, but do not go there until we go through the whole deal if ya wanna make it right!

Your are doing real well at stickin' with this...and I promise...I can outlast ya so don't give up! Bein' old does have advantages!

I'm in the office/shop until 9pm tonite, I'll continue to monitor this deal if ya have time to report back about the advance can.
 
Michael,

I'll get out there this afternoon and run a few of the vacuum tests.

If I drop out of teh thread suddenly for a little while, it is only because I'm probably in delivery with my wife. Our first baby is due any day now!

-dan
 
We got suck (I May try to get a vacuum pump this weekend).

I reset the curb idle to approximately 625 rpms in neutral as suggested. I disconnected the vaccum advance tube from the carb but left it attached to the can on the dizzy. With the timing light set (timing read 8* btdc with the Scout in neutral) and the tube handy, I sucked on it and watched the timing advance from about 8* btdc to 12*~15* btdc, so I now know the vacuum advance is working.

Alright. Next steps?

-dan
 
Ain't it great to suk sumtimes?? Great work grasshopper! Obviously ya don't smoke at your altitude!

The "spec" for the total amount of advance the vacuum can on your distributor can provide is 5*. If you remove the advance unit and flip it over, you will see a numeral "5" stamped on the actuator arm. Now you have really lernt stuff!!! "some" versions of that distributor (selected ihc oem distributor/engine/vehicles) use a vacuum advance with a 7* set point...another detail as to why the statement "all IH sv distributors are the same" is bogus!

The jetting sounds about right, and the #65 power valve is the most versatile for IH apps, that has nothing to do with what we're working through right now anyway, but it's good info to know!

An orange pump cam is correct for that carb outta the box and works perfectly at 0ft.>3000ft. I've not personally tried to tune one at 5,000ft. So I have no data in my notes. So what we end up with here will be real valuable for helping other folks!

Next...verify that the pump arm override screw is adjusted properly. To do this, hold the throttle lever to wot (yes it will squirt fuel down the gullet resulting in partial flooding at startup!), then with your other hand, depress the accel pump actuator lever down as hard as you can. With the lever held down, the clearance between thew override screw and the lever where it touches should be 0.015" using a feeler gauge. You can also "eyeball" that clearance, the whole idea is to make sure that the lever adjustment does not create a hard contact which ends up bending the lever and wearing the nylon cam very quickly. It also takes all slack outta the accel pump actuation system so that even one degree of throttle lever movement, results in a pump shot being initiated through the shooter nozzles.

I want ya to simply move the cam retaining screw to the #2 hole. That will give increased "lift" earlier in rotation, and provide a slightly heavier pump shot at tip-in. This will make it either...noticeably better...or noticeably worse! That is in relation to the fact that you know how it "feels" right now with the screw in #1.

Because IH sv engines have a very "high" rotating internal "mass" (comparatively speaking), and the vehicles themselves are superpigs (whether Scout II or fullsize stuff), they take a very healthy "pump shot" to cleanly/smoothly launch the rig at tip-in. Just winging the throttle at idle May appear that the tip-in is ok, but when ya actually do a "launch" (either gently or wot), the "hole" appears. That "hole" is what we are trying to eliminate.

And make certain when doing all this tuning...that the engine is fully up to temp. Don't just go do a quick test drive around the block and then condemn the problem...try it several times on both an uphill and downhill launch and be able to see a "pattern" which is repeatable.

Then we're gonna doubletask here...if it's a little better, then I want ya to advance the distributor timing to 8*btdc and go repeat the test. I bet you will see improved performance at your altitude! In fact, you can keep bumping the timing a degree atta time until the engine begins to detonate (ping/knock) under load, then back it off one degree...that's what we call "power timing" and has nothing to do with emissions or oem "specs" which are always the starting point.

If ya like it at that point, yore done. But...when ya go down tha hill to tha lowground (say 2000ft.), ya will have to back off the timing to 5* or ittle ping like a bitch under load!
 
Quick update (non-IH related): it's a girl! 6.5 pounds, 19.5 inches and huge appitite!

It might be a few days before I can get back out to the Scout... :)

-dan
 
Thanks guys.

I have some time today so I'm going to play with the Scout and run a few of the adjustments. I'll get back again once complete.

-dan
 
Back
Top