Holley 19XX Series Carb Stuff

Michael,
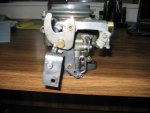
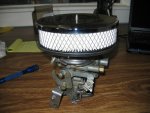
it's the the gold colored carb that's on the car. I will try as you suggest, but in the mean-time here's a more complete description of the symptom.

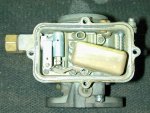
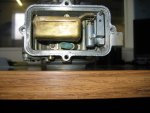
I had noticed fuel dripping from under the car a few days ago when I had it running in the driveway. There was a puddle of fuel on the frame directly below the carb and the bottom of the fuel bowl seam was wet to the touch. I snugged up the four screws, the bottom one and the one on the right turned perhaps an eigth to a quarter turn. The other 2 were already snug. The leak seemed to have stopped. I took the car out for a short spin last night and there was no drip on return.

Today I went out for a bit longer drive. After about 10 or so minutes, the car stumbled and misfired as I pulled away from a stop light. This happened again several times each time I stopped or slowed to corner, getting progressively worse and accompanied by a strong smell of fuel. It kept running as long as I kept the revs up but would stumble badly every time I slowed down. The engine stumbled and died as I pulled into the driveway, again a strong fuel smell. I was unable to start it again in the drive. Checked the plugs and all 4 were black & sooty. Again, fuel dripping from under the car, a puddle on the frame below the carb, a drop visible on the carb body at the fuel bowl joint below the bottom screw, the joint wet to the touch along the bottom. All four screws are still snug.

Does this description give any further clues as to what's going on?
 
Yes!

I'm 90% certain you have some "trash" in your fuel supply system. What has happened is that a tiny bit of gunk has gotten through the fuel inlet fitting and is now sitting inside the float needle/seat combo.

So...I'd make certain the entire fuel containment system is trash-free. Then install a clear fuel filter both in front of the fuel pump inlet...and another one just in front of the fuel inlet on the carb itself.

It only takes microscopic levels of foreign material to create an issue inside the fuel float block. We have this same issue continuously on the IH vehicles which are terrible in their ability to create these same issues. Once your fuel level inside the fuel bowl becomes unmanageable (too high), then engine performance drops to nothing but a flooding condition with wet plugs, no idle, etc.

After cleaning up the supply side, then you should carefully remove the fuel bowl and pull the small pin out of the float so it can be removed. The float needle will drop down but cannot come out of it's seat. Simply use a few shots of compressed air through the fuel seat and debris will disappear.

Then reinstall the float and it's retaining needle. No need to "set" or adjust anything since you moved nothing. Re-install the bowl screws fairly snug but don't strip. This will solve your problem!

Once you have it running again properly, can ya take some nice shots of the engine bay so I can see the whole setup? That will give me some standards for use when doing these carbs for the judson app!

This pics shows how it will look when the fuel bowl is removed. The float will be simply hanging down doing nothing. When it's reassembled and turned upside down, that position is used to actually gauge/set the fuel level.
 

Attachments

  • 1904 float.jpg
    1904 float.jpg
    84.6 KB · Views: 1,500
Ok. Thanks much for the quick reply michael. I'll give this a go in the morning and let you know how it works out. I'll be glad to send you some pics of the engine bay once it's all back together again.
 
Michael,

I had the carb out yesterday to clean as per your directions. It looks like this May have been a self inflicted problem. Although I dont recall doing it, I must've put a small dab of thread sealant on the fuel inlet fitting banjo bolt when I installed it (dumb!). I'm thinking some of that May have gotten into the needle valve causing it to not close completely.

Anyway, I cleaned off the bolt & the outter part of the fuel inlet, then removed the float and blew some compressed air both ways through the fuel inlet. I reassembled the carb and put the it back on the car, then fitted an inline fuel filter just ahead of the carb. I turned the ignition key on to get the fuel pump going (the car has a separate starter switch) and within a few seconds the carb overflowed and fuel began leaking out. Damn!

Since I had the second carb sitting there, I decided to give it a try so I swapped it for "leaky". Ignition on, fuel pump clicking as the float chamber fills and then...clicking stops and no overflow, no leaks! Start the car, adjust the idle speed and things are still looking good. Unfortunately it was raining like crazy so I couldn't take the car out for a spin (being a roadster and all). Hopefully the immediate problem is solved though.

Now, I'd like to get "leaky" working properly again since it's always good to have a working spare. Will I get into trouble if I disassemble the fuel inlet so that I can remove the needle valve from it's sleeve and hopefully clean it out a bit better?
 
Michael,

with the judson installed, I get some pinging on acceleration under load in high gear. I'm working with the fellow who rebuilt & set up my distributor for use with the supercharger. I have the initial timing dialed back and am still getting some pinging. He's asked me to check the air/fuel mixture. So, I have to track down someone with the necessary o2 sensor & wideband a/f meter, etc.

After I find someone with the necessary erquipment, if the a/f mixture is incorrect, how do I go about adjusting it on this carb? I know there's a mixture adjusting screw, but I believe that's only for adjusting the mixture at idle, correct? Sorry if that's a dumb question, but remember, I'm accustomed to dealing with su carbs which are a whole different beast.
 
I see no need to use any sort of gas analyzer on this setup. Anything can be done very simply by simple test runs. While I have an analyzer, I never use it to test these carbs.

Simply "power time" the engine using the guide posted here:

http://www.forums.IHPartsAmerica.com/ignition-tech/2122-ignition-power-timing.html

That process May certainly be used on any engine that uses a conventional distributor-type ignition system.

I believe that both of those carbs are jetted #59, I did not change the jetting at all as I had idea what engine they would be used with. That is a fairly lean jetting and would normally only be used at higher elevations on a non-supercharged engine.

Jetting that is too lean will most definitely enhance detonation (ping or knock). So both jetting and spark timing must be set hand-in-hand.

All the lucas distributors I ever had on my mga, mgb, land rover, and sprite, etc. Engines had the small vernier adjustment of the base timing so diddling with that device will always give a fairly accurate amount of idle advance and retard capability. Simply dial the distributor "back" (retard) and make the final calculation.

Then install a jet that is a bit larger (these are the commonly available Holley jets available at any parts house) than what is currently mounted. Then make a test run for performance and sparkplug color determination. Then advance the distributor vernier on e "notch". Keep doing this until you hit the best performance overall with no detonation and that give you the correct setup for your operational altitude.

Regarding the carb with the partially-blocked fuel inlet system, to disassemble those components is no big deal at all, only thing needed is a larger flat-tip screwdriver. You will find something in the system though that is creating a blockage.
 
Thanks for that information michael. It all makes a lot of sense. A lean mixture could very well be at least part of the cause of the detonation I am experiencing.

I checked the carbs and both have #62 jets in them. I'm suspicious now that they might still be too lean for this application though. I will find out which jet dominic is using then perhaps try going just a bit richer since he lives at a higher altitude than I do.

By the way, I have some photos of the engine bay with the judson installed. I'd be happy to email them to you if you still want to see them.
 
Hi everyone,
I'm a bit of a dunce when it comes to mechanics beyond "this goes here, that turns that, ect..." so please bear with me. I'll try to make the questions very generic until I can take a few pictures of my 1970 800a to make things a bit more evident.
Anyway, I was wondering if it is feasable to switch out my 1 barrel carburetor (I think it's a 1940 based on the picture) for a 2 barrel. My engine is the straight 6 cylinder (I can never remember more than that), and as far as I know, it's the original engine.
 
thanks for that information michael. It all makes a lot of sense. A lean mixture could very well be at least part of the cause of the detonation I am experiencing.

I checked the carbs and both have #62 jets in them. I'm suspicious now that they might still be too lean for this application though. I will find out which jet dominic is using then perhaps try going just a bit richer since he lives at a higher altitude than I do.

By the way, I have some photos of the engine bay with the judson installed. I'd be happy to email them to you if you still want to see them.

Just this morning, I have finally completed getting my entire computer network back up and operating after an extended vacation!

You are entirely correct, the #62 jets May in fact be too "small" for the judson setup. I really have no idea what they should be (range of service) until I get feedback from folks such as yourself for each type of engine application!

The photos of your system would be outstanding! I need to see each version of these judson systems so that I'm more aware of how the variations work out!
 
hi everyone,
I'm a bit of a dunce when it comes to mechanics beyond "this goes here, that turns that, ect..." so please bear with me. I'll try to make the questions very generic until I can take a few pictures of my 1970 800a to make things a bit more evident.
Anyway, I was wondering if it is feasable to switch out my 1 barrel carburetor (I think it's a 1940 based on the picture) for a 2 barrel. My engine is the straight 6 cylinder (I can never remember more than that), and as far as I know, it's the original engine.

Any information regarding performance parts for the amc 232/258 engines should be directed to some website that deals in that sort of stuff. However, for a stock engine I see no need at all to consider changing out the oem carburetor.

What the carb does need no doubt is a complete overhaul! The carburetors as very stable in operation if they are properly set up and tuned.
 
If I understand the post correctly...the term "pot" May refer to "dashpot. As on various carbs such as the su h4, h6 & a special h8.
The "ring" that you refer to May be the fill port for the oil for the dashpot. If I am correct, you would un-screw the "ring" counter clockwise and oil oil, 30w up 50w. I have heard of people using stp for the oil.

If it is a dashpot, inside the pot is a piston. And connected to the piston is a jet needle that moves in or out of the carburetor jet. The jet is inserted into the carb body through a movable assembly. You can increase your fuel intake by replacing the stock jet/needle assembly with a larger diameter jet/needle assembly.

Haddon judson
judson res. & mfg. Co. - conshohocken, pa 19428
judsonsuperchargers@gulphmills.com
 
if I understand the post correctly...the term "pot" May refer to "dashpot. As on various carbs such as the su h4, h6 & a special h8.
The "ring" that you refer to May be the fill port for the oil for the dashpot. If I am correct, you would un-screw the "ring" counter clockwise and oil oil, 30w up 50w. I have heard of people using stp for the oil.

If it is a dashpot, inside the pot is a piston. And connected to the piston is a jet needle that moves in or out of the carburetor jet. The jet is inserted into the carb body through a movable assembly. You can increase your fuel intake by replacing the stock jet/needle assembly with a larger diameter jet/needle assembly.

Haddon judson
judson res. & mfg. Co. - conshohocken, pa 19428
judsonsuperchargers@gulphmills.com

While we certainly appreciate a judson rep chiming in here, I don't know what it's in reference to???

We're not dealing with constant velocity (constant vacuum) carbs here, only the Holley 19xx series. I have considerable experience with most all cv carbs used with the euro-cars of the 50's>80's. But those mixers aren't suitable in mount for the IH engine apps.
 
got the parts yesterday and tried an install this morning.
Its obvious I will have to seriously tweak the connecting arm.
My measurements indicate that the arm should be about .95". This is estimating the adjustment of the throttle stop screw and measuring the distance between the hole on the throttle arm and the hole on the cam when it just contacts the plunger.
The arm that I have, in its current configuration, is 1.372". When I put it all together, I have to compress the plunger to get the cam on the cam stud, and of course wot won't be happening.
So... I'm contemplating my next step, but right now I'm all tied up with my snow farmer job.
I'll post up some pics when I get a chance.

I am finally back on this project. Drove the Scout quite a bit this summer, and it runs pretty well, although I can notice a hesitation when I throttle it. I had sent in my main well to michael for a poppet rebuild.
Attached are a couple photos showing the new arm I bent up from 1/8" rod and the initial setting for the float - slightly up from level. The new arm is about .94" inside dimension and causes the plunger to start moving with any throttle movement. The throttle will open all the way to the stop.
I installed a #57 jet, and left the tiny spring bumper on the seat assembly. The mm "rough trail" mods will be utilized.
I plan to switch out the carbs within a few days. The new setup will delete the oil bath filter with a paper filter.
 

Attachments

  • 1904 arms.jpg
    1904 arms.jpg
    57.2 KB · Views: 510
  • 1904 linkage.jpg
    1904 linkage.jpg
    77.5 KB · Views: 636
  • 1904 float.jpg
    1904 float.jpg
    90.3 KB · Views: 839
  • 1904 w filter.jpg
    1904 w filter.jpg
    94.2 KB · Views: 644
So whatcha got there greg is a 1904 that had been previously butchered at some point using wrong parts from a different version 1904.

Nice work on the accel pump connecting link! We want that accel pump to move at exactly the same point the throttle shaft begins to move, and that also allows a wot response to the throttle shaft without binding on the accel pump. This sometimes takes quite a bit of work to accomplish on these bastardized carbs but can be done!
 
I have a 1904 carb in my 65 Scout 80 and it is leaking out of a breather that is right next to the economizer cap. It spills out whenever I drive somwhat fast or on somthing a little bit bumpy. Is there supposed to be a fitting or tube on there to stop the spilling or is this not an original breather that needs to be fixed?
 
I have a 1904 carb in my 65 Scout 80 and it is leaking out of a breather that is right next to the economizer cap. It spills out whenever I drive somwhat fast or on somthing a little bit bumpy. Is there supposed to be a fitting or tube on there to stop the spilling or is this not an original breather that needs to be fixed?

Sounds like your float is not adjusted properly or your float is not regulating the fuel level.
 
no I dont think that is the case it doesnt flood and it runs good it just spills fuel out of the breather, its weird

Has this carburetor been properly rebuilt in the last two years using new internal parts as needed? If not, then a rebuild is what it needs.

The venting system you described is perfectly normal, all this type information can be seen in many pictures right here in this sub-forum.

The brass float itself must weigh between 11 and 13 grams or the float system won't work properly. The float needle and it's seat must be a matched set also, there are at least three variations used in these carbs. It must also be in perfect alignment, otherwise it will tend to ride on the bowl or some other part and hang.

Do not set the float "level", it must be "lowered" below what the specifications in most rebuild kits call out.
 
Back
Top