Fixing Drunk Simulator

Heyo, figured I might as well solve this as a seperate issue to my main build thread, I have a 1965 1100 PU 4x4 with newer 1200 or 1210 axles. Front axle is in question here, as the title goes: level of simulated drunkenness ( :crazy: ) is directly related to speed ( :icon_eek: ) times bumpyness of a given road ( :eek6: ) written this way:
:crazy: = :icon_eek: × :eek6:
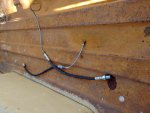
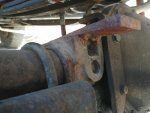
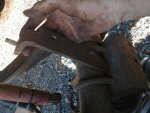
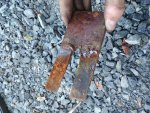
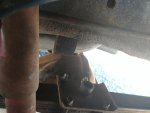
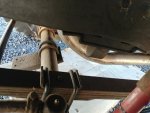
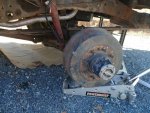
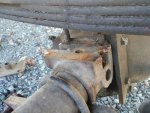
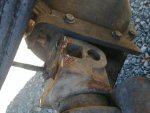
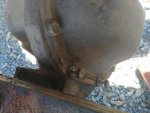
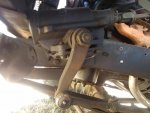
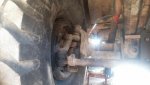
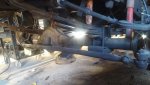
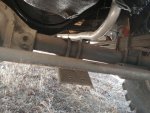
Basically country roads take me home has a grave meaning over 35mph, highways are perfectly fine up to 65-70. Obviously I want simulated drunkenness to equal 0 regardless of speed or pavement evenness. I did not install this axle, nor do I know for sure what model vehicle it came out of. I think its a FA-25. (Dana 44, large open knuck, drums, 8 lug, 6 bolt warn locking hubs, low pinion) I've never done much with altering alignment of axles (because I don't know how) but I have a 10 pound service manual (62-71 Pickall) and am feeling adventurous after eating some chocolate cake. What I know it needs: tie rod ends and basically every joint between the power box(same origin as axles) and the controll arm, new front shocks, rear shocks at all would probably help, also the horizontal shock common to alot of power steer axles is absent. I just stripped an axle at IHPA for a tie rod guard(my axle had the mounts for one) it had the shock so I have that with mounts but the shock itself I doubt is useable other than for dimentions collapsed/expanded unless the open knuck steers farther/lesser than the closed knuck I got it from. Also forgive my likely bad terminology, caster? camber? one o' those, where the steering axis of the knuckle is leaned back toward the cab may or may not be leaned the wrong way. I noticed a pair of shims welded (very poorly welded btw) in place in front thus canting it foreward? Anyways see pics, let me know how to measure what needs be measured, and let me know any thoughts on it. Also I will post any pics needed to diagnose the problem, havent had it apart as of yet specifically for this. Thanks in advance.
 

Attachments

  • 20180618_095756.jpg
    20180618_095756.jpg
    57.3 KB · Views: 339
  • 20170817_134552.jpg
    20170817_134552.jpg
    34.8 KB · Views: 344
  • 20170323_143407.jpg
    20170323_143407.jpg
    47.3 KB · Views: 340
  • 20161202_094539.jpg
    20161202_094539.jpg
    55.1 KB · Views: 326
  • 20170323_143407(1).jpg
    20170323_143407(1).jpg
    47.3 KB · Views: 345
  • 20180818_102924.jpg
    20180818_102924.jpg
    80.9 KB · Views: 332
Those shims are set to remove castor. Remove the shims and replace worn parts and then take it to a good shop for an alignment.
 
I can try that, I would like to measure caster before I run it in 4wd. I heard but correct me of Im wrong, altering the pinion angle too far from the t-case out put can cause drive line problems. The shims are welded in, but it looks like whoever did it forgot their sheilding gas its so bad :lol: Nothing a hammer/chissel cant fix. Thanks
 
I second the wedge removal. Also want to say that the way your spring pack is assembled is bad bad bad. The leaf order needs to be returned to its original order. Basically you only have a 2 leaf spring pack that is controlling your axle wrap. You axle can wrap around either direction will little resistance.

A side steer setup like you see on the C series like yours, where the steering gear pushes forward and back, is remarkably predisposed to bump steer if the geometry is set up wrong. Minimize the angularity of your drag link, and maximize the wrap stiffness of your spring pack.
 
Hermmm..... Ya know I see what youre refering to about the springs..... And I'm wondering why that hasnt struck me as odd before. Are these springs consistent with my original HD c series springs? I was thinking about replacing the springs all the way around in the next couple years, theres helpers in back, maybe my mind thought thats what these were. I was told "the telephone company used it to rip poles out of the ground" no idea if thats true but it has options on the LST that imply it was going to be heavily used. Im not sure what axle wrap is but it doesnt sound good. In regards to the drag link, how can I increase room for my driver side tire? I cant steer fully right because the tire contacts the front joint of the drag link.... I think you can see what I'm refering to in this picture from the shiny spot at front joint.
 

Attachments

  • 20161202_094539.jpg
    20161202_094539.jpg
    55.1 KB · Views: 415
Ive been looking through my manual, mainly for the U-bolt torque specs and how measurement of steering geometry is done, but cant seem to find them? Perhaps someone can point me to the section I need in Vol1/2 of the 62-71 service manual? I have found the section for and 95% confirmed my axle is the FA-25, but I can't seem to find the info I was looking for. Ive also looked under steering gear (the newer unit in my truck) and frame, but alignment covered under frame is only to ensure the axle is square to the frame so you won't go down the road sideways.
 
The right front brake line....Is that a section of hard line coming from the wheel and then connecting to rubber flex line? Tell me I'm wrong...please.
The caster shims want to angle the kingpin back towards the cab. The angle that messes with the front driveline has to be pretty severe to cause issues. I would definitely do what Robert suggests, and dial in those front springs, then flip the shims right way around and see how she drives. Improper toe-in will also cause squirrly handling, so give a good look at that with a tape measure before you go out on the road.
 
That brake line is an issue I'm ignoring in the hopes it will go away.... I paid a "profesional" to put new steel through the whole truck after my main line poped, and I figured a mechanic could do it faster than me.... You can read the whole story on my build thread...(it took him close to a year to complete) :mad2: :mad2: :mad2: Anyways, trucks getting a new radiator soon, Ill park it on my rv pad and put it on jackstands to do a bunch of stuff at once. I'll let you know how it goes, thanks for y'alls input. :icon_mrgreen: *edit: beware of "profesionals" he replaced 3 of my wheel cylinders and left one old one in to "save you some money". . . . . . on a $1400 bill :mad5:
 
Last edited:
Oh hell no! I'll bet that thing flexes and twists, jukes and jives, pops and locks and shimmies and shakes right down the road.
 
Ok, my fix in progress got delayed, the shop agreed to fix that stupid brake plumbing setup atleast. My current deal is fixing my leaky cooling system, so I will be doing alterations to the springs/axle setup once I get it back in a few days. My list so far: unmount axle, remove wedges, reassemble spring packs, fix another quasi suicidal po mistake in that U-bolt, remount axle, install horizontal shock, inspect steering linkages/prospect possible improvements. Now I've never removed an axle, will the axle self align when I bolt it back up? Or will I need to measure some things reattaching it?
 
The springs always have a locating pin that runs thru the pack. That's what the axle will locate to. However, your spring-over conversion looks a little sketchy, so it wouldn't be a terrible idea to take some pics and measurements to be sure. You know, just in case? I mean if the brake lines are any indication...
Also, looking at that front spring arrangement, is it possible they swapped in rear springs when they did this...? That doesn't look like a front spring pack. I could be wrong.
Keep us updated. We all are pushing you to get something enjoyable (and safe) back on the road.
 
The brake lines were done by me(by shop I paid) and they agreed to fix them for free so thats why Im on hold. I'm not sure about the front springs, the bottom 3 leafs are definatlty upside down, front hangers apear to be original rivited type. Rear shackle hangers are bolted, on the LST it has HD front springs, no idea if thats what these are. Rear springs are massive with helpers, not sure if they are from the 1200 or original. I will conduct some measurements before and try to make sure they are matched.
Keep us updated. We all are pushing you to get something enjoyable (and safe) back on the road.
I will and I apreciate it! :D
 
I was off base with that spring over conversion comment. This is a full size truck, not a Scout.
Those could be the original springs. Just need some TLC.
 
Yea true that on the TLC. You know somethings wrong when the spring at rest is still bent the wrong way :icon_xp: I should've crawled under the 66 1100 4x4 project truck at IHPA when I was there last. I'll be going back there anyways might as well take some pics of whats under it.
 
Those daft brake lines, have met their end.... More broken/worn out things to come this week, stay tuned. :winky:
 

Attachments

  • 20180921_141617.jpg
    20180921_141617.jpg
    71.2 KB · Views: 294
Spring packs are done, pulled the wedges, then dug into this, let me know your thoughts on it. A permanent fix will have to wait, I need it back together by tomorow.
 

Attachments

  • 20180912_101515_HDR.jpg
    20180912_101515_HDR.jpg
    67.3 KB · Views: 330
  • 20181013_132220.jpg
    20181013_132220.jpg
    61.3 KB · Views: 338
  • 20181013_130451.jpg
    20181013_130451.jpg
    60 KB · Views: 323
  • 20181013_142007_HDR.jpg
    20181013_142007_HDR.jpg
    70.3 KB · Views: 311
  • 20181013_131533.jpg
    20181013_131533.jpg
    133 KB · Views: 329
  • 20181013_142017.jpg
    20181013_142017.jpg
    58.5 KB · Views: 329
Another odd thing I noticed, the diference between the bump stops(see pics) and also with the springs hanging, distance between top of the top leaf and the bottom of the frame is aprox 1" bigger passenger side vs driver side. In another note, the shocks in front arent long enough, I had to lift the axle and compres the spring slightly to unbolt it. I have measurements for new shocks, around 23" open, roughly guesstimating 13" closed. Any good ones out there? I can get slightly used Billsteins out of an army suplus ware house for $30 per unit, but Im not 100% on if they will have the size I need.
 

Attachments

  • 15396207453002437296562527476626.jpg
    15396207453002437296562527476626.jpg
    46.5 KB · Views: 334
  • 15396208062537811974763916567948.jpg
    15396208062537811974763916567948.jpg
    61.6 KB · Views: 310
Alright, with hunting season drawing to a close I will have more time to work on the beast. Theres things I need in parts: tie-rod ends atleast, shocks(will look for input in suspension tech), drag link joints.
I get how bump steer works geometrically since I basically simulated it lowering the axle(steers left because of pull) maybe a conversion is in order. The bottom three leafs were right side up, but the ordering was backwards. When I held it up to the top two leafs it fit the arch perfectly, when I put it back the right way i had to compress the spring leafs together about an 1.5" with a c-clamp so maybe the front will be stiffer and not be as prone to veering off on uneven ground at slower speeds. There were two problems I found In the adventure, one was the missing drum screws in the first pic(sory the pic isnt that great, all 3 missing on that side), the other was finding out why the passenger Ubolt setup was so janky, I put it back temporary, but I dont really know what to make of it. There was a small piece in this hole, not sure how its supposed to be.
 

Attachments

  • 20181013_102232.jpg
    20181013_102232.jpg
    100.5 KB · Views: 425
  • 20181013_131546.jpg
    20181013_131546.jpg
    82.5 KB · Views: 306
  • 20181013_132220.jpg
    20181013_132220.jpg
    61.3 KB · Views: 313
  • 20181013_142017.jpg
    20181013_142017.jpg
    58.5 KB · Views: 317
Back
Top