hi marko,
I think that big spin-on fuel filter has so much "dirt" holding capacity that it can hold all the big chunks and tiny 2 micron size bits that could possibly be in my gas tank. As for vapor lock, we will see, but I will definitely post it here in this thread if that happens. But won't really know until I take it out in the desert camping next year.
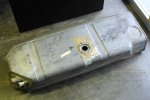
But tonight when looking to get some comparison prices for a new sending unit for my gas tank, I came across this picture (attached below) of the fuel tank recommended as stock for my truck.
It looks so obvious how the filler and fuel line should connect to this tank. Or is that the filler and vent, and the fuel line pickup is attached with the sending unit? But it looks kind of low to be a vent line as I would think the vent should exit from the top of the tank. But then where is the vent hookup? Or fuel line output? I just don't know as I have no experience with IH trucks. Can others please tell me, is this what your fender-fill, side frame mounted gas tank looks like??? And where are your vent and fuel line connections?
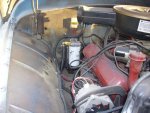
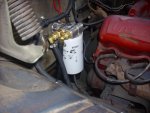
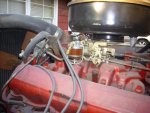
Mine doesn't look anything like this at all. Now I wonder if the p.o. Put some other gas tank in its place. My fuel line is a hard line that comes from some hidden side of the gas tank, comes down and around under the tank, then looks cut near the bottom of the rubber filler hose tube. And clamped to it is the rubber fuel line going to the fuel filter.
And the filler hose goes to a metal pipe that also goes to an unseen side of the tank. And this metal pipe is very lose so I suspect it is attached with another rubber coupling to the tank's actual input.
If mine isn't the proper tank, but this one in the attached picture is the proper tank that should be in my truck, I've got some more serious decisions to make real soon. Do I try and fix my tank with oem parts, or do I get a replacement oem tank like shown below (very pricey) and outfit it with oem parts, or do I design a custom tank, then outfit it with oem parts so the gas gauge reads correctly, stock fuel filler fills correctly, etc. Pros: it will have a much greater capacity, and will have no corrosion issues; cons: very much more time consuming, and will be just as expensive as a new stock replacement tank.
I once had a 57 Chevy panel 4x4 I designed a 60 gallon gas tank for that I was very happy with. If I get no more response to my questions about this gas tank as I did to my power steering questions here,
http://forums.IHPartsAmerica.com/basic-tech-questions/9999-general-power-steering-info-wanted.html
I'll just have to design my own gas tank as I have no idea about the proper way a stock gas tank should look or hook up.
Steve
p.s. Is this safe, or is there some safety factor/device/engineering I'm not aware of? I always thought gasoline tanks should be on the inside of the frame because if another vehicle ever runs into the side of your truck, you'll go up in the biggest ball of flames this side of 9-11. And I don't want to live the remainder of my life in the burn ward of a hospital. I've never had a truck with the gas tank on the outside of the frame. ...so little I know about IH trucks.