350 Buck Truck Project engine revival

Rusty Scout

Member
To make a long story short I am about 6 months into this just to get a 1975 ih150 up and driving after the previous owner threw in the towel about 3 yrs ago in strangecoach, nv. I paid $350 for her and have now spent about $750 since I dragged her home.

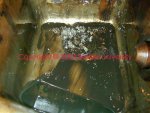
I am now ready to tackle the 304 engine which runs but has some oiling issues as well as 2 definite valve train problems. We pulled the valve cover on the driver side where the noise was coming from. I put the doc stewart chopped valve cover in place and ran the motor. #1 exhaust rocker was hardly moving. We, that is my buddy eldo gave the pushrods a twirl and found that #1 intake pushrod is bent a tad (maybe .25"). Oil draniback is fine. Oil is flowing along the rocker shaft. Inside the valve cover and the rocker area is fairly clean so it looks like she had good oil changes.

This motor is coming out for a rebuild based on the recent evidence uncovered and for some others as well.


Ok compression but sorta low 120 120 110 115 110 135 120 130

oil pressure about 15 at 2000rpm 22 at 2800rpm hot oil

leaky welch plugs under the intake manifold (coolant)

rusted out core pugs on the block beginning to leak

water pipe hold down on driver side missing and unable to replace because bolt head stuck against water pipe.

Tons of old blue rtv squeezed out of oil pan gasket, valve cover gaskets, water pump housing/timing cover gasket, oil filter adapter plate gasket and front oil seal. This alone is reason enough for a complete teardown because who knows what galleries are contaminated.

Most of the engine has been painted bumper chrome silver over dirt and grease.

More soon!!!

olpumpkin.jpg
 
Last edited:
So welcome to the world of botched, po-induced, non-oiling sv engines steve! That's why the rig was so cheeep! Classic case, I hear/deal with this nearly every day.

Compression issue is because one or more valves are not operating (valve timing issue). And no doubt at least one rocker arm is seized on the shaft which resulted in bending a pushrod or three!

The oil pressure readings indicate major problema there, but since ya found rtv contamination throughout, that is not surprising.

Hopefully the crank and cylinder bores will measure out ok...if so, then all the machine work needed will be a cleanup and having the heads done.

All engine parts needed for rebuild should be on the shelf at ihon now.
 
In hindsight, I think the first thing I should have done on this motor with unknown, unverified, and unspoken for history was pull the pan and I would have seen the record right then and there.

pb210095.jpg


The blue rtv was a warning someone had been up to no good. It seems that some rancher tried to stop oil leaks by adding lots of it to the original worn out gaskets. The oil pickup screen alone is about 30% covered with loose bits of rtv.

pb210098.jpg


This was the bearing material soup that made my stomach turn at the first sight of it.

pb210103.jpg


Not many big pieces of cam bearing but enough to say rebuild.


I did not get a shot of the #1 exhaust or intake lobes on the cam but I could see them as I was laying on my back looking up. The exhaust lobe showed signs of heavy scoring while the intake lobe seemed smooth and shiny.
 
Last edited:
Another aw shit moment steve! And it comes near exactly four years to the day that I looked into the sonjamotor pan and saw identical shrapnel and rtv!!

But don't despair, you are now looking at yore winter project! And today, we completed the sonjamotor and she's ready to go live at her house now instead of mine. So we'll be plenty happy to help ya work through this one.

Here's a pic that is a flashback for me, looks near identical to yore's huh??
 

Attachments

  • Sonjaguts.jpg
    Sonjaguts.jpg
    80 KB · Views: 1,497
I think your shot looks more like the cam bearings came apart fast while my shot shows a slower cam bearing death with much more fine bearing sludge at the bottom of the pan and less big metal flakes. Or my bearings have not failed completely.

The only thing that matters now is making this 304 right.
 
Naw...after looking at and repairing many of these motors now, what you are looking at is delaminated babbit layer on cam bearings #2 and #4. Once ya git the motor ripped apart, let me know how close that statement is!

If #1 came apart, then the cam nose and gear woulda broke off from lack of oil.

These cam bearings fail over time, not all at once. Some folks keep 'em hobbling along for years with 'em bending pushrods/sticking valves. Then they toss in the seafoam/rislone/motor honey/stp/moto-nu/wynn's/marvel mystery oil/etc. And call it an overhaul!

I found one motor with remnants of four broken pushrods down in the lifter chamber just along for the ride...no doubt someone just kept stuffing pushrods down the gullet!
 
Brrr 48 degrees in the shade of the redwoods.

I think I am ready to yank it almost. Only the 4 upper engine to trans bolts to go. Also the carb and alternator to go but I'd say its just a few hours to the engine stand. Hopefully this will go faster than 4 years.

Looking ahead a little I was wondering if I should go stock on the cam or get a little extra there???


Folks beware of that brake line that is routed inside along the rear curved crossmember under the trans access plate. Back when I drained the converter a while ago I was forcing that crossmember around without knowing about that brake line. It was hidden in barnyard buildup.
 
Last edited:
Brief update:

yanked it the night before turkey day and got it on the stand without too much trouble only because eldo was there to help get her done. Turkey day was shot due to food coma. Tore it down on the stand Friday. Found that the copper clad intake bolts had no ryhme or reason and the valley pan had a couple of cheap hardware store replacement bolts. Who dunnit?

Man those heads are heavy. What are they like 120lbs each? Number one exhaust lifter is mushroomed/dished about .125 and the number one intake pushrod is barely visibly bent.

Biggest surprise was that there are 9 rocker stands but with boat style rockers. I thought that boat stlye used only 5 rocker stands?

Note to self: pulling engines is messy and next time clean up the mess before the folks get back from their holiday air travel misadventures.

Pics soon
 
"boat" rockers could have been swapped in as replacements.

How were the nine-stand rocker shafts oriented??? To use with the boat rockers they must be turned upside down, otherwise the boat rockers can't lubricate properly.

To review...boat rockers need boat pushrods also. The rocker shaft oil spit holes for the rockers must be "down" to lubricate the rocker arm contact patch.

The five stand rocker assembly was intro'd in calendar year '78 (actually phased in before that time), this attached slf 78-6 is a bit ambiguous.
 

Attachments

  • SLF-78.pdf
    69.8 KB · Views: 511
Mm I have not taken the rockers completely apart yet but they appear notch down in orientation. Rockers are very loose on the shaft(roughly 1/4" if you rock them side to side on the shaft opposite normal axis of movement)

pb280151.jpg


pb280147.jpg

Pushrods seem right
pb280184.jpg

pb280185.jpg
 
Last edited:
Boat rockers are very sloppy on the shaft! They have no bushing for locating. They only contact the shaft at the two "wear points" on either side of the oiling channel...that is a very heavy point contact/load area and that is why the rockers and their companion shafts wear so badly. Not near as decent a setup as the full-bushed, welded rocker system that they replaced, but far cheeeeper to manufacture.
 
I hope you plan on using a new bump stick.:eek6:
if your lifters look like that no doubt the cam is toast. Common on old cams with limited depth surface hardening on the lobes.

Kinda takes a bite outa your budget.
 

Attachments

  • PB280184.jpg
    PB280184.jpg
    156.5 KB · Views: 1,411
I hope you plan on using a new bump stick.:eek6:
if your lifters look like that no doubt the cam is toast. Common on old cams with limited depth surface hardening on the lobes.

Kinda takes a bite outa your budget.

Ditto the cam (along with everything else!), that is why a replacement cam is included in a "stock" engine rebuild parts kit. If it's not needed, then it simply gets deleted from the kit order.
 
Agreed but which cam: stock or performance? This is a 1/2 ton 4x4 automatic with 3.54 gears for long road/camping trips into the
desert southwest.

Doc says to get a performance cam and others have said to go stock.


Looks like someone other than myself stripped the heads on the phillips screws for the cam thrust plate. I did not even bother to mess with that. Also the big timing gear has several teeth missing. And a few more lifters have cupping.
 
We will see what the machine shop says on this engine early this week. Plan b is to drop a runner 345 that's in erik's 75 parts Scout if the 304 fails inspection.
 
My personal preference would be stock / close to stock...

If you want a "pepped up" your 304, I think that using / rebuilding eric's 345 would be a "better" way to go...

Of course, my IH experience is very limited -- running a 392 for 35 years...

You might call Jeff and bounce the question off him...
 
agreed but which cam: stock or performance? This is a 1/2 ton 4x4 automatic with 3.54 gears for long road/camping trips into the
desert southwest.

Doc says to get a performance cam and others have said to go stock.


Looks like someone other than myself stripped the heads on the phillips screws for the cam thrust plate. I did not even bother to mess with that. Also the big timing gear has several teeth missing. And a few more lifters have cupping.

Doc is correct.

With the improved modern cam lobe designs you will actually see better power across the entire power band with a so called performance cam.

Below is my recommendation. I have installed several of these cams or cams from other grinders with the same valve timing and lift.
19+ inches of manifold suction and great low end. This cam will benefit from increased compression. Be sure you compensate for the thickness difference between the factory steel embossed head gaskets and the composite head gaskets that are available (felpro pt) by decking the block .020. Also use silvolite pistons that retain stock compression height. The others decompress the replacement pistons which will lower compression ratio significantly
isky performance camshaft for IH v8 engines - International Scout parts

An absolute must is to verify cam timing. If this or any other cam is installed retarded it will destroy low end performance and kill manifold suction. If you don't intend to degree your cam I would stick with oem.
 
Last edited:
I wanted to make a checklist for the machine shop to make double sure that nothing is overlooked. This guy has been doing engines for 30+ years and has done a few IH sv engines along the line. We agreed to rebuild it stock as this is my first IH rebuild and due to budget.

I have the following list so far:

1 magnaflux block, heads and crank

2 compensate for new style head gasket thickness to retain compression

3 disassemble rocker shafts and check for wear. If shaft is within tolerance remove core plugs at ends of shaft to remove all debris and sludge.

4 r&r intake manifold core plugs

5 silvolite flat top pistons are recommended

6 durobond cam bearings are not recommended

7 fel-pro gaskets and brass core frost plugs


what else should be added to this list?

Re: item #6 on the punch list...

The current crop of durabond in-11 cam bearings appears to be perfect regarding the location of each of the oil holes. I've knocked in four sets in various ihc blocks in the last several months (all the in-11 bearing sets were sourced through ihon) and found no misalignment issue with any. Same for the Ford fe (390) bearing set which is nearly identical in design and size.

I also have on hand now a set of cam bearings that chris pucci tossed my way...an enginetech p/n cc482 (manufactured in colombia). They are identical in every way dimensionally to the durabond bearings. These items are also full-circle shells like the durabond set, no finger joint as used with the clevite and other brand bearings. But...I have no issue using the clevite bearings also...the manufacturing process of these bearings has nothing to do with the failure mode we've experienced here regarding the oem cam bearings, they did not fail because they had a finger joint!

The manufacturer of the durabond bearing brand has never responded to my repeated correspondence regarding the oil hole misalignment issue that I and others have noted in the past...but they seem to have corrected the problem at some point.

But any decent machinist will know to carefully eyeball hole alignment before loading each bearing shell on the installation tool, and then verifying oil hole placement (and correcting if needed) after the bearing is in position. Discuss this point with the dude and turn him onto the info contained here at ihon!

Add to your list:

x) have your guy hone the lifter bores also.

edit: let me clarify this point...when I say "hone" the lifter bores, I use that term to mean clean the bores of any/all varnish and carbon/flashed oil accumulation so that a new lifter willdrop through the hole with ease. A stone-type hone will oversize the hole and should not be used. I use a flex/brush hone which when stroked five complete cycles with appropriate honing lube (I use atf) will remove no metal from the bores.

Xx) most machine shops have a "line item" in their available standard services that include "cleaning" of the oil galleries/orifices/threaded holes/passages/etc. After the block/head/crank/etc. Is prepped. No matter who supposedly did that operation, I'd do it again yourself! Ya can't be too clean! Since this is a diy block assembly, then he might be willing to delete that line item and save ya a few bucks since you are just going to do again anyway!

Xxx) stress the importance of getting the "assembled valve stem height" correct! Otherwise, the lifters won't be preloaded correctly and valve train noise will be excessive, or the lifter(s) will bottom out resulting in a compression issue.

In the past year, fel-pro has begun supplying for the ihc sv motor, full gasket sets which are inclusive of all components for 266/304/345/392 engines. A bit lower overall cost as compared to obtaining a head set and then an additional "conversion" set for the bottom end. But...each full set is specific regarding head gaskets. But...the full set will include only one pair of head gaskets for the spec'd engine. I.e., ya won't get head gaskets for a 304 in a 345 gasket set! No matter which versions of the gasket sets ya use, you will have several individual items left over that May not be used on your particular engine...common industry practice!
 
Last edited:
Regarding head gaskets...

Are the 304 head gaskets different from the 345?

Can we still get oem style gaskets from the International dealer?

Is there any specific brand of head gaskets that are better than others?

Also does ihonlynorth stock the case/IH red iron clad engine enamel? Is it legal in California? Is there a better engine paint than that? I see that tractor supply has valspar International red but I am not sure it is engine paint.
 
Back
Top