62 Crew Cab 4x4 restoration project

Hi,

I decided to document the restoration and build of my truck to help other people with similar restorations and to avail myself to the help, and insight others May be able to offer me. So please comment, and post lots of your own pictures here too. I don't mind a little thread hijacking as I learn from those comments too. This is the first IH I have ever owned, and other than one Scout in san pedro I recently saw when I went down to buy some parts, this is the only IH truck I, or anyone I know, has ever seen as of this date.

This is going to be a very different build from what many others are doing. First, I have a very limited budget. Yes, it will have a theme, and yes, it will be extreme, but it will not employ multi-link suspensions, or any thing like that. This truck's theme is one of extreme dependability, employing stock IH parts whenever possible. I'll include part numbers and what ever other info someone else might need to replicate any part of what I am doing.

Once I complete this truck, I intend to use it as a long distance traveling on and off road camper. I have restored two other trucks in the past. First was a 49 Chevy 1 ton panel truck. Once completed, I drove that truck all over, including twice from los angeles to ohio, through michigan and into canada. The only time it ever broke, was once the exhaust pipe broke at the manifold. Now that is dependability. I'd probably still have it today except when I was moving, I had it towed and the tow truck lost it on the freeway. It slid on its side until the roof crashed into another car. (fine print says they are not responsible for damages incurred while towing). :(

my second restoration vehicle was a 57 Chevy 1 ton 4x4 panel truck. I only had it finished for a couple years before I sold it to purchase a house. Never took it farther than the deserts of Nevada. Someone flew to l.a. And drove it home to boston. He said the only problem he had on the return trip was a flat tire. Unfortunately 6 months later the northridge earthquake struck and I lost my home, so no house and no truck.

Now this last time it's a 62 crew cab c120 4x4. This truck has come straight from alaska where it has spent its life as a snow plow truck. I gave away the snow plow but kept the grill guard as a tribute to its former life. It's very unique looking - I have never seen a similar grill guard, or with such unique looking lights. But I admit, I also have not seen many snow plow trucks here in los angeles.

At this point I am still mostly researching and acquiring parts so not much actual work has been done. But every system is going to have the extreme dependability theme. For example, the fuel system: I will have a 2 micron spin-on filter between the fuel tank and the fuel pump, wix part number 33528 with base wix part number 24770 mounted on the firewall. Then the fuel pump itself has a little glass bowl with a 19 micron filter, wix part number 33943. Then the carb has a small glass fuel/water separator with a 10 micron filter. This system will include an electric fuel pump that will only kick on if the mechanical fuel pump fails. And I will have a 10 psi mechanical gauge mounted under the dash connected at the carb inlet so I will know when I need to change the filters. So as you can see, theme: dependable but theme: extreme. Once installed, I'll post pictures,

I have similar filtering plans for the air, oil, and coolant systems too. And double fan belts to run the water pump, alternator and other accessories. And possibly double alternators. And as for the drive train - extreme will describe that too. But not because I'm running high horse power, because I'm not. In fact I'm running the stock 304 with the loadstar 9 quart oil pan (kind of extreme), but, you'll see.

To start, if anyone knows where I can acquire a reasonably priced t35 5 speed transmission with bell housing, please pass it along to me. I appreciate any help you can offer with this project.

And if I can help you in your build in any way, please ask! That includes hands-on (if you're in the west l.a area) if you need help in pulling a motor or something like that some time.

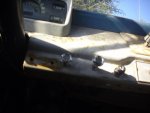
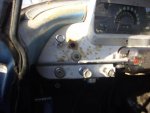
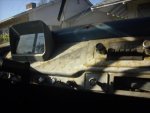
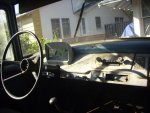
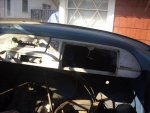
Once I get the engine dependable, my next project will be working on the dash board. Right now it, and the entire interior is so ugly, its embarrassing. (I'll post pics in a couple days). But I also consider it the control room or cockpit of the truck and it should convey the feeling the original designers intended. Therefore I will do an extreme job of restoring it to exactly the way it was originally designed to look and operate. (but with a few more gauges, switches and indicator lights added under the dash). But here again I will need your help. I've never seen a 62 dash, except in the second half of this video link below, so I have no idea what some of the holes and disconnected buttons are for in my dash.
http://www.youtube.com/watch?v=13y1fd3d3gc

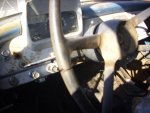
I believe I've acquired all the parts needed for the dash and steering column, except the original am radio or the plate that covers the radio location. Anyone have a stock am radio for a 62 IH pick-up they're willing to sell?

Well, that's it for tonight. Below are a few initial pictures of what I've been talking about. Good day!

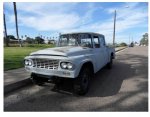
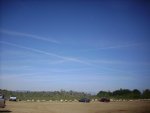
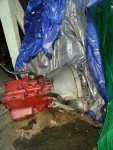
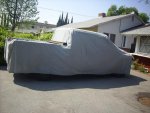
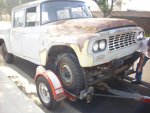
The first picture is my truck, fresh from alaska, as its being unloaded from the trailer.

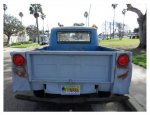
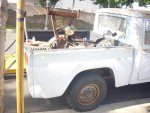
The second picture is the back of the truck as it arrives. You can see a little bit of the top of the front grill guard with the two big flood lights sticking up from it.

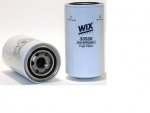
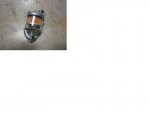
Third pic is just the wix 2 micron fuel filter I will be using.
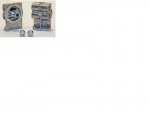
Next is that filter's base that attaches to the firewall.
Finally the carb's fuel/water separator filter.

Lots more pictures of the truck will be posted next week as I have to work this weekend.
 

Attachments

  • back_of_truck.jpg
    back_of_truck.jpg
    64.8 KB · Views: 718
  • Wix_fuel_filter.jpg
    Wix_fuel_filter.jpg
    16.4 KB · Views: 587
  • fuel_filter_base.jpg
    fuel_filter_base.jpg
    17.2 KB · Views: 575
  • fuel_water_separator_filter.jpg
    fuel_water_separator_filter.jpg
    20.2 KB · Views: 604
  • arriving_from_Alaska.jpg
    arriving_from_Alaska.jpg
    66.7 KB · Views: 796
Last edited:
nice looking truck. In pretty good shape for having been a snow plow!

Thank you. Actually the previous owner did more damage to the truck than the snow plow work ever did. Things such as wrapping the fuel line around the suspension shackle, or cutting holes in the fender to route the heater hose through the side of the cab instead of the firewall, to name just two of many. And the most damaging of all is he took some kind of power sander to the body, sanding down to bare metal, then only putting a couple rattle-cans of primer on it. With all the rain we've had almost every weekend since I got the truck, its changing into black rust before my very eyes. My first priority, after it is somewhat driveable, will be to replace the missing windows then put some kind of paint on it to stop the spread of cancer rust.

Here's a couple more pictures of the truck when I first saw it, and before I took possession of it (and before the winter rains).

The next pictures are the beginning of the actual build. I'll post lots of before and after pictures to document everything I do.
There's so much to be done, I just jump from job to job. I pulled the heater box to see what was wrong with that, and now I'm starting to work on the dash.

I am very particular about how I want the dash to look as I see it up close every time I get in the truck, and right now its appearance is driving me crazy. Anyone have any idea what the holes or push button is for on the left side of the dash? The button under the dash is the horn. And the two holes just to the right of the steering column was for the snow plow controls.

Also I'm looking for either an original am radio or the plate that covers the hole there. Please keep a lookout in junk yards or anywhere someone May be selling either. I do appreciate your help. I believe I now have all the other dash and steering column parts I need.

Thank you.

Steve
 

Attachments

  • IHtruck1.JPG
    IHtruck1.JPG
    52.9 KB · Views: 633
  • IHtruck2.JPG
    IHtruck2.JPG
    54.2 KB · Views: 930
  • IHtruck3.JPG
    IHtruck3.JPG
    48.6 KB · Views: 516
  • Dash_left_side.jpg
    Dash_left_side.jpg
    39.7 KB · Views: 498
  • Dash_left_side2.jpg
    Dash_left_side2.jpg
    48.2 KB · Views: 482
  • Dash_center_left.jpg
    Dash_center_left.jpg
    34.3 KB · Views: 462
  • Dash_center2.jpg
    Dash_center2.jpg
    59.6 KB · Views: 494
  • Dash_right_side.jpg
    Dash_right_side.jpg
    55.8 KB · Views: 496
  • Dash_center.jpg
    Dash_center.jpg
    41.6 KB · Views: 455
Last edited:
Thanks for doing this truck a favor and bringing it back to life man. Know where a t35 is but not sure you want to ship it from southeast Colorado
 
thanks for doing this truck a favor and bringing it back to life man. Know where a t35 is but not sure you want to ship it from southeast Colorado

Hi,
well, it actually all depends on condition and price. I might be very interested despite the shipping charges from Colorado.

I know where there is one at a trans rebuilders at this moment, about 3 hours drive from me, and they are asking $750 for a rebuilt with a 2 year warranty. I could pick it up with no shipping charges, but, unfortunately rebuilders supply the transmissions without any shifter, parking brake or drive shaft flange. I can get the u-joint drive shaft flange, but don't have any idea where to get just the shifter and parking brake assembly.

Let me know about the one in Colorado.

Thanks.

Steve
 
My weekly update -
only able to work on it one day this week.
I have a lot of parts on their way so to make room in the bed, I went to install the rear bumper that was taking up unnecessary space there. Now I realize why the previous owner never put the rear bumper back on the truck after he took it off. After taking it off, in his wisdom he decided to weld the brackets to the bumper when it was off the truck. Now they don't line up with the holes in the frame - not even close! Aaaagh! Everything wrong with this truck has been because the po did something stupid, and not because of age, wear and tear, weak or faulty design, or any other normal issue. Anyone else ever have po stupid issues? Now to decide if I waste another build day next week to grind the welds or just look for another bumper and brackets.

Also just saw where someone broke a big piece out of a rear brake drum. Another task to contend with. I seem to be jumping from one problem to the next with little to show for it at this time. Ever have that feeling with your projects?

No pictures at this time as it was threatening to pour rain all day today, so just wanted to get a few things done before it did.

Steve
 
my weekly update -
only able to work on it one day this week.
I have a lot of parts on their way so to make room in the bed, I went to install the rear bumper that was taking up unnecessary space there. Now I realize why the previous owner never put the rear bumper back on the truck after he took it off. After taking it off, in his wisdom he decided to weld the brackets to the bumper when it was off the truck. Now they don't line up with the holes in the frame - not even close! Aaaagh! Everything wrong with this truck has been because the po did something stupid, and not because of age, wear and tear, weak or faulty design, or any other normal issue. Anyone else ever have po stupid issues? Now to decide if I waste another build day next week to grind the welds or just look for another bumper and brackets.

Also just saw where someone broke a big piece out of a rear brake drum. Another task to contend with. I seem to be jumping from one problem to the next with little to show for it at this time. Ever have that feeling with your projects?

No pictures at this time as it was threatening to pour rain all day today, so just wanted to get a few things done before it did.

Steve

Ellie75 can share your pain. I talked her into a lemon that cost her a collection of new and used parts and probably more busted knuckles than I have. I myself bought a Scout where rust was stopped with silicone and where rtv was used judiciously on the engine.

Aint it miserable. You gonna be able to fix it with relative ease?
 
Oh boy! Nothing like previous owner ideas. Lol my baby's previous owner actually used a roller to apply the gun metal paint over his "iffy" bondo job. He didn't even remove the door handles, he just brushed around them. And that was one of the less impractical things he did. Hang in there . I'm getting the pieces pulled together. She's running nice and I'm only slightly smarter than the previous owner. ;) the harder it is, the more you'll love that IH.
 
oh boy! Nothing like previous owner ideas. Lol my baby's previous owner actually used a roller to apply the gun metal paint over his "iffy" bondo job. He didn't even remove the door handles, he just brushed around them. And that was one of the less impractical things he did. Hang in there . I'm getting the pieces pulled together. She's running nice and I'm only slightly smarter than the previous owner. ;) the harder it is, the more you'll love that IH.

Thanks. It is turning into a bigger, and more expensive project than anticipated. But eventually I'll get it done. Just doubt it'll be ready for use this summer. :(

at least you have paint. My po scratch sanded the entire body to bare metal, then just put a thin coat of primer over part of it. With all the rain this winter, it's turning into black rust faster than I can fix it.

My first big step is as soon as I get the missing window frame in, I'll be putting in all new windows (that's a lot of windows in a crew cab) ;) my front two windows are completely missing and the rear two are cracked badly. That will at least keep the interior dry and from rusting more.
 
Haha okay...u win. Your po gets the award lol. I did have to replace the driver side window but the rest was atleast water tight. Keep plugging along.
 
haha okay...u win. Your po gets the award lol. I did have to replace the driver side window but the rest was atleast water tight. Keep plugging along.

Hi ellie,
thanks. Unfortunately I think my po wins all the awards. :( I have a couple big non-technical issues my po left me with I haven't mentioned yet that eventually I will need everyone's advise on. But first I have to just get it drive-able.

I'd like to restore the interior to mostly stock. I'm starting to work on filling the holes in the dash. My first little question is, how hard is it to get a replacement cigarette lighter for this truck? Should I just fill the hole or hope to find a nos or good used cigarette lighter assembly?

And how is your Scout doing?

Steve
 
Last edited:
The receptacle portion of any cigar lighter is nothing special. They're pretty universal in nature. What tends to be more vehicle specific is the removable lighter element. So you could easily install a universal cigar lighter just to have the function and the hole in the dash filled, while keeping your eye peeled for a period correct lighter element to plug in at a later date.
 
the receptacle portion of any cigar lighter is nothing special. They're pretty universal in nature. What tends to be more vehicle specific is the removable lighter element. So you could easily install a universal cigar lighter just to have the function and the hole in the dash filled, while keeping your eye peeled for a period correct lighter element to plug in at a later date.

Hi,
thank you for the insight. As for the cigarette lighter assembly, I found a new one at the local auto parts store. I just unscrewed the knob it had on it's element and screwed on a knob from a 62 IH ash tray. I now have a new cigarette lighter assembly that looks exactly stock. I'm sure I can find another ash tray for my '62 IH as they don't wear out or get lost.

The remainder of this post has very little to do with this build, so skip it if you wish. It's just about something that really gets to me.

Hopefully the moderators don't delete what I'm about to say. I'm just stating an observation, and a very disturbing observation at that. I'll preference the following with it's nobody's opinion, or observation, but my own.

The main purpose of this truck build is to have a unique, long distance traveling, easy-to-maintain, on and off-road camper that is extremely dependable. I like the outdoors, camping, etc. Mountains, deserts, canyons, grasslands, snow or sand, it's all great to me. And sometimes the adventures of traveling there with the people I meet is as great as the final destination. I like being out in nature, the wilderness with clean, clear blue skies. And that brings me to the remainder of this post.

I live in the san fernando valley. There is no heavy industry here. And there is no air traffic over this valley except for one little airport for tiny personal aircraft in van nuys.

But every 3 to 4 weeks, and immediately after any gusty winds, and a few days after every rain, jet air craft do a massive high-altitude spraying campaign. They fan out, flying back and forth, criss-crossing and doing "s"'s while spraying who knows what. And it's very clear where they turn their sprayers on and off. It turns the sky from blue to milky-white. And the spray does not dissipate for days.

Presently I drive a para-transit bus. I use a gps 8 to 10 hours a day. My gps is sensitive enough it gets a full 5 bars of signal strength even under freeway over-passes. Except on days they spray. It's then 3 to 4 bars signal strength in the wide open, and sometimes no bars (no satellite connection at all) on the days they spray. The spray stays for days to weeks at a time in the air.

It rained a few days ago, we had about two days of clear blue sky, then today, Friday, all day today March 15, 2013 they were spraying again. What they spray is always milky-white. Except for once about two years ago it was yellow. Even the sun light on the ground that day had a strong yellow tint to it.

If you only occasionally look to the sky, it can easily be mistaken for natural rain clouds or vapor clouds. And after it spreads across the sky, it can easily be mistaken for smog or haze or fog. Unless you're outside all day (like me) and witness the spraying and transformation of the sky from clear blue to milky white.

Nobody says anything. So I'm saying something now. I'm saying I notice it. It makes my job much harder as the gps no longer works as well, and sometimes does not work at all on the days they spray and couple days thereafter. Sometimes, when windy and the spray bunches up into what appear to be clouds that collect towards the glendale/pasadena mountains, it effects my breathing. I really wish some pilot or technician would man-up and admit their involvement, or give some reason why they spray. It would make living with it so much easier if I knew it had a positive purpose.

In asking pilots at the oxnard point hueneme air shows, all that they would say is even under the most adverse conditions, the dirtiest, most smog-producing military jet air craft would have its jet trail completely dissipate in 20 to 30 minutes. They have no idea or comment what this spraying is all about. In the end, all I know is it's put there deliberately, and has been going on here for years, and it's destroying the air quality above my home.

Many people have grown up here thinking a white sky is normal. Some, in a total state of denial because they don't want to believe this is happening, even say it's just plain jet exhaust. But jets don't turn their engines on and off. They don't fly in fan-shaped configurations across the sky, then criss-crossing in a checker-board fashion, sometimes even doing "s"'s. And they fly in a set standard air space and set pattern, which does not include criss-crossing over the san fernando valley.

Any comments, anyone? Has anyone noticed this in their community? Please post here.

Ok, my rant is done. My remaining posts will concentrate on the build of my truck.

Thank you for letting me get this off my chest.
Moderators, please don't delete this. I think this environmental awareness is very important. So important, I've used part of my truck build thread to help people see what is happening to the world around them, despite the fact I've probably turned some people off from reading anything more I post,. This post is just only an observation. It is not political as it has been happening through multiple administrations for years now. It just seems to be getting more common and more intense the past couple years.

No offence is intended toward anyone in this forum (except to the perpetrators).
Thank you again for allowing me to air this grievance. (pun intended).
;)

sky1:
in the first picture, sky1, you can see where they have turned the sprayer on and off. Judging by how blue the sky was, this was most likely following a rain. Disregard the dates as I don't know how to set the date in my camera.
Sky2:
here you can see the beginning of their criss-cross pattern of spraying.
Sky3:
here you see nearing the conclusion of a day of spraying. The sky is mostly white, and now they are just reinforcing their saturation.
Sky4:
here they are working their way across the sky. You can see in the distance where the sky is already completely white.
Sky5:
and here is some more spraying, starting to work their way across the sky on a windy day. They continue until the entire sky, from horizon to horizon, is white. Tell me that's normal jet exhaust. Then the jets will not be seen again for another 2 to 3 weeks, unless it rains or we have another gusty, windy day.

Steve
 

Attachments

  • sky1.jpg
    sky1.jpg
    70.6 KB · Views: 528
  • sky2.jpg
    sky2.jpg
    55.9 KB · Views: 534
  • sky3.jpg
    sky3.jpg
    37.2 KB · Views: 471
  • sky4.jpg
    sky4.jpg
    29 KB · Views: 436
  • sky5.jpg
    sky5.jpg
    33.7 KB · Views: 494
Last edited:
Hey overdrivesteve! I'm really looking forward to seeing how your build goes. I'm really considering trying to build an IH truck one of these days. Good luck with it and thanks for restoring her.

About your rant, I too hope the admins don't remove it. I agree it's a serious issue and it's hard for a lot of folks to accept what's really going on. I would post the links but I'm on my phone. At any rate, if you haven't already, look up a couple of videos on youtube on the subject. They're both a little over an hour long but they throw a light down the rabbit hole. First is "what in the world are they spraying?" and the second is "why in the world are they spraying?". They've all but come out and admit what's going on.
 
I don't think you have anything to worry about so far as your off topic comments are concerned. This is your ride thread inside the sewing circle section that you chose to hijack. Now if this were part of a technical thread inside any of the technical headings, that might be a different story.
 
Saturday, March 16th, the haze is so thick that when standing in the middle of the valley, you cannot see the mountains in any direction you look. The jets have finished their work and are gone now. How sad is it to know I will never again be able to see the stars at night from home until it rains again next winter. Then I'll have about 2 nights of star gazing before the air is again re-sprayed.
This post concludes my comments on this topic. Anything more I add on this topic will be edited/added to this post.
Add / edit:
today, Sunday March 17th, 2013 they were spraying again, but not en force.
It's been breezy the past couple days, so today, 3-19-13, they were spraying again.
There have been several intense days of spraying since my last edit. But yesterday, Friday, 6-21-13 it was breezy and they have been on and off spraying all day, and at midnight they were still spraying. My brother, in alturas, northern corner of calif, says they spray there too on windy days.
.
.
.
now back to the build....
 
Last edited:
I've decided which gauges I will be adding under the dash. They include water temp, oil pressure, fuel flow, fuel pressure, volts, fuel quantity, and dwell.
They are from this company: http://www.umainstruments.com/

Water and oil are self-explanatory, except the oil pressure gauge I will be using is 0 to 50 psi and not 0 to 150 psi as shown. The company assured me occasional spikes to 60 psi would not hurt the 0 to 50 psi gauge as it’s tested beyond that at the time of manufacture. Also I'm just going with the simple black and white gauges, and not colored like some are shown below.

Fuel-flow - I chose to include this gauge because twice my carb started spewing fuel out all over the engine. I assume that is because dirt is getting into it. If I was on the freeway, I May not have ever noticed until it was too late. The gauge comes with an alert if the engine suddenly starts using more fuel than normal. And this is the only company I could find that offers such a gauge. The gauge I will be using is the 0 to 8 gallons per hour gauge, not the 0 to 60 gph gauge shown.

Fuel pressure is to know when the fuel filters need replacing. A 0 to 10 psi gauge will be used.

Volts is a good indicator that the charging system is working ok. A steady 13.8 volts is ideal regardless of electrical load – unless the load far exceeds the ability of the alternator used. It also comes with an alert if the voltage goes out of a specified range.

Fuel quantity is because I'll be adding a second fuel tank. Much more on that topic when I get to it.

And finally dwell. This company does not make a dwell meter. In-dash dwell meters were made in the past but don't know who, if anyone, still makes them. I saw one once on ebay; made the mistake of not bidding on it. It went cheap.

I'm keeping the ignition stock. Although electronic ignitions are known to be very reliable, I've had the worse possible experience with them, both in my honda and GM car. Twice the one in my honda died and without warning leaving me suddenly stranded in the middle of the road. And the GM had the habit of going out with no warning, randomly going totally dead with no spark every 30 minutes to two days between incidents. Problem was after about 20 minutes the car would start and drive perfectly like nothing ever happened. I spent about 2k with two mechanics replacing every computer module and sensor in the car. Never did find the problem. Had to sell the car at a major loss as no one wanted to pay much after learning of its problem. Don't know how many times I was left stranded sitting for 20 minutes in the middle of an intersection when turning left, or in the fast lane of the freeway on my way to work.

I could never feel at ease driving in the wilderness in a vehicle with an electronic ignition. And dwell is something that goes out gradually as the points wear, causing an almost imperceptible loss of power and increase in fuel used. Therefore I want to keep a watch out on the ignition dwell. Now if only I could find an in-dash dwell meter for sale somewhere….

Are there any other gauges you can recommend while I am still in this planning and designing stage? The only other one I could think of is a fuel mixture gauge to indicate how Rich the fuel is. But I don't know anyone who makes such a thing or how it would test that, other than perhaps with a sensor in the intake manifold.

I worked this weekend, so not much was done on the truck again.

And despite the temporary thread hijack, thanks for staying with me in this build and offering your comments, suggestions, insights and inspirations.

Steve
 

Attachments

  • Water_temp_meter.JPG
    Water_temp_meter.JPG
    49.3 KB · Views: 410
  • Oil_press_meter.JPG
    Oil_press_meter.JPG
    39.9 KB · Views: 380
  • Fuel_flow_meter.JPG
    Fuel_flow_meter.JPG
    36.4 KB · Views: 368
  • Fuel_press_meter.JPG
    Fuel_press_meter.JPG
    35.1 KB · Views: 348
  • Volt_meter.JPG
    Volt_meter.JPG
    47.3 KB · Views: 350
  • Fuel_quantity_meter.JPG
    Fuel_quantity_meter.JPG
    36.5 KB · Views: 360
Those are some great looking gauges! Thanks for the link. Definitely keep us updated as you install them. I'm anxious to see how easy they install. Being aircraft grade I'm pretty sure they'll work flawlessly. I'm curious about the dwell now myself, lol. I May join you in that treasure hunt and will let you know if I find anything.
 
I think the dwell gauge would be superfluous. Dwell angle with breaker points changes so slowly that watching it occur on a daily basis with a gauge inside the cabin would be akin to watching grass grow or paint dry. You could simply elect to measure your dwell at regular intervals, such as lof with a handheld meter and make any minor adjustments necessary at those times. With the range for a v8 engine being 28 to 32 degrees, starting at the lower end of that range will maximize the amount of time between the next adjustment. As the rubbing block wears, the gap closes and the dwell angle increases. But again, this takes many revolutions.
I think a much more useful instrument in place of the dwell would be a vacuum gauge in hg. That would give you another instant feedback point about the health of your engine, help you maximize engine fuel efficiency, and alert you to the presence of manifold vacuum leaks.
 
Back
Top