Beater's Third Life

looks real good, but I still would of liked to have seen the old box with a dually axle underneath it. :thumbsup:

That was the original plan, but this extended wheelbase has done wonders for straightline handling! Drove it 50 miles today,...bitch drives like she's on autopilot, no longer needs to be herded with that wildly oversensitive steering these pos have!

And the brakes are monsters!!!

At 9:30 last nite, I did manage to fab up the top mounts for the sway bar, it's now functional.

I'm gonna have my new-found friend over at harco machine, cut 3/4" off those lift blocks, and change the face angle from the current 6* to 10*, but that doesn't need to be done right now, I need the weight of the bed loading the suspension to make the final calcs for ride height. Going with 10* on the blocks not only enhances pinion angle, but will increase shock pre-load by another 3/4", and soften up the sway bar without having to extend the links.

Should have the parking brake functional tomorrow, picked up some fab parts for that today, along with some additional trailer connector supplies, I can't stand having the electrical system on the azzend in that kinda shape, even just for a short time!
 
After dealing with numerous exhaust leaks, rotted mufflers, rattlin' pipes, etc., I finally got a gas extraction system that works!

My original plan to use a dynamax with built-in "x" pipe just is not in the budget right now. And this couldn't wait until my stimulus package is shit out by them hawgs up in washington.

So I been collectin' pieces of exhaust schnizz for the last year in anticipation of this moment. Grand total investment not including steel mix and wire for the mig, comes to about $165 for all the head pipe bells, bends, toob, mufflers, hangers, etc.

Then 2.5" tailpipes ain't the final, once the bed is installed for the final time, I'll work out sumthin' else.
 

Attachments

  • Beater Exhaust.jpg
    Beater Exhaust.jpg
    69 KB · Views: 575
how's she sound? Bust out the betamax I know you got hidden away and post up a clip on scru-toob!

Sounds about like the hooty-pile, only worser! Real tinny but all that will hide once the bed goes on and the outlets are moved back.

Main thing is, I can now hear the engine and all it's related janglin' without all them strange noises being hidden by exhaust leaks that kept recurring. I only put up with it this long 'cause I hate ta wear them dam ear-trumpets and since my ears and eyeballz is rapidly diminishin' in effectiveness, I thought the exhaust leaks were bein' healed by majik.
 
I'm under the gun to git this pile on the road again, we're down to only this one as a dd while the dodge pos goes across the highway to the pooter shop to have it's pooter fixed.

After turning the shop into a disaster area, I was able to dig out the bed and set the camper jacks up to levitate it. Then it's simple to back under and lower onto the frame rails for trial fit.

The bed needs to be temporarily installed on the chassis so I can verify all the dimensions before finishing out the bed framing and skirting.
 

Attachments

  • Bed Drop.jpg
    Bed Drop.jpg
    74.3 KB · Views: 555
Here's the bed just sitting on the chassis.

Once I got the rig situated back in the shop on a level floor, I used the porta-power and a pinch bar to shift it around into alignment and final location. It's currently clamped into place using the hardware that secured it to the Ford donor. But now it is drivable again.

Another trip to town will take care of additional needed hardware to finalize the mount and an additional support needs to be fabbed for the front section on either side.

At 2:30 this morning I finished installing the toolbox, lights and mudflaps...all this schnizz is a temporary workaround so that I can complete the rear section of the bed. Once the metal fab is done, then permanent lighting will be scabbed on along with permanent mudflaps.

At that point, the bed will be removed for prep and paint...right now it don't look any worse than it did, so the finish-out is not gonna be a priority.

Next up, I gotta do something about a lift/springing for the front axle. That will be temporary also until I can locate the "right" steering axle I'm looking for. I May end up using a pair of those hub/wheel gender-changer adapters so I can mount the dually front wheels as well, this current setup sure looks like shit!
 

Attachments

  • Initial Position.jpg
    Initial Position.jpg
    112.6 KB · Views: 533
You still need those dually wheels for the front? I May be able to find you a front axle from my top secret jy connection. I will be headed out to area 51 tomorrow afternoon, I could Scout around for what you need.
 
you still need those dually wheels for the front? I May be able to find you a front axle from my top secret jy connection. I will be headed out to area 51 tomorrow afternoon, I could Scout around for what you need.

Nope!

I'm gonna use the Ford donor wheels, I'm still parting out that rig, anyone need a decent 400/c6 that's been on propane most of it's life???

The Ford wheels are 16" and the tires are certainly useable as is for now, remember that budget thang?? Do you ever haveta think abouta budget thang???

Those dodge wheels I got from you are 16.5" nothing wrong with that, tires in many configs are readily available (and cheeep) around here. The guy who is taking that dodge axle doesn't want the wheels though, he already has nice tires/wheels to go on the axle, it's going in a '64 travelette with service fenders. That one is a "stretched" frame with a d60/big 6 lug pattern that has had a pair of those super-strong dually wheel adapters added. The dodge d70 will be an ultimate axle for this ride as it's being built into an ultimate trailer dragger. I'm doing a 727 tranny for it now to replace the borg warner that's pukin' all over the street...he's building' a fresh 392 to stick in it in place of the original 304.

The front axle I'm looking for would be any d60, dually-width/passenger drop, closed knuckle or open knuckle, either is ok. Needs to be geared 4.10, Ford used some geared 4.09 and I'd rather not have the gear mis-match since this rig can see many miles in 4high chained up on ice/snow when towing.

Next best would be same in a d44-hd. Dually-width is the key deal here though.
 

Attachments

  • Tette move 002.jpg
    Tette move 002.jpg
    105.2 KB · Views: 600
Mike,

this is going to be one unique IH tool hauler. What a change!! It's amazming how nice the ferd axle, shocks, etc. Bolted right into the IH frame. Nice to get the e-brake stuff tucked up out of the way.

I was wondering what you were doing for a dd.

Lyle
 
Mike,

this is going to be one unique IH tool hauler. What a change!! It's amazming how nice the ferd axle, shocks, etc. Bolted right into the IH frame. Nice to get the e-brake stuff tucked up out of the way.

I was wondering what you were doing for a dd.

Lyle

I'm tellin' ya lyle, this Ford schnizz is just tha tickee for any IH upgrade!

This worked so nice I thought I'd take the concept one step further this morning and breed the pair. But now I need sum advice from margaret...they're still locked up after 6 hours,...does linda or margaret know what I should do now? Will they spawn out after the sun goes down? Should I spray 'em off with the water hose?
 

Attachments

  • Breeding Session 001.jpg
    Breeding Session 001.jpg
    127 KB · Views: 661
hey!!! That wuz jerry's werk bench/power nappin' kuhbanna!:incazzato:

If jerry wuz here, the breedin' pair would not be locked up right now. Jerry woulda been on this deal!

You tell 'ol jer he needs ta bring hiz ladder from now on if he's gonna rack out in the shop.

I cut the lid off the gooseneck bucket a few hours ago and opened tha hole to sunshine for the first time ever. That tread-plate cover welded over the hole had shed several layers of rusty skin, but the ball mount is in great shape and ready to be used.

Tomorrow I'm gonna put the stinger in the front receiver and go hunt sum prius-meat over in eujoisee. Since it's so quiet, I can sneak up on 'em real stealth-mode.
 
I'm tellin' ya lyle, this Ford schnizz is just tha tickee for any IH upgrade!

This worked so nice I thought I'd take the concept one step further this morning and breed the pair. But now I need sum advice from margaret...they're still locked up after 6 hours,...does linda or margaret know what I should do now? Will they spawn out after the sun goes down? Should I spray 'em off with the water hose?


Now you've done it; you have a permenant problem now. With how easy the Ford stuff bolted up to beater, you should have known this would happen. :yikes:

lyle
 
now you've done it; you have a permenant problem now. With how easy the Ford stuff bolted up to beater, you should have known this would happen. :yikes:

lyle

Hadn't thought of that angle! So whatcha sayin' is...I'm stuck witha f350 Ford I can use to power a generator to run the house off of if I mount it on the driveshaft stub behind the cab, and now it's back to dually configuration with the added attraction of 4x4 with a hi-tek four wheel steering system that is user-selectable??

Think what you could do along similar lines with yore white t'all rolled up in the back of linda's s80!!! A stretch-limo version! The t'all izza 34" frame width too!

Neighbormike served as a "tiller man" on the springtukee fire department for years. He don't need no training in how to drive tha thang, and he dam shore don't need no pooter to tell it which way ta turn tha wheels!

If ya really retard that timing on tha 196, it'll run backwards, that would give three gears in reverse (or forward??? Dependin' upon perspective) and serve in pusher mode!
 
Last edited:
iz this 4'em really the place fer them grafik fornukashun pics?:yikes:

This is breedin' man...genetic manipulation of the highest order! Funded and approved by tsa/cia/nea/scotus/potus/fbi/nsc/, and peer-reviewed by j-no "the system worked"!!!

Funkikashun is what jerry does when ya turn him loose on tha populace with no nannystate oversight.
 
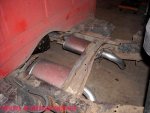
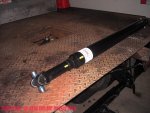
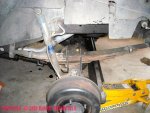
Got the fresh rear driveshaft installed tonite, no more drivin' on the front axle only.

Took the rear half of the f350 shaft over to anderson bros. Truck and equipment in eugene on Monday for a looksee. When six states shut down the eugene operation, their driveline guy, Mike levenhagen went to work for them since they also bought the entire driveline shop out of the six states operation. Quite an impressive bunch of gear is used in building this stuff!

This guy is a genius! I spent an hour being educated by Mike last Monday, and another hour today pickin' his brain about this stuff!

So he cut 2" out of the Ford shaft (which is 3" toob with 0.065" wall thickness), then "straightened" it using the heat/shrink technique that Jeff and Darren have described regarding straightening d44 axle tubes.

I had a fresh 1330 rear output yoke (larger replacement for the oem 1310) for the np 205 transfer case, turns out that the Ford shaft uses 1330 u-joints also, even though they are "specials" that have a reduced diameter bearing cap. Just so happens that Mike had on the shelf a nos "obsolete" slip joint and stub shaft for the 1330 that he gave me for half price! I also had a 1350 yoke but we decided not to use that one since Mike had such a great price on the slip joint system, a new one for the 1350 yoke would have run well over $150!

So the entire driveshaft build ran $222 and included new "u" bolts for the 1330 "special" joint used at the rear axle pinion and likewise for the front 1330. By comparison, a full boat fabrication using new tubing and new end hardware (for 1350 yokes which I have several of for both the pinion end and the transfer cases) would run about $425.

Can't say enough about my experience with Mike at anderson bros.! I'd budgeted $350 for this shaft build based upon telephone quotes from two other local driveline shops.

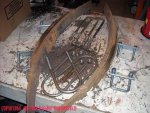
Mike had some recent specialty shafts sitting on the table waiting for pick-up, all were for some exotic off-road rig including several highly modded cv couplings/shafts.

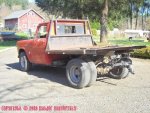
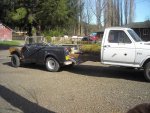
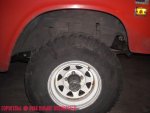
A quick five mile test drive was the real test. Acceleration is significantly improved (it should be based upon the 4.10 gears), I was able to actually smoke the dual wheels with a hard launch! Didn't take the time to make a mph comparison with the gps vs. Engine rpm, I'll do that later.

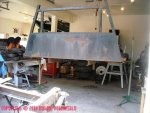
I did put the rig across the scales today, with a full load of fuel, all spares I normally carry, and no spare tire, the weight registered at 5150lbs.! That is a net loss at this point of over 600lbs. Since losing the oem pickup bed and fiberglas shell (and the oem rear bumper)!!! The transmission shifts out real quick due to the significant weight reduction, so the kickdown linkage will need to be played with some. By the time the bed is completed with the tail section and secondary receiver added back on, I think the final weight in fighting trim will be around 5300lbs.
 

Attachments

  • Beater Rear Driveshaft 002.jpg
    Beater Rear Driveshaft 002.jpg
    73.8 KB · Views: 639
Now that we've got a second driver in the fambly collection, I could take the beater offline for a few days and continue on.

The front end needs a lift of at least three inches to level it out once the I complete the bed fabrication, adding another 400lbs. Of weight in the rear. I've yet to locate the front axle I'm looking for, but now the spring issue is handled along with a lift.

The overload spring packs from the oem rear axle setup was separated from the service springs. The overloads actually are "arched", whereas the oem front springs are a "flat" design that is intended to keep the height reduced on the 4x4 pickups. All the IH springs on fullsize stuff are 2.5" in width.

So after doing some calcs for length, I snaked an assortment of appropriate u bolts and longer grade 8 spring mount pad bolts to use for mating a portion of the overload packs from the rear, with the oem springs on the front.

Those extra-long universal spring center pins that ihon stocks are perfect for doing this kind of work, just whack 'em to length with the sawzall after snuggin' the nut!
 

Attachments

  • Rear Overload Donors.jpg
    Rear Overload Donors.jpg
    106.9 KB · Views: 561
This is a shot of the weight still compressing the oem "flat" front springs but the hardware removed. No doubt these springs a sacked to a degree, especially since the weight of the dual battery setup and the fabbed front bumper/winch combo is much greater that the oem setup. But even when new, these springs are "flat" when the weight of the vehicle is resting on the tires.

I figure that the springs shown in this pic have lost 1" of ride height over the years just through use. The spring bushings have all been replaced in the last few years, and the very problematic and cheezzee front spring hanger bolts were replaced with 5/8" grade 8 hardware years ago after they sheared while in service (common pickall failure).

A few years back I replaced the front brake hoses with items that were 6" longer than oem in preparation for a spring lift that never happened (until now).
 

Attachments

  • OEM Flat Arch Spring.jpg
    OEM Flat Arch Spring.jpg
    70.9 KB · Views: 591
So...after some spring leaf juggle (and torching the riveted spring clamps off the donor overloads), I ended up removing one long leaf from the oem pack along with one short leaf (both were "flat"). Then I deleted one long leaf from the overload pack. The two spring packs were then married in a staggered formation, making sure the lengths were oriented correctly, the center hole on these front springs is offset and the axle does not sit equi-distant under the pack.

Appropriate new hardware was then used to clamp everything down, this is the passenger side of course and uses only a single u bolt.

Now with the weight resting on the spring on this side, you can see the major change in the arch of the spring. I have no way of calc'ing the spring rate as ya see it now.

The shocks have plenty of travel to accommodate this upgrade. And...when I touched the cheezee rubber oem bumpstop, it fell right off, so later on I'll deal with that, the springs now will not allow bottom-out as they did before which abused the bumpstops constantly.
 

Attachments

  • Combined Spring Pack.jpg
    Combined Spring Pack.jpg
    81.6 KB · Views: 556
And the result...a 3" lift, just like I needed!

These 32" tires are exactly 1" shorter than the tires I'm gonna end up running on the front (which match the rear dually tires). So the overall height should increase about 1/2" once all the tires are freshened in the future.

And with the loaded weight of the trailer on the azzend once the bed is completed, the rig should sit level with very little assist from the equalizer system. I'll set the spring bars for about 200lbs. Of weight shift to the front axle when the trailer is hooked.
 

Attachments

  • 3 inch Effective Lift.jpg
    3 inch Effective Lift.jpg
    51.2 KB · Views: 565
Hey, post a pic of the whole rig. You always piece meal the photos so I have a hard time picturing the whole deal.
 
Here's a profile of the pile onna chunk of level parking lot.

The space under the bed between the headache rack and the rear tire is gonna be filled with a steel drop-front box and about 150lb.s of crap on each side. That will hide the frame and partially hide the fuel tanks which each have 5/16" plate aluminum skidders under 'em.

Might even git sum leftover house paint rolled on with a real nappy roller.
 

Attachments

  • Beater profile.jpg
    Beater profile.jpg
    125.2 KB · Views: 562
Here's a shot of the two piles tradin' spit.

Same year, same model series, same gvwr originally though the t'all is a longer wheelbase.

The chunk is settin' on 245 x 16 meats on the rear and the two matching 32" x 15" tires off the beater on the front so it's a bit "down" in the nose. The chunk springs show no evidence of sakkin' at all, still actually have some positive arch even with the weight of the rig supported. Them meats on the chunk git swapped off tomorrow for a set of 265 kumho snowflakes.

While both rigs are 1110 series, the azzend of the chunk has only 1" riser blocks under it (springover of course). The beater originally had 2" riser blocks. The rear springs on the chunk have been swapped for a custom set in the past for some reason, but before ernie and ron installed the d60 semi-floater.

Yeah, that's a dam shop rag stuffed in the chunk's filler neck, dam pumpjockee in town last nite forgot to click on the locking gas cap! He wuz all excited about chuink bein' the oldest vehicle he'd ever pumped alkeegaz into (kid musta led a real sheltered life).
 

Attachments

  • Long shot.jpg
    Long shot.jpg
    139.4 KB · Views: 557
Last edited:
Keep in mind, the front suspension weight on the beater in this shot is at least 400lbs. Greater than what the chunk is seein' or any stock pickall.

Did a test drive a few hours ago up across some potholes and speedbumps. The beater front end acvtion is vastly improved! It actually has springs again! I still plan to remove prolly one long and one short leaf out of the rear spring pack, that axle/spring package the way it's settin' right now (including tires) is rated at 10k lbs., that is way too much for this ride and the trailer load. So if I drop those leaves out, the azz should settle another inch which will level the rig.
 

Attachments

  • Tradin' spit.jpg
    Tradin' spit.jpg
    91.3 KB · Views: 539
Back
Top