Up a Transmission Without a Lever

usugarbage

New member
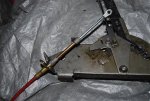
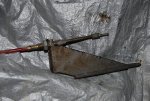
My 71 Scout II/727 came with a B&M shifter setup that doesn't work very well. I think its really a combination of being out of adjustment and probably a cheap solution to begin with. I would like to be able shift without having to guess what gear its in and I'd prefer just going back to the original setup if possible anyway. I've already pulled out the B&M (pics: 5594 - shifter, 5592 - B&M bracket/cable) and purchased an orig shift lever (ebay) and a new 727 shift cable (ihon) to make the regression.

For a little background, the B&M is a little different as it doesn't use the clamp-down bracket, but comes with a big bracket arm that bolts through the transmission pan bolts. The other difference is the cable comes out of the front of the B&M shifter and the loop goes towards the bell housing and then hooks up instead of out the back and looping towards the rear. So essentially the B&M shifter pulls the transmission into the gears instead of pushing. So there's no doubt it would adjust similar to the original setup, but I prefer the action of a normal lever to this ratcheting shifter.

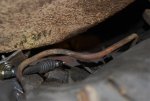
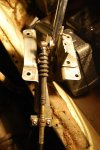
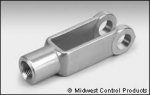
That brings me to my problem - the new cable is about 2? Inches shy of hooking onto the transmission (pics: 5604, 5607). And as I didn't make the change to the B&M and this is my first time dealing with a 727 and I'm not sure what I'm missing. I would imagine my cable is the right one since I emailed back and forth with Jeff before I got it, but I don't know any better. And it doesn't look like the bracket is in the wrong place. And both the tranny and stick are in park. So I'm stuck. What am I missing?

Other useful info...the engine isn't origingal (I've got that too), but I have no idea which engine this tranny came behind. I looked for the casting numbers before pulling off the shifter, but the bracket was in about the same place that it should be. If needed I can look for it now. Thanks for any help.
 

Attachments

  • DSC_5594.jpg
    DSC_5594.jpg
    76.5 KB · Views: 668
  • DSC_5592.jpg
    DSC_5592.jpg
    83.8 KB · Views: 476
  • DSC_5604.jpg
    DSC_5604.jpg
    51.8 KB · Views: 495
  • DSC_5607.jpg
    DSC_5607.jpg
    37.6 KB · Views: 463
  • DSC_5596.jpg
    DSC_5596.jpg
    36.5 KB · Views: 514
Let's work through this step-by-step!

Your pics are kinda confusing, but I know it's difficult to shoot this stuff upside down!

So here is a copy of the parts list for the Scout II shifter assembly when equipped with the tf727/t-407 trans. It's somewhat different than the shifter for the borg warner bw 11 tranny that was on the very first production run of the Scout 810/Scout II, so make sure the egay parts ya got were for a 727 on a post'72 Scout II!

Print this out and take an inventory of your entire assembly.

I agree, the early B&M shifter setup you have is not anywhere close to being "right" for install in a Scout II! Those were made for primarily chrysler product and amc vehicles that used the 727. But today, there are some B&M (and lokar) shifters that will work ok for Scout II.

Also, the B&M shifter is indexed for the chrysler-pattern shift lever that mounts on the valve body rooster comb. The Scout II shifter lever is much shorter! And it's designed to be used with only the Scout II shifter geometry. There are many variations of that shifter arm, and then there are the arms that were supplied in various shifter kits supplied by B&M, hurst, speedway, lokar, sparkomatic, etc. Some used whatever was on the actual trans application (such as a '72 dodge pickup, or a '69 plymouth satellite), others used their own arm supplied in the kit!

So what you need to make a stock Scout II shifter work, is a stock Scout II shift arm/lever!

I have several samples of all the arms but unfortunately I neglected to label 'em all as to application!!! My scruup! I need to sort this out and make up a thread for this so that folks can id this stuff by application.

I monitored your "parts wanted" post but I did not respond because I don't have any of those I can let go of, I save 'em all for the service work I do for ihon customers regarding these trannys. But I do have several workarounds for that part, that I have developed here, I'm fortunate to have some real good sources for stuff like that, I know some folks around the country find that kind of stuff very difficult to source in their own markets.

Also, in reviewing your pics, I see the B&M-supplied cable mount attached to the B&M cable. That mount will not work without extensive modification in order to use with the oem shifter stuff! The oem cable mount is completely different in design (callout #22 in the parts list) and it mounts in a totally different position. I have only one of those mounts, but Jeff probably has some additional items on the shelf if he can find 'em. If you need a picture of that item, I'll dig it out of the parts shelf here and post tomorrow.

On the side of the pan rail under the shifter lever and nss switch, you will find an IH part number stamped along with some other numbers. If you will post the part number for your tranny, I'll try to id it for you, there were "about" eleven different t-407 slushers used throughout the sii production run, just for the sv motors. The rambler/amc 232/258 motors also used the amc version of the 727 inthe Scout II, but they don't interchange since the bellhousing design is different.

Here's a link to some info about locating the tranny assembly part number, that starts in post #96:

http://www.forums.IHPartsAmerica.com/transmission-tech/588-torqueflite-727-guapo-3.html
Have you reviewed all the torqueflite-related threads in this sub-forum?? We have one of the most extensive bunch of factual info you will find anywhere on the 'net!
 

Attachments

  • Scout II 727 Shifter Parts.PDF
    800.6 KB · Views: 753
Last edited:
so here is a copy of the parts list for the Scout II shifter assembly when equipped with the tf727/t-407 trans.
That is exactly what I needed! I am lacking the yoke/pin (#23/#24). I had incorrectly assumed that it was the same as the cable swivel on the other end, because that's how the B&M hooked up there with one. So I would be interested in seeing what workarounds you use or if someone has one they're willing to sell.

also, in reviewing your pics, I see the B&M-supplied cable mount attached to the B&M cable. That mount will not work...
As for the bracket that the cable gets clamped to (#22) it is whats hiding under the gunk. Fortunately it was just left ignored there by the po because the B&M routed the other way.

Here's a link to some info about locating the tranny assembly part number...have you reviewed all the torqueflite-related threads in this sub-forum?? We have one of the most extensive bunch of factual info you will find anywhere on the 'net!
Honestly, I think the whole forum is a great asset. I've read through most of the threads on here and I like how they're broken up and organized. I makes it feasible to graze a whole topic, front-to-back. Anyways, I appreciate that people like you and the other knowlegeers out there are forthwright with information and willing to spend their time reading & writing to these sites.
 
Last edited:
Also, now that the B&M's bracket is down I'll be sure to stick my smaller camera up there and see if I can snap the numbers for future reference. Couldn't get to 'em until I committed to taking the junk shifter out.
 
Man you are just too easy!

So ya have the oem cable mount still there! Great!

That #23/24 is a simple deal man! Hardware store!!

That is nothing more than an old-fashioned "clevis" end! Nothing special at all. Any decent auto parts will have those in the dorman assortments (those slide-out drawers), same for any real hardware store.

That is a common 10-32 machine screw thread clevis with a 3/16" clevis pin retained with either a cotter key or a hairpin clip, your choice. That same part was used forever on both tractor and truck throttle and choke controls, before the shift to cable-control throttle linkages. It's also the same thread that is on the other end of the replacement oem shift cable ya now have.

Once ya have all the cable setup installed and mounted solidly, you will prolly find you need to fine-tune the exact positioning of the shift lever on the tranny, to the travel/gate notching on the shifter itself. Since you have a new cable, that makes this much easier. Trying to adjust a worn cable is a real bitch in order to get it to index properly! So don't button it all up until you have verified that the shifter indexes the shift lever perfectly, especially in regards to park (verify a solid lockup in the park position where the vehicle cannot roll away!) and neutral, both those indexes must be right in order for the nss system (neutral safety switch) to allow starter engagement.

Thanks again for signing on with us and we really appreciate you chosing ihon for your parts needs!
 
man you are just too easy!
Eh, I get that all the time....

nothing special at all. Any decent auto parts will have those in the dorman assortments (those slide-out drawers), same for any real hardware store.
I tried a handful of some 1/2-way decent auto and hardware stores today and no joy. Nothing fantastic close by. They were easy enough to find online though.

The nss was bypassed by the po rather than popping in a new one. I'll fix the wire rigging and replace it when I do the maintenance on the filter, bands, etc.
 
Don't forget, the nss system also uses a relay, many time the nss switch is replaced when the relay itself is the problem.

And the connector for the nss can be problematic also.

The relay itself is identical to the horn relay. You should find both components just to the right of the steering column, above where the lip of the dash fascia ends. They will either be dangling loose or possibly mounted to a brace with sheetmetal screws.

Most of the time, the relay with the white pigtail is the nss relay. But I have seen a few rigs (including pickalls) that have a black pigtail.

Those relays are very common items at any parts house as the horn relay was used by nearly all manufacturers for many different applications over the years! We have 'em on the shelf at ihon also.
 
Mike, I've also seen the horn relay located under the hood on scouts right where it can become impregnated by water run-off. One easy fix for that is to mount it upside down in the same location.
 
Mike, I've also seen the horn relay located under the hood on scouts right where it can become impregnated by water run-off. One easy fix for that is to mount it upside down in the same location.

Exactly trev!

That's why we try and not use the terms "always" and "maybe" and "might" and "could" around here! There is no telling where some of this stuff might be found!

Those terms will bite azz bigtime!!

Thanks for posting the "possible"!!
 
You bet! I know sugar ain't tryin' tuh sort out any horny issues on his rig at present, but just in case he wanted to do a qwik relay swaperoo 'fer diagnostic purposes...provided his honker is horny raht now.
 
I finished the swaparoo and have got it all buttoned back up. I'll get back in there after a little break-in to check everything out and make any final adjustments, but I'm good to go now. Thanks.

And for future searches here's the pic of the threaded yoke that I was lacking.
 

Attachments

  • 199.jpg
    199.jpg
    5.3 KB · Views: 542
That clevis looks like forged stainless! Must be a marine rigging component!

Waaaay too fancy for a Scout II! Cut a hole in the floor so ya can see it!!

This'll work out just fine, and I bet this threads helps alotta folks who have run into thee aftermarket shifteroos!!

Thanks for posting this!
 
Back
Top