Trev's Olde Thyme Torkflite Tips

Scoutboy74

Moderator
Introduction:

this thread will detail a few observations gathered from a recent autopsy I performed on a tf 727 transmission that I had professionally rebuilt, which subsequently went into failure mode as soon as it was placed into service. I was slow to accept that the unit had failed for a variety of legitimate reasons which really aren't germane in the grand scheme of things. By no means do I consider myself an authority or expert on this topic, but this experience has certainly shifted my education process on these units into overdrive...pun intended.

Much of what follows May seem obvious to anyone familiar with the inner workings of these transmissions, but as I can now testify, familiarity alone isn't a lead pipe cinch for success. Nobody is perfect, and this event should serve as a reminder to us all that anybody is capable of making a mistake. That fact does not excuse the missteps, and I do feel that enumerating them here for the purpose of educating others is fair game and serves a worthwhile purpose. When dealing with precision machinery, we should always check ourselves before we wreck ourselves. I just want to be clear that I am not about naming names or creating some kind of bs controversy. The dots are not that difficult to connect for most folks around here anyway. I've gone through all the various phases on this deal that one might reasonably expect including disbelief, denial, discovery, disgust, and finally acceptance. What's done is done. I anticipate at some point soon, the builder and I will have an opportunity to discuss what went right as well as what went wrong with this build like two reasonable adults, hopefully emerging with our mutual respect intact. My preference would have been for he and I to get together on this and work to resolve it via back channel methods, but circumstances being what they've been, it just didn't work out that way. Its nobody's fault, its just the way it is. Sometimes life gets in the way, and real life should always take precedence over what for most of us is a hobby.

For the most part, the service literature...ie the carl munroe book and the factory service manual are very detailed with excellent photos and explanations making them indispensable for this work, but there are just a couple instances I encountered where additional emphasis might prove helpful to the occasional diyer.
 
Last edited:
1. Low/reverse band apply linkage:

never under any circumstances allow yourself or anybody else, no matter how experienced, to install the low/reverse apply strut with the long edges running north/south in the apply cradle. The strut is only to be installed with the long edges running east/west and the short edges engaged between the band tang and the intermediate apply lever. The initial band tension can be attained with the strut installed incorrectly, but the transmission will experience an immediate and catastrophic failure the first time it is operated, especially in reverse.

This malfunction cannot occur if the transmission was functioning normally the last time it was in use. For comparison's sake, a properly oriented strut can fall out of place and land harmlessly in the fluid pan if the band tension is too loose or the band breaks. Both are common failures. There is no way that the rectangular shaped strut can rotate 90 degrees in either direction while properly engaged between the band tang and the intermediate apply lever during normal operation. Human manipulation is required for that phenomenon to occur. As such, this specific failure is fairly uncommon, which is a good thing because its a total bitch to debotchify. If by some unfortunate circumstances you find yourself with a suddenly misbehaving transmission immediately following major service, there are some relatively simple diagnostics which should be performed.

After fixing the above mechanical linkage issue, reverse function has been restored. Unfortunately, I am still attempting to resolve some lingering forward motion issues which appear to be hydraulic in nature. The sad saga continues...
 
Last edited:
2. Diagnosis:

rule out potential external causes first. I'm going light on the specifics here, as these procedures are all covered in great detail elsewhere. Fluid level, engine tune, idle speed, shifter linkage, and throttle pressure adjustment should all be verified for correctness as indicated in your fsm. Also check your brake system to rule out the possibility of brake drag which can mimic a transmission issue.

With all simple possibilities ruled out, the next step is to perform fluid pressure checks on the transmission. The test procedures are outlined in detail in the fsm as well as the munroe book. You need at least one pressure gauge capable of displaying up to 300 psi. A two gauge set is preferred, with three being ideal. Assuming that you have two gauges at your disposal, the smaller of the two (min 100 psi) should be dedicated to the line pressure port, leaving the larger gauge to be switched between the front and rear servo ports. You should have roughly ten feet of hose for each gauge with barb fittings for the gauge ends and barb fittings that can be threaded into the pressure test ports on the transmission end. You will also need an engine tachometer with at least a 1000 rpm readout to monitor and maintain specified engine speeds. The rear axle must be elevated and safely supported so that the wheels are off the ground. Follow the procedures for testing the front and rear servos plus resting line pressure as indicated.

If the test results fall outside established parameters, it will then be necessary to remove the fluid pan for a visual inspection of the internal components. At this point you need to plan ahead. You will likely be faced with a decision whether to perform the repair with the trans in the rig or remove it for easier access. For some failures, there is no choice but to remove the unit. Exhaust all possibilities for repairing the unit inside the vehicle first, as r/r is generally quite labor intensive.

You're going to want at least the front end elevated for increased clearance underneath. Once the fluid is drained, even a partially ambulatory vehicle has now been rendered immobile.
 
Last edited:
3. Valve body cleaning/inspection:

if you've removed the valve body for cleaning, don't just stop at separating the halves for rinsing. That's the equivalent of washing your car, applying wax and then not buffing off the haze. Take the extra time and effort to completely gut the sucker. There May be grit and sludge trapped inside and underneath that you can neither see nor remove by rinsing alone. There also May be cracks in the passages or damage to one or more valves that you have little chance of seeing with everything in place. Yes, these items are chock full of intricate pieces like check balls, valves and springs. But if you've got the time-tested reference materials, you take your time and you follow all the instructions, it isn't that bad of a job. Be advised that some of the cover plates are retaining compressed springs, so care should be taken to ensure that you don't launch any shop missiles. Some of the springs are unique enough that it is fairly obvious as to which location they belong. There are several others, however, that are quite similar in size and appearance, yet they are not identical. While the pictures in the books are nice, they fall a little short in so as far as helping you definitively distinguish between similar springs. You should take good pictures of each spring with reference to which bore it was removed from so that you don't have to play spring roulette when you put everything back together. Wash all individual items thoroughly and spend plenty of time on the gutted valve core. You May even need to use soft bristle pipe brushes of various diameters to make sure you get everything spotless. Carefully inspect the body passages for cracks or damage that could result in a fluid pressure leak. Use adequate lighting and magnification if you're peeper-impaired. Then apply valve and governor lubrication spray to all the valves and their corresponding bore surfaces before inserting the valves into their bores. Pay particular attention to the direction that the valves are inserted. There is only one correct way in each case. Don't force anything into place! Blunt force instruments are not required for any part of this process. Do not use the retention screws to suck the cover plates into position! You'll strip out the threads and be in a world of hurt. Every piece should slip home nice and easy. Cover plates should rest flush against the valve body before screws are inserted. There are several critical measurements/adjustments for the external pieces fastened to the valve body. The specifications and procedures for doing so are spelled out clearly in the literature. Refer to your factory service manual for your specific vehicle application, as there are some variations between makes and models. Failure to do so could result in improper fluid pressure delivery and potential binding of one or more valves. Ensure that all valves are moving freely inside their bores before rejoining the two halves.
 
5/10 update/preliminary conclusion:

it isn't a good one. After correcting the rear apply linkage issue detailed above, reverse function was restored, but the unit began exhibiting very erratic shifting behavior in both drive and 2nd selector positions, with manual low giving the only decent forward motion. Suspecting that I May have done something incorrectly with my valve body rebuild, I decided to drop the pan again for a second look at things. In the pan I saw an alarming amount of what appears to be friction material. Especially alarming considering how little operation this unit has seen since the linkage issue was fixed. Obviously, there is something very screwed up within one or both of the clutch assemblies. Now there is no alternative but to remove the unit for a complete tear down and autopsy to determine the full extent of the damage. At this point I feel completely entitled to re-classify this "professional rebuild" a complete and total fail! I don't much care who's feelers might be hurt by that. I can assure you that my nerves are extremely raw at the moment.

In light of this, anyone unfortunate enough to be confronted with this rare failure, unless caught immediately, would likely be time and frustration ahead to proceed with r&r rather than investing time, effort, and trans fluid trying to resuscitate a terminal patient.
 
Last edited:
I plan to pull it on Sunday. Then I can gut it at my leisure, which for good or bad is something I have in abundance these days. I'm no expert either, but I'm not nearly as intimidated by them as I once was, thanks in large part to mm. If I take my time, dot all my t's and cross all my I's, I believe I can make this re-rebuilt unit finally shift properly for the first time in nearly 30 years. That would feel like quite an accomplishment for sure.
 
I think I know the root cause. I saw the picture tak'in and I swear I saw jerry off to the side.

You boyz been nipp'in his bottle 'o likwid wisdom.
 
You know I have some sailor jerry on the shelf and it ain't 80 proof now is it????? Maks a damn nice rum and diet coke. Yeah thats right diet coke!! :dita:

ps wad mayben think about the bar being open?
 
I tell ya trevor, if there's any example of handl'in misfortune in an above board manner; this is it. Some would bounce wrenches off the wall, or get into tirades shaming others and character assassination. But you've certainly demonstrated patience and processes of elimination.

Shit happens fer sure, but when a pro does it, it's really hard to swallow. I wonder if it's an age thing too, I find myself doing boneheaded stuff once in blue moon and it's like wtf was I thinking even after check and cross check and boucou manhours of experience. I certainly don't have the eyesight and dexterity of years ago, it's like 60 and stuff doesn't work the same. Even a 30 veteran at work forgot the oil filter one time. That's twice in my life I've seen that.


Give jerry the best :gringrin: he left the likwid wisdom raht heer.
 
you know I have some sailor jerry on the shelf and it ain't 80 proof now is it????? Maks a damn nice rum and diet coke. Yeah thats right diet coke!! :dita:

ps wad mayben think about the bar being open?

92 proof...80's just a waste of my time. Diet choke? That shit'll kill ya rk, but if you've gotta watch yer purdy figyer...:winky: you saw the vid of me mixin' a jerry. That wern't play-aktin. The man was pissed!:mad5:

I tell ya trevor, if there's any example of handl'in misfortune in an above board manner; this is it. Some would bounce wrenches off the wall, or get into tirades shaming others and character assassination. But you've certainly demonstrated patience and processes of elimination.

Shit happens fer sure, but when a pro does it, it's really hard to swallow. I wonder if it's an age thing too, I find myself doing boneheaded stuff once in blue moon and it's like wtf was I thinking even after check and cross check and boucou manhours of experience. I certainly don't have the eyesight and dexterity of years ago, it's like 60 and stuff doesn't work the same. Even a 30 veteran at work forgot the oil filter one time. That's twice in my life I've seen that.


Give jerry the best :gringrin: he left the likwid wisdom raht heer.

Thanks greg. That was my aim. Was I butt hurt about this? Dam betcha, but I'm a git'n over it. You know, I started thinking about this from a differnt angle too. What if mayben actually set this whole thing up as a johnny cash "boy named sue" lernin' kinda deal? Sometimes a teacher's gotta think outside the box and devise creative ways to drive a lesson home to the more "learning challenged" students in his flock. Talk about brilliant strategy! I did not see that one coming. Where ya at, master yoda? Its time ya weighed in.
 
Well, fwb johnboy dropped by early this am and we set about removing the trans from mongo before the heat of the day hit us. Still not acclimated to 90+ temps in mid-May. That's sweatsford for ya. We took our time and got it out slicker than dog poo. Then we loaded it in the shop north xkloosiv tranz-porter (aka wheelbarrow), so that I can move it around easily by myself. I'll do the tear down as she sits in the 'porter. That way I can move it out in the sun while its cool and then back into the shade as it gets warmer. I'll be updating this thread with pics as I get the various sub-groups broken down. My guess is that the loose friction material belongs to the front clutches. If I'm right, maybe prof. Mayben will buy me a candy bar:smilewinkgrin:.
 
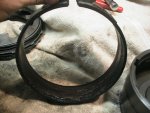
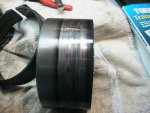
No candy bar for me. Both clutch packs are in excellent condition, as is the front band. So, by process of elimination, in addition to all the black fluid I see oozing out from between the rear band and drum surface, there's no doubt as to where the friction material came from. I don't have that band removed yet, but I'm imagining it will look like the armpit of hell. So one lesson to pass along here is that if you see considerable heat discoloration on a drum surface, but little to no loose friction material in your pan, you probably won't have to wait long before it starts sloughing off the band in big chunks.

I'm glad the clutches are fine. It looks like I'm essentially a new rear band and a corrected valve body away from having a functional unit. That's an oversimplification, but yawl get the idea. Anybody got an extree 727 rear band in good shape they'd like to kickdown to a fat white boy in need?
 
attachment.php

attachment.php

attachment.php

attachment.php

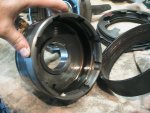
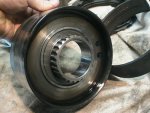
Armpit of hell May have been an understatement. That's one scorched ass rear band and drum. The drum surface still seems smooth, but considering how hot this thing got, it might be a good idea to replace it. I know exactly how this sitcheeyashun can be rectumfied. All it would take is a replacement rear drum, new rear band, and a valve body that is totally sterile and gayrondamteed to be dead-nuts perfect...if it accidentally came equipped with a transgo tf-2 kit installed, I wouldn't bitch. Call it a fence mender, late birthday present, early x-mas present or all the above. I don't think that would be too far out of line...well, maybe the shift kit is a bit of a stretch.
 

Attachments

  • Rear Band.JPG
    Rear Band.JPG
    144.5 KB · Views: 1,691
  • Drum Surface.JPG
    Drum Surface.JPG
    136.1 KB · Views: 1,737
  • Drum Inside.JPG
    Drum Inside.JPG
    135.7 KB · Views: 1,681
  • Drum Backside.JPG
    Drum Backside.JPG
    140.9 KB · Views: 1,661
A roasted rear drum and band is certainly not an unusual failure mode in one of these units. Those parts are unusually robust, but a vehicle which is badly "stuck" over and over and is abused during the removal process (rocking) really puts a tremendous strain on the low/reverse band and drum.

A very small amount of friction material will always be found in the sump as the stuff wears away from the clutch discs and the bands. That is why we replace those parts during a rebuild.

A tranny with that kind of deterioration will certainly load the valve body with really nasty oil and debris also so an extreme cleaning must be performed also (which I gather you have already done).

The torque converter is going to have a major load of debris also, I'd always replace it before re-installing the trans.

That rear drum should not be re-used. It's not even a candidate for "turning" ( a very poor reman process in my opinion). It's been badly overheated and those parts (new or used) are fairly inexpensive so no way or reason to try and clean it up.

I do have a few of those rear drums, you are welcome to one if needed. Just needs to be final cleaned before installation.

As for the band, those can vary in cost from $35>$185. No need for the high dollar version which is only used in sub-11 second drag rigs.

While in texas last June, I lost reverse in my t-all. Drove it on home from ft. Worth, just had to be careful where I parked it. The problem was a broken low/reverse band along with a servo piston that tried to escape it's bore crossways. Put the rig up on stands where it then set all summer when my back gave out. Finally got it back together when my Dad stroked this last time and I hit the road east for the temporary relocation.

The absolute best deal on quality 727 parts is the B&M rebuild kit which ihon offers. That kit now includes both bands and both clutch sets, the price can't be beat!

For individual hard parts which ihon/B&M do not carry, I now use these folks who truly do bizz in the right fashion:

automatic transmission parts online

Lemme know if ya want the drum and I'll prep/ship down to ya.
 
Great to hear from you Mike. Sorry about your lingering back ailments and the other continuing life stresses. I'm continuing to grapple with a real life issue of my own, that while not on the same level as yours, is nonetheless equally unpleasant. The timing on pretty much everything continues to suck, but there really is no good time for any of these things to happen.

I understand and agree that rocking to unstick a slushbox rig is very abusive and is also a great way to destroy a one-way clutch. I can assure you that there was no such abusive application with regards to this trans. I've detailed the cause of the failure in the initial post of this thread. In a nutshell, the rear band apply linkage malfunctioned on the first engagement due to the fact that the apply strut had been improperly installed. This prevented the band from fully applying when needed in reverse and manlow, and also prevented it from fully releasing in drive forward gears. It was slipping the entire time it was in operation. As hard as that May be to fathom, that's the bible-stackin' truth. In that condition, its easy to see that it wouldn't take many hours or miles of operation to toast the band, even on completely flat ground. With a 5k + lbs vehicle, several jockeys around the yard and a few laps around the neighborhood is plenty. We're talking about a unit that has logged fewer than five miles since the build. I still don't even have this pile registered for legal driving. The rest of the wear parts inside the trans look just as pristine as on the day they were installed. As I stated previously, had this problem been discovered and dealt with immediately, I'm confident that the damage to the band could have been prevented.
So the obvious begged question is, why wasn't it discovered and dealt with immediately? Pretty simple really. A perfect storm of events conspired.

1. Significant time elapsed between completion of the build and installation into the rig.

2. The trans was not original to the rig so a few, minor fitment issues had to be dealt with.

3. The rig was a dead-dog pos in non-running condition at the time of the trans install. Significant effort, equaling further delay was required in order to get the engine running soundly. The vehicle also had horrendous brakes (big surprise) and a suspected rear differential issue. Situations arose which required me to place the vehicle into motion several times, even as obvious functional issues were in various stages of repair. As additional time elapsed, the brake issues were addressed and a low-miles rear diff was swapped in place of the tired unit.

4. I did not want to believe and therefore was slow to overcome my state of denial that there might be something wrong with this freshly rebuilt trans. Once all other rotational issues had been addressed, the unthinkable suddenly became plausible. Of course it was too late by then to undo the damage that had already been done.

Now that the situation has been cleared up, I would very much like to continue this discussion with you by phone if possible. Are either of your numbers from last year still active? I tried getting in touch with you some time ago just to check in. Both your cell and home number appeared to be disco at that time. Please advise. Thanks Mike.
 
Last edited:
I discovered something else that had been installed incorrectly during the initial build. At this point, these discoveries have lost their shock value on me. Once again it pertains to the rear apply servo. What I found is the servo piston riding on top of the outer servo spring, which does not jive with the parts layout in the fsm or munroe. The sheet metal piece which rests just underneath the spring clip is called a spring retainer. The only way it can truly do its job is if it is in direct contact with the spring. It can't contact the spring if the piston is between it and the spring.

Once again, I reviewed the footage from the install and just as before, the video don't lie. It clearly shows the spring being installed into the bore ahead of the piston, with the sheet metal spring retainer placed atop the piston. With everything compressed into place and the spring clip set, the bottom of the servo is seen protruding out past the spring retainer a good inch. When installed properly, the bottom of the piston should be recessed inside the servo bore.

Now I see why the band tension was able to be set even with the apply strut oriented in the wrong direction. The apply portion of the piston protruding past the bore surface more than takes up for the slack in the apply linkage caused by incorrect strut length. Damn near everything that could have been done wrong to the rear servo and apply linkage installation was done. I can suspend my disbelief far enough to begrudgingly accept that an experienced builder can make an occasional mistake. Two screwed pooches in a row is just unfathomable.
 
And the hits just keep coming. After close inspection and comparison of the various servo springs I've autopsied from this trans in conjunction with further review of the build footage, I've discovered the following:

not only was it installed improperly as discussed in the previous post, in addition, the spring that was used for the rear servo is the wrong one! It's a front or kd servo spring, which is larger in diameter than the correct rear servo spring. The actual rs spring was incorrectly installed in the accumulator bore. The correct accumulator spring is considerably smaller in diameter and shorter in length than the rs spring. No wonder I had such a bitch of a time getting the valve body into position on my last attempt! So where is the correct accumulator spring? Hell if I know. Probably sitting in a pile of parts covered in a layer of dog hair inside the shop on the river.

I keep telling myself this is just an episode of the twilight zone and that I'll wake up any minute and none of this will have happened. Think it'll work?
 
Idk but the way I felt Monday morning (rum and coke) :icon_stressed: it could have been sailor jerry hiz own self.. Are you sure the man by the river was not hitting the bottle?
 
Pretty sure. Once upon a time maybe, but the hard shit don't mix well with a weak ticker. A simple and logical explanation or excuse would at least be entertaining. I'd love to hear it...hell I'd love to hear just about any response with more substance than the disjointed and mostly irrelevant one from two weeks ago. Pretty tough to explain the inexplicable. I think I've been tremendously patient and accommodating thus far out of respect, but my respect tank is sucking fumes.

The numbers are in and the accounting is done. This build was a complete botch job with no fewer than four, blatant fuckups stacked one on top of the other like cord wood. An automatic transmission is a precision piece of machinery. Whether you're a grizzled veteran or a rank novice, if you start mixing and matching springs, installing parts in the wrong order, direction or location...well friends, you're going to have issues. I don't reckon its much different than an engine in that regard.
 
After crapping in one hand while hoping the empty one would fill with something better for over two weeks with nothing to show for it, I finally decided to say piss on it and move forward using a few parts sourced from scott sinner aka buck dodson to replace what had been damaged and/or lost as a result of the previous build. A special thank you to mr. Dodson for such a generous contribution to this cause. I'm still expecting a meaningful resolution from the previous builder, the kind that any reasonable person in a similar situation would rightfully expect. Whether it happens or not remains to be seen. At any rate, the truck isn't doing anyone a lick of good with the front end up on ramps and trans parts scattered hither and yon. So over the past couple days, I undertook a complete tear down, inspection, cleansing, and reassembly. Basically, I rebuilt the rebuild, which was unavoidable as already discussed. I got everything buttoned up and fresh kool-aid dumped in around noon today. I'm pleased to report that this major problem child is now behaving properly for the first time in nearly 30 years! Its quite an accomplishment and I don't feel bad about crowing a little and patting myself on the back. This was my first transmission rebuild and I doubt it will be my last. I'm pretty sure that I will never encounter another build as needlessly challenging as this one proved to be. It amazed me how much easier everything went back together once I determined what parts needed to go where and in what order. Like the old saying goes, work smart not hard. Since the unit now works perfectly with all the right parts in the right places, that serves as the final indictment on the previous build.
 
A lot of angst in this ol' thread. Its often tough to reconcile in your head and heart when someone you consider a mentor and friend leaves you holding the bag, even when it wasn't done with any malice or intent. During my recent visit with the gang at IHPA, I had a chance to discuss mayben with Jeff and Chad and they helped give me some fresh perspective. Not that it excuses the mistakes that he made with this build, nor his failure to recognize and assume responsibility once they were pointed out. But it does at least provide a plausible explanation for their occurrence, which I hadn't considered previously. With reasonable explanation comes closure. So michael mayben, if by some strange chance you happen to read this post, I ain't holding any grudges. I'm over it. This transmission is still shifting great nearly two years later, not that the truck logs that many miles. Myself, Jeff, Chad...hell, everyone who frequents this forum, misses the hell out of you. We hope you're doing well and we'd love to hear from you, even if its only an occasional quick message in the chit chat section. Just thought you should hear it from me.
 
Last edited:
Not to kick that dead horse again, but 100% of the (4) 727's I'm associated with, that mayben built, failed in short order. I own two of 'em. The bright side is they didn't cost much. The r & r process (again) was rather unpleasant, though.
Hell, I'd still by the old fwaker a beer if he showed up.
 
Back
Top