Scout II Ignition issues

Hi IH only, I'm brand new to the forums. I recently received a 1976 International Scout terra as a project for use as my first car. Restoring this has proved to be a pretty interesting project, and since I'm only 15, a good learning experience. So introduction aside, my Dad and I managed to get the v-345, albeit somewhat weakly, running and idling fine. It came with a meyer plow attached to it and my Dad and I removed the plow and all electronics, to find it still ran. It was running fine for a while and then it didn't want to start suddenly. We put in more gas, thinking it was out, but to no avail. I have a fairly decent understanding of the internal combustion engine and I know the engine is receiving gas (can see and smell it in the carburetor), not sure about compression but seems ok, intake is clear, it just seems that the ignition isn't working correctly. My Dad and I turned the key and tested the voltage on one of the poles while grounding the other on the headers, and got a steady 12.45 volts. Put one of the multimeter prongs into the wire going from the coil to the distributor while grounding it against the headers and got around .45 volts. Just wondering if testing that was correct, and if you guys could help diagnose the problem. If any more pictures are necessary just let me know. Thanks!
13995d1311127916-Scout-II-ignition-issues-2011-07-19_21-08-31_423.jpg

13996d1311127916-Scout-II-ignition-issues-2011-07-19_21-08-40_421.jpg

13997d1311127916-Scout-II-ignition-issues-2011-07-19_21-08-45_397.jpg

13998d1311127916-Scout-II-ignition-issues-2011-07-19_21-09-07_269.jpg

13999d1311127916-Scout-II-ignition-issues-2011-07-19_21-09-25_964.jpg
 

Attachments

  • 2011-07-19_21-08-40_421.jpg
    2011-07-19_21-08-40_421.jpg
    53.1 KB · Views: 4,777
  • 2011-07-19_21-08-45_397.jpg
    2011-07-19_21-08-45_397.jpg
    49.2 KB · Views: 4,404
  • 2011-07-19_21-09-07_269.jpg
    2011-07-19_21-09-07_269.jpg
    54.6 KB · Views: 4,421
  • 2011-07-19_21-09-25_964.jpg
    2011-07-19_21-09-25_964.jpg
    31.7 KB · Views: 4,555
  • 2011-07-19_21-08-31_423.jpg
    2011-07-19_21-08-31_423.jpg
    58.4 KB · Views: 4,775
Last edited:
Welcome to the forum. The Scout makes a great vehicle platform for a young mechanic in training to get their feet wet as they are reasonably simple to work on compared to late model cars and quite dependable once all issues from decades of neglect and po abuse have been properly addressed.

The removal of the plow should have no bearing on engine function as the two are quite isolated. The vast majority of scouts running today have no plow currently and never did to begin with.

As I'm sure you're aware, three basic elements are needed to allow internal combustion: air, fuel, and spark in the proper mixture and at the proper time. The first one is easy. You're breathing. You say that you can smell raw fuel around the carb, but have you looked down into the top of the carb while actuating the throttle by hand to verify that streams of fuel exit the nozzles?

Is there any chance that you or your Dad May have inadvertently re-routed any of the spark plug wires? Did you remove or replace any of the plugs? Did you make any timing adjustments? Did you make any adjustments to the carb?

Your testing methods could use a little brushing up. First off, it isn't clear what you mean by the term "poles". I'm assuming that is a reference to one of the ignition coil terminals.

The first thing we need to do is determine for sure what type of ignition system and carb is on your Scout. Most of us oldtimers know what came on your Scout from the factory in 1976, but we're 35 years removed. Things get swapped on these rigs like soap opera stars swap spit. So get your camera handy again and take some wider pics focusing on the passenger side of the bay. Remove the air filter canister so we can see the carb clearly. Take a good shot of the firewall on the driver side. Carefully remove the distributor cap without removing any plug wires, remove the dust cap if one is present and post a pic of that. Once we know for sure what specific components we're dealing with, then we can begin to provide you with diagnostic suggestions. In the mean time, this forum contains a wealth of knowledge on a wide array of subjects pertaining to scouts and other International vehicles. It would behoove you to spend some time reading through the threads as a means of self-education. This is just the first of many issues you will undoubtedly encounter in the process of reviving your Scout.
 
Thank you for the quick reply. Yes my Dad and I removed a spark plug grounded it and looked for a spark after the engine stopped running, but nothing else was done. And yes you're correct I meant the terminal. Took quite a few pictures I'll upload them asap.
14001d1311137544-Scout-II-ignition-issues-2011-07-19_23-22-28_702.jpg

14002d1311137544-Scout-II-ignition-issues-2011-07-19_23-22-32_562.jpg

14003d1311137544-Scout-II-ignition-issues-2011-07-19_23-22-38_994.jpg

14004d1311137544-Scout-II-ignition-issues-2011-07-19_23-22-48_193.jpg

14005d1311137544-Scout-II-ignition-issues-2011-07-19_23-23-30_568.jpg

14006d1311137544-Scout-II-ignition-issues-2011-07-19_23-24-07_977.jpg

14007d1311137544-Scout-II-ignition-issues-2011-07-19_23-24-16_385.jpg

14008d1311137544-Scout-II-ignition-issues-2011-07-19_23-24-22_999.jpg

14009d1311137544-Scout-II-ignition-issues-2011-07-19_23-30-20_133.jpg

14010d1311137544-Scout-II-ignition-issues-2011-07-19_23-30-23_767.jpg
 

Attachments

  • 2011-07-19_23-30-23_767.jpg
    2011-07-19_23-30-23_767.jpg
    43.3 KB · Views: 4,441
  • 2011-07-19_23-30-20_133.jpg
    2011-07-19_23-30-20_133.jpg
    32 KB · Views: 4,323
  • 2011-07-19_23-24-22_999.jpg
    2011-07-19_23-24-22_999.jpg
    43.1 KB · Views: 4,285
  • 2011-07-19_23-24-16_385.jpg
    2011-07-19_23-24-16_385.jpg
    43 KB · Views: 4,269
  • 2011-07-19_23-24-07_977.jpg
    2011-07-19_23-24-07_977.jpg
    52 KB · Views: 4,288
  • 2011-07-19_23-22-48_193.jpg
    2011-07-19_23-22-48_193.jpg
    44.8 KB · Views: 4,319
  • 2011-07-19_23-22-38_994.jpg
    2011-07-19_23-22-38_994.jpg
    55 KB · Views: 4,960
  • 2011-07-19_23-22-32_562.jpg
    2011-07-19_23-22-32_562.jpg
    52.1 KB · Views: 4,298
  • 2011-07-19_23-22-28_702.jpg
    2011-07-19_23-22-28_702.jpg
    48.3 KB · Views: 4,526
  • 2011-07-19_23-23-30_568.jpg
    2011-07-19_23-23-30_568.jpg
    56.4 KB · Views: 4,316
Last edited:
Also, if you see from the pictures, is it a big deal that there's a stray wire near the coil that isn't connected to anything?
14011d1311137929-Scout-II-ignition-issues-2011-07-19_23-43-47_148.jpg

14012d1311137929-Scout-II-ignition-issues-2011-07-19_23-30-23_767.jpg

14013d1311137929-Scout-II-ignition-issues-2011-07-19_23-43-54_920.jpg

14014d1311137929-Scout-II-ignition-issues-2011-07-19_23-44-00_326.jpg

14015d1311137929-Scout-II-ignition-issues-2011-07-19_23-53-38_305.jpg

14016d1311137929-Scout-II-ignition-issues-2011-07-19_23-53-43_940.jpg

14017d1311137929-Scout-II-ignition-issues-2011-07-19_23-53-52_676.jpg

14018d1311137929-Scout-II-ignition-issues-2011-07-19_23-54-00_344.jpg
 

Attachments

  • 2011-07-19_23-53-38_305.jpg
    2011-07-19_23-53-38_305.jpg
    45.8 KB · Views: 5,788
  • 2011-07-19_23-54-00_344.jpg
    2011-07-19_23-54-00_344.jpg
    44.7 KB · Views: 4,230
  • 2011-07-19_23-53-52_676.jpg
    2011-07-19_23-53-52_676.jpg
    42.8 KB · Views: 4,618
  • 2011-07-19_23-53-43_940.jpg
    2011-07-19_23-53-43_940.jpg
    47.4 KB · Views: 4,802
  • 2011-07-19_23-44-00_326.jpg
    2011-07-19_23-44-00_326.jpg
    62.7 KB · Views: 4,309
  • 2011-07-19_23-43-54_920.jpg
    2011-07-19_23-43-54_920.jpg
    64 KB · Views: 4,286
  • 2011-07-19_23-30-23_767.jpg
    2011-07-19_23-30-23_767.jpg
    43.3 KB · Views: 4,309
  • 2011-07-19_23-43-47_148.jpg
    2011-07-19_23-43-47_148.jpg
    57.8 KB · Views: 4,644
Last edited:
Pictures without distrib. Dust cover
14019d1311139831-Scout-II-ignition-issues-2011-07-20_00-22-54_14.jpg

14020d1311139831-Scout-II-ignition-issues-2011-07-20_00-22-58_443.jpg

14021d1311139831-Scout-II-ignition-issues-2011-07-20_00-23-03_407.jpg

14022d1311139831-Scout-II-ignition-issues-2011-07-20_00-23-07_803.jpg

14023d1311139831-Scout-II-ignition-issues-2011-07-20_00-23-12_84.jpg

14024d1311139831-Scout-II-ignition-issues-2011-07-20_00-23-16_246.jpg
 

Attachments

  • 2011-07-20_00-22-54_14.jpg
    2011-07-20_00-22-54_14.jpg
    34.2 KB · Views: 4,199
  • 2011-07-20_00-22-58_443.jpg
    2011-07-20_00-22-58_443.jpg
    65.8 KB · Views: 4,180
  • 2011-07-20_00-23-03_407.jpg
    2011-07-20_00-23-03_407.jpg
    51.4 KB · Views: 4,111
  • 2011-07-20_00-23-07_803.jpg
    2011-07-20_00-23-07_803.jpg
    43.1 KB · Views: 4,128
  • 2011-07-20_00-23-12_84.jpg
    2011-07-20_00-23-12_84.jpg
    39.3 KB · Views: 4,137
  • 2011-07-20_00-23-16_246.jpg
    2011-07-20_00-23-16_246.jpg
    61 KB · Views: 4,146
Last edited:
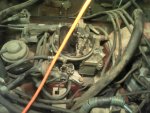
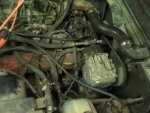
Thanks for the pictures. Things appear to be in mostly unmolested, original condition which is a good thing. Some observations:

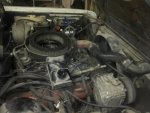
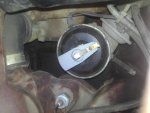
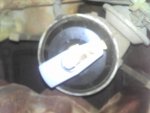
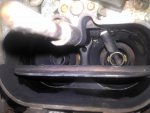
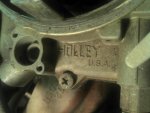
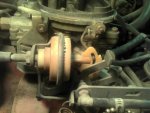
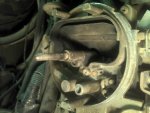
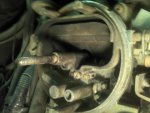
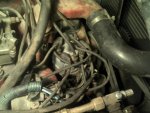
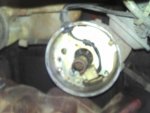
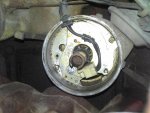
the carb is a stock Holley 2210 2bbl. I see evidence of raw fuel seepage around some of the gaskets. The black soot residue in the throttle boars indicates an overly Rich (too much fuel, not enough air) fuel mixture, which is a common issue with this particular carb model. An internal part known as the power valve is meant to enrich the fuel mixture as the throttle is opened and the vacuum signal drops under load. These valves are susceptible to failure. When that happens, the valve is stuck open constantly, which makes the engine idle like dog crap with dark black smoke visible from the tailpipe. There is no possible way to adjust the idle mixture lean enough to compensate for this issue, and in fact doing so has little if any effect on overall idle quality. This is less of an issue while driving, as the engine is able to more easily consume the excess fuel at higher revs, although fuel economy does suffer.

So what all that means to you is that the carb is in dire need of a complete tear down, surgical cleaning, through inspection, and rebuild with a quality carb kit. This carb can be a bit finicky for the novice to make play nice, so if you and your Dad feel out of your comfort zone, there's a tech moderator on this forum by the name of michael mayben who rebuilds these carbs in his sleep better than most can wide awake. He does this type of work on a contract basis for IH Parts America, which is the light line vendor who makes this website possible. Depending on your locality, if this Scout is not subject to smog certification, and you're not doing a strict, by-the-numbers restoration, you May elect to upgrade that carb by purchasing an aftermarket Holley 2300 list #0-7448, which is also available from ihon and comes to you fully ready for plug-n-play installation on your engine.

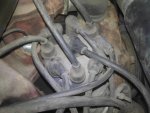
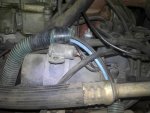
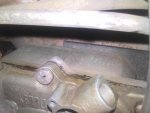
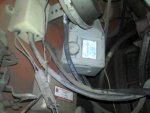
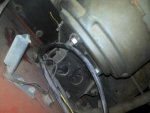
Your ignition system is as expected, a Holley breakerless distributor combined with a remote ignition control module, which is the gold-colored item on your firewall with the red & white label which identifies it as such. This system is more commonly referred to as a Holley gold box ignition. Those control modules do have a reputation for failure after so many years of exposure to tremendous underhood heat. I'm not saying that yours has failed. That is yet to be determined.

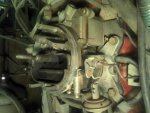
Based on the visual condition of your carb, your non-start issue could be either fuel or ignition related, or a combination of the two. Even if your ignition system is up to snuff, that engine will never run properly with a mungy carb in full failure mode.

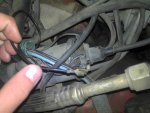
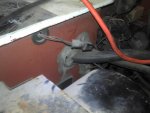
I could not clearly make out from the supplied pics which loose wire near the coil you're referring to. Have you tried tracing it to see where it goes?

That should be enough blabbing for you to digest and ruminate on for awhile. Don't worry, we ain't done brainwarshin' ya yet, yung'un!
 
You have a great project vehicle to work with over time!

Since the ignition system is a Holley "gold box" electronic system, we do know those a have a rather high failure rate. Most of the time the issue is the control amplifier (gold box) on the firewall becomes intermittent and then dies. This process can take several weeks or simply a few minutes.

We carry replacement modules for those units on the shelf. And for about the same money, the distributor can have all it's innards replaced by using a pertronix ignition conversion. If you do a search here you will find many threads regarding the gold box system and failure modes.

Likewise, we have many threads here regarding the Holley 22xx series carbs (along with all other carburetors used on ihc applications).

Wiring-wise...the actual harnesses used on these vehicles have several "loose" connections included ion the housings. Those are for use with optional items or when other engines are installed. Do not be concerned about a wiore that is not attached at this time.

The small metallic canister on the coil mounting bracket is a suppressor for rfi (radio interference) and has nothing at all to do with the actual electrical system.

Take several hours and read through many different threads here and you will see that all Scout II vehicles will suffer from the same abnormalities created either by fairly poor original engineering, or by time, or both! What we do is make an attempt to improve upon the faults, and fix the failures correctly, we do not deal in conjecture, maybe, "might", grandma said, etc.
 
Thanks for the quick replies! It sounds like first off I should get that carb fixed. So would you guys suggest I buy that new Holley 2300 which looks to be around $300, or should I just send my older one to you michael for you to rebuild? And I should fix the carb before looking into the ignition any further correct? I'll be doing quite a bit of reading in the meantime.
Thanks
 
Like I alluded to earlier, the direction you head in carb-wise depends on a number of factors. Where are you located? Is the vehicle still subject to periodic smog certification including under hood visual inspection? Is the difference in price between new versus rebuild going to break the piggy bank? If the answer to any of those is yes, then you should stick with the oe carb. Once refurbished it will function very well for you. If no, then for the long term, you will be happier with the 2300. It is an upgrade in every way.

It won't hurt anything for you to perform some simple tests to see if your ignition system is making a spark. One thing I forgot to add in my observations yesterday...since there is visual evidence that the carb is running Rich, there is little doubt that your spark plugs are also covered in the same black soot. So go ahead and remove any one spark plug you'd like and see if that is the case. Then you can plug it back into the wire boot, ground the electrode to metal, and crank the starter a couple times to see if there is a spark.

Have you done like I suggested earlier and looked down into the carb with the cleaner canister removed while actuating the throttle linkage to verify that fuel is squirting? If you have spark and the carb is still capable of delivering fuel in some fashion, the engine will run, just not well. If any one or more of the three vital elements aren't present, you're dead in the water. If you verify through testing that there is no spark, that's the issue to address first in my view. If you have spark, but don't see fuel squirting in the carb, you need to find out why. Are you out of gas? Is the fuel pump not working? Is there a blockage in the fuel line? Or is the carb suddenly incapable of delivering fuel to the combustion chamber?
 
I think that I would be interested most in just buying a Holley 2300. I live in mn and shouldn't have to deal with all those inspections. Just pulled out a spark plug to find it covered in that same black soot. Grounded it and again found no spark whatsoever. Had my friend crank it and throttle it, and had fuel visably squirting into the carb. What direction should I proceed in from here?
 
Suspicions are pointing to the gold box amplifier as to the root cause of your non-start. Couple more things you can do. Unscrew the fasteners that hold the gb to the firewall. No need to disconnect any wires. Flip it over and look for the presence of internal potting material that has escaped the confines of the box. It will be black-greyish in color. That's one visual indicator of gb failure, but the lack of it does not mean that the module hasn't failed.

Then you can disconnect the lead wire that runs from the coil to the distributor cap from the cap. Stick a screwdriver in the loose end and ground the shaft to metal while cranking the engine to see if it throws a spark. Careful not to touch just in case. It could be a shocking experience. Take your hand held meter and re-verify battery voltage at the coil + terminal with the key on. Red probe to the + terminal and black probe to engine block rather than the coil negative terminal. Never leave the key in the on position without the engine running for any longer than is necessary. Mayben says that there is no defintive way for the gb modules to be tested. A couple forum members have stated that their local napa stores were able to test their modules. This has not been verified for accuracy and acceptance by the tech community here. If you wanted to try that approach to see how far it gets you, go for it.

All the above comprise the best ways I can think of to definitively isolate that box as the culprit, which again is very likely at this point. I think you'll soon find yourself looking to either replace that box with another one or performing the pertronix upgrade as michael suggested. Since the price point is roughly the same either way, the smart money is on upgrading rather than continuing down the same path. That will get the engine running which should be the first goal. Then you can move onto making it purr as time and funds permit.
 
Alright I removed the gold box and looked behind it. All of the potting mix stuff seemed to be settled at the bottom of the unit. The rubber back to it had a hole in it and I could see a circuit board behind it. While doing the test you explained the engine had a difficult time cranking. No spark, but when I plugged the battery charger in it showed the battery was lacking juice.
 
Also, when testing voltage, the wire from the coil to distributor had around an 11.7 volts, and the positive terminal on the coil was at about 5 volts.
 
Neither of those numbers make much sense at those locations. A fully charged battery should give a surface charge reading of roughly 12.8 volts when the terminals are probed. The reading at the coil + terminal with key on should be nearly identical to that. There's no point in taking any voltage measurements until the battery is fully charged.
 
What are you seeing? Should be a minimum 12.x. You do have the meter selected to measure dc voltage on the lowest numerical value, correct?
 
Correct, primary winding-6.3 volts, wire from coil to distributor-11.3 volts. Is this petronix system you spoke about a drop in? And if so is there a specific kit I should get or just certain parts like a coil, ignition wiring, module, or what? Thanks again!
 
No points. Its a gold box breakerless. Let's forget about the primary winding and the wire from the coil to the distributor. The coil has two small terminals with threads on them. One is positive and one is negative and are clearly marked as such. Let's see what your dvom readings are at the following locations only:

1. Battery at the terminal posts once the battery has been fully charged.

2. Coil positive terminal with key switched "on" just long enough to take the reading.

3. Coil positive while a helper cranks the starter briefly.

4. Coil negative while a helper cranks the starter briefly.

Don't probe both coil terminals at the same time ie black probe on coil - and red probe on coil +. Rather ground the black probe to engine ground and probe each coil terminal independently with the red probe. Please post the results of each in corresponding order.
 
Sorry I didn't have time to look at all the pic.s, but I had a 75 Scout II with the infamous holly 'gold box' electronic ignition. I swapped it over to the pertronix that came as part of a distributor. Just dropped it in. So easy and fixed all my starting problems.
 
Back
Top