R-100 4X4

Jesse Stewart

Active member
Getting there ...

349989371_773019577853337_1205113275403044725_n.jpg


Did a wide body to it due to the tires sticking out so much ...

349958464_2311427029039920_6648709207407884646_n.jpg


400ci SBC, 4L85E trans, 203 NP transfer, Dana 44 up front ( Open, no lunchbox ), 14 Bolt Corporation with Detroit Locker in the rear ...

364122230_10227945069030686_4382516152189033549_n.jpg


274100579_482653540143727_853046556056477662_n (1).jpg


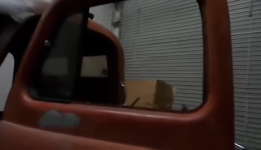
Added a world of creature comforts ..

342065788_6474164829263385_6659891198927419807_n.jpg


Ele. windows, 4-way ele. seats with adjustable lumbar support, keyless power door locks, AC, power cowl vent, killer sound system, courtesy under dash lights ect ..

Progress is slow ... My plan is to paint it a Mopar color, Hi-Octane Red ..
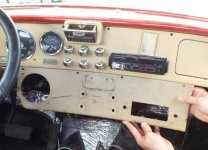
Wood graining the dash to match the Caddy horn button ..

363839603_10227918604089079_2990277901469160576_n.jpg


Keeping just a bit of the IH almond color on the dash ..

391681136_10228460596238544_4297936672339276842_n.jpg


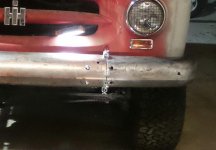
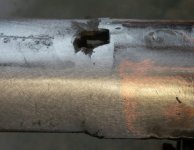
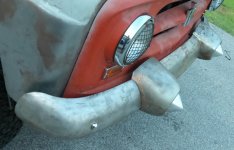
Also added Dagmars from a 58 GMC, had to add a few more inches to each side of the bumper cause of the fat fenders ..

352305003_10227562776913622_6489717043899104549_n.jpg


Pasties are custom spun alum for 57 Bel-Air ..

352363733_10227562776593614_7799054125882961321_n.jpg


47 Ford hood ornament, installed led lights in it ..
T-Rex in the grill opening ..

355631801_10227649531242426_316383366761815383_n.jpg
 
Last edited:
1650762127164.png


Little of this and that went into the soup ...

262612410_355840756301961_5860323432527945037_n.jpg


1655144178086.png


Been in the mode of getting the vent windows back in good working condition. some time went into them .
Time was not all that friendly on them ..

New rubbers was installed years back when I first built the truck .. Still in grand shape.
Passenger side lower pivot was broken and allowed for the vent to dance around, top pivot had a piece missing ..
Both these items are made from pot metal, using Muggy Weld Super Allow 1 made the needed repairs ..

384562619_10228350238399667_7238485676201612324_n.jpg


Top pivot stood fast, not so much on the lower ,, Tightening the drag to a point where they would stay open at 70 mph broke the weld ...
Tring to find a good one or even NOS seem like a dead end .. !!

Did find a NOS for the driver's side .. Used it to scale off the dimensions in order to make one out of steel,

384802559_10228373604223798_6358122648844566414_n.jpg


New gray tinted glass is in use all the way around but for the windshield.

It has a green tint with a blue sun-band ..

292556471_10225375994325424_4769449043085415531_n.jpg


Rubber seal was new at the time of the build, it too is still in grand shape and will be reused ..

Sun-band most likely was overkill cause of the "Charles Peckat" sun visor I found on Facebook Marketplace ..
( Ad said; Don't know what it came off of and No Clue what it'll fit )
It was in really good shape but for a bunch of dings in the stainless trim . Bumped all of them out and polished ..


132080207_391393742094048_3327214673946612791_n.jpg


135480903_227715995589644_3750208588224338226_n.jpg


Attachments

  • 1697998112082.png
    1697998112082.png
    272 KB · Views: 175
Last edited:
Vent window is dialed in ..
Only need to glue on the division bar rubber ...

1698023575826.png


1698023619369.png


Netted a really nice fit .. Should not be hearing many wind leaks if any ..

1698274152117.png


Dang, turned out looking like new !!
 
Last edited:
1698082947867.png


The used knob looks much better than what was ...

Almost pulled the trigger for a re-pop ...
They are 3-D printed and indeed very nice ...

19284a_237806.jpg


19284b_237807.jpg


Wanted to keep a look of nostalgia alive ...
Went on the hunt for a NOS which think I'd had better luck finding Hitler's Gold Train !!
Ran up on a good used one in Michigan ...

(Ya know, think I'll 3-D print one up just for shits & giggles.
Do it in black ... Might be changing the knob out ??)
 
Last edited:
Fellow asked me how I did the wide body ?
Here's how that was accomplished ..

Rear fenders seen 3 inches added to them ..

312539046_10225930787994919_142224249870531295_n.jpg


318724967_10226369299757439_4963760062361174694_n.jpg


That end of the truck was fairly easy to do but was time involved ..
Front end was a great deal more time involved !
Thoughts was to slice & dice the 100 fenders ..
Sure would be a world of metal work to make that happen, wasn't liking the huge wheel opening that was there ..
The more I thought about doing the job on em, the more I thought about attaining the fat look another way ..

Got the idea of using fenders from a larger R-Series truck .. The R-140/150's had a smaller wheel opening than the 160-up had .. Those would close up the huge gap over the tire and net bout three more inches of fat..
After a long and exhausting search, found a solid set in the corn belt and had them shipped ..

339136668_782294929860496_2760115102189895431_n.jpg


Knew it wasn't going to be a bolt on deal due to the differences between the models ..
Some metal work would be needed in order for them to look like they belong ..

340079525_1264574711126045_8945371462259145066_n.jpg


Wheel well was nowhere close to what the 100 fenders had ..
Adding metal to the rear and slicing some out of the front was in the picture ..
Then there was the drop at the running boards to be contended with ..

339753792_736013601553268_1679990732122249205_n.jpg


Had to get rid of the shelf and shorten them ..

348984630_275087004936881_2171154013950588092_n.jpg


350955127_806615197551867_3396084330809023940_n (1).jpg


After all the work was done on the wheel wells including welding in 1/4" round stock along the edge for support got the look I was after ..

Looks like it came straight from the factory that way ...
Very pleased with the end results ..
 
Last edited:
Metal work is always a need when you drift into the world of custom fabrication ...

As with doing the wide-body, there was a need to get created installing the AC ..
The look that I was after was to make the install look like factory ...
That is if AC was available as a option back in 1954 ..

Needed to mount a center vent & the AC/Heater switches, seen no place on the dash being it's super busy already ..
My thoughts lead to making up a pod to mount under the dash .. Keeping in mind of how the IH factory would have constructed it back in the day ..

In order to match the contour of the dash needed to acquire a donor dash to build the pod from ..


341173829_183408534517791_832412302411034583_n.jpg


Trying my best not to get to hokey with my design, came up with somewhat of a idea of how I wanted it to look ..

341877475_545745690972997_168984338343869582_n.jpg


This is almost done, was going to weld it on, but decided to bolt it on in order to make service work under the dash easy ..

The pod caused a issue with having the room to work the cowl vent handle !
Doing away with the handle altogether by installing a ele. motor to work the vent ..

1698156344991.png


Give your cowl vent a lift with this powerful gear motor kit that comes complete with gear motor, brackets, hardware, interior switch, wire, connectors, and instructions. Steel bracket for cowl can be bolted or welded. Attractive 5″ aluminum rod arm gives a clean look. Motor with mounting bracket and lever arm measure 2-1/2″ wide, 4″ high and 3-1/4″ deep including motor, not including 5″ connecting arm. Also works for power glove box door.
The motor is not waterproof.

The install of AC came with unseen other needed work to do ..
Mounting the unit under dash to the firewall was a bit of a chore, had mega holes to fill in order to net a clean look in the engine bay ..

353637033_10227661888071339_4324514643537277758_n.jpg


Driver's side is yet to do ..

356264093_10227677279216108_8177780487179214671_n.jpg


357117949_10227710028874829_6985808925319205134_n.jpg


In order to keep the clean look going on didn't want to drill new holes in the firewall to mount the unit, welded studs on the inside wall ..

355290854_10227690157618060_4316275536846805672_n.jpg


The glove box was another area that the AC was having a problem with ..

364056538_10227945251435246_3918782800568180435_n.jpg


Needed to have room for the unit's ductwork, the box had to be shorten ..
Being the old box was getting old went with a re-pop ..
Did the deed with the fit and lined it with felt, hid the trans stand alone controller on the wall so I could eyeball the display ..
It has a trans temp readout built in on demand, comes in handy when towing ..
Thoughts are there's not much need to look at the controller so hiding it in the glove box was as good of a place as any ..

357131046_10227728560458107_7715687700064831599_n.jpg


Tried out the fit using the old box first before modifying the new box ..

Will be installing a new mat when the time comes ..

356125030_10227669073050959_1552822288592894957_n (1).jpg


Be awhile before it's installed ..
Changing out the wiring harness and fuse panel from the 75 GMC's glass fuses ( Came from the 4X4 donor truck ) to a aftermarket ...
 
Last edited:
357725410_10227729796128998_696068019182197800_n.jpg


Got a world of wiring yet to do !!

Added a trick shifter knob to the transfer shift lever, it has four channel wireless control for on-off of circuits ..

1698195625407.png


I'm using one channel to turn on and off the subwoofers' amp, another channel for the exhaust cut-outs, third channel will be for the hood ornament light, no clue to what the fourth channel will be used for just yet ?
 
Last edited:
Such an awesome build!

How do the standalone controllers handle lock up for the torque converter? I'd be doing a reverse full manual Valve body.

I'm picking up a 4L80E morrow for $250 not sure I'll ever use it, but want it just incase my NV4500 craps the bed.
 
Thanks ...

These boys got it going on ...


Sounds like you got a great deal, I gave $400 for mine ..
Was you aware that these (4L80E) trannys was also used in Bentley's, Jaguar's, Aston Martin's and Rolls-Royce's ....
(The Ol' Binder will be rubbing elbows with the elite of Hi-End British cars) .. Tea and Crumpets anyone .. Lol

Shoot .. !!
They seem to have stuck em in everything that rolled or crawled ..

1698379416717.png


Wanted one from 97 and up due to the revised internal oiling ..
( Easy way to tell the early models, they have the cooler lines being both at the front of the case, 97-up have one line up front and the other in the middle of the case.)

1698194551540.png


Came home with one out of a 2000 3/4 ton Van, the yard said it was rebuilt not very long ago before the motor gave up the ghost ..
Got lucky cause when I pulled it apart the fluid was like new and no cuttings was to be found anywhere ...
Was going to go though it anyways, in order to attack some know weak areas and super beef some others ..

183482854_10223087146825667_3573163467788360889_n.jpg


1698195135766.png


Yeah Baby, yeah ...

1698199942964.png


That dust cover was hard to find, GM made them for just a few years, used on 4X4 trucks running big block motors ..
 

Attachments

  • 183482854_10223087146825667_3573163467788360889_n.jpg
    183482854_10223087146825667_3573163467788360889_n.jpg
    36.6 KB · Views: 150
Last edited:
386650112_10228386177738128_727387639420664172_n.jpg


Courtesy lights will help with seeing to climb into the cab at night ...

386191922_10228375307346375_5091932653035828381_n.jpg


The truck did come with one dome light on the driver's side, passenger side had the boss for another one but never was drilled.
A trip to the bone-yard got one over there, wired these to only work from the headlight switch .. Super bright !!

380731541_10228278865255383_1282378068287410486_n.jpg


Thinking about changing out the headlights to upgrade them to today's standards ..
( Halogen to LED )

Holley RetroBright LED Headlights

Everyone loves the look of classic sealed beam headlights, but the dim halogen light output makes nighttime driving a potentially risky endeavor for you and your beloved classic. Holley's new RetroBright LED headlights offer a number of advantages over traditional sealed beam headlights, such as plug-and-play compatibility, better visibility, and 6x longer life. Not only that, but because they are LED, the lights take up less space, create far less heat, and use less power than other headlights. The low-profile housing design fits most shallow headlight buckets found on classic cars without the hassle of cutting or drilling. Holley worked closely with Morimoto, a leader in lighting design, to develop its lineup of lighting solutions that boast a classic look with modern lighting technology. A special PWM LED driver resides inside of the headlight to keep the LEDs running at their peak intensity, even during prolonged periods of use. For example, the 7 in. round LED produces 32,000 Candela for low beam, and 53,000 Candela for high beam, which is nearly three times more light output than your original headlights.

RetroBright has offerings to fit most classic and modern vehicles that utilize the popular 5.75 in. round, 7 in. round, 4 in. x 6 in. rectangular, and 5 in. x 7 in. rectangular headlight housings. They're available in 3000 Kelvin and 5700 Kelvin color temperatures, depending on whether you're looking for that classic lighting hue or want an even brighter, more modern look. And if your vehicle feels more at home across the pond, Holley also offer headlights with yellow lenses for that European flair.

1698242596976.png


Looks bone stock too ..

Taillights are yet to do ...
The lights came from a 68 908-B .. They work find using 1157 bulbs ..
Wanting to keep them in play being they are made by International, will be upgrading em to Led's ..
Hadn't gave a lot of thought to how this will be done ??

Do like what's made for the 67-72 Chevys

1698377165597.png


They have 41 Led's
Not the same size as the IH len .. but with a little work to the IH housings can get em nailed on ..

I just may go this route ??
Not doing a complete ground up restore on this truck (Far from it), so I'm not concern about keeping it all International although I'll miss (A little, but not very much) the IH logos on the lens ..

352356428_6096148287151090_8758947445753804296_n.jpg
 
Last edited:
Been in the mode of getting ready for painting ...
Removing all the rubber on the cab and replacing with new ..

These tidbits came in today ..

1698465761824.png


They are 1950-1957 pickup truck lower door latch pillar seals ..

What's there now is the og 54 stuff and are still in good shape even though they have harden from age .
Most likely they will fall apart taking them off ?
Reason for the new ...
Don't have all the rubber just yet for the doors, but will nail down what's left to get fairly soon ..
 
Last edited:
Here's a thought ...

398857073_10228570990078321_8950825291077767118_n (1).jpg


398941241_10228570989398304_9106084700523388053_n (1).jpg


12-valve 5.9L 6BT Cummins is one of the Bad Boys for diesel motors ..
If I didn't have a built 400 ci SBC in the old Binder now, I might be looking into installing this diesel ..

Doing this swap would dig deep into the pocket .. !!

1698972682372.png

Could keep the 4L85E on line with this adapter ..

Capture 12 Valve.PNG


The adaptor kit is around $2300 ...
Alright, that's more than enough dreaming the 400 SBC will stay in use, it's been built pretty heavy duty for pulling and has served me well with many more miles still on the clock ..
That 12 valve can easily be bumped to around 700 HP and most certainly would find things to break in the drivetrain ..
Done a mighty fine job of talking myself out of doing a motor swap, didn't I ?? .. Lol

BTY ... The 12 valve (Aka; the million mile motor) you see in the photos is for sale .. (Came out of a Motorhome with low miles on it .. The Allison trany is not included)
 
Last edited:
Gave up the idea of using Chevy tail light lens ...
Bolt spacing wasn't the same .. Would need to use the complete Chevy light assembly ..

Rebuilding the IH light with new parts ...

398747756_10228575467910264_5254725453617233349_n.jpg


Since what I have seen better days upgrading to new will net a back to a new look ..

398805448_10228575563112644_2594025690979982897_n.jpg


Got a set of better Blue Dots that will be installed in the re-pop lens ..

Dang. I'm going to have a sack full of money in these tail lights ...

Capture RF.PNG
 
Last edited:
!! Talk about Wide Body !!

Capture WBIH.PNG


.. This Monster is super cool ..
First of the crew cabs ??

(Sure would love to see how they did the dash ??)
 
Last edited:
398959271_10228584556657477_8292862990990141651_n.jpg


Guess the bumper will look ok on the Binder ...
(Going to have too, got way to much time into it to start over .. Took three bumpers to make)

398847866_10228584554617426_2756444042785785441_n.jpg


I'm keeping the 50's alive with the Dagmar's ..
 
Thank you for showcasing your truck build. It's refreshing to see some innovative ideas amidst the familiar content we often come across in the IH realm.
 
Been fun building the truck to meet my needs and wants ... (Boy has it !)

Details, even the smallest can become very difficult to accomplish ..
The latest I got going on is the dashboard ..
Since I have this wild hair to woodgrain it and will be all over it, timing will be ripe to make the gauges to match ..

Here's what's going on with the gauges ..

I'm using a dashboard from a R-190 .. It was drilled for a tach and a air gauge ..
Used a VDO Series 1 7000 rpm 3-3/8" tach to fill the left hole that had the og IH over the road tach in it ..
Needed to find a gauge to fill the other hole that had the IH air gauge ..
All the factory gauges works with the use of a Ron Francis 12V to 6V reducer ..

Capture IHG.PNG


With those on line didn't need oil pressure, water temp or a fuel gauge in that hole ..

Ran up on a vacuum gauge that Pontiac used back in the early 60's in their center consoles ...

1699383716504.png


It was 3-3/8" and plugged right into the IH dash .. But .. The bezel was huge and looked out of place ..
Got the idea to get a replacement bezel with one for the VDO tach .. That was a bit of a hunt to come across ..
Did find one and is on it's way to me ..

1699384913414.png


Most likely will be a chore to swap the bezels out .. We will soon see what can of worms I will be opening up .. ??
Already had the vacuum gauge apart to paint the face (Got rid of the word Pontiac) did that years ago ..
341173829_183408534517791_832412302411034583_n2.jpg


Needs to be taken apart again anyways to repaint ..
Ready didn't need a vacuum gauge to tell me when I had my foot in it, got that down pretty dang good, but did a nice job of filling the hole up !

Got it apart and painted the face waiting on the VDO bezel to show up ..

402103516_10228625597163464_2760583521464912254_n.jpg


Not sure this is going to work out ... Did manage to save the Pontiac gauge bezel to reuse just in case I'm beating a dead horse here .. ?!?

1700086974967.png


Needing thinner glass than what the Pontiac gauge had .. Don't have enough lip to capture the gauge housing ...
Hopping I can come up with the glass .. Should work out well ??

To tell ya the truth ... This job has turned into a PITA !!
 

Attachments

  • 341173829_183408534517791_832412302411034583_n.jpg
    341173829_183408534517791_832412302411034583_n.jpg
    121.4 KB · Views: 165
Last edited:
Back
Top