Need some Tech Advice on Camshafts

Mump...

I'm moving your thread into the "gas engine tech" sub-forum which helps make it more easily searchable for the future. This topic is an outstanding example of all the potential problems many folks face when doing this type work!

Some members develop tunnel-vision in dealing with and researching stuff around here and simply do not run through all the topics on a regular basis!
 
Oh, I promise you, they will fix this and they will fix this properly. I'm sooooo pissed at them for messing this up, I am so freaking lucky how things have went down the past few days to lead me into finding this out.

Thank you michael
 
Ok, so, let me update my findings.

First one is the #1 cam bearing, bottom hole looked perfect, top hole looks kind of like it's protruding but with closer inspection that hole is kind of angled into the cam area so I feel confident with that cam bearing position.

#2 and #3, basically these two cam bearings have two holes in them but only one hole is functional which is the 6:eek:'clock position hole... Correct? These holes look to be in perfect position and once again I feel comfortable these cam bearing positions.

#4 - this is the one I was scared the most about and I hope I was able to do a good enough inspection with the light and mirror. I was able to take an extension mirror and run it from the front of the engine and into the cam bearing #4 and shine a light into the engine from the lifter hole and rotate the mirror until I could see the hole from the top. It looked to be in perfect position. I then shined my light in the oil hole between the 3&4 pistons and it shines a perfect little circle onto the cam bearing which makes me feel comfortable with it's position.

So, with all of that said, it looks like I am going to be able to take the engine into the machine shop and have them follow your directions for pushing my cam bearing forward just a tad so the oil gallery is clear and the hole isn't restricted.

What say you michael?

Rangers lead the way!
 
Nice work...now you know what to do and look for next time!

I agree with your findings, have the gumbas move the #5 into proper position!

If I was abit further along in my own four-holer engine build, I'd post a how-to regarding installing cam bearings. But the block is going back out soon for the bore job and decking. I don't want the new cam bearings in the block while that stuff is going on, and the block will have to be cleaned again after that also.

That engine build can be found here:

http://www.forums.IHPartsAmerica.com/gas-engine-tech/1144-ultimate-IH-fourbanger.html
 
I left a lot of things up to the machine shop and things went wrong. Next time every detail will be double checked by myself. The front passenger side lifter gallery plug was left out by the machine shop which caused a lot of un-necessary bs in my life.

The other thing that bugs me about my 304 build was that I was unclear on the need to increase compression ration slightly for the isky cam to really perform like it should. Instead the compression ratio is probably slightly lower than stock due to thicker new style head gaskets. The other unknown is what exactly did the silvolite pistions do for the compression ratio? Also maybe I should have advanced the cam slightly with an offset camkey. That's all history now cause its under the hood and being driven anyway. It runs ok and a hell of a lot better than it did with the old flat cam and mushroomed lifters. Just thought I would share some of my frustrations. I did check the cam bearings though and they got those right the first time around.
 
Last edited:
Your rocker shafts were delivered late yesterday evening mump!

One is a boat-type (the clean one), and one is a welded rocker type, both nine stand. I stripped the welded rocker unit out this afternoon and put the parts in the soak tank for preliminary cleaning and will have more info regarding "wear" at that point.

In determining which system is best for your application...what is the condition of all the pushrods? Inspect each closely for any evidence of "bend", and look very carefully at the "cup" end of the welded rocker pushrods, we're looking for tiny cracks forming in the cup area.

More to come...
 
Last edited:
Michael, I will look tonight at my push rods, hell I have no clue as to where the cup type rods are even at since I had planned on using the boat rocker arm assembly. Let me hunt them down. I know that the push rods for the boat rocker arm assembly are good to go, but I haven't even looked at the cup push rods, I'll have to find those.
 
michael, I will look tonight at my push rods, hell I have no clue as to where the cup type rods are even at since I had planned on using the boat rocker arm assembly. Let me hunt them down. I know that the push rods for the boat rocker arm assembly are good to go, but I haven't even looked at the cup push rods, I'll have to find those.

I just want to be able to look at both options for you, especially in light of the budget constraints we all face!

The boat pushrods have recently become unavailable to us again (both lengths). We have plenty of reconditioned welded (ball and cup) pushrods in both lengths available.

And...this makes you look at all your parts in detail so you can learn how to I.d. Any faults that folks that don't normally mess with will overlook!
 
I can't wait to see what comes out of that boat rocker arm assembly since that is the one I had acid dipped at the machine shop. You would think acid dipping them would clean them out, but I know better now. I have to really think hard about what I did with those cup push rods. I hope I didn't throw them away thinking I wouldn't need them. They've got to be somewhere, surely I wouldn't throw them away... Surely?

Let's cross our fingers
 
Well we can scratch the idea of me having the push rods with the cup on the end, I looked everywhere last night and couldn't find them. They are in a landfill somewhere probably. My other push rods are all straight and very cleean and shiny!

So, let's really try and get the boat rocker arm assembly to be the one I use.

Thanks
 
Too bad about the pushrods!

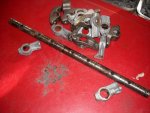
Here's a pic of your "clean" rocker assembly. If you had mounted this one the results would have been disastrous!

The debris shown in the pic is the stuff that I managed to gather as I peeled the parts off the shaft, the majority of the stuff is on the floor!

As I've said before, hot-tanking these assemblies does nothing other than remove some of the surface varnish. And the inside of the shaft which is really the critical item is far worse looking than this pile of debris.

And on top of the filthy condition, the actual wear points on the rocker shaft made by the boat rocker contact are not usable at all. This would have been one noisy valve train and no doubt the blame would fall on the "cam and lifters" when in reality those parts have nothing to do with this.

The pic does not show the terrible wear points on the shaft, but trust me, this one is not useable as a "boat" rocker shaft .

The "oil feed" rocker stand that you saw that still had partial clogging after being vatted, is actually completely clogged deep inside. This rocker assembly could not have been oiling at all, that leads to rapid wear on the shaft where the rockers ride at the two tiny points.

Internally, the shaft is even worse than what you can see on the surface here. I've not popped the plugs out since it May be wasted anyway.

The other shaft is of course a "welded" rocker assembly, it's equally as filthy and hasn't been pre-cleaned at all. Four of the welded rocker "tips" that contact the valve tips are worn beyond use, and as we've discussed, currently we don't have a source for remanufacturing those items.

So here is what I can do for ya...

I have some nine stand rocker shafts that though too worn to use as welded rocker shafts, can be turned upside down and used as boat assemblies. I will clean the best of those internally, re-plug, and then assemble a nice boat rocker assembly for ya. I absolutely gayrontee this will work and would do it for my own engines if need be.

And in consideration of your budget, I'll simply "trade" with ya for the welded rocker parts of which some are usable down the line. We can always use bits and pieces as the stuff eventually adds up to a full set. I'll cover the return shipping back to ya so you won't incur any additional expense about this deal and you'll end up with a rocker assembly of nice quality.
 

Attachments

  • Boat Rocker Parts.jpg
    Boat Rocker Parts.jpg
    75.4 KB · Views: 459
I've completed the assembly of your rocker shaft.

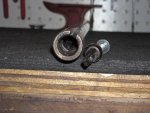
Just to show you and others contemplating an engine rejuvenation, here's a shot of your original boat rocker shaft that had been "cleaned" in the hot tank by the machine shop.

On the right is one of the core plugs after removal, you can see the heavy accumulation of sludge and hard carbon particulate that is stuck to the end of the plug.

My camera won't do macro, but if you look carefully in the end of the shaft, you can see the beginning of the sludge "plug" that extend all the way through the shaft interior.

So...the hot-tank process cleaned the exterior of the system to a degree, but did nothing except make the interior blockage even worse. The exterior cleanliness really means nothing other than being cosmetically nice.

This rocker shaft would not allow lubrication whatsoever!

Look for your return shipment in the mail by Friday (if not sooner). I'll use the return address that was on your original package unless you advise otherwise, if so, then send me a correct ship-to address to:

michael@IHPartsAmerica.com

Edit:

I forgot to mention a very important point. I have all nine bolts inserted into their respective stands. All bolt threads should be treated with a non-hardening sealant such as permatex #2 or hylomar, that will seal the bolt threads which penetrate the intake ports to prevent both vacuum leaks and oil being pulled into the intake ports which will result in major oil smoke on those cylinders.

And...remember, this shaft was originally a welded rocker unit that is worn too badly to be used with welded rockers. So I have "flipped" it to use with boat rockers, that means the wear points on that shaft are just the same as a new shaft. So...the small notch on each end of the shaft must be installed towards the head surface!!! The way the bolts are now inserted will allow it to mount only in that orientation, so don't change anything, it is plug and play. The shaft assembly will be "pre-lubed" when you do the pre-oil procedure once the cam, lifters, oil pump, pan, and oil is installed. You want to spin the oil pump before installing the head so you can see the oil emerge from the oil port in the block deck.

Then after the head is installed and torqued, along with mounting the rocker assembly, you will spin the oil pump again to pressurize the rocker shaft to observe oil flow from all eight rocker arm locations.

 

Attachments

  • Rocker shaft blockage.jpg
    Rocker shaft blockage.jpg
    79.7 KB · Views: 437
Last edited:
Michael,
I can't say enough good things about you man. My wife was even telling my friends over the weekend about what a great help you guys have been to me.

Thank you so much, I really truly can't say enough.
 
Michael,
I received the rocker arm assembly last night and I am very pleased with what you did. Thank you thank you thank you. I can't say enough about you guys, you're the best!
 
too bad about the pushrods!

Here's a pic of your "clean" rocker assembly. If you had mounted this one the results would have been disastrous!

The debris shown in the pic is the stuff that I managed to gather as I peeled the parts off the shaft, the majority of the stuff is on the floor!

As I've said before, hot-tanking these assemblies does nothing other than remove some of the surface varnish. And the inside of the shaft which is really the critical item is far worse looking than this pile of debris.

And on top of the filthy condition, the actual wear points on the rocker shaft made by the boat rocker contact are not usable at all. This would have been one noisy valve train and no doubt the blame would fall on the "cam and lifters" when in reality those parts have nothing to do with this.

The pic does not show the terrible wear points on the shaft, but trust me, this one is not useable as a "boat" rocker shaft .

The "oil feed" rocker stand that you saw that still had partial clogging after being vatted, is actually completely clogged deep inside. This rocker assembly could not have been oiling at all, that leads to rapid wear on the shaft where the rockers ride at the two tiny points.

Internally, the shaft is even worse than what you can see on the surface here. I've not popped the plugs out since it May be wasted anyway.

The other shaft is of course a "welded" rocker assembly, it's equally as filthy and hasn't been pre-cleaned at all. Four of the welded rocker "tips" that contact the valve tips are worn beyond use, and as we've discussed, currently we don't have a source for remanufacturing those items.

So here is what I can do for ya...

I have some nine stand rocker shafts that though too worn to use as welded rocker shafts, can be turned upside down and used as boat assemblies. I will clean the best of those internally, re-plug, and then assemble a nice boat rocker assembly for ya. I absolutely gayrontee this will work and would do it for my own engines if need be.

And in consideration of your budget, I'll simply "trade" with ya for the welded rocker parts of which some are usable down the line. We can always use bits and pieces as the stuff eventually adds up to a full set. I'll cover the return shipping back to ya so you won't incur any additional expense about this deal and you'll end up with a rocker assembly of nice quality.

I just love reading this post. Man, talking about making a person feel good about doing business with a company. It's things like this that makes everything worth while.

Thank you again michael
 
Guess what?

You guessed it! Camshaft has arrived!!! Time to start putting this baby back together!!!
camshaftarrived.jpg
 
guess what?

You guessed it! Camshaft has arrived!!! Time to start putting this baby back together!!!
camshaftarrived.jpg

Oh shit!

This is gonna git real interesting now!

Did that machine shop take care of the cam bearing dealybob??

I feel a major learnin' 'spiriment coming on....
 
Taking it in here in about 30 minutes. Can't wait to get started putting this bad boy back together!
 
Michael,
just a quick update. I took the engine to the machine shop yesterday morning and made them fix it while I watched as well as doing it exactly as I told them to do it. You'll get a kick out of this, I pulled up the post on my iphone and read verbatim to the shop dude your explanation on how to fix the issue. He fixed it, let me inspect it and then said, you know as long as there isn't more of a lip about the depth of the thickness of a quarter you're fine and as long as you have 80% more of a hole you'll be ok as well. I simply smiled and said, yea, they said you'd say something like that and left.

Anyway, last night I installed the camshaft, backplate, timing gears, oil pump, head, lifters, rods, rocker arm assembly and torqued everything to spec.

Tonight I plan on just about having it all together and ready for the priming instructions.
 
Last edited by a moderator:
Knowledge is power dude!

And I'm sure the machine shop guy would pull the engine back out, tear it down, and eat all related charges, and reimburse you for your labor for re-doing that engine since it would have mucho "lifter rattle"...not. They would blame the fail on "that dam smartazz customer didn't know what tha hail he was doin'".

If the original design/installation of probably close to half a million+ or so of the #5 cam bearings didn't matter to the "factory", they would not have engineered the way they were meant to be! Does the "factory" ever scruu up? Of course they do, but then the issue gets fixed. This was the truck bizznizz,...not the typical deetrot "big 3 don't give a shit" passenger vehicle bizznizz that is still prevalent today!

These engines were for working vehicles making wages for someone, their owners would have never tolerated engine failure (lubrication-related) when they were running fleets of five>fifty of these motors back in the day! If even one failed due to a manufacturing issue, they all would fail and the fleet owner woulda stuck 'em all up the dealer or factory branch butt!

Anyway, let's move forward.

Here's your own personal copy of the "pre-oil" document. While it is somewhat more involved than what you are doing, the process is exactly the same.

You have now seen exactly how the feed hole in the #4 cam journal aligns only twice per each full revolution of the camshaft to allow oil to feed through the rocker assembly. So you must use extreme patience in carefully rotating the crankshaft to hit that "sweet spot", don't get anxious, don't get in a hurry, take your time. Once you hit the spot, oil will slowly start oozing form all the clearance voids throughout the entire rocker assembly. Keep spinning the oil pump for at least 15 minutes once you observe oil drool, the engine will be very appreciative of your efforts in the end!!

You will also be able to look down past the pushrods into the lifter gallery and see oil flooding...if that cam bearing had not been re-positioned, the oil flow at that point would not be sufficient when the engine was actually running. This attention to detail insures success in an engine build!!

And for when you are really bored but feeling super-educated....look through this thread and you will see an example of that old adage..."you are not alone"!:

http://www.forums.IHPartsAmerica.com/gas-engine-tech/2694-no-oil-driverside-head.html
 

Attachments

  • Old Iron Pt 1 v1.2.pdf
    70.7 KB · Views: 431
Last edited:
Back
Top