Need help identifying this carb

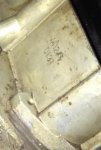
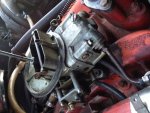
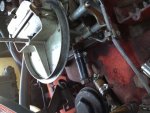
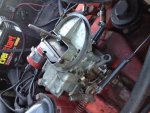
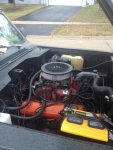
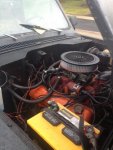
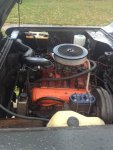
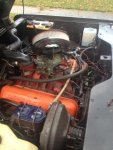
Ok so I sort of skimmed through the stickys to try and id the carb on my Scout so that I can try and tackle rebuilding it. This thing doesn't really look like any of the other carbs. It sort of looks like the aftermarket 2300 but I have no idea.

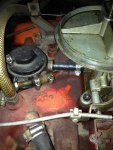
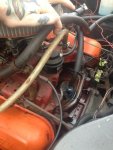
Also theres a hose out the back of it thats plugged with a bolt. Not sure what that is maybe someone here can help.

Thanks:icon_up:
 

Attachments

  • photo 1.JPG
    photo 1.JPG
    147.7 KB · Views: 383
  • photo 2.JPG
    photo 2.JPG
    135 KB · Views: 339
  • photo 3.JPG
    photo 3.JPG
    145.2 KB · Views: 325
  • photo 4.JPG
    photo 4.JPG
    148.6 KB · Views: 384
I've got the 304 v8 in my Scout. I don't know too much about it. I just got the truck about a month ago. It ran fine for a few weeks. Then the past week I noticed the truck running really Rich and sort of bogging down around 30mph and sometimes it would just die. Now it wont start at all.
 
The carb is the Holley 2300, 0-7448. Could be the 350 or 500 cfm. The smaller 350 cfm would be better for the 304 engine. If you check the venturi size, the 1 3/16" will be the 350 cfm. The larger 500 cfm carb will have the 1 3/8" venturi. The 350 carb has more capacity than the 304 engine can use. The hose on the back is just another source for vacuum and can be blocked if you have no need for it.
 
To best identify a carb post up the list number found on the upper choke part of the carb.
 
Could you post up a pic or two that shows your entire engine? Its difficult to tell in the tight shots just what you have in the way of pcv (crankcase ventilation) which could have some bearing on your issue if not plumbed properly. More than likely this carb is out of tune/adjustment, but it May also be in need of a rebuild. The tuning basics for these models involve a proper fuel float level and having both idle mixture screws identically set for the lean best or highest steady vacuum at a smooth curb idle. As bill indicated, the 4412 (500 cfm) will continually make your 304 run on the Rich side of the spectrum throughout the useable throttle range. Hopefully yours is the 0-7448. If your spark plugs are extremely sooty and fuel soaked, they are probably not producing adequate spark to detonate the overly Rich mixture. You might randomly pull a few one at a time for a visual.
 
Great thanks guys. That helps a lot. I did buy a set of new spark plugs just in case. Haven't looked yet. Haven't had any time I've been sick lately.

I will try to get some pictures up asap. I know the guy I got it from said he just replaced the pcv valve before he gave me the truck but who knows if he even knew what he was doing.

Any tips on tuning that carb that I can try before I go and rebuild it? It'd be nice if it was as easy as turning a few screws and not having to pull the whole thing apart haha.
 
The easiest adjustment to make with a non-running engine is to the idle mixture screws, which are the little guys on either side of the carb, housed in the metering block. Screw them each in gently until you just feel the resistance of them seating. Then back each one of them an equal 2.5 turns out. This is a starting point. The engine really needs to be running in order to fine tune the mixture from there. The fuel float level is also best examined and set while the engine is idling and rig parked on level surface. The only way to check it and set the baseline level when the engine is not running is to remove the fuel bowl and turn it upside down. The top of the float should be level with the top of the bowl, which will appear to be the bottom since you are holding it upside down. There will be a gap of roughly an 1/8th of an inch between the float and bowl as viewed upside down. This is a baseline setting, which is again fine tuned when the engine is running. If you remove the fuel bowl, keep in mind that unless there is a multi-use blue neoprene gasket in place, you will be looking at a gasket replacement there when the bowl goes back on. If you do remove the bowl, have a look at your jets and make note of what size they are. The jets are little circular brass objects that will have a two digit number stamped in them such as 61 for example.
 
Ok here's a few shots of the engine. I finally have a day off work tomorrow and I'll pull the plugs to see what they look like in the morning. The guy I got it from said he replaced the pcv valve right before he sold me the truck. Who knows if he did it right or not. I think he said something about a "vacuum issue" too. Might have something to do with that one weird hose going to the brake booster?

Thanks again for all the help you guys
 

Attachments

  • photo 1.jpg
    photo 1.jpg
    41.5 KB · Views: 316
  • photo 2.jpg
    photo 2.jpg
    38.7 KB · Views: 374
  • photo 3.jpg
    photo 3.jpg
    43.1 KB · Views: 339
  • photo 4.jpg
    photo 4.jpg
    42.4 KB · Views: 324
  • photo 5.jpg
    photo 5.jpg
    40.6 KB · Views: 320
Clearly the po screwed up the pcv hose routing.

The pcv grommet in the valley pan is covered with bathtub caulking, so obviously the rubber grommet needs to be replaced.

The hose from the pcv valve should go directly to the base of the carb, rear....and not teed into where it is now.

Next, the breather hose from the right rocker cover should go directly to the base of the air cleaner housing, where it is now, but without the tee fitting.

The hose to the power brake booster appears to be from the pos dishwasher, replace it with a proper material vacuum hose.

Do these things and report back with new photos of your work.
 
Thanks for the pics. In addition to scott's observations/suggestions which are spot on, I see several other "opportunities" for improvement. First, the zip-tied bundle of spark plug wires as viewed from the driver side is not recommended. Most importantly, the #7 (rear most driver side) plug wire should be routed so that it cannot potentially crossfire with the #5 plug wire, as these cylinders are not only adjacent to each other, they also fire in sequence. Best way to accomplish this is to route #7 wire around the passenger side of the carb and approach #7 plug from the flank so to speak. The remaining wires should be kept separate from each other via plastic plug wire looms. That goes for the other side as well. Still hoping to get a list number from you or a pic focused in on the airhorn where the little numbers are.

Next point of concern...I see you have an auto trans which I suspect is a torqueflite 727. What year is this Scout? If it is a 727, then you are missing some very critical linkage components which allow the carb to interface with the trans for proper internal hydraulic pressure control. This has no bearing on your current non-run situation, which is where your immediate focus should be, but this is something that must be addressed before you start logging miles. Severe trans damage will occur in short order if the rig is driven without the throttle valve/kickdown linkage in place and properly adjusted. Again, that's only if this is a 727 trans, which we will need to confirm. Knowing the year of the truck will help us there. The quickest way for you to id this trans for us is to look for two small diameter, metal cooling lines that would run down the driver side from the radiator and connect to fittings on the trans. If those are present, you have a 727.

This nit-picking is not intended to make you feel overwhelmed. Step one is to get the thing running consistently decent. Once that's been accomplished, then we focus on getting your carb to trans interface squared away, but we'll do that in a new thread in the trans tech section, right on?
 
Ok great. The truck is a 1980.

I'm about to go out and check out the trans and grab some more pictures.

The po mentioned something else too about a rod coming from the trans that he just bolted on to something and it "works fine" I'm guessing that's where the linkage is missing. Is that part hard to find or no?
 
ok great. The truck is a 1980.

I'm about to go out and check out the trans and grab some more pictures.

The po mentioned something else too about a rod coming from the trans that he just bolted on to something and it "works fine" I'm guessing that's where the linkage is missing. Is that part hard to find or no?

The po "fixes" I've seen so far have not impressed me to the point where we should be accepting his assessments along the lines of "gud enuff ta git-r-dun, hoss. Jes drive the sumbitch like ya stole er! Hardy, har, har! Pwit...ting (tobacco juice hitting the spittoon)." I'm sure he's a nice enough guy, but that jerry-riggin' sob really should not have been allowed to turn one bolt on this rig. 1980 year is one more indication of it being a 727 trans. The missing parts should not be overly difficult to source, though they are International specific. Like I indicated earlier, let's not get too carried away with the trans stuff. We know it needs attention, but let's slide it to the back burner and keep trucking on getting the engine to run.

Yes pcv hose to the rear carb fitting that is bolt-blocked.
 
Alright well I pulled all the plugs and every single one had black soot all over it. I put new plugs in one at a time so I didnt put a wire in the wrong place. I also tried to separate the wires and make it a little neater in there.

I didn't get a chance to do the hoses since I have no working car right now and no one was here to give me a lift. Bummer. And it got too dark to take more photos.

Anyways I figured since it ran before maybe I'd at least be able to start it to move it into the driveway off the street (been getting tickets...:mad5:)

it'll crank, but it won't start.
 
alright well I pulled all the plugs and every single one had black soot all over it. not surprisingI put new plugs in one at a time so I didnt put a wire in the wrong place. good! Which brand? What is the gap set too?I also tried to separate the wires and make it a little neater in there.good!

I didn't get a chance to do the hoses since I have no working car right now and no one was here to give me a lift. Bummer. And it got too dark to take more photos.

Anyways I figured since it ran before maybe I'd at least be able to start it to move it into the driveway off the street (been getting tickets...:mad5:)

it'll crank, but it won't start.

That sucks. Sometimes these pigs (I don't mean the cops!) don't make it easy on a feller. Where are you located? The next time you get a few minutes to fiddle, I want you to take a small standard screwdriver and gently turn in both of those tiny screws that you see on either side of the metering block. When you feel them come snug...stop! Don't over-tighten. Also, I want you to count each full turn as you go in and jot down how many full turns d-side was out and how many full turns p-side was out. Hopefully you will find that they were something like 3 to 5 full turns out, which is way too Rich an idle mixture. Once you've got that info...which I want to read btw...take your driver and back each screw out an identical two full turns and stop. We want both sides to match up perfectly. Next, grab a spill rag and position it under the fuel bowl from the passenger side. Hopefully the rig is sitting fairly level. If not, this next step isn't worth trying. Only if fairly level, take your driver and carefully remove the sight plug from the side of the fuel bowl. Does fuel just come gushing out? No fuel spill at all? Just a little dribble? Make note of it and replace the plug. This carb has a manual choke on it. Are you able to close the choke plate up nearly all the way? Are you then able to open it up all the way? If the answer to either of these is no, then we need to address that. The choke plate should be closed up for a cold start, and then gradually opened as the engine warms, until it is ready to run without any choke assistance at all.

Oh yeah...I still want that stinkin' list number off the front of the carb airhorn. I'm gonna keep beatin' you over the head with a 2x4 about it until I get my way...copy?
 
Last edited:
Haha copy. I'm located in illinois.

I already adjusted the mixture screws to 2 turns out on each side. I dont remember how many turns out they were but it wasnt as much as 5 that's for sure. I'm pretty sure they weren't the same either. One was out way more than the other.

The plugs I put in are autolite plugs. .35 gap

I'm about to go brave the elements again (a crisp 32 degrees) and look for that list number and try the fuel bowl thing. I wound up having a guy tow the car onto the driveway last night. It's pretty level where it's at I think.
 
Oh good. Obummer kuntry. Thought if you were close enough I might could get eyes/hands/nose on this thing. We'll just have to make do with this long distance affair. Good on the plugs and good on the mix screw adjustments. Glad you got it off the street. What about the choke function that I asked about?

Now if the thing gushes fuel from the sight hole, you need to rock the rig side to side to slosh out as much as you can and get the level down below the hole. If you only get a trickle or less to come out even with some gentle rocking, that might mean your float level is okay. Like I said several posts ago, the thing really needs to be running in order to set this adjustment, but it won't hurt anything to have a look while she's dead. So once you're done playing around with that, pop the air filter canister off, grab a good flashlight, position yourself to where you can look down inside the carb, have the choke plate open...then blip the throttle by hand. You should see two strong streams of fuel that squirt out the instant the throttle linkage moves. How'd they look? Where's my damn list number?
 
Well I got the thing started. The wiring to the ignition coil was done with spade connectors for some reason and one came loose. Put it back on. Fired right up. I dont know how I missed that before. I feel like an idiot.

Anyways I think I have the 500 cfm carb. It says 4412 right on the front. I had to turn the mixture screws in a full turn just to keep it idling. And even then I had white smoke coming out of the exhaust pipe like crazy. I didn't even bother with the sight plug thing after I saw that 4412 stamped on it. Looks like its new carb time?

Also I noticed another (refrigerator) hose plugged with a bolt coming off the intake manifold. Where's that supposed to go?
 

Attachments

  • photo (1).jpg
    photo (1).jpg
    9.4 KB · Views: 218
  • photo (2).jpg
    photo (2).jpg
    49.3 KB · Views: 215
Well, now you've got a little good news to go along with your bad. Don't feel bad about missing that wire. It happens. Yeah, that's the 500 cfm version. I'm of the opinion that even if you were quite knowledgeable about carb tuning, you'd still be constantly tweaking and fiddling with it and never be completely satisfied. Just too much carb for the engine. It'll still run you around, but your fuel mileage is going to suck even more than you'd expect from such a rig, and your performance is going to be all over the place. Alright in some instances, downright crappy in others.
Now this white smoke concerns me. If it's just condensation because its cold outside, that's normal. But if the white or grey "smoke" out the tailpipe persists even after the engine has warmed, that's not normal. The color I'd expect to see from the tailpipe of a rig that's running too Rich is dark black and it will smell like unburnt fuel. If the white stuff has a sweet smell to it, that's engine coolant...not good. Let's check your oil and pop the oil fill cap off the valve cover for a look down inside. What's it look like? What's the oil on the dipstick smell like? Is it amber/honey in color on the stick or yellow-brown mocha frappacino colored?
 
Oh yeah I'm sure I was getting 10 mpg or less when the truck was running a few weeks ago.

The smoke was definately white smoke and not because of the cold and it smelled like gas. My tailpipe points down at the ground right behind the rear drivers side wheel. There's a big black spot under where the tailpipe is. The truck has been sitting for about a week and a half and I didnt run the engine for very long.

When I pulled the dipstick the oil on it was dark brown/black. I havent changed the oil and I don't know the last time it was changed, so keep that in mind. When I looked into the valve cover everything looked really clean in there.
 
Back
Top