JMiller's 77' Scout II

JMiller

Member
Hello all,

I want to thank the people involved with this forum. If it were not for them, I would still be standing in the shop staring at this thing they call an International. Special thanks to m. Mayben for all the 1-on-1 sessions spent with this newbie to master the art of "how 2's on a Scout II".

My build is in it's end stages but I am just now finally finding time to post about it. I know how everyone likes to see pics of other peoples scouts so I took plenty as the build progressed.

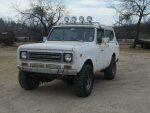
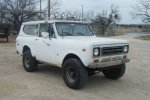
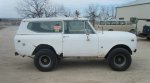
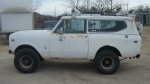
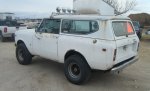
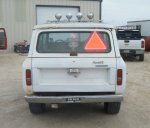
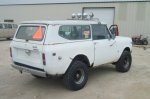
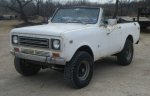
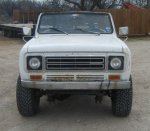
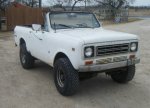
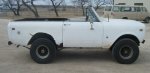
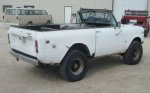
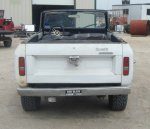
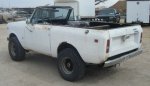
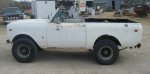
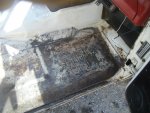
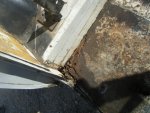
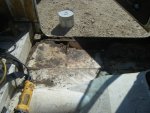
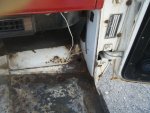
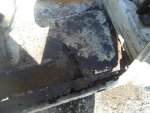
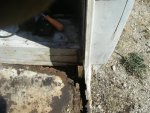
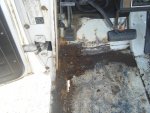
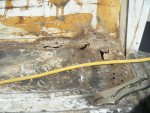
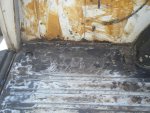
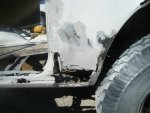
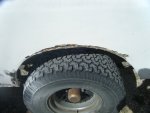
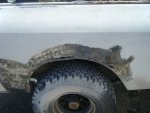
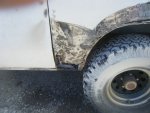
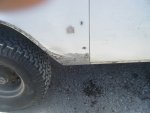
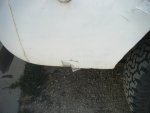
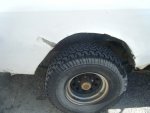
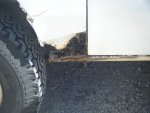
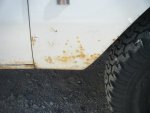
I am not new to scouts but I am new to working on them. This is the first one I have ever attempted to bring back to life. I aquired this Scout in March from a guy in central texas who used it only for hunting purposes. He bought it from a military guy who had it some other state. And that guy bought it from someone who had it in alaska. It still has an electric cord tapped into the oil pan I guess to keep the oil from freezing so I know it has been some place cold. It was pretty rusty before I started. So bad that when I tried to pull it on the trailer I sat on bench seat and it fell right through the floor!

Luckily I was between construction projects so I jumped right in. My primary direction for this was a weekend run-about and a hunting buggy during season. Once again, this is my first build so please forgive me for doing things a little backwards.

This is how the Scout looked before I started...
 

Attachments

  • DSCF1132.JPG
    DSCF1132.JPG
    117.1 KB · Views: 620
  • DSCF1133.JPG
    DSCF1133.JPG
    87 KB · Views: 503
  • DSCF1134.JPG
    DSCF1134.JPG
    104.5 KB · Views: 485
  • DSCF1135.JPG
    DSCF1135.JPG
    86.8 KB · Views: 478
  • DSCF1139.JPG
    DSCF1139.JPG
    86.1 KB · Views: 448
  • DSCF1138.JPG
    DSCF1138.JPG
    97 KB · Views: 457
  • DSCF1137.JPG
    DSCF1137.JPG
    92.8 KB · Views: 447
  • DSCF1136.JPG
    DSCF1136.JPG
    98.6 KB · Views: 541
I have not quite figured out how to put the picture in the actual post instead of having to click on it. Will work on that.

First order of business was to get the top off so to better assess the inside of the Scout's damage...
 

Attachments

  • DSCF1140.JPG
    DSCF1140.JPG
    94.2 KB · Views: 464
  • DSCF1141.JPG
    DSCF1141.JPG
    96.7 KB · Views: 413
  • DSCF1142.JPG
    DSCF1142.JPG
    110 KB · Views: 397
  • DSCF1143.JPG
    DSCF1143.JPG
    75.7 KB · Views: 402
  • DSCF1144.JPG
    DSCF1144.JPG
    96.5 KB · Views: 390
  • DSCF1145.JPG
    DSCF1145.JPG
    100.1 KB · Views: 399
  • DSCF1146.JPG
    DSCF1146.JPG
    90.2 KB · Views: 407
  • DSCF1147.JPG
    DSCF1147.JPG
    76.8 KB · Views: 448
I just realized I am going to have to re-size every pic I have taken so this thread May be slow on updates.

After I got the top off, I had to get all the carpet and sound dampner off the floor to check everything out. The Scout had a top on it with a homemade moonroof that obviously leaked because the carpet and sound dampner was soaking wet which I'm sure contributed to rust factor.

Had to do a little grinding on the outside to fully see the extent of bondo this thing had...
 

Attachments

  • DSCF1148.JPG
    DSCF1148.JPG
    127.3 KB · Views: 439
  • DSCF1149.JPG
    DSCF1149.JPG
    123.4 KB · Views: 374
  • DSCF1150.JPG
    DSCF1150.JPG
    122.4 KB · Views: 393
  • DSCF1151.JPG
    DSCF1151.JPG
    130 KB · Views: 380
  • DSCF1152.JPG
    DSCF1152.JPG
    128 KB · Views: 363
  • DSCF1153.JPG
    DSCF1153.JPG
    129 KB · Views: 380
  • DSCF1154.JPG
    DSCF1154.JPG
    121.1 KB · Views: 369
  • DSCF1155.JPG
    DSCF1155.JPG
    136.5 KB · Views: 402
  • DSCF1156.JPG
    DSCF1156.JPG
    128.2 KB · Views: 391
  • DSCF1161.JPG
    DSCF1161.JPG
    122.3 KB · Views: 388
  • DSCF1162.JPG
    DSCF1162.JPG
    112 KB · Views: 392
  • DSCF1163.JPG
    DSCF1163.JPG
    110.1 KB · Views: 374
  • DSCF1164.JPG
    DSCF1164.JPG
    117.6 KB · Views: 373
  • DSCF1165.JPG
    DSCF1165.JPG
    110.5 KB · Views: 380
  • DSCF1166.JPG
    DSCF1166.JPG
    100.7 KB · Views: 363
  • DSCF1167.JPG
    DSCF1167.JPG
    104.9 KB · Views: 400
  • DSCF1168.JPG
    DSCF1168.JPG
    113.5 KB · Views: 385
  • DSCF1169.JPG
    DSCF1169.JPG
    113.2 KB · Views: 415
I had not found (searched) any International Harvester websites at this point in time to figure out how to do this right so I opted to just cut the bad rust out and later go over the floors with new plate.

DSCF1157.JPG

DSCF1158.JPG

DSCF1159.JPG

DSCF1160.JPG
 
So with me knowing very little about scouts, I thought it ran fine and started on body work by grinding the whole outside of the body down to bare metal...

DSCF1171.JPG

DSCF1172.JPG

DSCF1174.JPG

DSCF1175.JPG

DSCF1176.JPG

DSCF1177.JPG

DSCF1178.JPG

DSCF1179.JPG

DSCF1180.JPG

DSCF1181.JPG

DSCF1182.JPG

DSCF1183.JPG
 
So I bought some 14ga plate and proceeded to fix the floors up front. I obviously got in a bit of a hurry because I didn't take very many pics. Most of this stuff was done well into the night with a few alcoholic beverages attached. Tried to get some pics at the end of everyday but often did not work out.

IMG00177.jpg

IMG00180.jpg

IMG00179.jpg

On the two rear quarter panels I also opted to just go over the bad stuff with 16ga metal. There were some bad dents and massive rust holes and this was cheaper than buying new fenders and fitting them.

I used some thick rolled cardboard and made some templates on the Scout and then transfered them to the sheetmetal. I positioned the new metal in place and tack welded a few spots and then used a small torch to heat up and roll the bottoms of the metal to where they needed to be. Drilled a few holes and tack welded where ever I could.
 
Then I moved on to doing some bondo work and prepping for primer. Quickly found out that bondo is not exactly like doing some mud-work on sheetrock...took quite a bit of practice and still never got the hang of it...to show car quality anyways. But once again it is not a show Scout due to my budget.


DSCF1428.JPG

DSCF1429.JPG

DSCF1430.JPG

DSCF1432.JPG

DSCF1433.JPG

DSCF1434.JPG

DSCF1435.JPG

DSCF1436.JPG

DSCF1438.JPG

DSCF1439.JPG

DSCF1440.JPG

DSCF1441.JPG

A friend of mine helping out...


DSCF1442.JPG

DSCF1443.JPG

DSCF1444.JPG

DSCF1445.JPG

DSCF1446.JPG
 
For my first trip with a cup gun without stained wood clear coat in it, the primer turned out pretty good. Had to sand a few spots out and re-spray. And next time I will most definately spray in a booth. Little fibers of something kept showing up.

I actually ran out of the black sandable buildable primer while spraying and had to run to town and all I could find was gray sandable buildable primer.


Me getting ready 2 make a mess...
DSCF1448.JPG

DSCF1449.JPG

DSCF1450.JPG

DSCF1452.JPG

DSCF1453.JPG

DSCF1454.JPG

DSCF1455.JPG

DSCF1456.JPG

IMG00223.jpg

IMG00224.jpg

IMG00225.jpg
 
I let the primer sit a couple days before I started paint. I wanted to go solid flat black but instead chose sunset orange so I wouldn't lose my Scout in the woods at night.

I did not paint all the way down to the bottom of the body panels because the bottom 12" and inside of the Scout are getting spray on bedliner which requires you to sand glossy areas.

I went with a single stage paint because of price and ease of use. Next time I will go with 2 stage so I can fix any issues. This was my first auto paint job and I got a lot of orange peel because of being scared of runs. So it kinda looks like textured paint...and turns out it helped hide a few blemishes and looks pretty cool.

DSCF1457.JPG

DSCF1458.JPG

DSCF1459.JPG

DSCF1460.jpg

DSCF1461.JPG

DSCF1462.JPG

DSCF1463.JPG

DSCF1464.JPG

DSCF1465.JPG

DSCF1466.JPG

DSCF1467.JPG

DSCF1468.JPG

IMG00228.jpg

IMG00227.jpg

IMG00226.jpg

DSCF1469.JPG
 
I had to let the paint cure for a full 2 weeks before doing anything with it. I then started prepping it for exterior and interior spray-on bedliner.

DSCF1470.JPG

DSCF1471.JPG

DSCF1472.JPG

DSCF1473.JPG

DSCF1474.JPG

DSCF1475.JPG

DSCF1476.JPG

DSCF1477.JPG

DSCF1478.JPG

DSCF1479.JPG

DSCF1480.JPG

DSCF1481.JPG

DSCF1482.jpg

DSCF1483.JPG

DSCF1484.JPG

DSCF1485.JPG

DSCF1486.JPG

DSCF1487.JPG

DSCF1488.JPG

DSCF1489.JPG
 
I chose 2 go with the duplicolor truck bed coating for 2 reasons: 1) the gun to spray it was cheap. 2) the day I went in to buy the stuff from autozone, they had discontinued it that day and the remainder of stock was only $0.01 a gallon and $0.01 a quart. So after running all over town to our 3 local autozones, I headed back to the shop with 10.5 gallons for less than a quarter!!!

DSCF1491.JPG

DSCF1492.JPG

DSCF1493.JPG

DSCF1494.JPG

DSCF1495.JPG

DSCF1496.JPG

DSCF1497.jpg

DSCF1498.jpg

DSCF1499.jpg

DSCF1500.JPG

DSCF1501.JPG

DSCF1502.JPG

DSCF1503.JPG

DSCF1504.JPG

DSCF1505.JPG
 
The day after spraying the truck bed coating, I kind of pieced her back together to get it rolling again.

I had also lined the small dash cover.

And in the meantime, I had bought a set of bucket seats from the junkyard out of a camry and built seat brackets in the Scout to do away with the bench seat.

Sorry for the crappy pics...

IMG00229.jpg

IMG00230.jpg

IMG00231.jpg

IMG00233.jpg

IMG00234.jpg

IMG00235.jpg

IMG00236.jpg

IMG00237.jpg

IMG00238.jpg

IMG00239.jpg
 
Lookin' good dude! I like the liner on the lower body panels. You've got a nice shop for doing that kind of work.
 
For mainly being a hunting buggy, I wanted some sort of door but not the original ones. I ended up building some suicide 1 1/2" pipe doors. Made for quick exits due to the windshield not being able to lay down.

IMG00240.jpg

IMG00241.jpg

IMG00242.jpg

IMG00243.jpg

These get sprayed with the truck bed coating later when the bumpers get sprayed...
 
Thanks scoutboy74. I am a project super. For a commercial contracting company so during down time we turn the shop into hobby central. Would be nice if we could now find the time to get some of the junk out of there so I can get more of my toys in there at one time to work on...:devil:
 
After finishing the pipe doors, I decided I needed a front bumper that would hold a winch when I get the money to buy it and also the 4 kc lights that originally came on the top of the Scout.

So I really tested my newbie fab skills here by making the outside egdes angle up from the bottom and in from the front. It turned out ok but I think it still sticks out to far...even for a winch.

IMG00244.jpg

IMG00245.jpg

IMG00247.jpg

IMG00248.jpg

IMG00249.jpg

IMG00250.jpg

IMG00252.jpg

IMG00253.jpg

IMG00254.jpg
 
Here I just slapped the lights on it because I still wasn't sure if I liked the overall profile of the bumper...

IMG00302.jpg

IMG00303.jpg

IMG00310.jpg

And as you can tell by now...I am by no means a professional photographer...:mad2:
 
I decided that the front bumper would grow on me or I would mow down a few trees and see how it looked then...

Moving on to the rear bumper build. I kept with the same theme of 3/16 wall 3x3 square tubing turned like a diamond and angled up on the ends. I also wanted a swing-away spare tire carrier stout enough to eventually carry a 36" tire...

IMG00260.jpg

IMG00261.jpg

IMG00262.jpg

IMG00266.jpg

IMG00263.jpg

IMG00264.jpg

IMG00267.jpg

IMG00269.jpg

IMG00271.jpg

IMG00272.jpg

IMG00273.jpg

IMG00276.jpg

IMG00278.jpg

IMG00279.jpg

IMG00274.jpg
 
The people at the steel supply house assured me that hinge I used would support 2000lbs...:icon_down:

they were wrong. Or my fab work was wrong. I even alotted 1.5" for sagging purposes.

I did get 1 pic of it all installed before I attempted swinging away the swing-away tire carrier...not a good one either...

IMG00292.jpg

Shortly after the pic was taken, I took the metabo to the tire carrier and hacked it off. I am in the process of researching a different type of hinge so I can weld it back on.
 
Back
Top